7. How to Build an NFT Marketplace from Scratch
Welcome to Week 7 of the Road To Web3 series. This tutorial teaches you how to build your own NFT marketplace from scratch: frontend, data storage, and smart contracts!
Whether you sort by number of users or by volumes, NFT marketplaces are some of the biggest companies in Web3. For instance:
- In Jan 2022, Opensea, Ethereum's largest NFT Marketplace sold ~2.5 million NFTs and traded $5 billion in volume.
- In May 2022, Magic Eden, Solana's largest NFT Marketplace had ~11.3 million transactions and $200 million in volume.
Such scale is only achieved with great smart contracts and scalable infrastructure. So if you're a web3 dev looking to improve your web3 development skills, follow along with this tutorial on building an NFT marketplace using Alchemy, IPFS, Hardhat and ethers.js.
Some things to keep in mind:
- The focus of this tutorial will be on building the smart contract and not building the frontend. However, the frontend code for an NFT marketplace is available on GitHub.
- No backend or database is involved in this tutorial. A backend and database will only be needed when you start to archive data and integrate registration or login features.
Step 0: Sign up for an Alchemy account and create a new app
If you haven't already, sign up for your free Alchemy account.
You can then create a new app and create API keys from the app dashboard.
Check out this video on how to create an app:
Video tutorial on how to create a new Alchemy app
Or follow the written steps below:
- Navigate to the "create app" button in the "Apps" tab
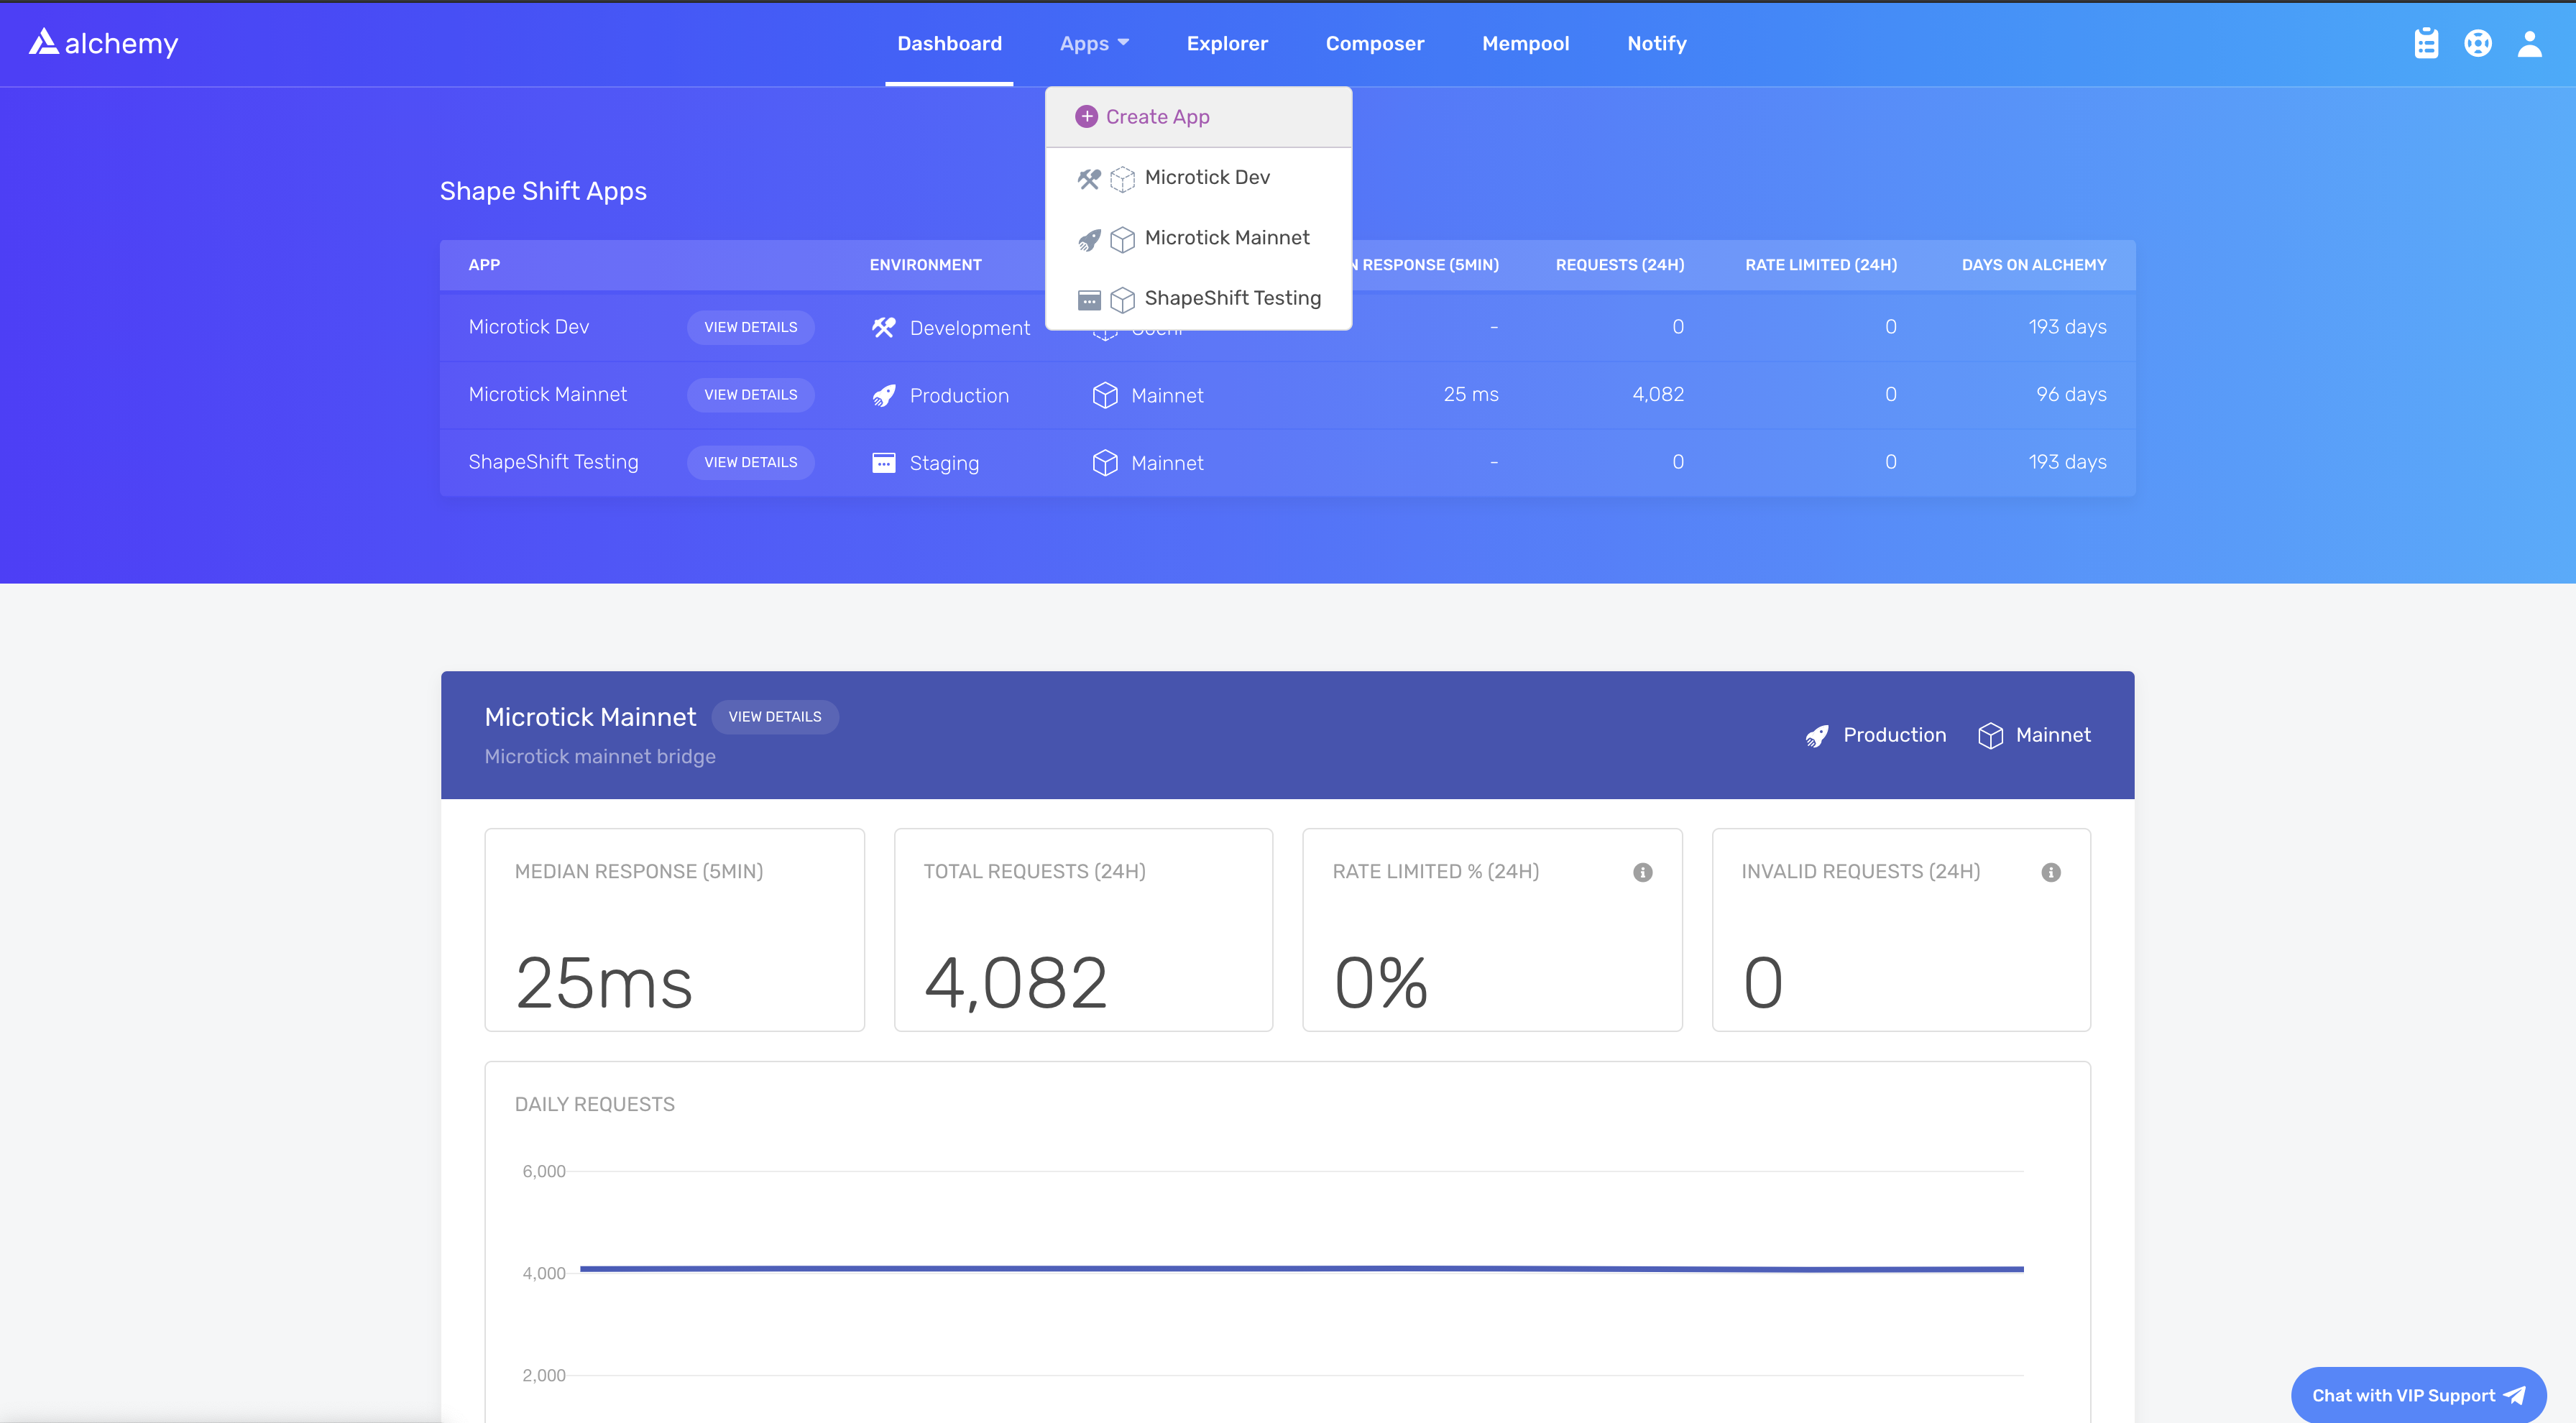
Screenshot of a sample dashboard
Fill in the details on the popup to get your new key. For this tutorial, you should choose "Ethereum" as the chain and "Goerli" as the test network.
Choosing a testnet
While you can use the Goerli testnet, we caution against it as the Ethereum Foundation has announced that Goerli will soon be deprecated.
We therefore recommend using Sepolia testnet as Alchemy has full Sepolia support and a free Sepolia faucet also.
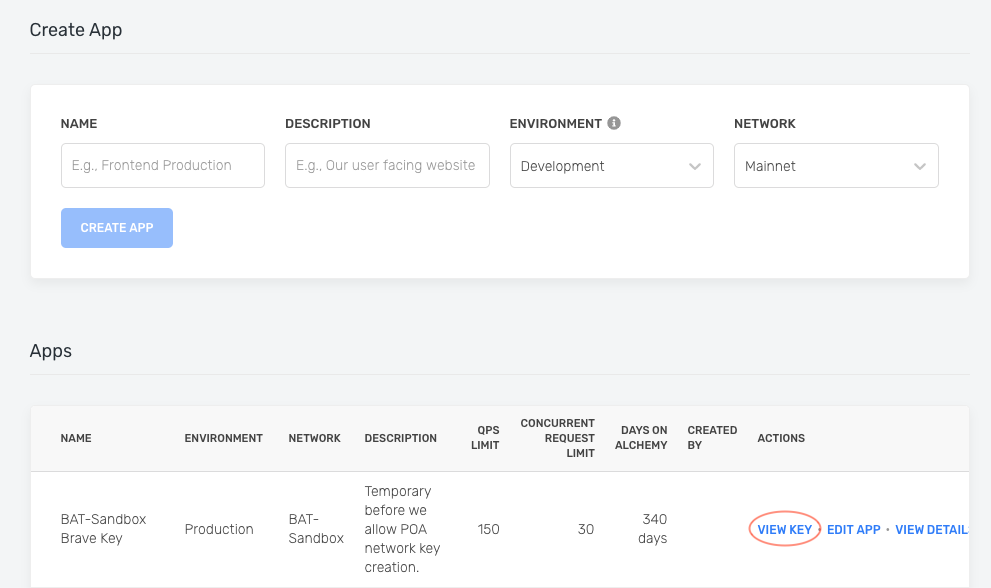
Create app popup
You can also pull existing API keys by hovering over "Apps" and selecting one.
You can "View Key" here, as well as "Edit App" to whitelist specific domains, see several developer tools, and view analytics.
Step 1: Set up your MetaMask wallet for development
If you already have MetaMask with a Goerli address and at least 0.1 Goerli ETH on it, skip to Step 2.
If you do not have a Goerli address, connect MetaMask to the Goerli network, and then use a Goerli faucet to request Goerli ETH. You will need Goerli ETH to deploy smart contracts and upload NFTs to your NFT marketplace.
Make sure you add the below details when adding a new network:
Network Name: Goerli Test Network
RPC base URL: https://eth-goerli.g.alchemy.com/v2/{INSERT YOUR API KEY}
Chain ID: 5
Block Explorer URL: https://goerli.etherscan.io/
Symbol (Optional): ETH
Step 2: Set up the repository
To make it easy, we have uploaded the base code to the below GitHub repository. This code has the frontend all written but doesn't have a smart contract or integrations with frontend.
Github Repository to be used for this tutorial
To clone the repository, run the below commands in your command prompt:
git clone https://github.com/alchemyplatform/RTW3-Week7-NFT-Marketplace.git
cd RTW3-Week7-NFT-Marketplace
npm install
npm start
Note
The above GitHub repo is the base repo that you should build on top of.
There's a different GitHub repo with the final NFT Marketplace code.
Refer to this if you get stuck following along with the tutorial.
Step 3: Set up your environment variables and Hardhat config
Create a new .env file in the root of your project, which is right inside the RTW3-Week7-NFT-Marketplace folder, and add:
- The Alchemy API URL that you created in Step 1
- The private key of the MetaMask wallet that you will use for development
When you're done, your .env file should look like this:
REACT_APP_ALCHEMY_API_URL="<YOUR_API_URL>"
REACT_APP_PRIVATE_KEY="<YOUR_PRIVATE_KEY>"
If not already installed, install dotenv in your root folder:
npm install dotenv --save
dotenv helps you manage the environment variables that are mentioned in the .env file, making it easy for your project to access them.
Warning
Do not ship a production app with secrets in the
.envfile. This tutorial shows you how to upload to IPFS via your react client directly as a demonstration only.When you are ready for production, you should refactor your application to upload IPFS files using a backend service.
Read this for more context on React environment variables.
In your home directory, make sure the below code is added to your hardhat.config.js file:
require("@nomiclabs/hardhat-waffle");
require("@nomiclabs/hardhat-ethers");
const fs = require('fs');
// const infuraId = fs.readFileSync(".infuraid").toString().trim() || "";
require('dotenv').config();

task("accounts", "Prints the list of accounts", async (taskArgs, hre) => {
  const accounts = await hre.ethers.getSigners();

  for (const account of accounts) {
    console.log(account.address);
  }
});

module.exports = {
  defaultNetwork: "hardhat",
  networks: {
    hardhat: {
      chainId: 1337
    },
    goerli: {
      url: process.env.REACT_APP_ALCHEMY_API_URL,
      accounts: [ process.env.REACT_APP_PRIVATE_KEY ]
    }
  },
  solidity: {
    version: "0.8.4",
    settings: {
      optimizer: {
        enabled: true,
        runs: 200
      }
    }
  }
};
Note
You may face issues in making the
process.envwork in the above hardhat config even after installing dotenv. In that case, just paste the goerli URL and private key directly in this config. Make sure to not push it to GitHub.
Step 4: Use Piñata to upload your data to IPFS
If you don't have a Piñata account, sign up for a free Piñata account and verify your email.
Create your Piñata API key
To create your Piñata key:
- Navigate to
https://pinata.cloud/keys - Select the "New Key" button at the top
- Set the Admin widget as
enabled - Name your key
You'll then be shown a popup with your API info. Copy this over to somewhere safe.

Now that the Piñata key is set up, add it to your project so you can use it.
Add your API key and secret so that the .env file now looks like below:
REACT_APP_ALCHEMY_API_URL="<YOUR_API_URL>"
REACT_APP_PRIVATE_KEY="<YOUR_PRIVATE_KEY>"
REACT_APP_PINATA_KEY="<YOUR_PINATA_KEY>"
REACT_APP_PINATA_SECRET="<YOUR_PINATA_SECRET>"
Step 5: Understand the requirements
Below is the NFT marketplace that you will be making by the end of this tutorial.
We chose Dogs for this marketplace. Feel free to switch to any other photos you like!
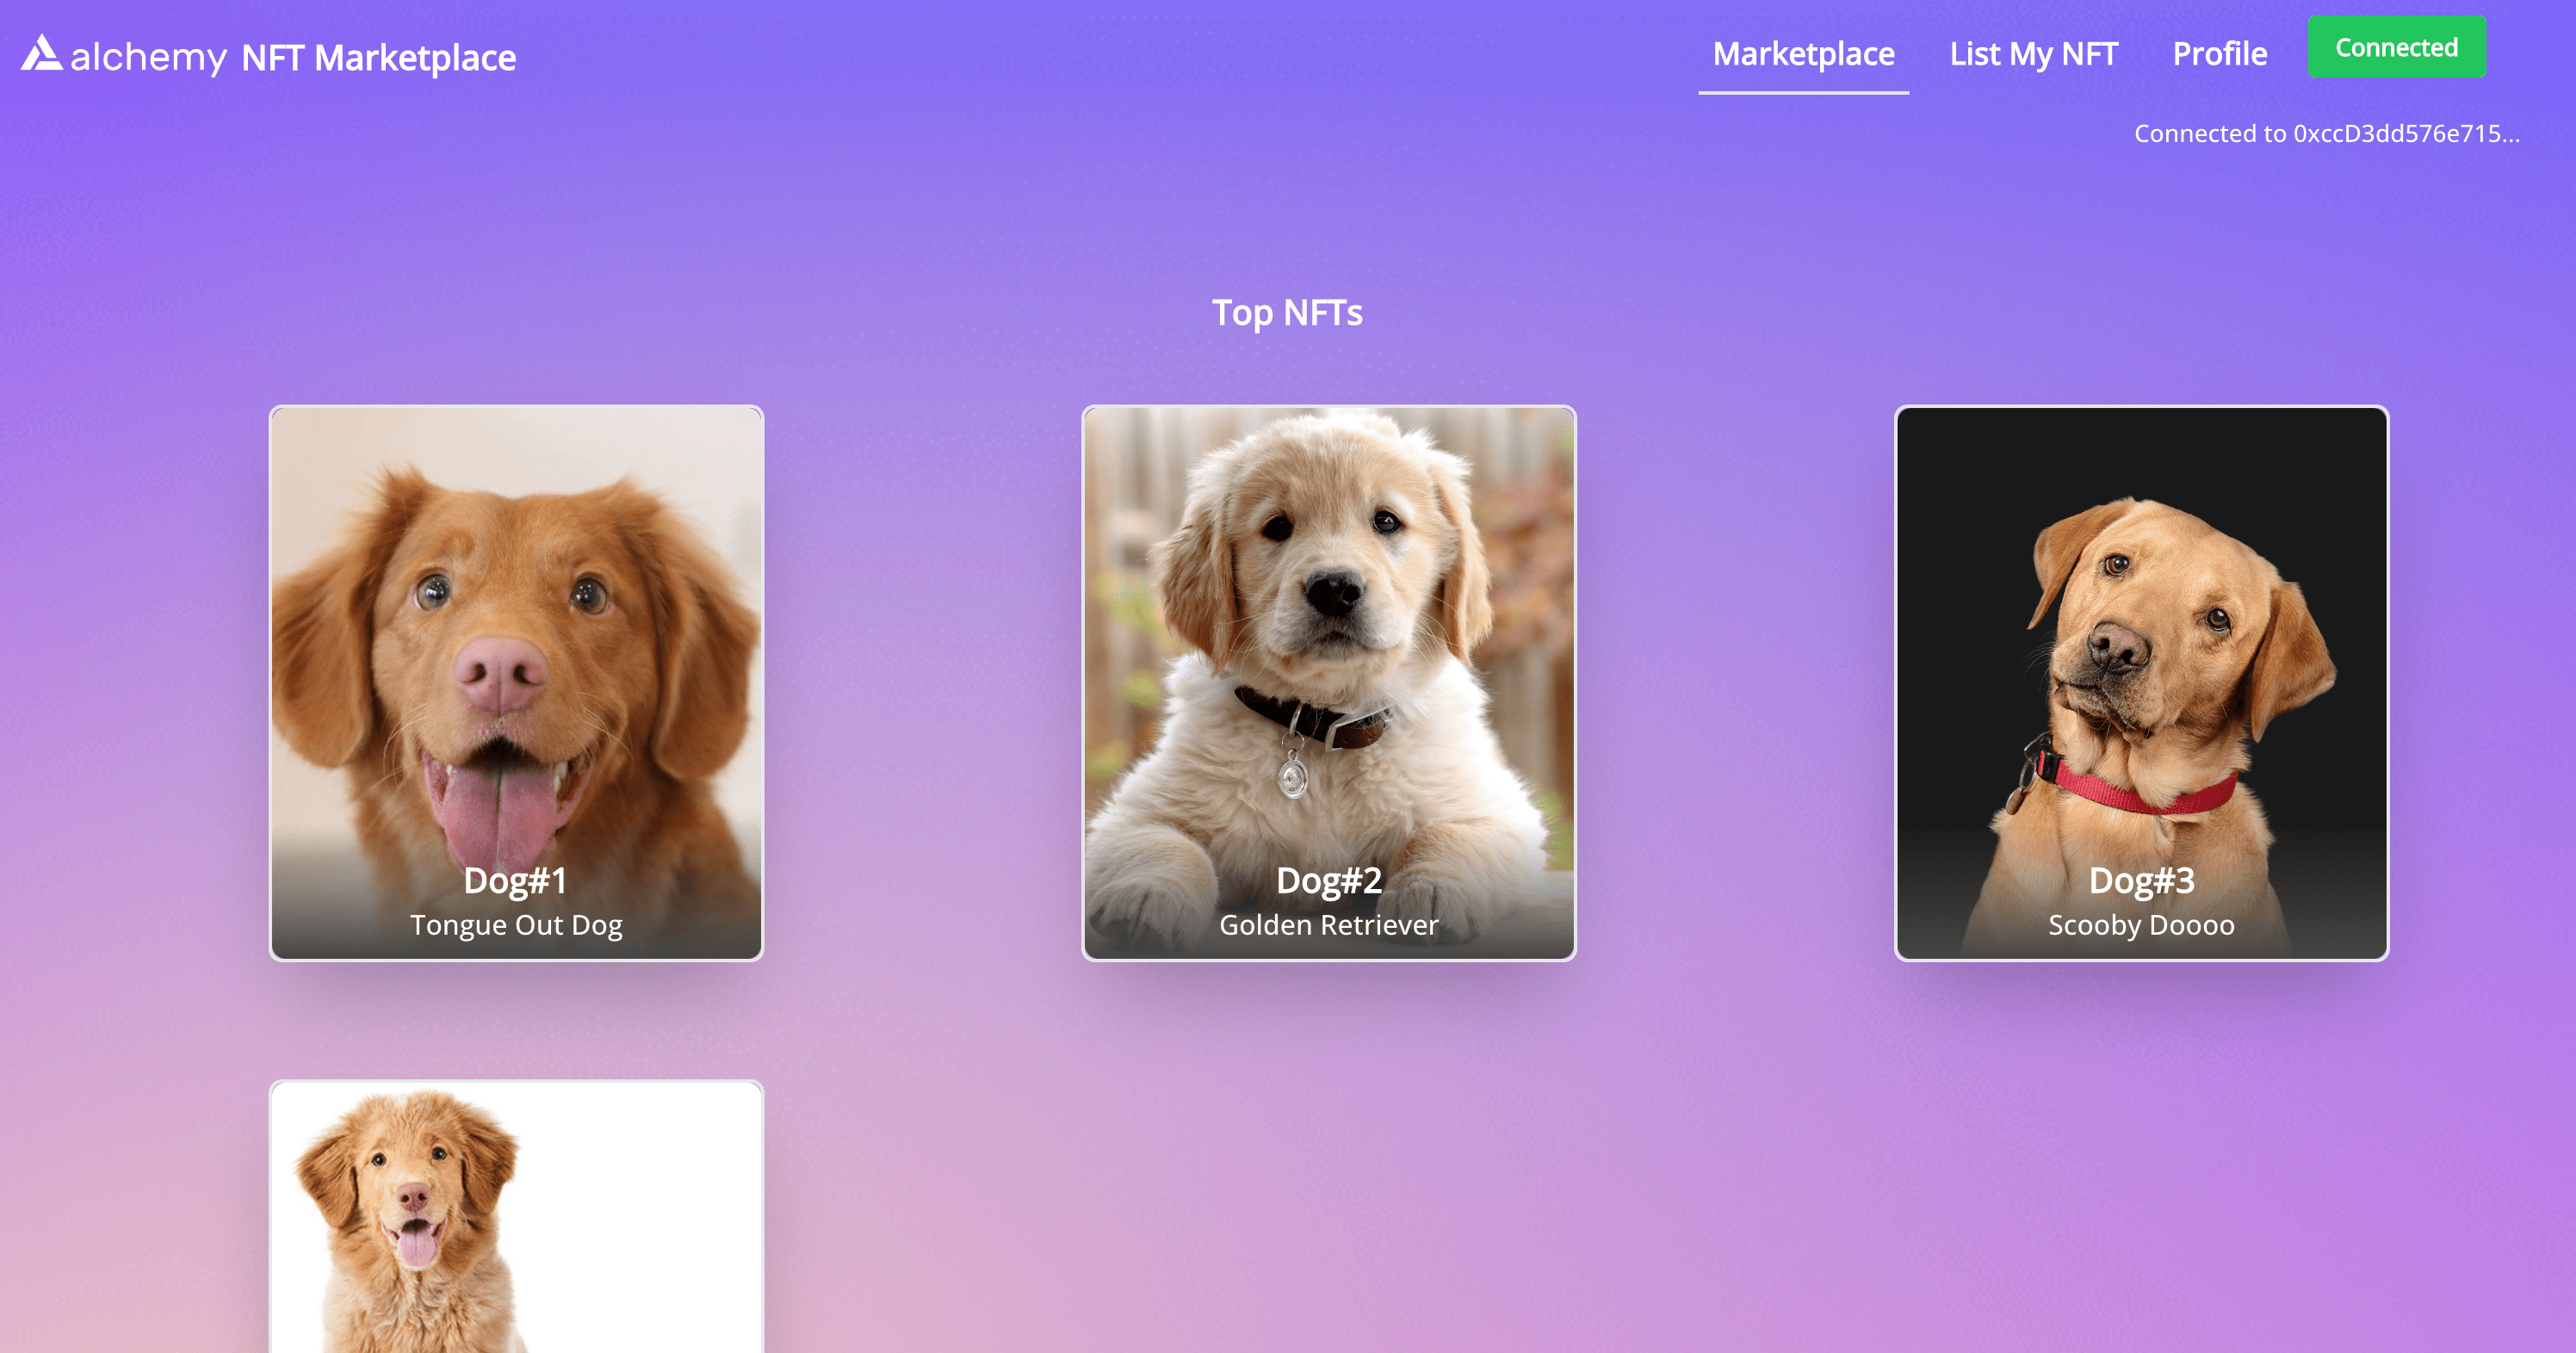
Before we can dive deeper into writing code, let's go over separate pages to understand the feature set we need, both from a frontend and a smart contract perspective.
List your NFT page
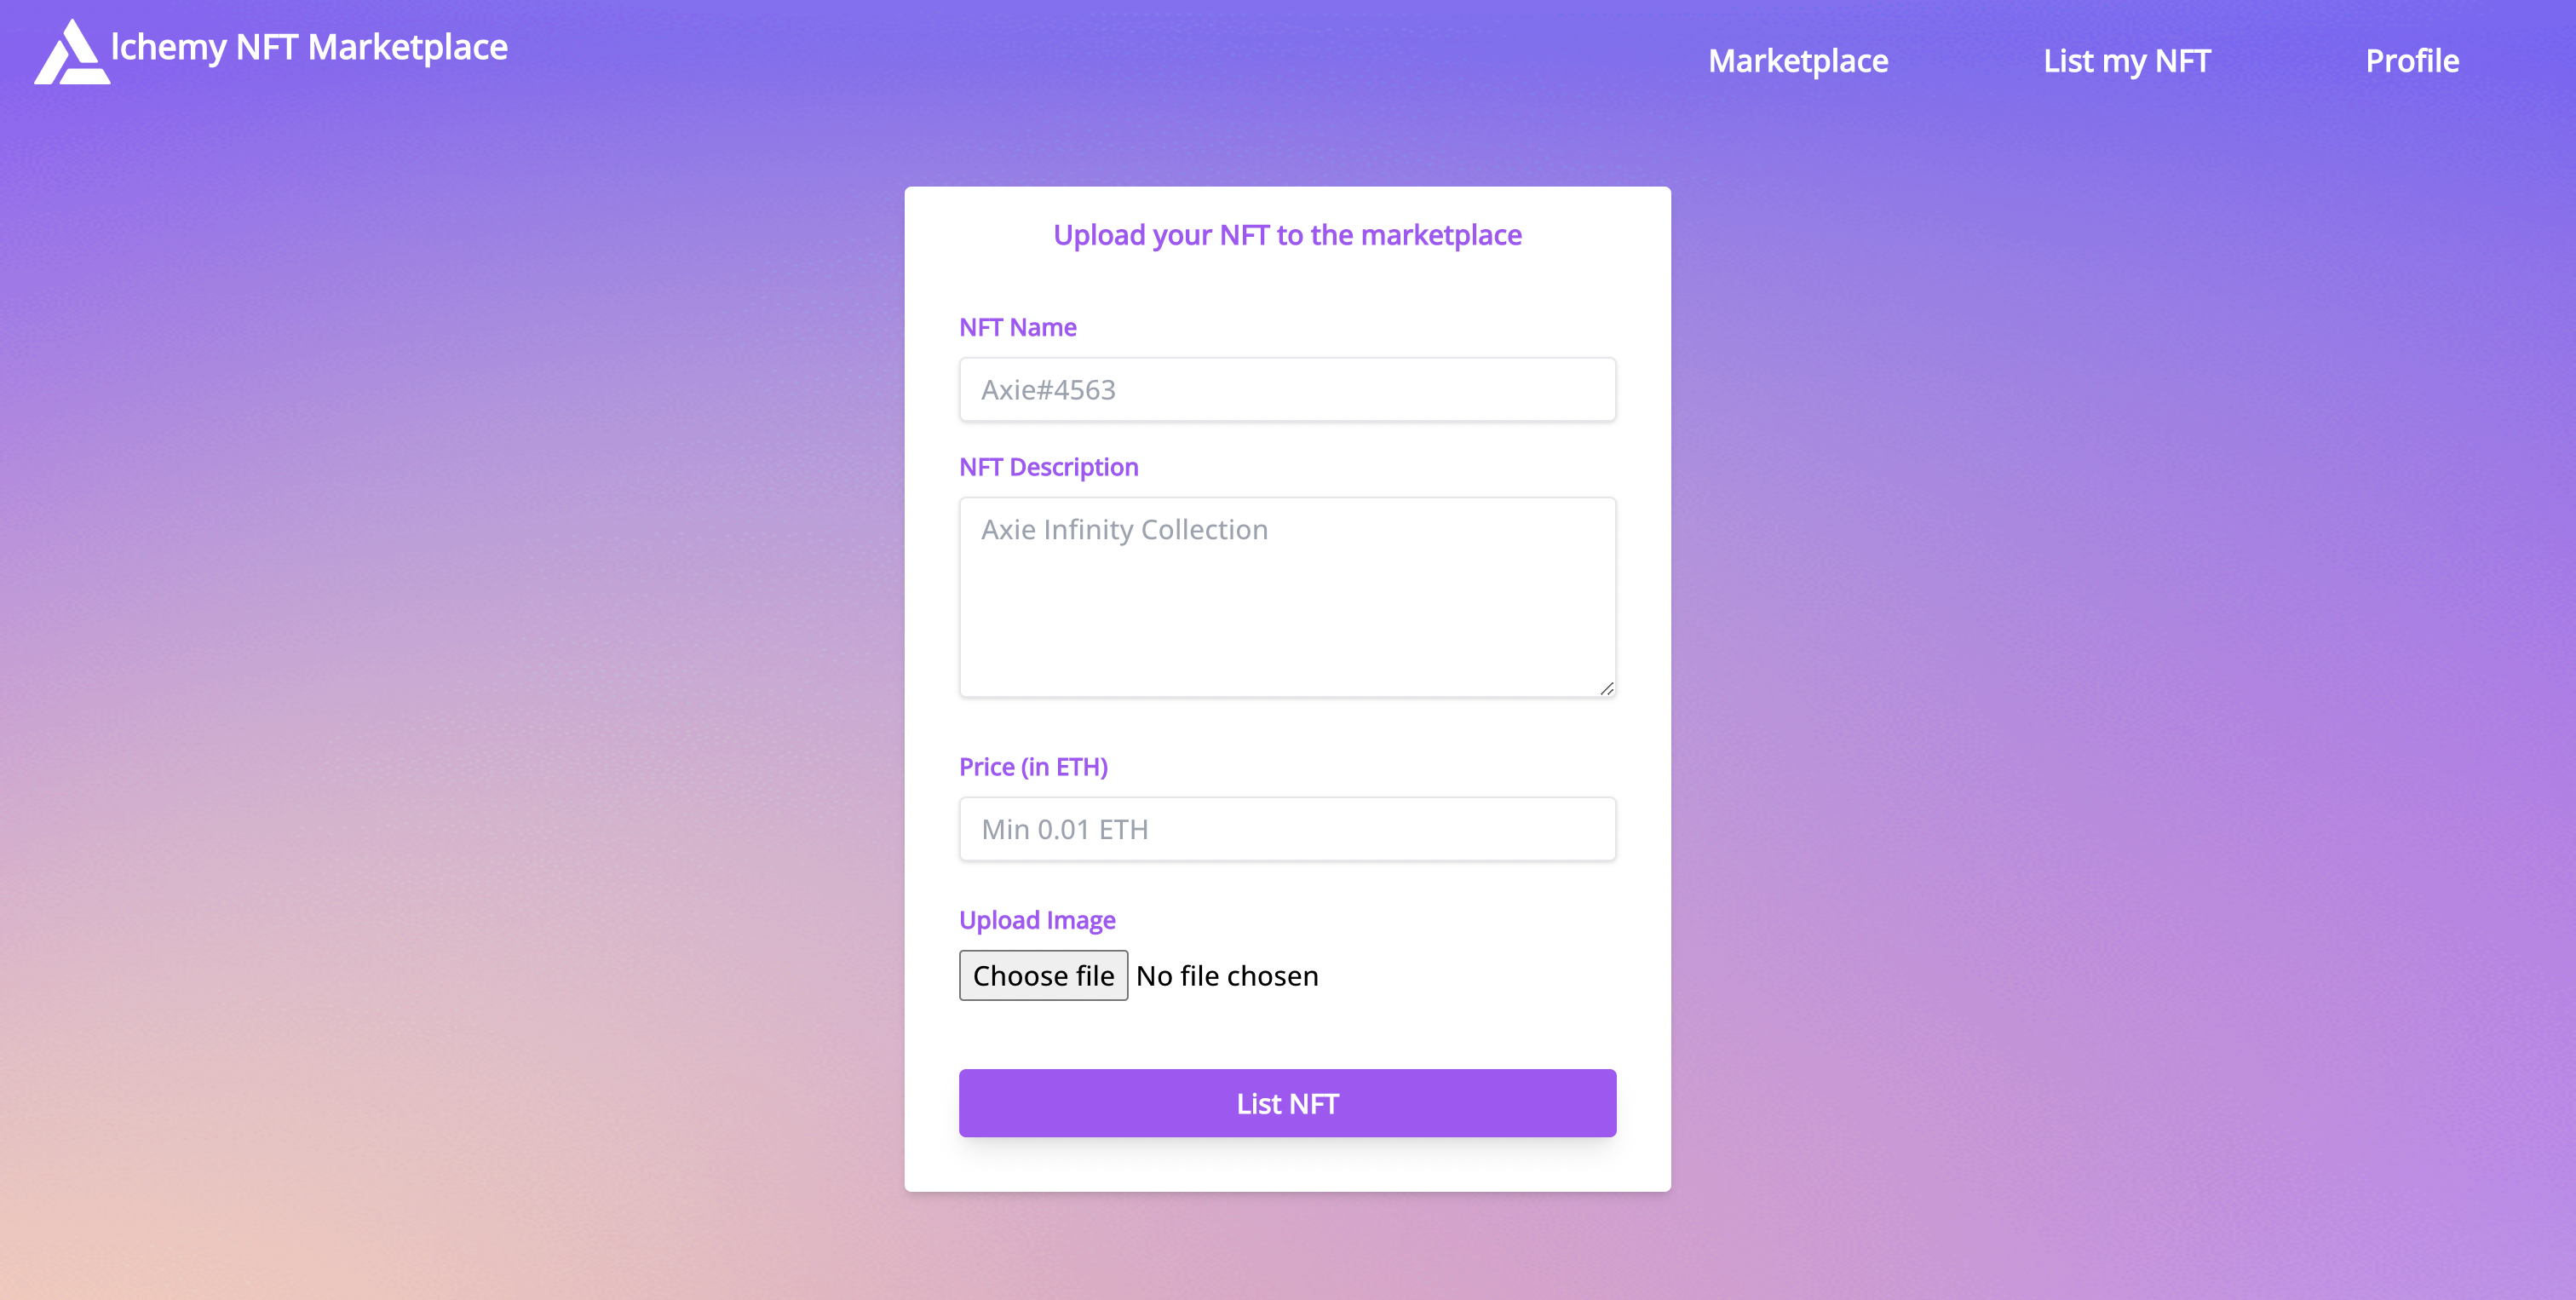
List your NFT page
For any artist or creator, this is the page where they can list their NFT for sale on the marketplace.
As you can see, this takes in the following NFT attributes:
NFT NameDescriptionPrice (in ETH)NFT Image
Once completed, this content will be uploaded to the NFT marketplace.
To make this happen, we need the following:
| Smart Contract | Frontend |
|---|---|
function createToken()Input an IPFS URL that has metadata the listing price for the NFT What it does? Assigns a _tokenId to your NFTSaves corresponding data to the marketplace contract * Emits a Listing Success event once done See the implementation here. | Script that does the below: Take inputs of all relevant details of the NFT Upload NFT image to IPFS Upload NFT metadata with an image link to IPFS Send IPFS link and price to the createToken() function in the smart contract* Notify the user of a successful upload You can find the implementation in src/contracts/SellNFT.js |
Marketplace home page
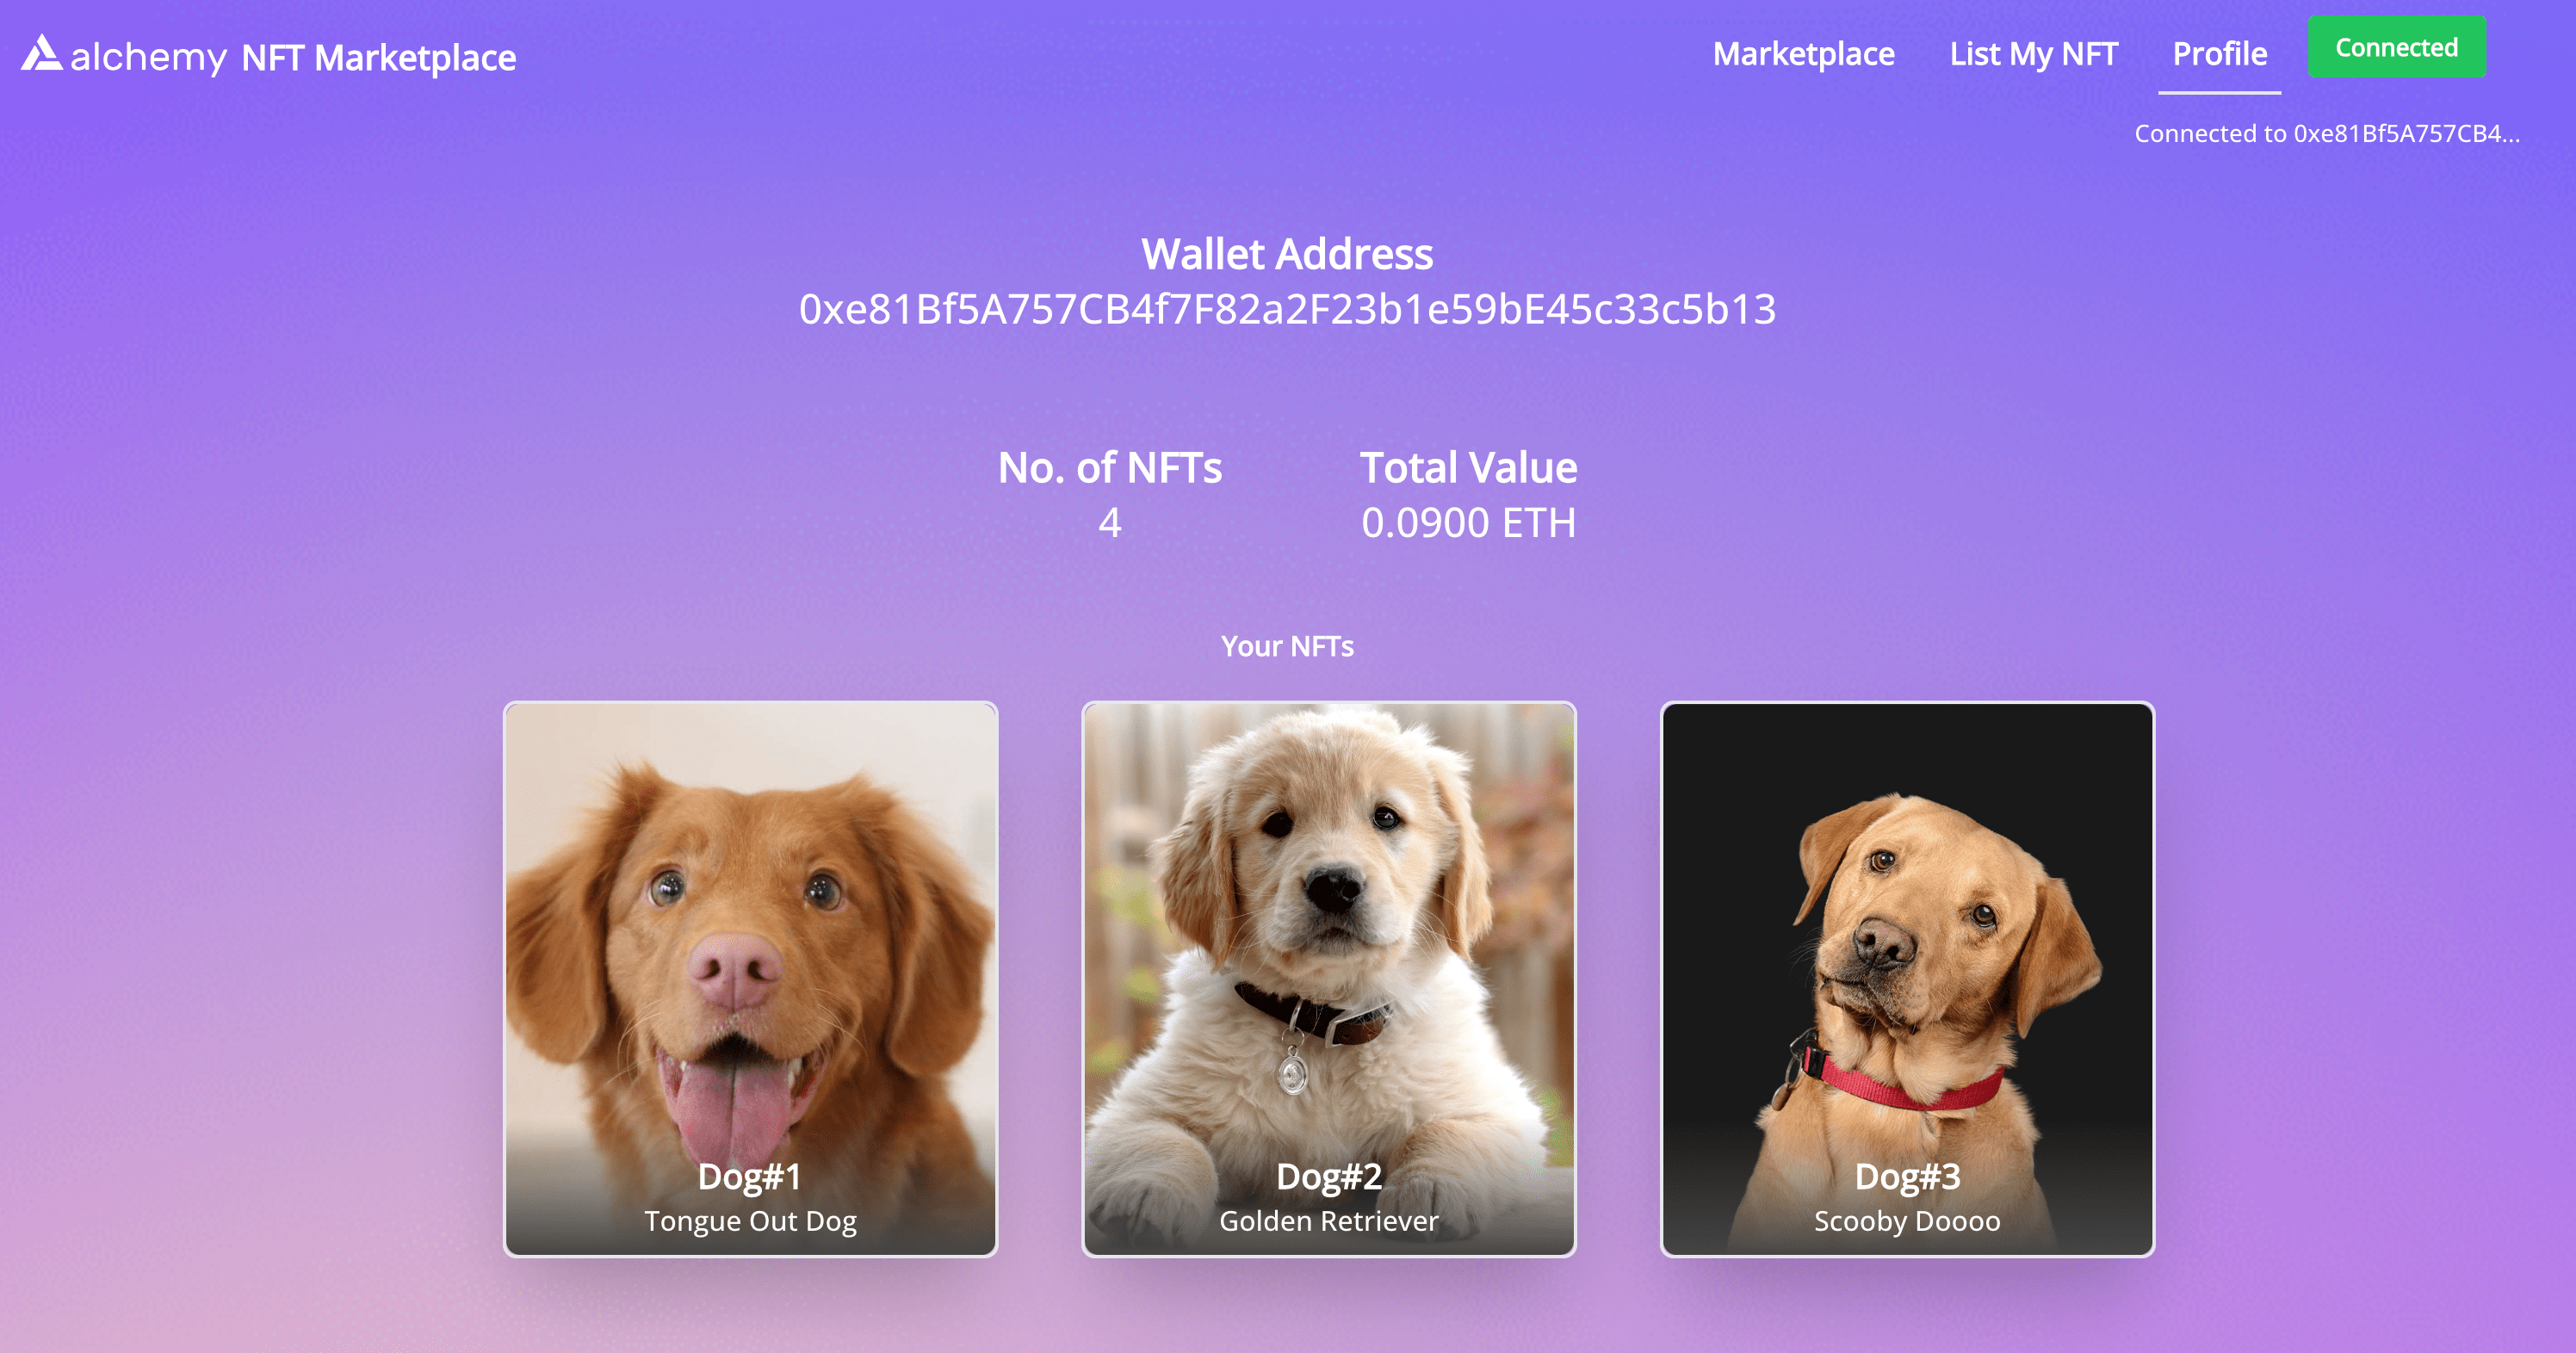
NFT marketplace home page example
This is the home page of the marketplace where all NFTs are listed.
To make this happen, we need:
| Smart Contract | Frontend |
|---|---|
function getAllNFTs()Input _ None Output _ A list of all NFTs currently on sale with their metadata See the implementation here. | Fetch all NFTs on sale using the getAllNFTs() function in the smart contractDisplay them in a grid format * Let users click through into an individual NFT to see more details You can find the implementation in src/components/Marketplace.js , src/components/NFTPage.js and src/components/NFTTile.js |
User Profile page
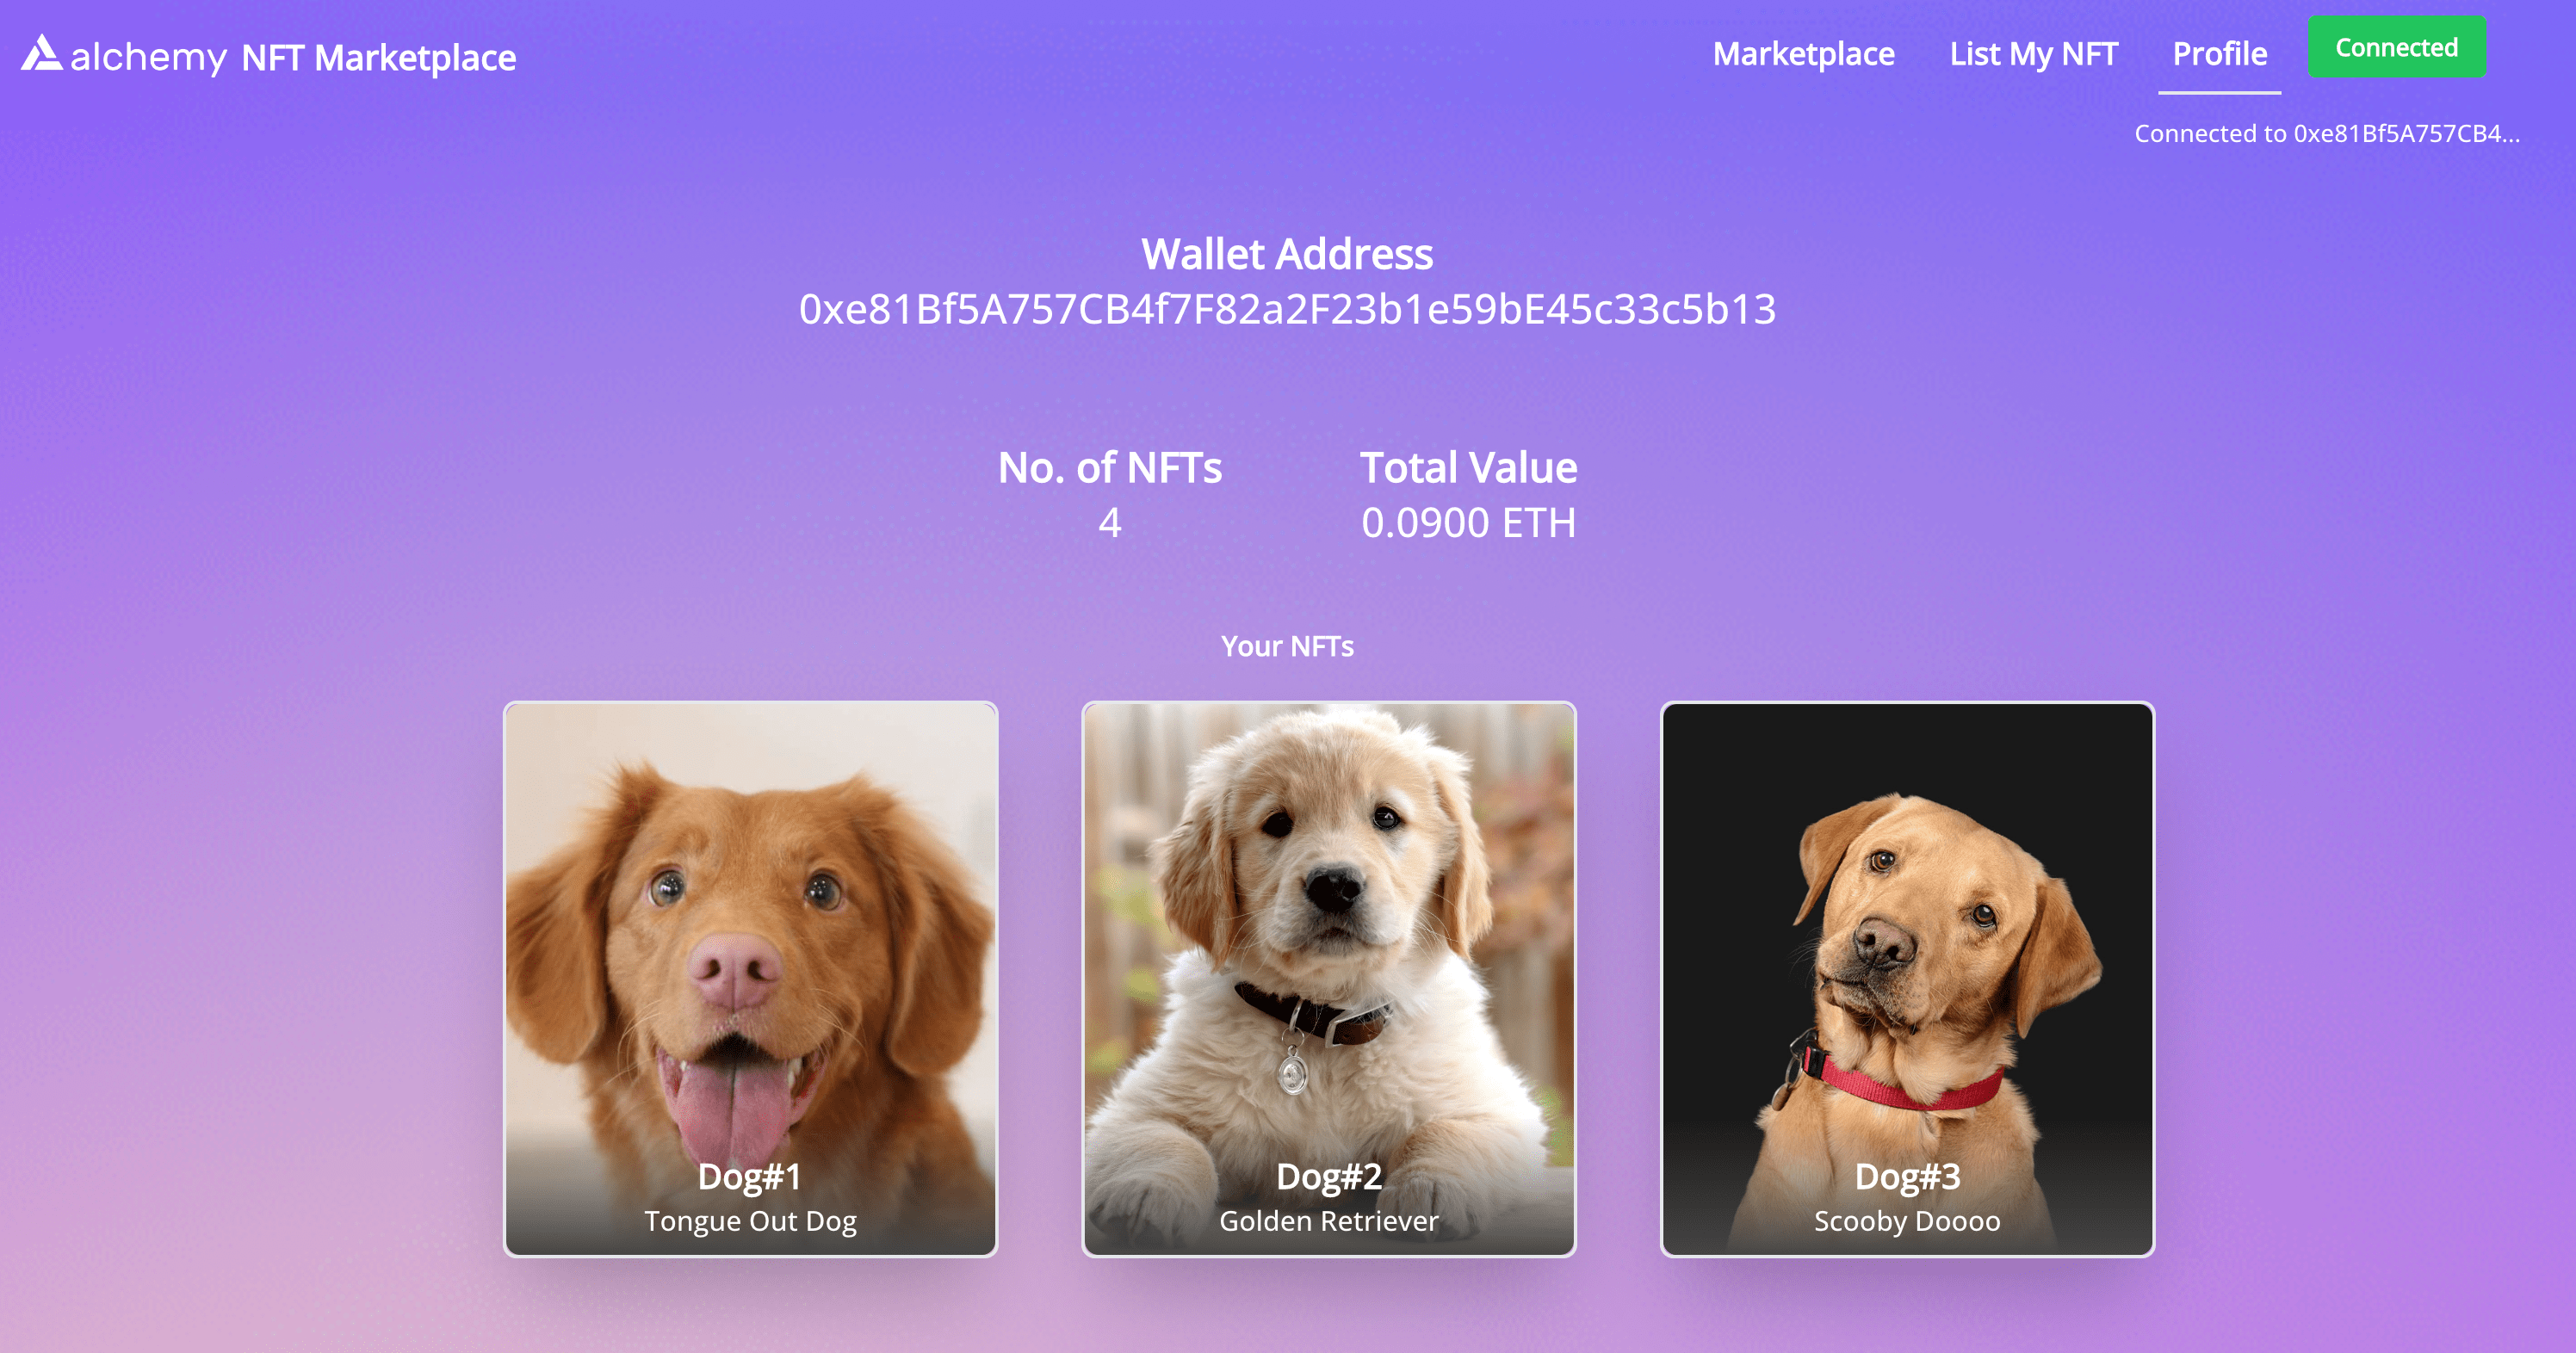
Profile Page
This is a user profile on the NFT marketplace and displays:
- User's wallet address
- Data about the user's owned NFTs
- A grid view of all of those NFTs with details
To achieve this, we need:
| Smart Contract | Frontend |
|---|---|
function getMyNFTs() that returns all the NFTs a user has sold in the pastThe implementation can be found here. | Fetch data using and getMyNFTs() from the smart contractAnalyze data to get aggregate numbers and statistics * Display data in the above format |
Individual NFT Page
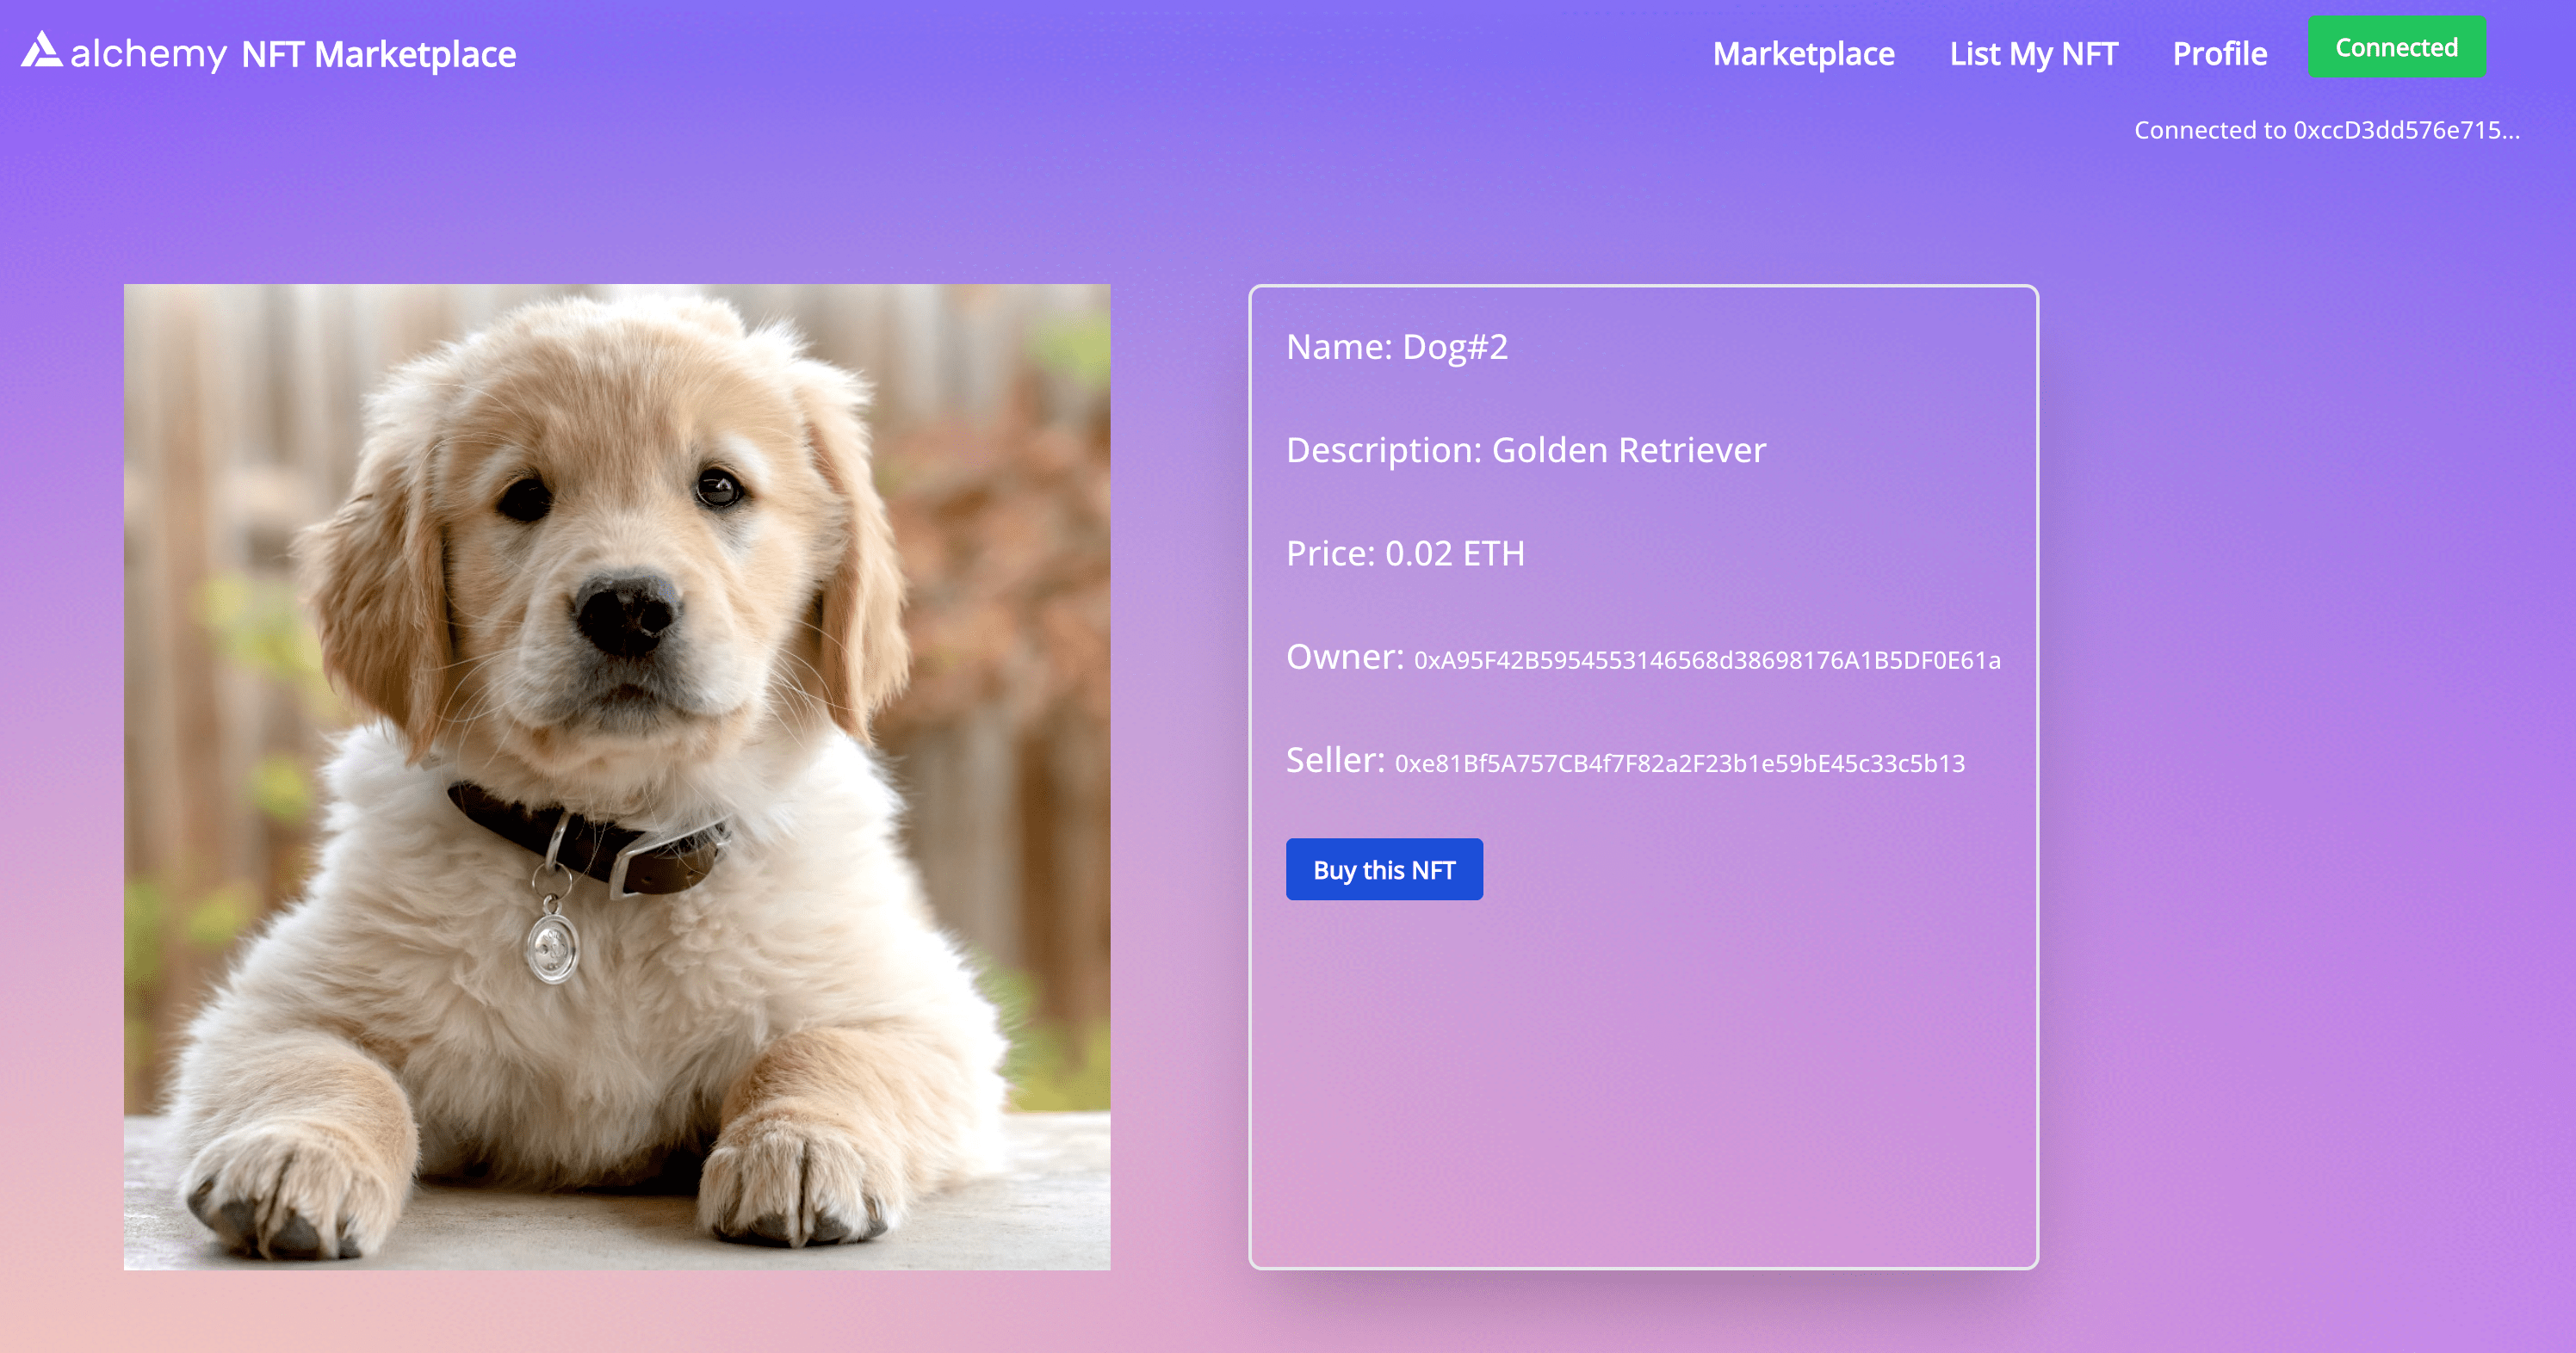
Landing page for an individual NFT on the NFT marketplace.
If you click on any NFT on the marketplace page or from the Profile page, this is the page that visitors will see. This page displays:
- Metadata of the NFT
- A "Buy this NFT" button which lets another user buy the NFT
To achieve this, we need:
| Smart Contract | Frontend |
|---|---|
| A few functions: 1. A tokenURI function that returns the tokenURI for a tokenId. We then fetch the metadata for that tokenURI.2. An executeSale() function that helps do the necessary checks and transfers ownership when a user clicks on the "Buy this NFT" button. The implementation can be found here => (#executesale) | Script that does the below: Fetch tokenURI using tokenURI method Fetch data from that IPFS tokenURI using axios Display the data Also, call the executeSale() function when the "Buy this NFT" button is clicked |
Now you have a complete understanding of the features needed to build an NFT marketplace.
Let's keep it going! 🎉
Step 6: Write the Smart Contract
Let's start building an NFT marketplace! If you get confused, refer to the finished Smart Contract.
Add Imports
There is a file NFTMarketplace.sol in your contracts folder.
Add the below imports to the top of this file and add an empty class with a constructor:
//SPDX-License-Identifier: Unlicense
pragma solidity ^0.8.0;

//Console functions to help debug the smart contract just like in Javascript
import "hardhat/console.sol";
//OpenZeppelin's NFT Standard Contracts. We will extend functions from this in our implementation
import "@openzeppelin/contracts/utils/Counters.sol";
import "@openzeppelin/contracts/token/ERC721/extensions/ERC721URIStorage.sol";
import "@openzeppelin/contracts/token/ERC721/ERC721.sol";

contract NFTMarketplace is ERC721URIStorage {
    constructor() ERC721("NFTMarketplace", "NFTM") {
        owner = payable(msg.sender);
    }
}
The code is explained in the comments.
Add Global Variables
Add the below Global variables to the top of your Smart Contract inside the class declaration:
    using Counters for Counters.Counter;
    //_tokenIds variable has the most recent minted tokenId
    Counters.Counter private _tokenIds;
    //Keeps track of the number of items sold on the marketplace
    Counters.Counter private _itemsSold;
    //owner is the contract address that created the smart contract
    address payable owner;
    //The fee charged by the marketplace to be allowed to list an NFT
    uint256 listPrice = 0.01 ether;

    //The structure to store info about a listed token
    struct ListedToken {
        uint256 tokenId;
        address payable owner;
        address payable seller;
        uint256 price;
        bool currentlyListed;
    }

    //the event emitted when a token is successfully listed
    event TokenListedSuccess (
        uint256 indexed tokenId,
        address owner,
        address seller,
        uint256 price,
        bool currentlyListed
    );

    //This mapping maps tokenId to token info and is helpful when retrieving details about a tokenId
    mapping(uint256 => ListedToken) private idToListedToken;
_tokenIds: This is the latest token ID that corresponds to an NFT minted with this smart contract. tokenIDs map totokenURIwhich is the URL that contains the metadata of the corresponding NFT_itemsSold: Is a count of the number of items sold on the marketplaceowner: This is the owner of the smart contract. The only address that can issue a withdrawal request.listPrice: The price (in ETH) any user needs to pay to list their NFT on the marketplaceListedToken: A solidity struct (similar to Javascript object) dictating the format an NFT's data is stored inTokenListedSuccess: Event emitted when a token is successfully listedidToListedToken: It is the mapping of all existing tokenId's to the corresponding NFT token
createToken and createListedToken
This function turns a tokenURI (URL with metadata) into an actual NFT on-chain, with details stored in the smart contract. This is useful for the List your NFT page.
Add the below functions inside your contract class right under your Global variable declaration:
    //The first time a token is created, it is listed here
    function createToken(string memory tokenURI, uint256 price) public payable returns (uint) {
        //Increment the tokenId counter, which is keeping track of the number of minted NFTs
        _tokenIds.increment();
        uint256 newTokenId = _tokenIds.current();

        //Mint the NFT with tokenId newTokenId to the address who called createToken
        _safeMint(msg.sender, newTokenId);

        //Map the tokenId to the tokenURI (which is an IPFS URL with the NFT metadata)
        _setTokenURI(newTokenId, tokenURI);

        //Helper function to update Global variables and emit an event
        createListedToken(newTokenId, price);

        return newTokenId;
    }

    function createListedToken(uint256 tokenId, uint256 price) private {
        //Make sure the sender sent enough ETH to pay for listing
        require(msg.value == listPrice, "Hopefully sending the correct price");
        //Just sanity check
        require(price > 0, "Make sure the price isn't negative");

        //Update the mapping of tokenId's to Token details, useful for retrieval functions
        idToListedToken[tokenId] = ListedToken(
            tokenId,
            payable(address(this)),
            payable(msg.sender),
            price,
            true
        );

        _transfer(msg.sender, address(this), tokenId);
        //Emit the event for successful transfer. The frontend parses this message and updates the end user
        emit TokenListedSuccess(
            tokenId,
            address(this),
            msg.sender,
            price,
            true
        );
    }
The relevance of every line of code is mentioned in the comments. Take 2 mins to go through it.
getAllNFTs
This function returns all the "active" NFTs (currently on sale) in the marketplace. This is useful for the marketplace home page.
Add the below function in your contract class, right below the createListedToken function:
    //This will return all the NFTs currently listed to be sold on the marketplace
    function getAllNFTs() public view returns (ListedToken[] memory) {
        uint nftCount = _tokenIds.current();
        ListedToken[] memory tokens = new ListedToken[](nftCount);
        uint currentIndex = 0;

        //at the moment currentlyListed is true for all, if it becomes false in the future we will
        //filter out currentlyListed == false over here
        for(uint i=0;i<nftCount;i++)
        {
            uint currentId = i + 1;
            ListedToken storage currentItem = idToListedToken[currentId];
            tokens[currentIndex] = currentItem;
            currentIndex += 1;
        }
        //the array 'tokens' has the list of all NFTs in the marketplace
        return tokens;
    }
The relevance of every line of code is mentioned in the comments.
getMyNFTs
This function returns all the "active" NFTs (currently on sale) in the marketplace, that the current logged in user owns. This is useful for the profile page.
Add the below function in your contract class, right below the getAllNFTs function:
    //Returns all the NFTs that the current user is owner or seller in
    function getMyNFTs() public view returns (ListedToken[] memory) {
        uint totalItemCount = _tokenIds.current();
        uint itemCount = 0;
        uint currentIndex = 0;

        //Important to get a count of all the NFTs that belong to the user before we can make an array for them
        for(uint i=0; i < totalItemCount; i++)
        {
            if(idToListedToken[i+1].owner == msg.sender || idToListedToken[i+1].seller == msg.sender){
                itemCount += 1;
            }
        }

        //Once you have the count of relevant NFTs, create an array then store all the NFTs in it
        ListedToken[] memory items = new ListedToken[](itemCount);
        for(uint i=0; i < totalItemCount; i++) {
            if(idToListedToken[i+1].owner == msg.sender || idToListedToken[i+1].seller == msg.sender) {
                uint currentId = i+1;
                ListedToken storage currentItem = idToListedToken[currentId];
                items[currentIndex] = currentItem;
                currentIndex += 1;
            }
        }
        return items;
    }
The relevance of every line of code is mentioned in the comments.
executeSale
When a user clicks "Buy this NFT" on the profile page, the executeSale function is triggered.
If the user has paid enough ETH equal to the price of the NFT, the NFT gets transferred to the new address and the proceeds of the sale are sent to the seller.
Add the below function to your smart contract:
    function executeSale(uint256 tokenId) public payable {
        uint price = idToListedToken[tokenId].price;
        address seller = idToListedToken[tokenId].seller;
        require(msg.value == price, "Please submit the asking price in order to complete the purchase");

        //update the details of the token
        idToListedToken[tokenId].currentlyListed = true;
        idToListedToken[tokenId].seller = payable(msg.sender);
        _itemsSold.increment();

        //Actually transfer the token to the new owner
        _transfer(address(this), msg.sender, tokenId);
        //approve the marketplace to sell NFTs on your behalf
        approve(address(this), tokenId);

        //Transfer the listing fee to the marketplace creator
        payable(owner).transfer(listPrice);
        //Transfer the proceeds from the sale to the seller of the NFT
        payable(seller).transfer(msg.value);
    }
Other Helper functions
Below are other helper functions, which are good to have in your smart contracts for testing and would be helpful if you decide to extend more functionalities.
Feel free to add these anywhere in your class:
    function updateListPrice(uint256 _listPrice) public payable {
        require(owner == msg.sender, "Only owner can update listing price");
        listPrice = _listPrice;
    }

    function getListPrice() public view returns (uint256) {
        return listPrice;
    }

    function getLatestIdToListedToken() public view returns (ListedToken memory) {
        uint256 currentTokenId = _tokenIds.current();
        return idToListedToken[currentTokenId];
    }

    function getListedTokenForId(uint256 tokenId) public view returns (ListedToken memory) {
        return idToListedToken[tokenId];
    }

    function getCurrentToken() public view returns (uint256) {
        return _tokenIds.current();
    }
After doing all of the above, below is what your smart contract should look like:
//SPDX-License-Identifier: Unlicense
pragma solidity ^0.8.0;

import "hardhat/console.sol";
import "@openzeppelin/contracts/utils/Counters.sol";
import "@openzeppelin/contracts/token/ERC721/extensions/ERC721URIStorage.sol";
import "@openzeppelin/contracts/token/ERC721/ERC721.sol";

contract NFTMarketplace is ERC721URIStorage {

    using Counters for Counters.Counter;
    //_tokenIds variable has the most recent minted tokenId
    Counters.Counter private _tokenIds;
    //Keeps track of the number of items sold on the marketplace
    Counters.Counter private _itemsSold;
    //owner is the contract address that created the smart contract
    address payable owner;
    //The fee charged by the marketplace to be allowed to list an NFT
    uint256 listPrice = 0.01 ether;

    //The structure to store info about a listed token
    struct ListedToken {
        uint256 tokenId;
        address payable owner;
        address payable seller;
        uint256 price;
        bool currentlyListed;
    }

    //the event emitted when a token is successfully listed
    event TokenListedSuccess (
        uint256 indexed tokenId,
        address owner,
        address seller,
        uint256 price,
        bool currentlyListed
    );

    //This mapping maps tokenId to token info and is helpful when retrieving details about a tokenId
    mapping(uint256 => ListedToken) private idToListedToken;

    constructor() ERC721("NFTMarketplace", "NFTM") {
        owner = payable(msg.sender);
    }

    function updateListPrice(uint256 _listPrice) public payable {
        require(owner == msg.sender, "Only owner can update listing price");
        listPrice = _listPrice;
    }

    function getListPrice() public view returns (uint256) {
        return listPrice;
    }

    function getLatestIdToListedToken() public view returns (ListedToken memory) {
        uint256 currentTokenId = _tokenIds.current();
        return idToListedToken[currentTokenId];
    }

    function getListedTokenForId(uint256 tokenId) public view returns (ListedToken memory) {
        return idToListedToken[tokenId];
    }

    function getCurrentToken() public view returns (uint256) {
        return _tokenIds.current();
    }

    //The first time a token is created, it is listed here
    function createToken(string memory tokenURI, uint256 price) public payable returns (uint) {
        //Increment the tokenId counter, which is keeping track of the number of minted NFTs
        _tokenIds.increment();
        uint256 newTokenId = _tokenIds.current();

        //Mint the NFT with tokenId newTokenId to the address who called createToken
        _safeMint(msg.sender, newTokenId);

        //Map the tokenId to the tokenURI (which is an IPFS URL with the NFT metadata)
        _setTokenURI(newTokenId, tokenURI);

        //Helper function to update Global variables and emit an event
        createListedToken(newTokenId, price);

        return newTokenId;
    }

    function createListedToken(uint256 tokenId, uint256 price) private {
        //Make sure the sender sent enough ETH to pay for listing
        require(msg.value == listPrice, "Hopefully sending the correct price");
        //Just sanity check
        require(price > 0, "Make sure the price isn't negative");

        //Update the mapping of tokenId's to Token details, useful for retrieval functions
        idToListedToken[tokenId] = ListedToken(
            tokenId,
            payable(address(this)),
            payable(msg.sender),
            price,
            true
        );

        _transfer(msg.sender, address(this), tokenId);
        //Emit the event for successful transfer. The frontend parses this message and updates the end user
        emit TokenListedSuccess(
            tokenId,
            address(this),
            msg.sender,
            price,
            true
        );
    }

    //This will return all the NFTs currently listed to be sold on the marketplace
    function getAllNFTs() public view returns (ListedToken[] memory) {
        uint nftCount = _tokenIds.current();
        ListedToken[] memory tokens = new ListedToken[](nftCount);
        uint currentIndex = 0;

        //at the moment currentlyListed is true for all, if it becomes false in the future we will
        //filter out currentlyListed == false over here
        for(uint i=0;i<nftCount;i++)
        {
            uint currentId = i + 1;
            ListedToken storage currentItem = idToListedToken[currentId];
            tokens[currentIndex] = currentItem;
            currentIndex += 1;
        }
        //the array 'tokens' has the list of all NFTs in the marketplace
        return tokens;
    }

    //Returns all the NFTs that the current user is owner or seller in
    function getMyNFTs() public view returns (ListedToken[] memory) {
        uint totalItemCount = _tokenIds.current();
        uint itemCount = 0;
        uint currentIndex = 0;

        //Important to get a count of all the NFTs that belong to the user before we can make an array for them
        for(uint i=0; i < totalItemCount; i++)
        {
            if(idToListedToken[i+1].owner == msg.sender || idToListedToken[i+1].seller == msg.sender){
                itemCount += 1;
            }
        }

        //Once you have the count of relevant NFTs, create an array then store all the NFTs in it
        ListedToken[] memory items = new ListedToken[](itemCount);
        for(uint i=0; i < totalItemCount; i++) {
            if(idToListedToken[i+1].owner == msg.sender || idToListedToken[i+1].seller == msg.sender) {
                uint currentId = i+1;
                ListedToken storage currentItem = idToListedToken[currentId];
                items[currentIndex] = currentItem;
                currentIndex += 1;
            }
        }
        return items;
    }

    function executeSale(uint256 tokenId) public payable {
        uint price = idToListedToken[tokenId].price;
        address seller = idToListedToken[tokenId].seller;
        require(msg.value == price, "Please submit the asking price in order to complete the purchase");

        //update the details of the token
        idToListedToken[tokenId].currentlyListed = true;
        idToListedToken[tokenId].seller = payable(msg.sender);
        _itemsSold.increment();

        //Actually transfer the token to the new owner
        _transfer(address(this), msg.sender, tokenId);
        //approve the marketplace to sell NFTs on your behalf
        approve(address(this), tokenId);

        //Transfer the listing fee to the marketplace creator
        payable(owner).transfer(listPrice);
        //Transfer the proceeds from the sale to the seller of the NFT
        payable(seller).transfer(msg.value);
    }

    //We might add a resell token function in the future
    //In that case, tokens won't be listed by default but users can send a request to actually list a token
    //Currently NFTs are listed by default
}
Step 7: Deploy the smart contract on Goerli
Good job coding through that huge smart contract! You're awesome! :sparkling_heart:
Now we need to deploy the contract. Alchemy recommends the Goerli testnet since Rinkeby will be deprecated with the incoming Ethereum merge.
There's a script named deploy.js within the scripts/ folder. In that file, paste this code:
const { ethers } = require("hardhat");
const hre = require("hardhat");
const fs = require("fs");

async function main() {
  //get the signer that we will use to deploy
  const [deployer] = await ethers.getSigners();

  //Get the NFTMarketplace smart contract object and deploy it
  const Marketplace = await hre.ethers.getContractFactory("NFTMarketplace");
  const marketplace = await Marketplace.deploy();

  await marketplace.deployed();

  //Pull the address and ABI out while you deploy, since that will be key in interacting with the smart contract later
  const data = {
    address: marketplace.address,
    abi: JSON.parse(marketplace.interface.format('json'))
  }

  //This writes the ABI and address to the marketplace.json
  //This data is then used by frontend files to connect with the smart contract
  fs.writeFileSync('./src/Marketplace.json', JSON.stringify(data))
}

main()
  .then(() => process.exit(0))
  .catch((error) => {
    console.error(error);
    process.exit(1);
  });
Hit save.
Then open your command prompt and execute the below command:
npx hardhat run --network goerli scripts/deploy.js
Make sure you've updated your
hardhat.config.jsas per Step 3 to be able to deploy the smart contract.
If you don't see any errors or warnings, your smart contract was successfully deployed!
You should be able to see the address it was deployed to and the ABI of the smart contract in src/Marketplace.json
Step 8: Add the functions to upload NFT metadata to Piñata
In your home directory, in the empty file named pinata.js add this code:
//require('dotenv').config();
const key = process.env.REACT_APP_PINATA_KEY;
const secret = process.env.REACT_APP_PINATA_SECRET;

const axios = require('axios');
const FormData = require('form-data');

export const uploadJSONToIPFS = async(JSONBody) => {
    const url = `https://api.pinata.cloud/pinning/pinJSONToIPFS`;
    //making axios POST request to Pinata ⬇️
    return axios
        .post(url, JSONBody, {
            headers: {
                pinata_api_key: key,
                pinata_secret_api_key: secret,
            }
        })
        .then(function (response) {
           return {
               success: true,
               pinataURL: "https://gateway.pinata.cloud/ipfs/" + response.data.IpfsHash
           };
        })
        .catch(function (error) {
            console.log(error)
            return {
                success: false,
                message: error.message,
            }

    });
};

export const uploadFileToIPFS = async(file) => {
    const url = `https://api.pinata.cloud/pinning/pinFileToIPFS`;
    //making axios POST request to Pinata ⬇️

    let data = new FormData();
    data.append('file', file);

    const metadata = JSON.stringify({
        name: 'testname',
        keyvalues: {
            exampleKey: 'exampleValue'
        }
    });
    data.append('pinataMetadata', metadata);

    //pinataOptions are optional
    const pinataOptions = JSON.stringify({
        cidVersion: 0,
        customPinPolicy: {
            regions: [
                {
                    id: 'FRA1',
                    desiredReplicationCount: 1
                },
                {
                    id: 'NYC1',
                    desiredReplicationCount: 2
                }
            ]
        }
    });
    data.append('pinataOptions', pinataOptions);

    return axios
        .post(url, data, {
            maxBodyLength: 'Infinity',
            headers: {
                'Content-Type': `multipart/form-data; boundary=${data._boundary}`,
                pinata_api_key: key,
                pinata_secret_api_key: secret,
            }
        })
        .then(function (response) {
            console.log("image uploaded", response.data.IpfsHash)
            return {
               success: true,
               pinataURL: "https://gateway.pinata.cloud/ipfs/" + response.data.IpfsHash
           };
        })
        .catch(function (error) {
            console.log(error)
            return {
                success: false,
                message: error.message,
            }

    });
};
The two functions are:
1. uploadFileToIPFS()
This function uploads the NFT image file to IPFS and then returns an IPFS URL which can be queried to obtain the image.
2.uploadJSONToIPFS(JSON)
This function takes the entire JSON to be uploaded as input and uploads it to IPFS. The value returned by the function is an IPFS URI which can be queried to get the metadata. This URI is super helpful when we want to retrieve the NFT metadata info later.
Step 9: Integrate the Frontend with the Smart Contract
For the platform to work seamlessly, integrate the frontend with functions from the smart contract.
A note about the frontend
Building the frontend for this is a huge task. While we'd love to teach it all here in this tutorial itself to our devs, we do not want to overwhelm you.
Hence, the Github repository has all the frontend code with separate components for every separate page.
Every frontend component like
src/components/SellNFT.jsfor instance,
- Has a function that creates a provider, signer, and a contract object
- Fetches relevant data from the smart contract
- Fetches relevant data from IPFS via Axios
- has a return where it returns the JSX/HTML for the page
While we are skipping talking about 4 in this tutorial, we still cover items 1, 2 & 3. We will release a future tutorial on item 4 and will keep this page updated.
src/components/SellNFT.js
The most important integration will be in src/components/SellNFT.js where we do 3 steps:
- Upload the image to IPFS
- Upload the metadata with an image to IPFS
- Send the metadata tokenURI and price to the smart contract
Add the below code to your src/components/SellNFT.js file right after the state variable declarations at the top:
async function disableButton() {
    const listButton = document.getElementById("list-button")
    listButton.disabled = true
    listButton.style.backgroundColor = "grey";
    listButton.style.opacity = 0.3;
}

async function enableButton() {
    const listButton = document.getElementById("list-button")
    listButton.disabled = false
    listButton.style.backgroundColor = "#A500FF";
    listButton.style.opacity = 1;
}

//This function uploads the NFT image to IPFS
async function OnChangeFile(e) {
    var file = e.target.files[0];
    //check for file extension
    try {
        //upload the file to IPFS
        disableButton();
        updateMessage("Uploading image.. please dont click anything!")
        const response = await uploadFileToIPFS(file);
        if(response.success === true) {
            enableButton();
            updateMessage("")
            console.log("Uploaded image to Pinata: ", response.pinataURL)
            setFileURL(response.pinataURL);
        }
    }
    catch(e) {
        console.log("Error during file upload", e);
    }
}

//This function uploads the metadata to IPFS
async function uploadMetadataToIPFS() {
    const {name, description, price} = formParams;
    //Make sure that none of the fields are empty
    if( !name || !description || !price || !fileURL)
    {
        updateMessage("Please fill all the fields!")
        return -1;
    }

    const nftJSON = {
        name, description, price, image: fileURL
    }

    try {
        //upload the metadata JSON to IPFS
        const response = await uploadJSONToIPFS(nftJSON);
        if(response.success === true){
            console.log("Uploaded JSON to Pinata: ", response)
            return response.pinataURL;
        }
    }
    catch(e) {
        console.log("error uploading JSON metadata:", e)
    }
}

async function listNFT(e) {
    e.preventDefault();

    //Upload data to IPFS
    try {
        const metadataURL = await uploadMetadataToIPFS();
        if(metadataURL === -1)
            return;
        //After adding your Hardhat network to your metamask, this code will get providers and signers
        const provider = new ethers.providers.Web3Provider(window.ethereum);
        const signer = provider.getSigner();
        disableButton();
        updateMessage("Uploading NFT(takes 5 mins).. please dont click anything!")

        //Pull the deployed contract instance
        let contract = new ethers.Contract(Marketplace.address, Marketplace.abi, signer)

        //massage the params to be sent to the create NFT request
        const price = ethers.utils.parseUnits(formParams.price, 'ether')
        let listingPrice = await contract.getListPrice()
        listingPrice = listingPrice.toString()

        //actually create the NFT
        let transaction = await contract.createToken(metadataURL, price, { value: listingPrice })
        await transaction.wait()

        alert("Successfully listed your NFT!");
        enableButton();
        updateMessage("");
        updateFormParams({ name: '', description: '', price: ''});
        window.location.replace("/")
    }
    catch(e) {
        alert( "Upload error"+e )
    }
}
src/components/Marketplace.js
Here we just need to pull all the NFTs from the smart contract.
Add this to your file right after the state variable declarations at the top and before the return:
const [dataFetched, updateFetched] = useState(false);

async function getAllNFTs() {
    const ethers = require("ethers");
    //After adding your Hardhat network to your metamask, this code will get providers and signers
    const provider = new ethers.providers.Web3Provider(window.ethereum);
    const signer = provider.getSigner();
    //Pull the deployed contract instance
    let contract = new ethers.Contract(MarketplaceJSON.address, MarketplaceJSON.abi, signer)
    //create an NFT Token
    let transaction = await contract.getAllNFTs()

    //Fetch all the details of every NFT from the contract and display
    const items = await Promise.all(transaction.map(async i => {
        var tokenURI = await contract.tokenURI(i.tokenId);
        tokenURI = GetIpfsUrlFromPinata(tokenURI);
        let meta = await axios.get(tokenURI);
        meta = meta.data;

        let price = ethers.utils.formatUnits(i.price.toString(), 'ether');
        let item = {
            price,
            tokenId: i.tokenId.toNumber(),
            seller: i.seller,
            owner: i.owner,
            image: meta.image,
            name: meta.name,
            description: meta.description,
        }
        return item;
    }))

    updateFetched(true);
    updateData(items);
}

if(!dataFetched)
    getAllNFTs();
src/components/Profile.js
Add the below code which pulls all the NFTs that the logged in user owns:
    const [dataFetched, updateFetched] = useState(false);

    async function getNFTData(tokenId) {
        const ethers = require("ethers");
        let sumPrice = 0;

        //After adding your Hardhat network to your metamask, this code will get providers and signers
        const provider = new ethers.providers.Web3Provider(window.ethereum);
        const signer = provider.getSigner();
        const addr = await signer.getAddress();

        //Pull the deployed contract instance
        let contract = new ethers.Contract(MarketplaceJSON.address, MarketplaceJSON.abi, signer)

        //create an NFT Token
        let transaction = await contract.getMyNFTs()

        /*
        * Below function takes the metadata from tokenURI and the data returned by getMyNFTs() contract function
        * and creates an object of information that is to be displayed
        */

        const items = await Promise.all(transaction.map(async i => {
            const tokenURI = await contract.tokenURI(i.tokenId);
            let meta = await axios.get(tokenURI);
            meta = meta.data;

            let price = ethers.utils.formatUnits(i.price.toString(), 'ether');
            let item = {
                price,
                tokenId: i.tokenId.toNumber(),
                seller: i.seller,
                owner: i.owner,
                image: meta.image,
                name: meta.name,
                description: meta.description,
            }
            sumPrice += Number(price);
            return item;
        }))

        updateData(items);
        updateFetched(true);
        updateAddress(addr);
        updateTotalPrice(sumPrice.toPrecision(3));
    }

    const params = useParams();
    const tokenId = params.tokenId;
    if(!dataFetched)
        getNFTData(tokenId);
src/components/NFTPage.js
This is the individual page for every NFT, which serves two functionalities:
- display all the data of a particular NFT
- let any user buy it with a "Buy this NFT" button
So paste the below two functions in your code:
async function getNFTData(tokenId) {
    const ethers = require("ethers");
    //After adding your Hardhat network to your metamask, this code will get providers and signers
    const provider = new ethers.providers.Web3Provider(window.ethereum);
    const signer = provider.getSigner();
    const addr = await signer.getAddress();
    //Pull the deployed contract instance
    let contract = new ethers.Contract(MarketplaceJSON.address, MarketplaceJSON.abi, signer)
    //create an NFT Token
    var tokenURI = await contract.tokenURI(tokenId);
    const listedToken = await contract.getListedTokenForId(tokenId);
    tokenURI = GetIpfsUrlFromPinata(tokenURI);
    let meta = await axios.get(tokenURI);
    meta = meta.data;
    console.log(listedToken);

    let item = {
        price: meta.price,
        tokenId: tokenId,
        seller: listedToken.seller,
        owner: listedToken.owner,
        image: meta.image,
        name: meta.name,
        description: meta.description,
    }
    console.log(item);
    updateData(item);
    updateDataFetched(true);
    console.log("address", addr)
    updateCurrAddress(addr);
}

async function buyNFT(tokenId) {
    try {
        const ethers = require("ethers");
        //After adding your Hardhat network to your metamask, this code will get providers and signers
        const provider = new ethers.providers.Web3Provider(window.ethereum);
        const signer = provider.getSigner();

        //Pull the deployed contract instance
        let contract = new ethers.Contract(MarketplaceJSON.address, MarketplaceJSON.abi, signer);
        const salePrice = ethers.utils.parseUnits(data.price, 'ether')
        updateMessage("Buying the NFT... Please Wait (Upto 5 mins)")
        //run the executeSale function
        let transaction = await contract.executeSale(tokenId, {value:salePrice});
        await transaction.wait();

        alert('You successfully bought the NFT!');
        updateMessage("");
    }
    catch(e) {
        alert("Upload Error"+e)
    }
}

    const params = useParams();
    const tokenId = params.tokenId;
    if(!dataFetched)
        getNFTData(tokenId);
    if(typeof data.image == "string")
        data.image = GetIpfsUrlFromPinata(data.image);
src/components/Navbar.js
This is the Navbar that runs common between all pages. Add the below code that handles the connection of a wallet and the pulling of relevant info
async function getAddress() {
  const ethers = require("ethers");
  const provider = new ethers.providers.Web3Provider(window.ethereum);
  const signer = provider.getSigner();
  const addr = await signer.getAddress();
  updateAddress(addr);
}

function updateButton() {
  const ethereumButton = document.querySelector('.enableEthereumButton');
  ethereumButton.textContent = "Connected";
  ethereumButton.classList.remove("hover:bg-blue-70");
  ethereumButton.classList.remove("bg-blue-500");
  ethereumButton.classList.add("hover:bg-green-70");
  ethereumButton.classList.add("bg-green-500");
}

async function connectWebsite() {

    const chainId = await window.ethereum.request({ method: 'eth_chainId' });
    if(chainId !== '0x5')
    {
      //alert('Incorrect network! Switch your metamask network to Rinkeby');
      await window.ethereum.request({
        method: 'wallet_switchEthereumChain',
        params: [{ chainId: '0x5' }],
     })
    }
    await window.ethereum.request({ method: 'eth_requestAccounts' })
      .then(() => {
        updateButton();
        console.log("here");
        getAddress();
        window.location.replace(location.pathname)
      });
}

  useEffect(() => {
    if(window.ethereum == undefined)
      return;
    let val = window.ethereum.isConnected();
    if(val)
    {
      console.log("here");
      getAddress();
      toggleConnect(val);
      updateButton();
    }

    window.ethereum.on('accountsChanged', function(accounts){
      window.location.replace(location.pathname)
    })
  });
Step 10: Test your code
When you hit the npm start command in the terminal, the marketplace should open up in your localhost and will look like the below:
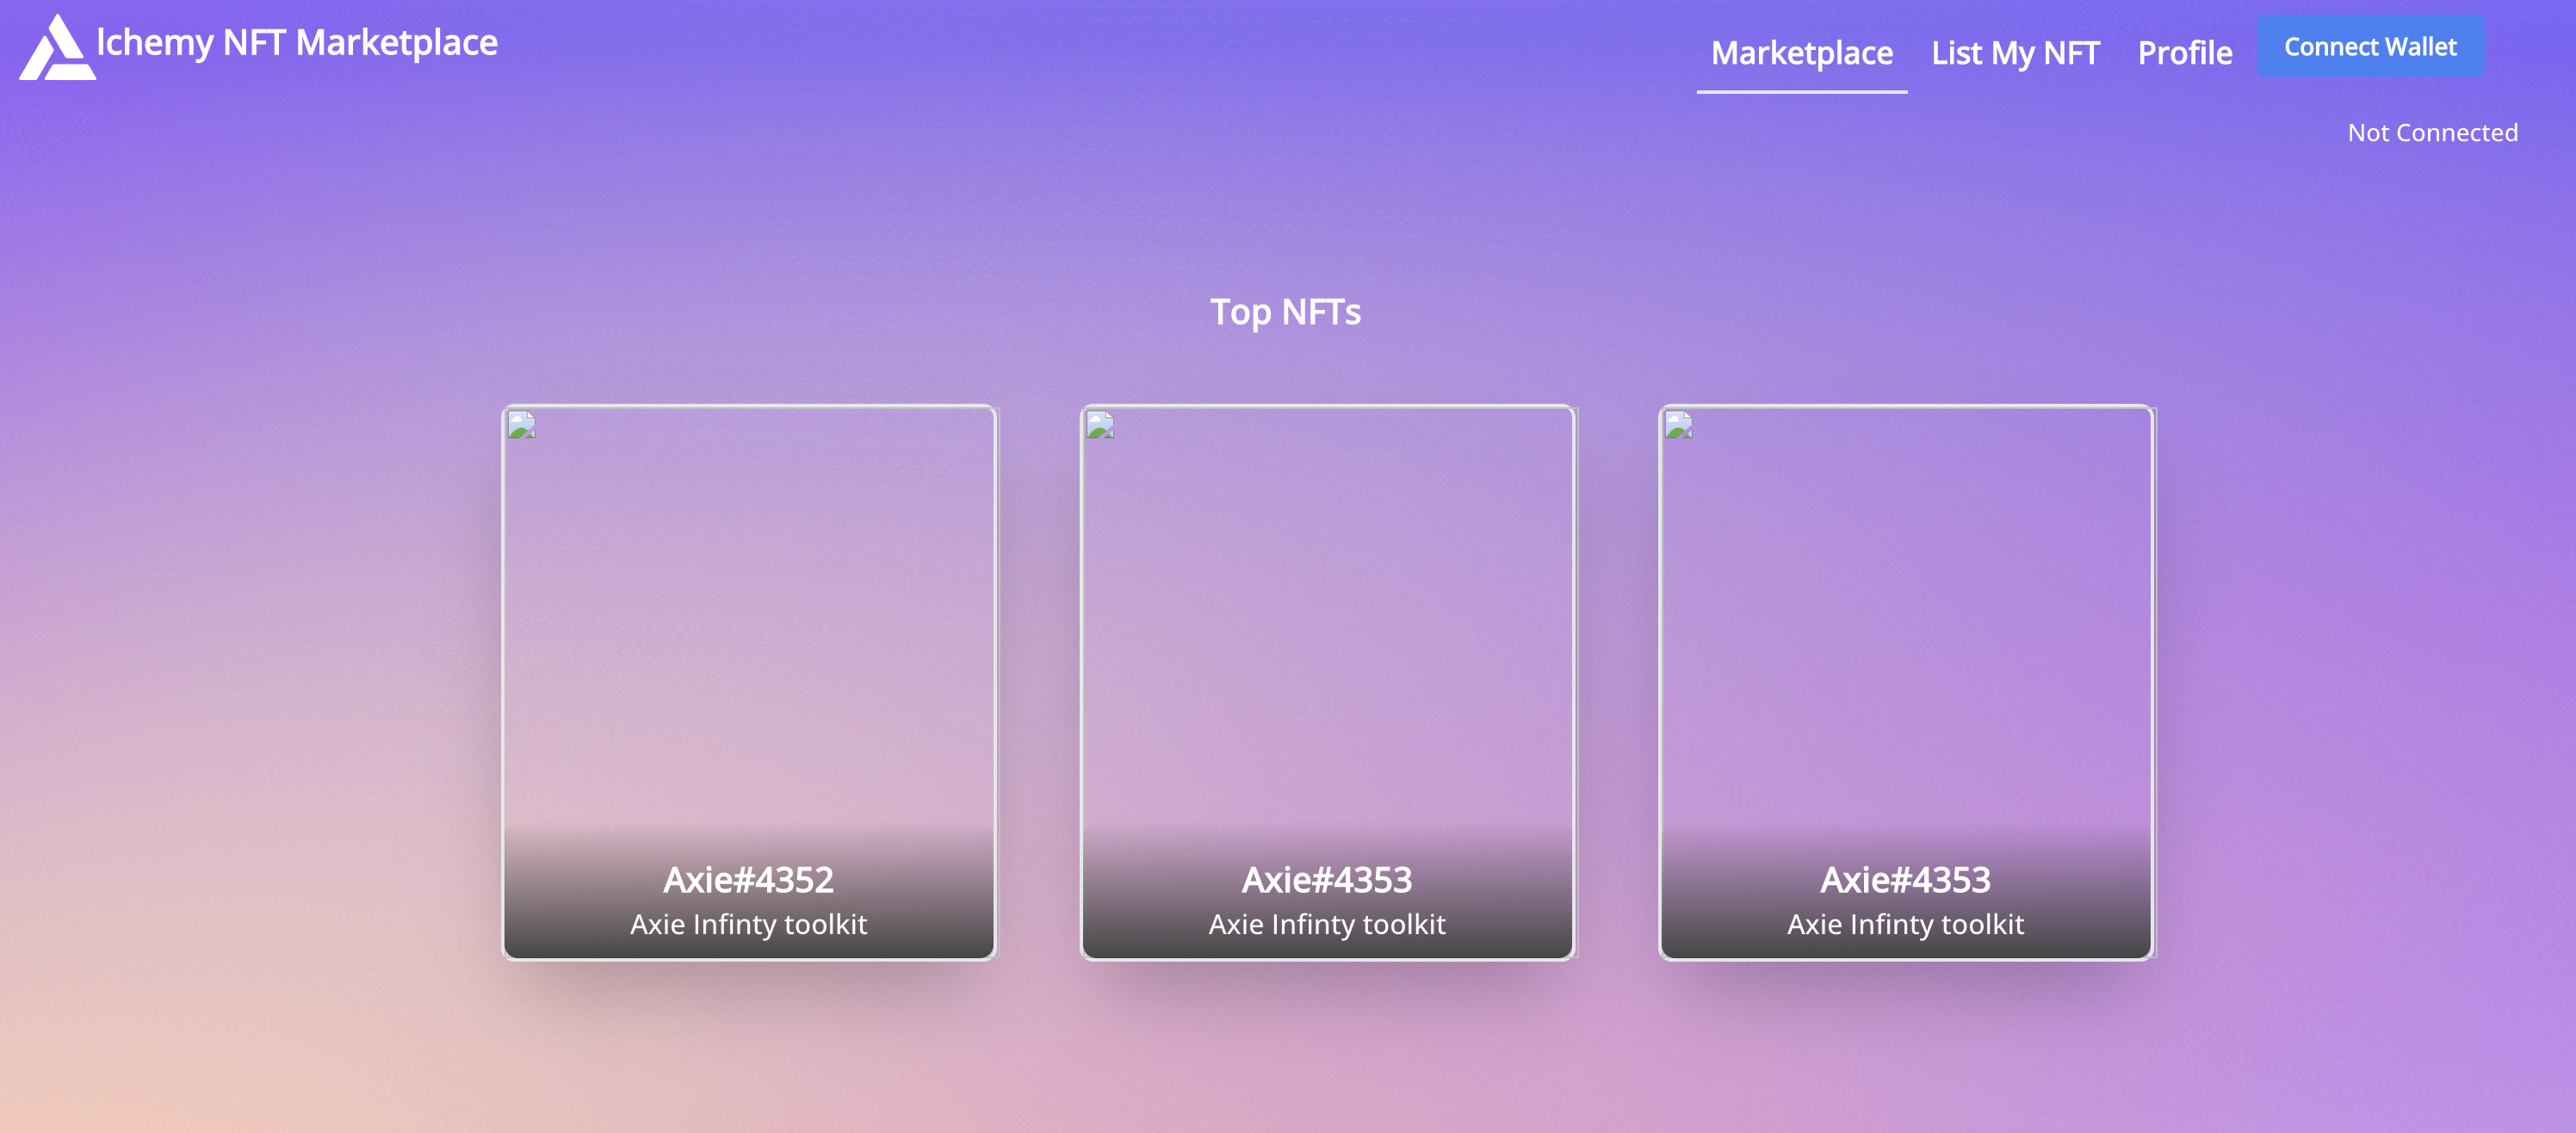
If your code doesn't work at this point refer to the GitHub repo of the finished NFT Marketplace tutorial. If you pull this directly, the marketplace should work for you!
Connect your marketplace
First, connect your marketplace by clicking on the "Connect Wallet" button in your Navbar.
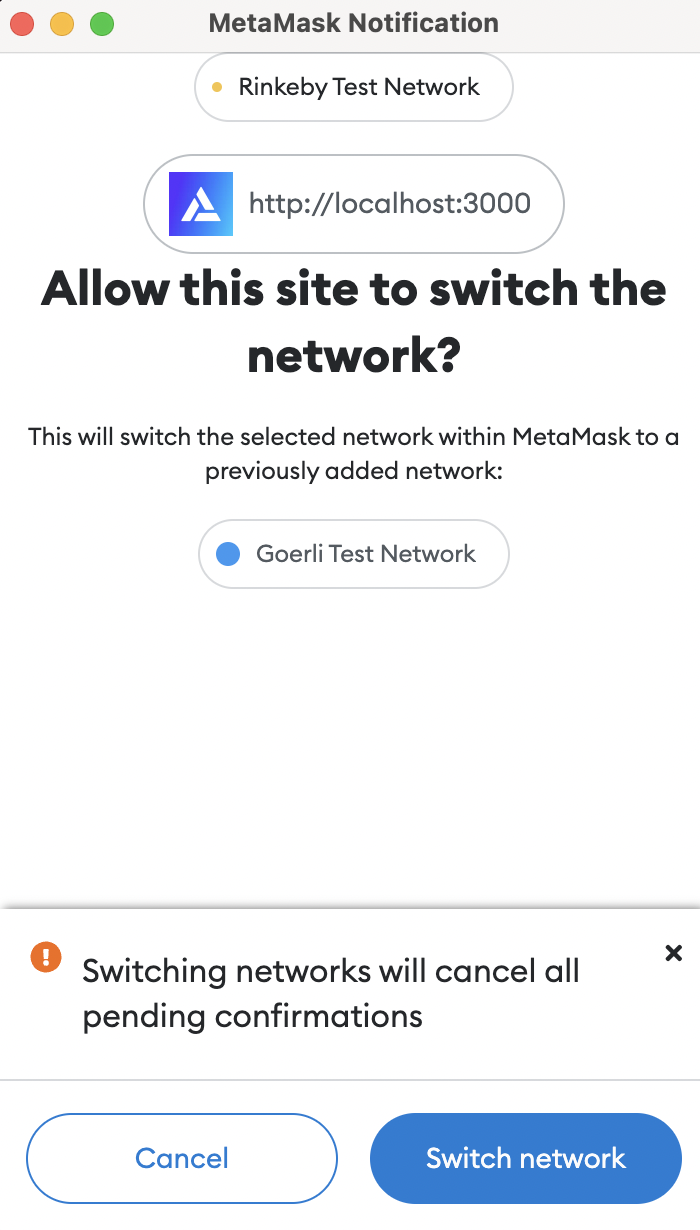
If you're on a different network than Goerli, MetaMask will first prompt you to switch the network.
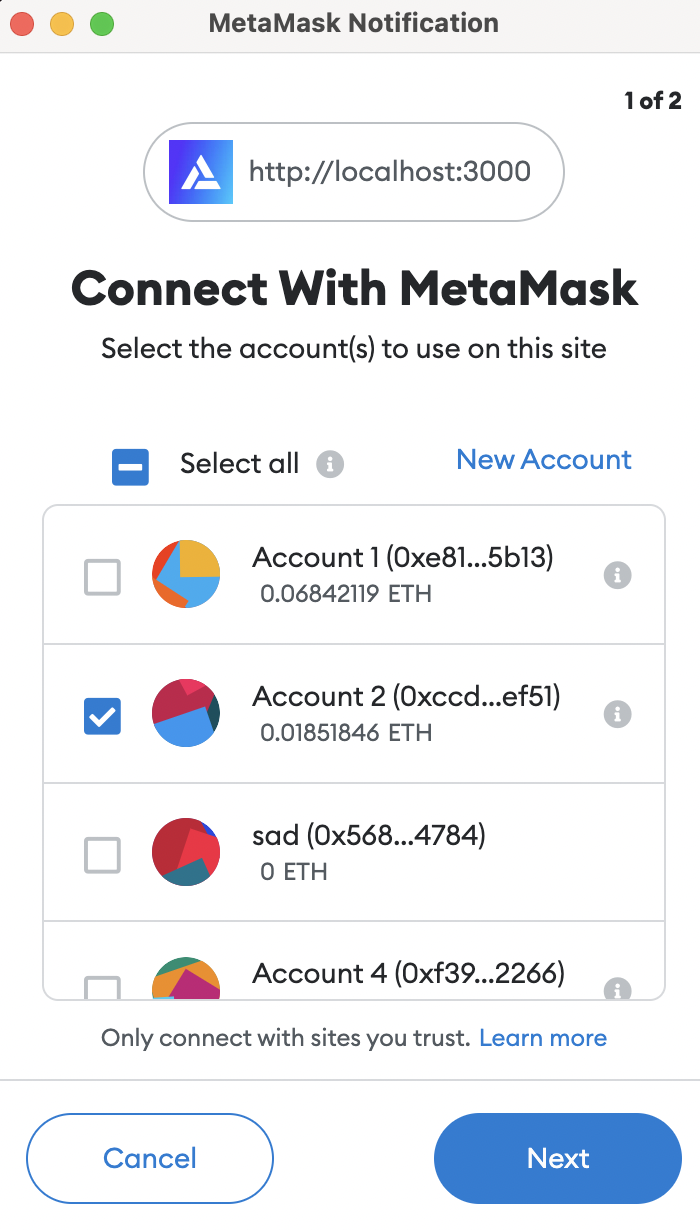
Then it will ask you to connect to your specific account.
Upload an NFT
After a successful login, your marketplace probably looks like the below.
It might be missing NFTs since you just deployed the contract.
Fresh, right?\
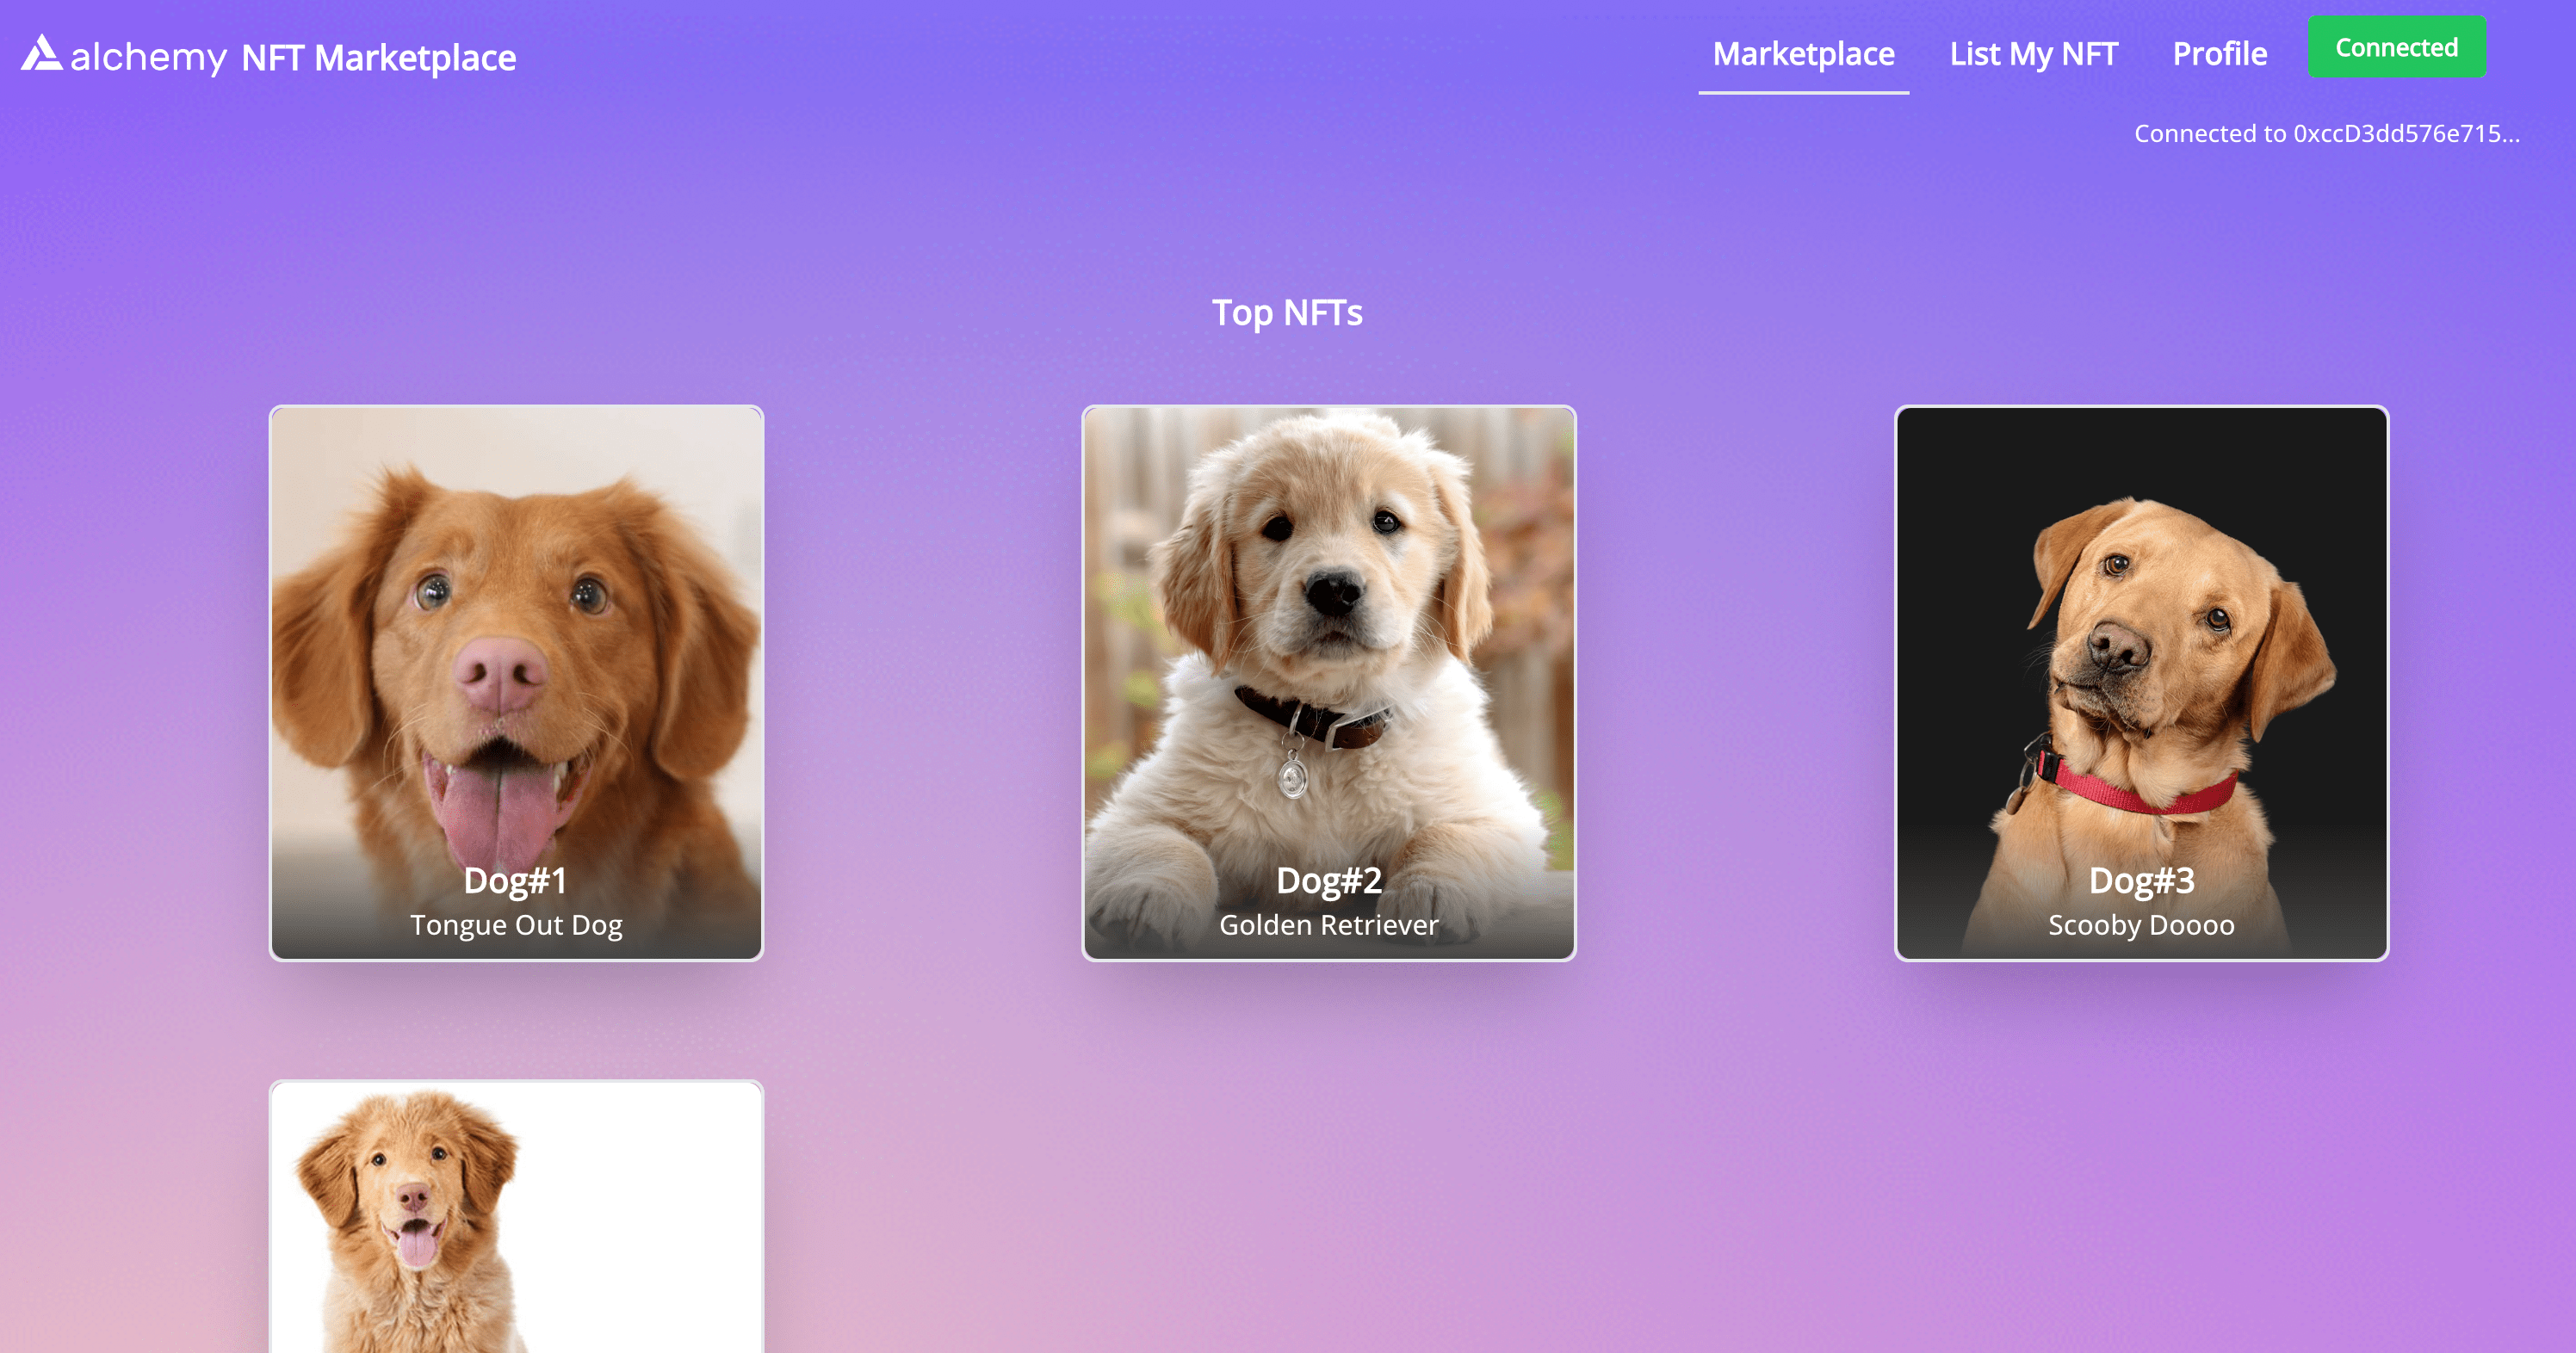
Marketplace home page
Now, head over to the "List My NFT" page in the navbar and fill in the details to upload your first NFT. It should look somewhat like the below before you hit submit:
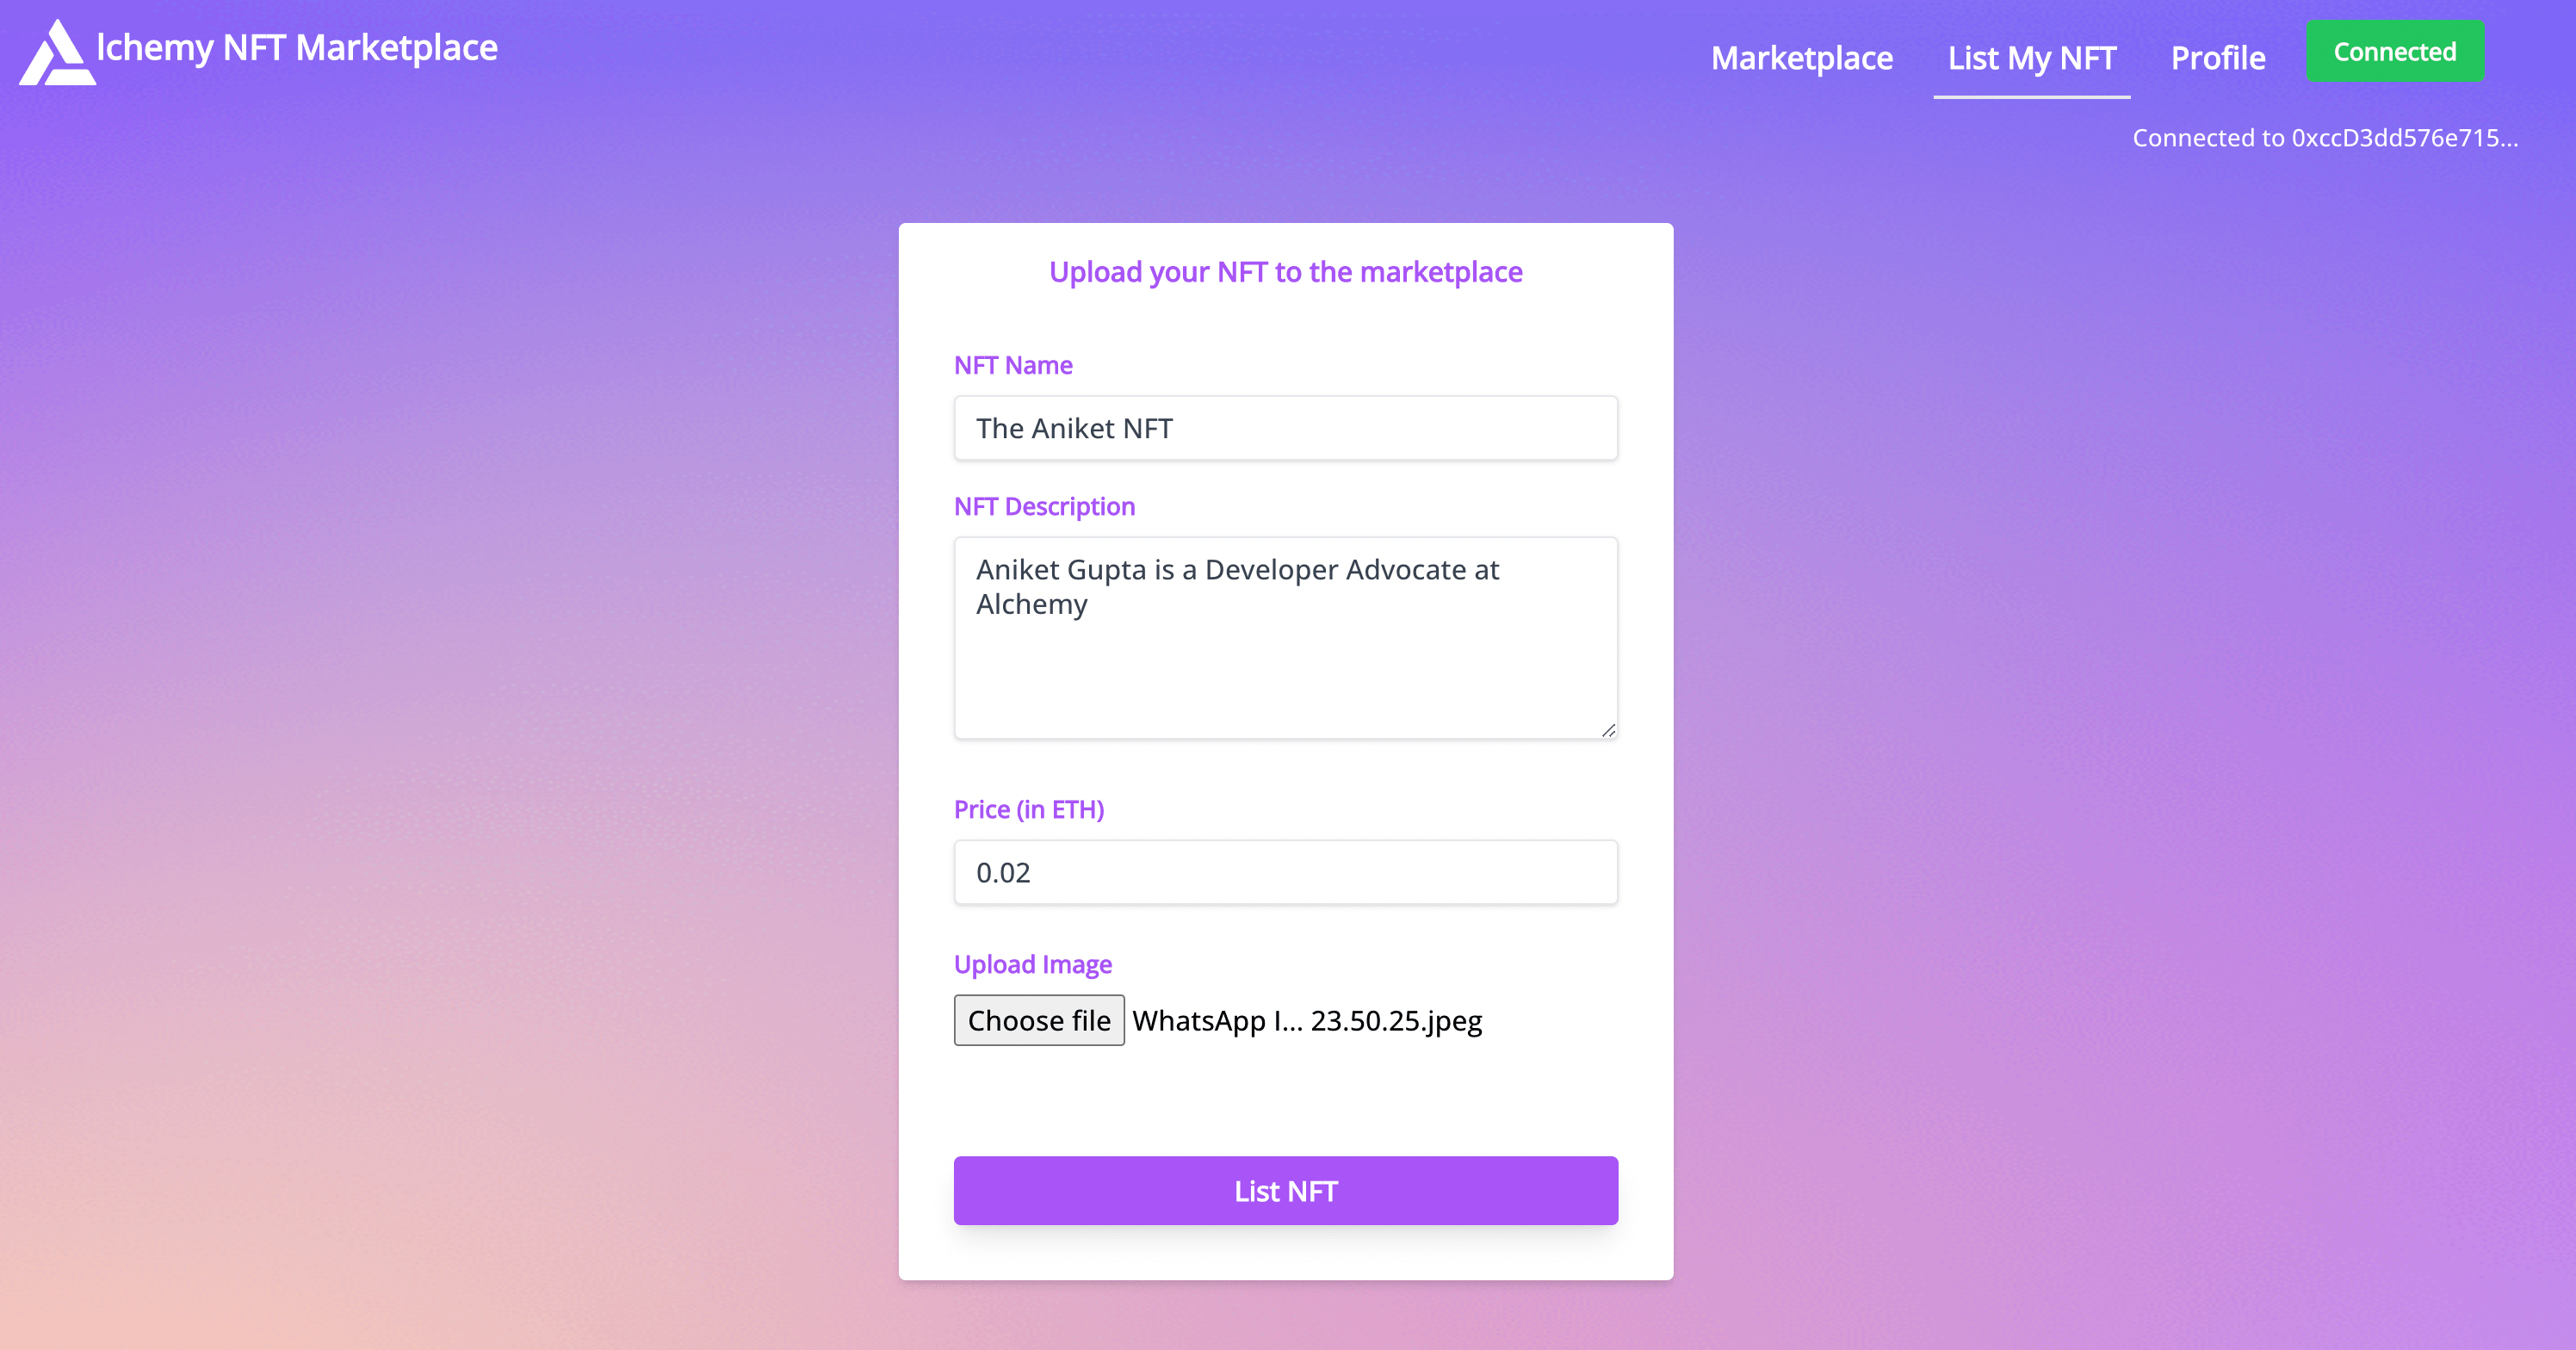
NFT marketplace upload form
Make sure you've got some Goerli ETH from Goerli Faucet at this point. If you do not have enough Goerli ETH, the transaction could fail due to insufficient funds.
Now if you hit submit and wait for a while (up to 5 mins max), you should see an alert that says "Successfully uploaded your NFT!".
If you click OK, it will then redirect you to your marketplace home page.
Now if you head over to the marketplace and your profile, you should see that NFT!
Buying an NFT
To test the functionality of buying an NFT, first switch the wallet in your Metamask to some other wallet by going into "My Accounts" in your MetaMask wallet extension.
It will show the below screen.
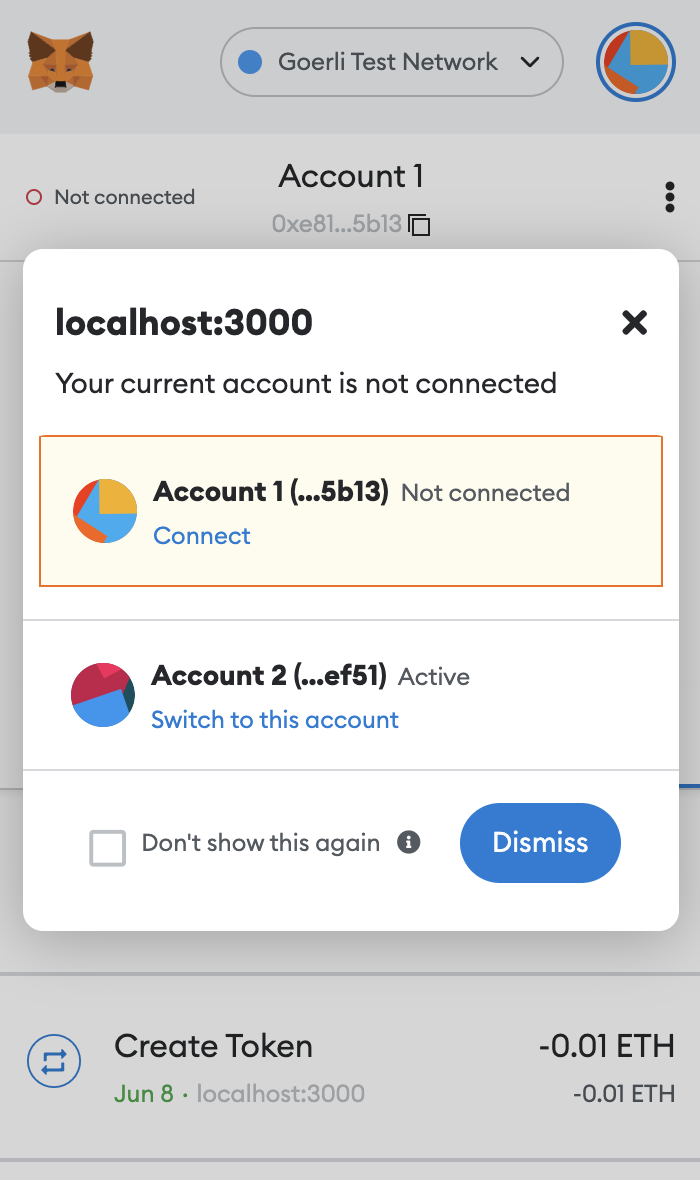
If you don't already have another account, create one and load it with Goerli ETH.
Next, go to an individual NFT's page and click the "Buy this NFT" button.
After some wait time, you should see an alert saying "Successfully bought the NFT!".
Now if you head up in your profile section, that NFT should show up!
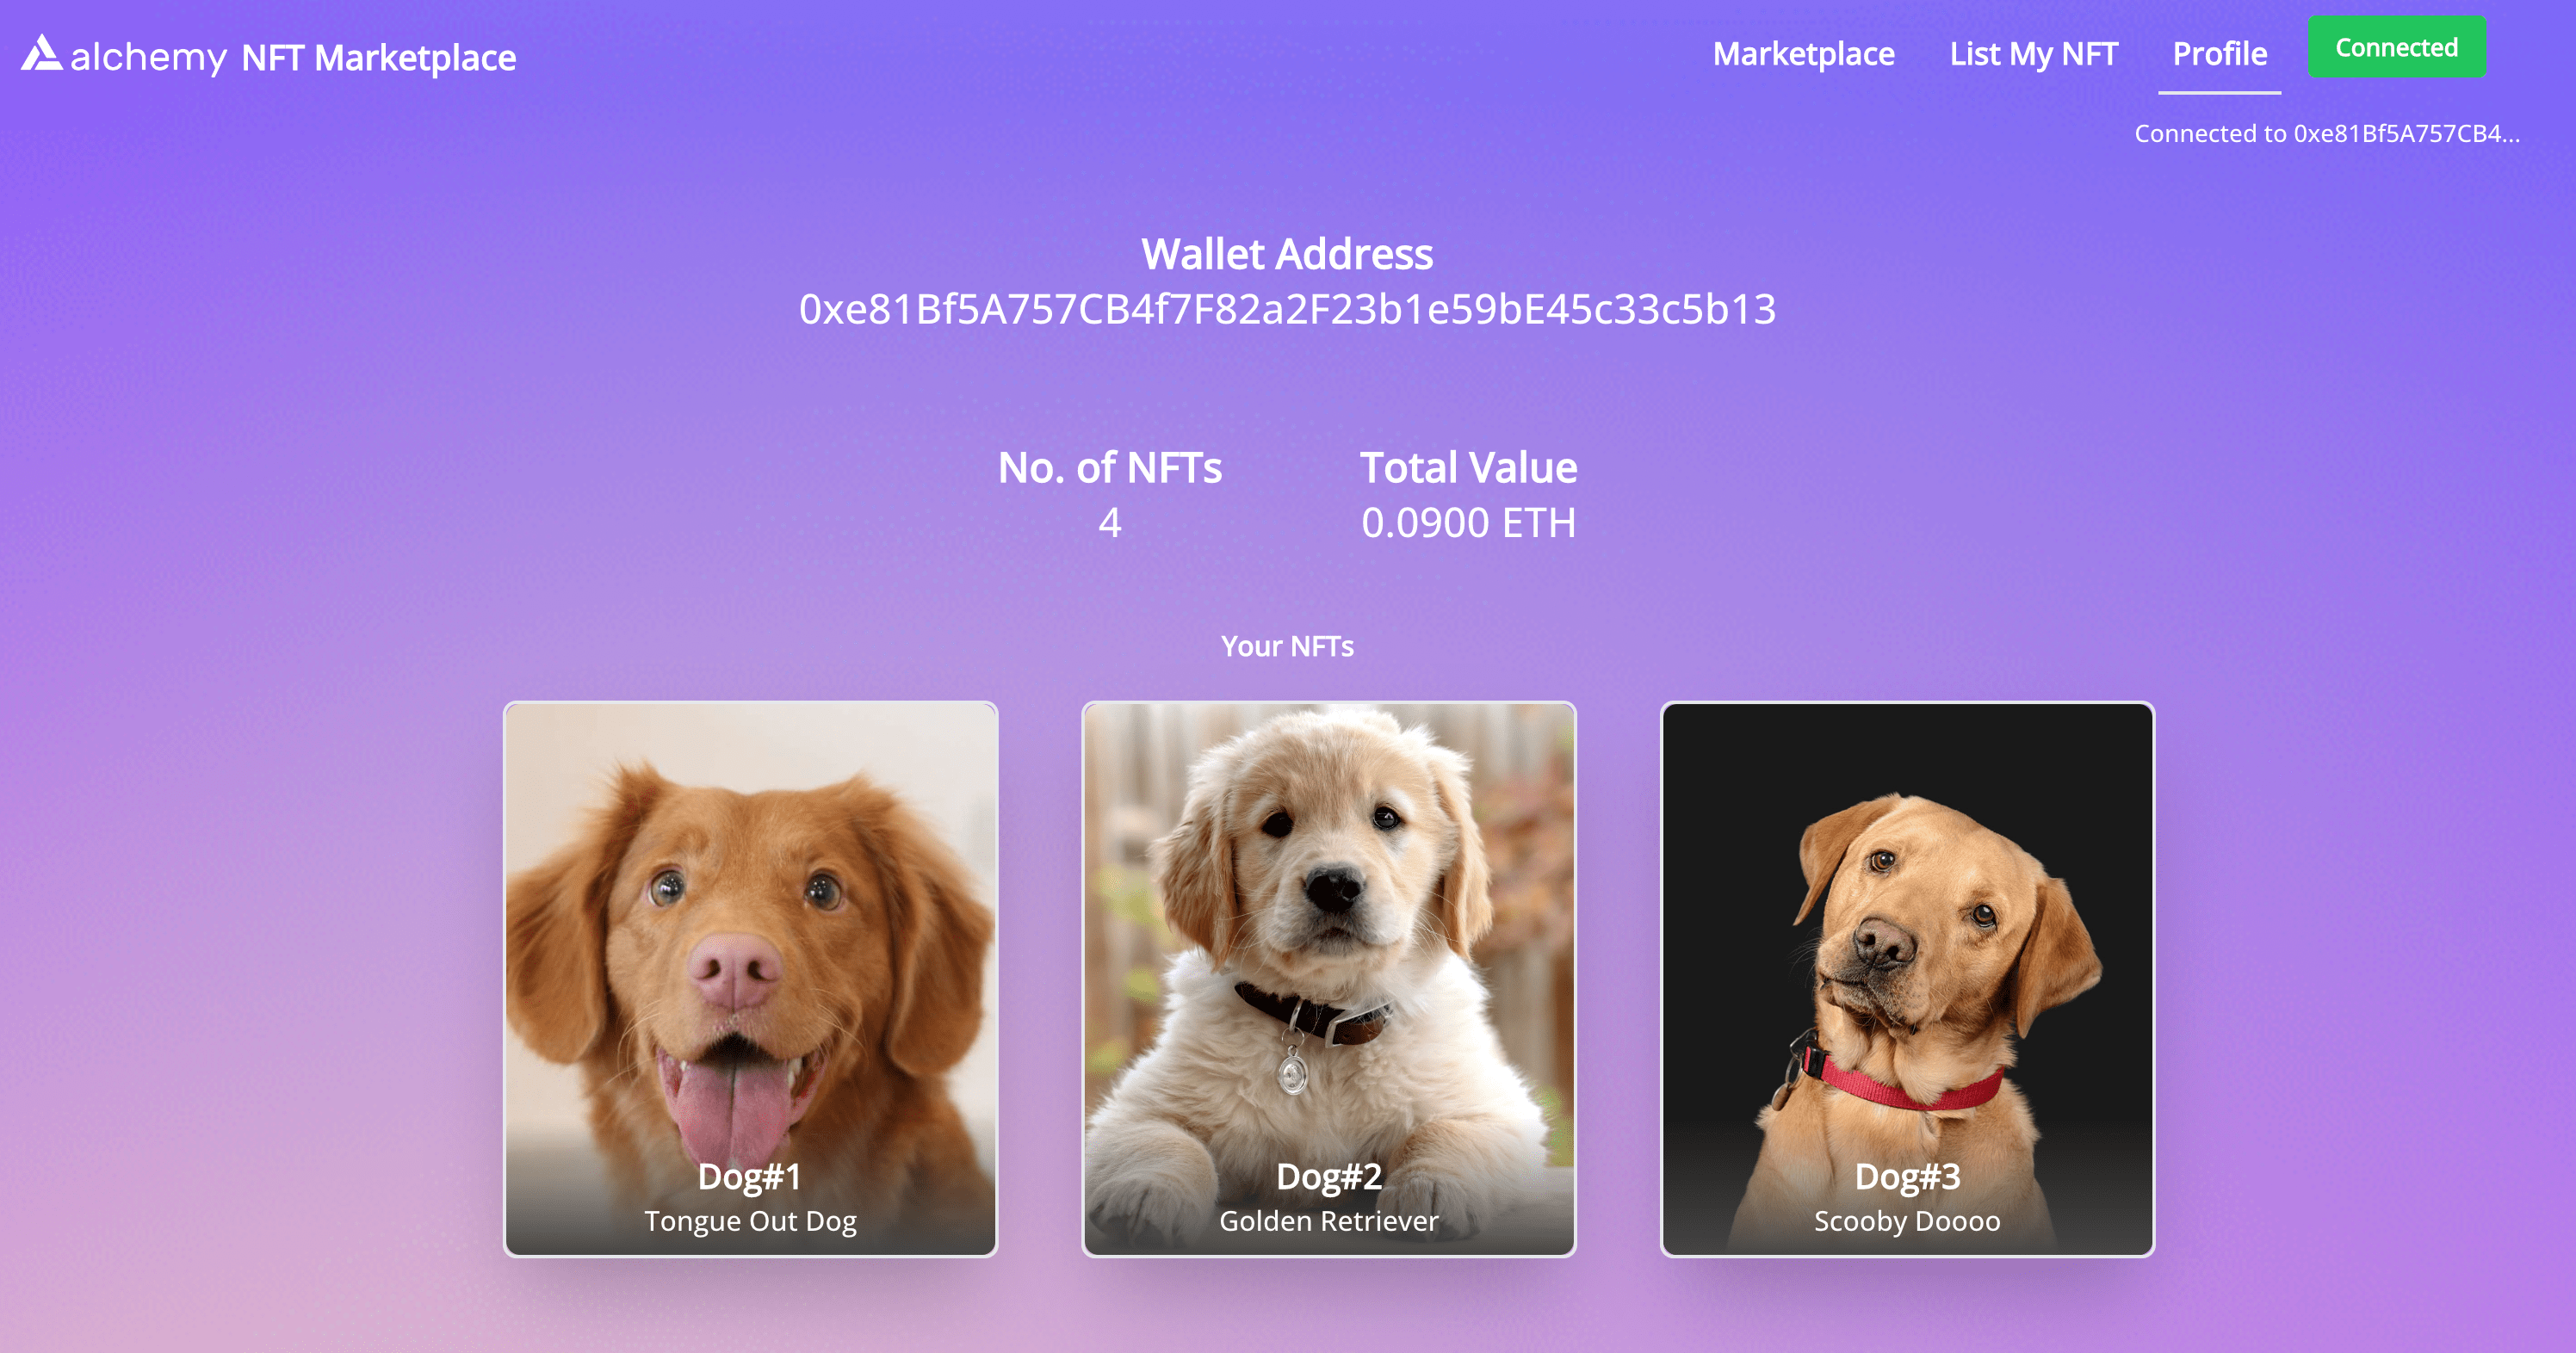
NFT wallet profile page
Voila!
If all that worked for you, you have now successfully built a working v1 of an NFT marketplace.
Legendary!
Step 11: [Optional] Extending functionality
Do you know what would be cool? The coolest thing would be if some of you went ahead and extended some of the functionality we've implemented in this tutorial!
A couple of potential extensions could be
- Use Alchemy's getNFTs and getNFTsForCollection endpoints to fetch NFTs for the marketplace and profile page
- Add functionality to let users list pre-existing NFTs to the marketplace
- Adding Royalties such that the original NFT creator gets 10% of the proceeds every time that NFT gets sold
If you end up implementing the above or absolutely any other functionality, tag @AlchemyPlatform and share it with us on Twitter! We might even share it with our community of 40k (and growing) developers.
Conclusion
With this tutorial, you've successfully built your own NFT marketplace from scratch!
Congratulations on completing Road to Web3 Week 7!
Feel free to add more features on top of it like using Alchemy's APIs and listing older NFTs.
If you enjoyed this tutorial for building an NFT marketplace, give us a tweet @AlchemyPlatform! (Or if you have any questions/feedback give the author @ankg404 a shoutout!)
Don't forget to join our Discord server to meet other blockchain devs, builders, and entrepreneurs! Also do share what you built with us 🎉🎉
We are always looking to improve this learning journey, please share feedback with us!
Updated almost 2 years ago
