How to Add Royalties to an ERC-20 Token
This tutorial’s purpose is to create an ERC-20 token that will return a royalty amount (of that ERC-20 token) to the original creator of the contract.
Table of Contents
- Why build your own ERC-20 token with royalties?
- The tools we're using
- Initial Set-Up
- Making Our Environment
- Smart Contract Development
Why build your own ERC-20 token with royalties?
An Ethereum Token is a compelling feature of the Ethereum virtual machine since it can represent virtually anything from financial assets or a fiat currency to the skills of a game character.
Developers often want to be rewarded for the work that they do. An ERC-20 token that provides royalties for the original contract deployer is a unique form of compensation. Building upon our previous tutorial on How to Create an ERC-20 Token (4 Steps), we will create an ERC-20 token, add in some custom functions, and deploy it to the Ethereum Testnet.
The Tools We're Using
We're going to be doing all of the work in Solidity (no Javascript needed!). We'll take advantage of cutting-edge tools like Foundry that allow us to write contracts, test them, and deploy them, all in Solidity.
Libraries / Tools used:
- Foundry - a fast Solidity development toolkit that enables developers to write their tests in Solidity.
- Solmate - a library that contains gas-optimized contracts such as ERC20, ERC721, and more.
- Alchemy
- Etherscan - an Ethereum block explorer.
- MetaMask - an Ethereum wallet.
Set up Foundry
Before we can start writing some code, we need to set up our environment. We're going to be writing our contracts and testing them in Foundry.
🖥 Installing Foundry For MacOS / Linux:
Open-up terminal and type in the command:
curl -L https://foundry.paradigm.xyz | bash
Afterward type:
foundryup
Foundry should now be installed and ready to go!
🪟 Installing Foundry For Windows:
If using Windows, you need to install Foundry from the source. First, install Rust with the official documentation.
Then, open the command prompt and type in the command:
cargo install --git https://github.com/gakonst/foundry --bins --locked
Afterwards type:
foundryup
Foundry should now be installed and ready to go!
Make our environment
Now that we've installed Foundry, it's time to set up our folder where we will write our smart contract. From the same terminal window that you installed Foundry, type the following commands:
1. Make our folder where will we initialize our project. Then navigate into that folder with the following commands:
mkdir ERC20_Royalty && cd ERC20_Royalty
2. Initialize our Foundry project within our ERC20_Royalty folder:
forge init
3. Install Solmate into our Foundry project:
forge install rari-capital/solmate
4. Create a remappings.txt file for the Solmate library we just added:
touch remappings.txt
5. Open up your project in your IDE. For this tutorial, we’ll be using VSCode with this Solidity plugin:
code .
Here’s what our IDE looks like.
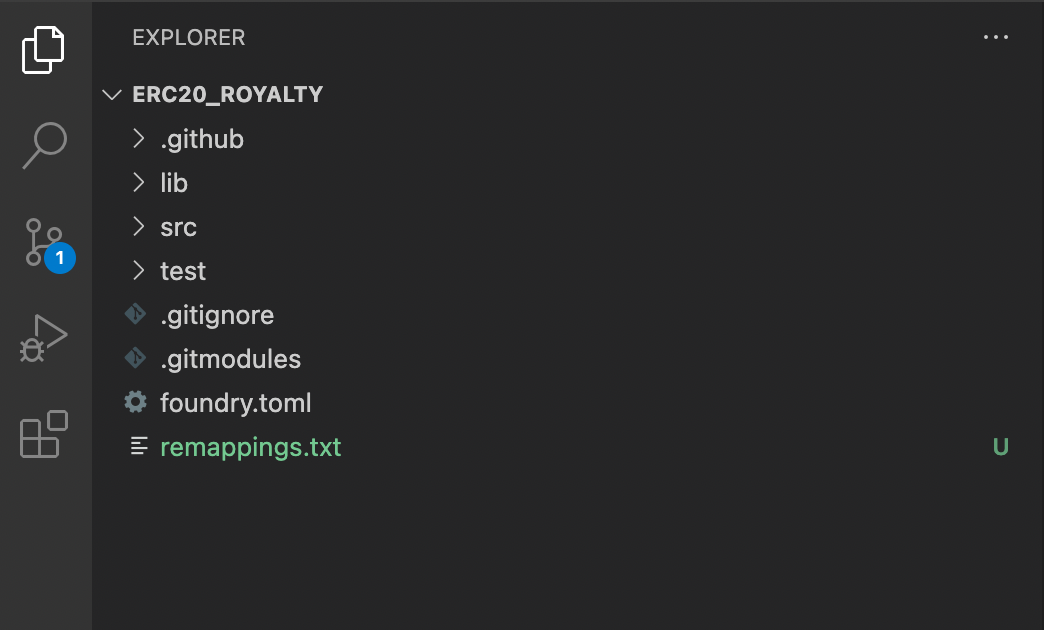
6. Add these lines to remappings.txt so we can easily call the Solmate library in our contract:
solmate/=lib/solmate/src/
forge-std=lib/forge-std/src/
Now that our environment and libraries are set up, we'll move into developing our smart contract!
Smart Contract Development
We will make a contract that passes tokens to the original contract creator whenever a token is transferred between wallets!
1. In your IDE, navigate to src/Contract.sol and rename the file to RoyaltyToken.sol.
2. In the renamed contract, update the Solidity compiler version.
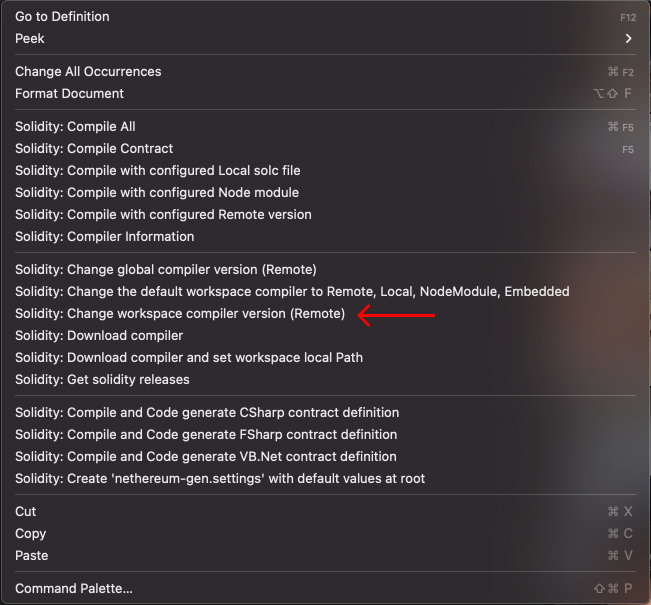
- Open
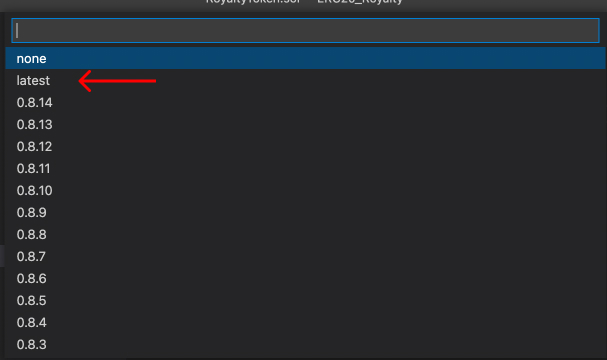
RoyaltyToken.sol, right-click anywhere on the text to open a menu, select Solidity: Change workspace compiler version (Remote), then choose latest.
3. Import the Solmate ERC20 library in RoyaltyToken.sol and change the name of the contract. Under pragma solidity ^0.8.12;, add the following lines of code:
import { ERC20 } from "solmate/tokens/ERC20.sol";

contract RoyaltyToken is ERC20 {}
4. Add in our state variables for the royalties. In the contract, add an address royaltyAddress variable and uint256 royaltyFeePercentage variable:
contract RoyaltyToken is ERC20 {
	address public royaltyAddress;
  uint256 public royaltyFeePercentage;
}
5. Make a constructor for the ERC-20 token. A constructor is what creates our token from the imported Solmate template.
Add the following variables to the constructor:
string memory _namestring memory _tokenuint8 _decimalsuint256 _royaltyFeePercentageuint256 _initialSupply
Directly after we’ve added these variables and closed the (), add ERC20(_name, _symbol, _decimals).
After the ERC20 add brackets ({}) and inside the brackets set the following variables:
- Set
royaltyAddressvariable as the wallet address of the creator of the contract:royaltyAddress = msg.sender; - The
RoyaltyFeePercentageas the constructor variable:royaltyFeePercentage = _royaltyFeePercentage; - Mint the tokens to the creator of the contract and pass in the
_initialSupplyvariable:_mint(msg.sender, _initialSupply);
Our constructor should now look like the following:
contract RoyaltyToken is ERC20 {
    address public royaltyAddress;
    uint256 public royaltyFeePercentage;

    constructor(
        string memory _name,
        string memory _symbol,
        uint8 _decimals,
        uint256 _royaltyFeePercentage,
        uint256 _initialSupply
    ) ERC20(_name, _symbol, _decimals) {
        royaltyAddress = msg.sender;
        royaltyFeePercentage = _royaltyFeePercentage;
        _mint(msg.sender, _initialSupply);
    }
}
6. Next, override the transfer function in the Solmate ERC-20 template.
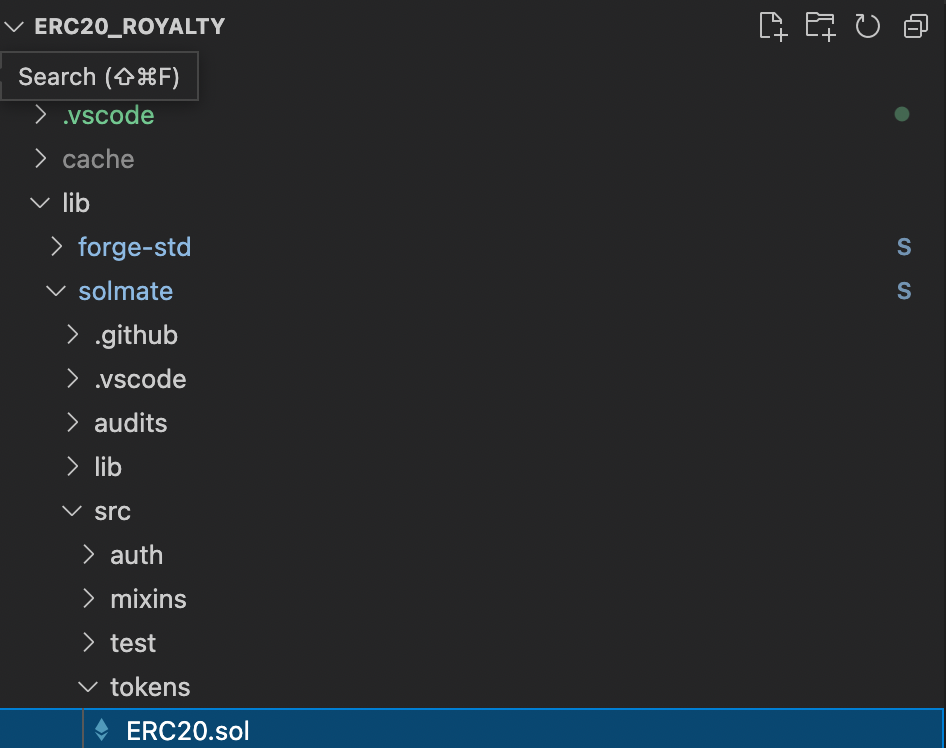
- In your IDE navigate to
ERC20_Royalty/lib/solmate/src/tokens/ERC20.sol:
- Within
ERC20.sol, find and copy the transfer function. It should look like:
function transfer(address to, uint256 amount) public virtual returns (bool) {
        balanceOf[msg.sender] -= amount;

        // Cannot overflow because the sum of all user
        // balances can't exceed the max uint256 value.
        unchecked {
            balanceOf[to] += amount;
        }

        emit Transfer(msg.sender, to, amount);

        return true;
    }
- Return to our
RoyaltyToken.solfile and paste the transfer function under the constructor.
Our contract now looks like this:
pragma solidity ^0.8.12;

import { ERC20 } from "solmate/tokens/ERC20.sol";

contract RoyaltyToken is ERC20 {
    address public royaltyAddress;
    uint256 public royaltyFeePercentage;

    constructor(
        string memory _name,
        string memory _symbol,
        uint8 _decimals,
        uint256 _royaltyFeePercentage,
        uint256 _initialSupply
    ) ERC20(_name, _symbol, _decimals) {
        royaltyAddress = msg.sender;
        royaltyFeePercentage = _royaltyFeePercentage;
        _mint(msg.sender, _initialSupply);
    }

    function transfer(address to, uint256 amount) public virtual returns (bool) {
        balanceOf[msg.sender] -= amount;

        // Cannot overflow because the sum of all user
        // balances can't exceed the max uint256 value.
        unchecked {
            balanceOf[to] += amount;
        }

        emit Transfer(msg.sender, to, amount);

        return true;
    }
}
Add override after virtual in the function declaration:
function transfer(address to, uint256 amount) public virtual override returns (bool) {
...
}
Inside of the transfer function, create a uint256 called royaltyAmount and set it equal to the amount in the function parameters multiplied by the royaltyFeePercentage divided by 100. This calculates the royalty amount that we will be sending to our royaltyAddress.
uint256 royaltyAmount = amount * royaltyFeePercentage / 100;
function transfer(address to, uint256 amount) public virtual returns (bool) {
        uint256 royaltyAmount = amount * royaltyFeePercentage / 100;
	balanceOf[msg.sender] -= amount;

        // Cannot overflow because the sum of all user
        // balances can't exceed the max uint256 value.
        unchecked {
            balanceOf[to] += amount;
        }

        emit Transfer(msg.sender, to, amount);

        return true;
    }
In the unchecked {} for the balanceOf[to], subtract the amount by the royaltyAmount and add an additional balanceOf[royaltyAddress] where we add the royaltyAmount:
function transfer(address to, uint256 amount) public virtual returns (bool) {
        uint256 royaltyAmount = amount * royaltyFeePercentage / 100;
				balanceOf[msg.sender] -= amount;

        // Cannot overflow because the sum of all user
        // balances can't exceed the max uint256 value.
        unchecked {
						//subtract the amount by the royalty amount
            balanceOf[to] += amount - royaltyAmount;
						//add to the royaltyAddress wallet the royaltyAmount
						balanceOf[royaltyAddress] += royaltyAmount;
        }

        emit Transfer(msg.sender, to, amount);

        return true;
    }
Add an additional emit Transfer where we send the royaltyAddress the royaltyAmount. Additionally, subtract the original emit Transfer amount by the royaltyAmount:
function transfer(address to, uint256 amount) public virtual override returns (bool) {
        uint256 royaltyAmount = amount * royaltyFeePercentage / 100;

				balanceOf[msg.sender] -= amount;

        // Cannot overflow because the sum of all user
        // balances can't exceed the max uint256 value.

        unchecked {
						//subtract the amount by the royalty amount
            balanceOf[to] += amount - royaltyAmount;
						//add to the royaltyAddress wallet the royaltyAmount
            balanceOf[royaltyAddress] += royaltyAmount;
        }
        //transfer to the royalty address
        emit Transfer(msg.sender, royaltyAddress, royaltyAmount);
        //transfer to the original address
        emit Transfer(msg.sender, to, amount - royaltyAmount);

        return true;
    }
7. Our contract is now finished! In total it should look like this:
pragma solidity 0.8.14;

import { ERC20 } from "solmate/tokens/ERC20.sol";

contract RoyaltyToken is ERC20 {

    address public royaltyAddress;
    uint256 public royaltyFeePercentage;

    constructor(
        string memory _name,
        string memory _symbol,
        uint8 _decimals,
        uint256 _royaltyFeePercentage,
        uint256 _initialSupply
    ) ERC20(_name, _symbol, _decimals) {
        royaltyAddress = msg.sender;
        royaltyFeePercentage = _royaltyFeePercentage;
        _mint(msg.sender, _initialSupply);
    }

    function transferWithRoyalty (address to, uint256 amount) public returns (bool) {
        uint256 royaltyAmount = amount * royaltyFeePercentage / 100;

        transfer(royaltyAddress, royaltyAmount);

        transfer(to, amount - royaltyAmount);

        return true;
    }

    function transfer(address to, uint256 amount) public virtual override returns (bool) {
        uint256 royaltyAmount = amount * royaltyFeePercentage / 100;

        balanceOf[msg.sender] -= amount;

        // Cannot overflow because the sum of all user
        // balances can't exceed the max uint256 value.
        unchecked {
            balanceOf[to] += amount - royaltyAmount;
            balanceOf[royaltyAddress] += royaltyAmount;
        }
        //transfer to the royalty address
        emit Transfer(msg.sender, royaltyAddress, royaltyAmount);
        //transfer to the original address
        emit Transfer(msg.sender, to, amount - royaltyAmount);

        return true;
    }
}
8. Now, let’s compile our contract. Open up that terminal window we used earlier and type the command forge build .
forge build
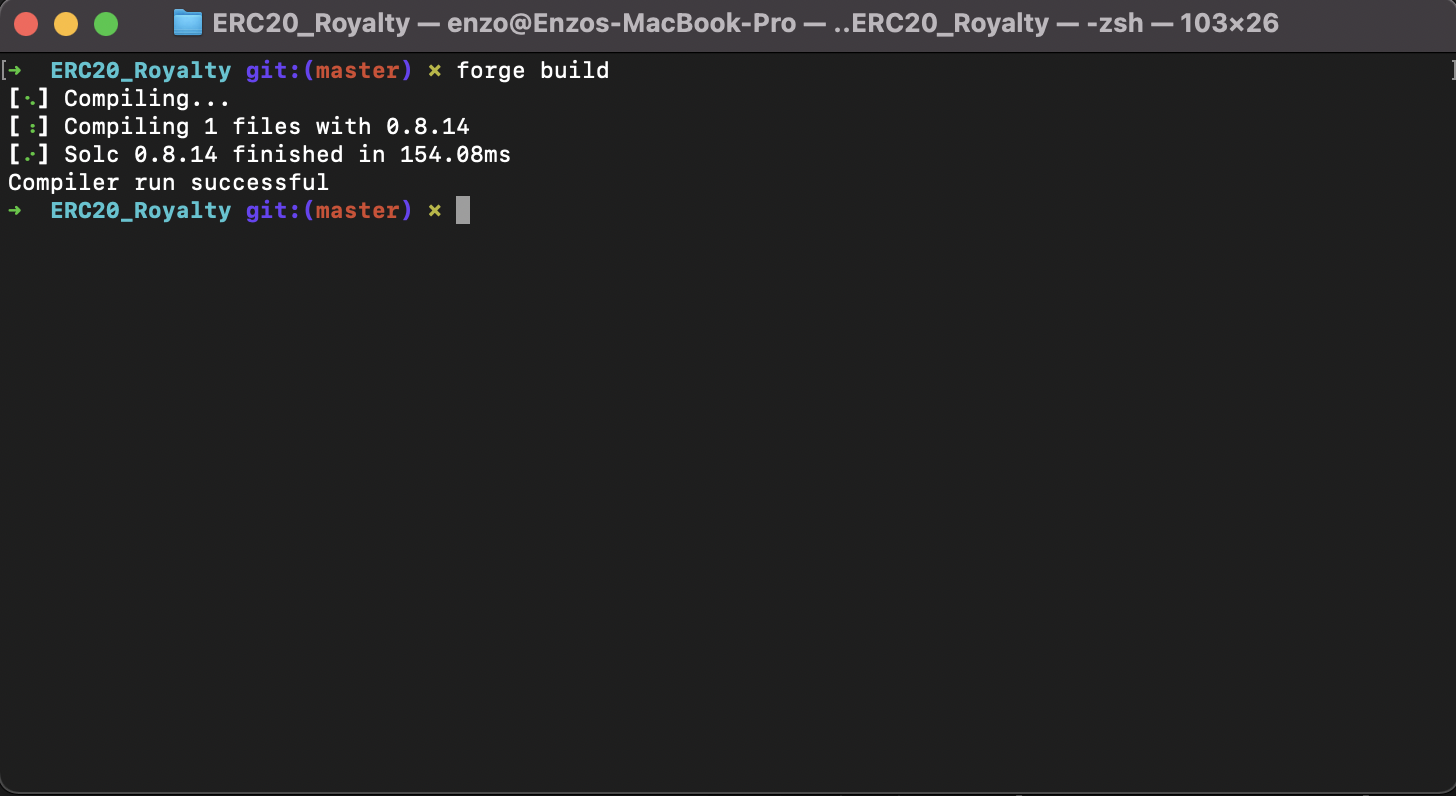
Our smart contract is finished and is correctly compiling! Now let's test our smart contract to make sure it's actually doing what we want it to do.
Testing Our Smart Contract
Thanks to Foundry, we can test our new RoyaltyToken.sol contract in Solidity!
Set up your test contract
1. In your IDE, head to test/Contract.t.sol and rename the file to RoyaltyToken.t.sol.
2. Delete everything in the original body of RoyaltyToken.t.sol.
3. Add our solidity version to the top: pragma solidity ^0.8.12;.
4. Import the RoyaltyToken from .royaltyToken.sol. Add import {RoyaltyToken} from "src//RoyaltyToken.sol"; to the top of your contract.
5. Import forge testing tools: import "forge-std/Test.sol";.
6. Make a new contract called RoyaltyTokenTest and set it to a Test. Our contract should look like this.
pragma solidity ^0.8.12;

import {RoyaltyToken} from "src//RoyaltyToken.sol";

import "forge-std/Test.sol";

contract RoyaltyTokenTest is Test {}
Create your test contract
1. Create your RoyaltyToken, RoyaltyFeePercentage, and InitialSupply arguments. For this test, we will be using 2% for the fee and 10,000 initial tokens:
pragma solidity ^0.8.12;

import {RoyaltyToken} from "src//RoyaltyToken.sol";

import "forge-std/Test.sol";

contract RoyaltyTokenTest is Test {
	RoyaltyToken public token;
  uint256 public royaltyFeePercentage = 2;
  uint256 public initialSupply = 10 ** 4;
}
2. Create a setUp() function that constructs our RoyaltyToken.
pragma solidity ^0.8.12;

import {RoyaltyToken} from "src//RoyaltyToken.sol";

import "forge-std/Test.sol";

contract RoyaltyTokenTest is Test {
	RoyaltyToken public token;
  uint256 public royaltyFeePercentage = 2;
  uint256 public initialSupply = 10 ** 4;

	function setUp() public {
       token = new RoyaltyToken("RoyaltyToken", "ROYT", 18, royaltyFeePercentage, initialSupply);
    }

}
3. Create a testTransfer() function that makes two dummy addresses and transfers funds between them. We will transfer 1,000 of the 10,000 tokens we created to an address. We're then going to check whether the address received 980 of those 1,000 tokens and whether our original contract address received the other 20. Afterward, we will initiate a transfer of 100 tokens between the newly created address and another wallet. We'll then check whether all 3 of the wallets have the correct amounts.
function testTransfer() public {
        address alice = address(1);
        address bob = address(2);

        token.transfer(alice, 1000);

        assertEq(token.balanceOf(alice), 980);
        assertEq(token.balanceOf(address(this)), 9020);

        hoax(alice);
        token.transfer(bob, 100);

        assertEq(token.balanceOf(alice), 880);
        assertEq(token.balanceOf(bob), 98);
        assertEq(token.balanceOf(address(this)), 9022);
    }
4. Our entire contract should look like this:
pragma solidity ^0.8.12;

import {RoyaltyToken} from "src//RoyaltyToken.sol";

import "forge-std/Test.sol";

contract RoyaltyTokenTest is Test {
    RoyaltyToken public token;
    uint256 public royaltyFeePercentage = 2;
    uint256 public initialSupply = 10 ** 4;


    function setUp() public {
       token = new RoyaltyToken("RoyaltyToken", "ROYT", 18, royaltyFeePercentage, initialSupply);
    }

    function testTransfer() public {
        address alice = address(1);
        address bob = address(2);

        token.transfer(alice, 1000);

        assertEq(token.balanceOf(alice), 980);
        assertEq(token.balanceOf(address(this)), 9020);

        hoax(alice);
        token.transfer(bob, 100);

        assertEq(token.balanceOf(alice), 880);
        assertEq(token.balanceOf(bob), 98);
        assertEq(token.balanceOf(address(this)), 9022);
    }
}
5. Open up terminal and run forge test. This runs our tests and helps us understand whether or not they passed.
Hint
If your tests are failing, run
forge test -vvvto see more information about errors.
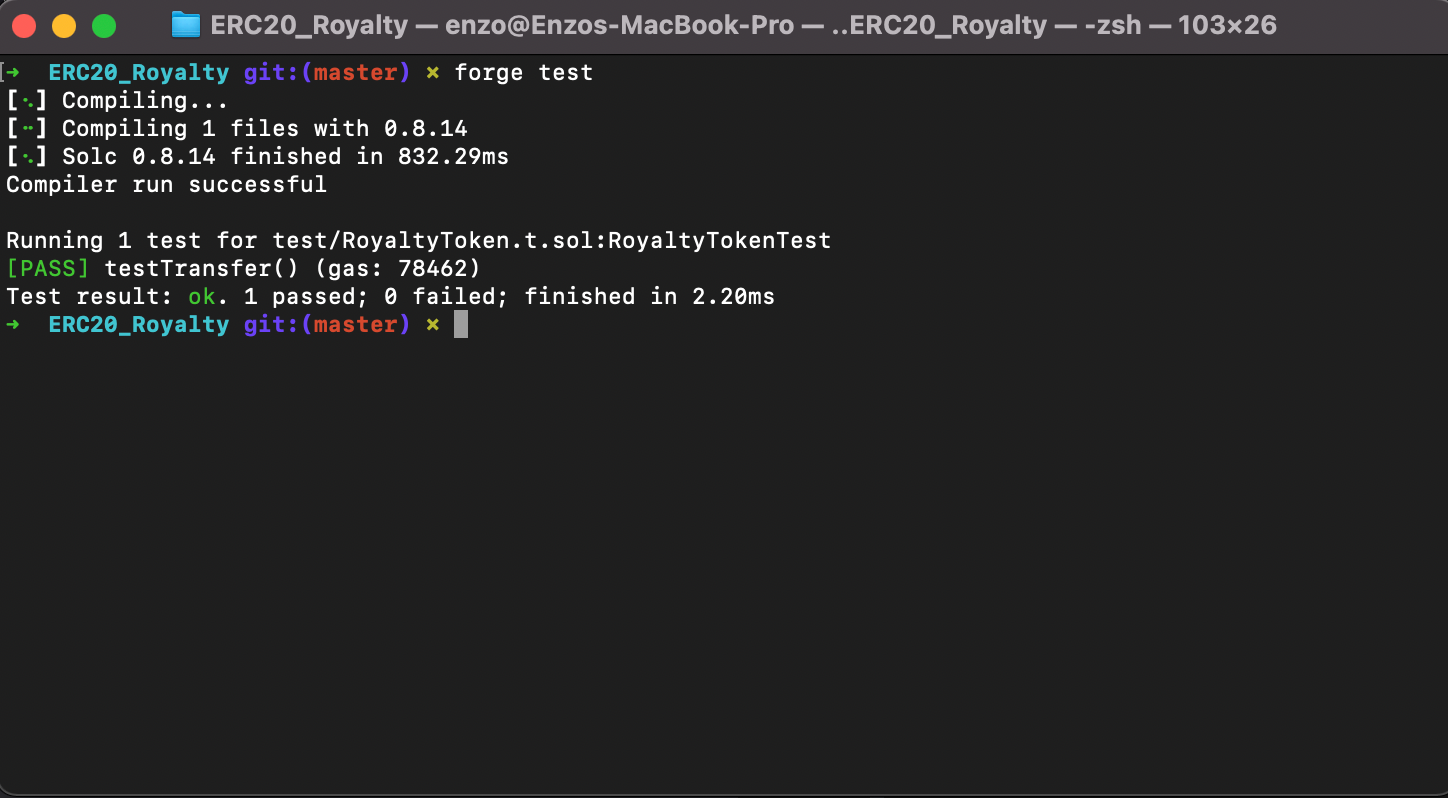
If all goes well, you've just successfully made a new ERC-20, overrode the original transfer function, and ran some successful tests! Now, it's time to deploy the contract.
Deploying Our Smart Contract To The Blockchain
It's time for us to deploy our smart contract to the blockchain. First, we're going to set up MetaMask, and then we're going to connect to the blockchain using Alchemy!
🦊 Setting up MetaMask
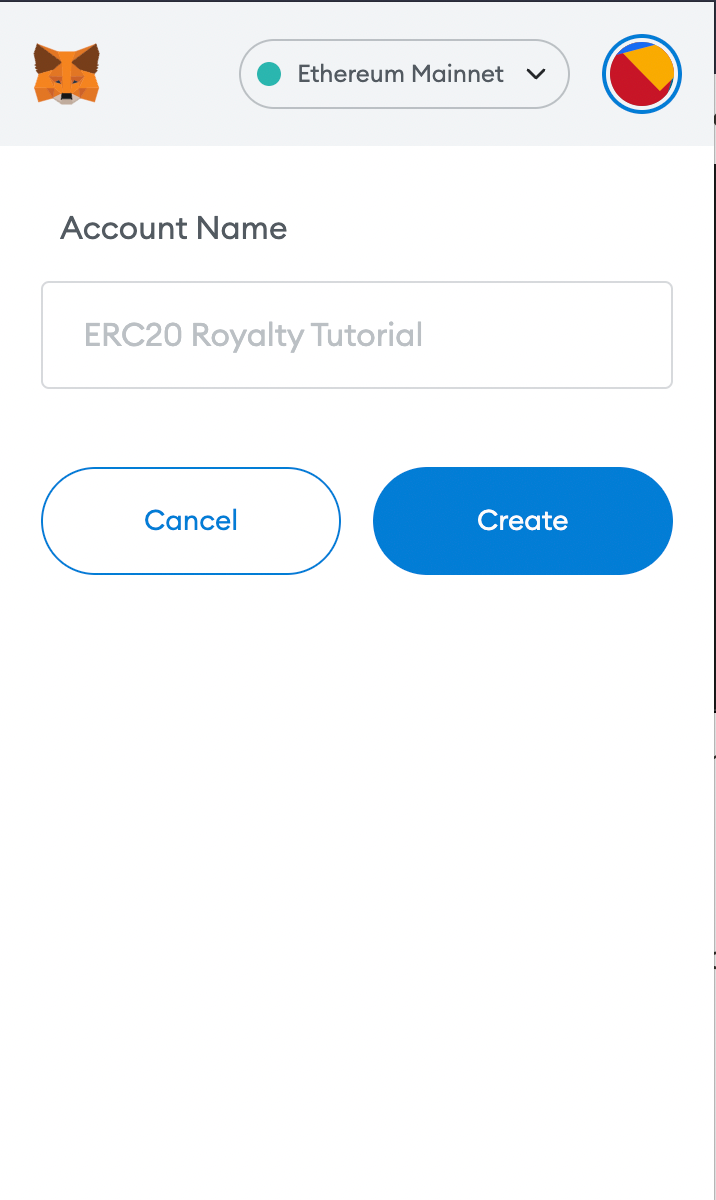
- Create a new or use an existing MetaMask account for this tutorial.
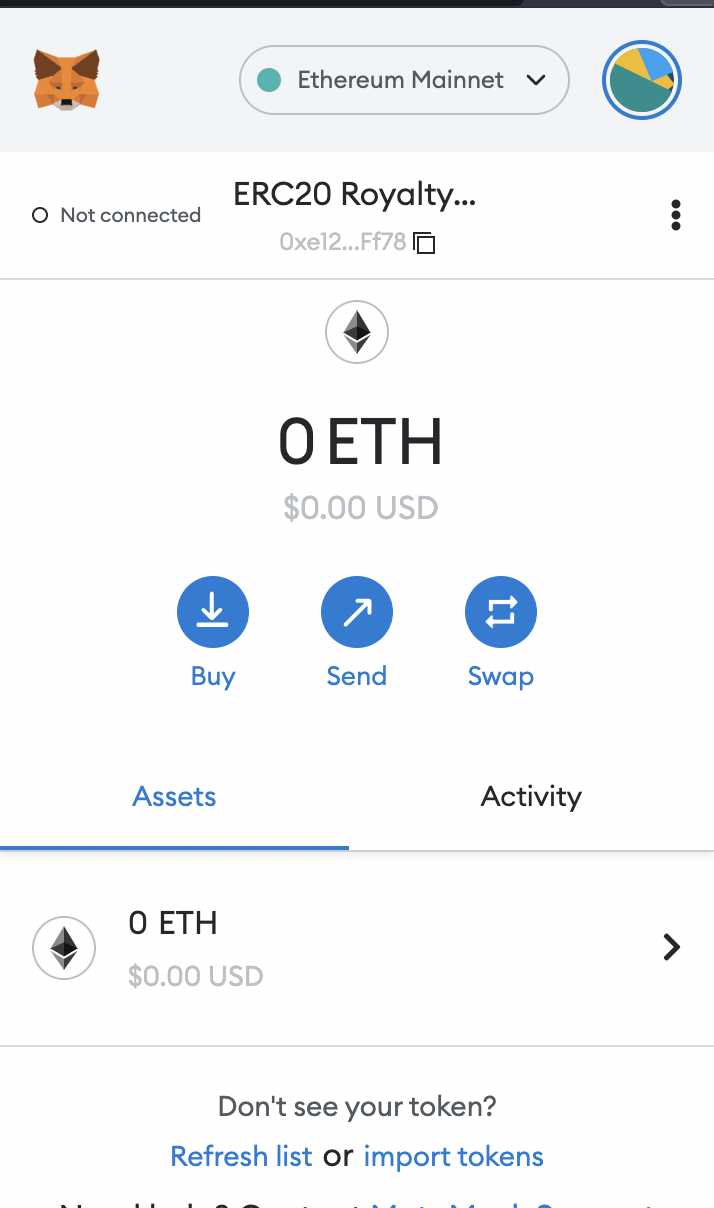
2. Record the public address of your MetaMask. For our tutorial, the public address is 0xe12348749f47375d2102f3DCEbC9b70c202cFf78.
3. Click the 3 vertical dots menu, click Account details, then click Export private key. Enter your password and save your private key for later.
Caution
Never share your private key with anyone. This tutorial shows you a private key for the sake of example, but this wallet was freshly created with no funds.
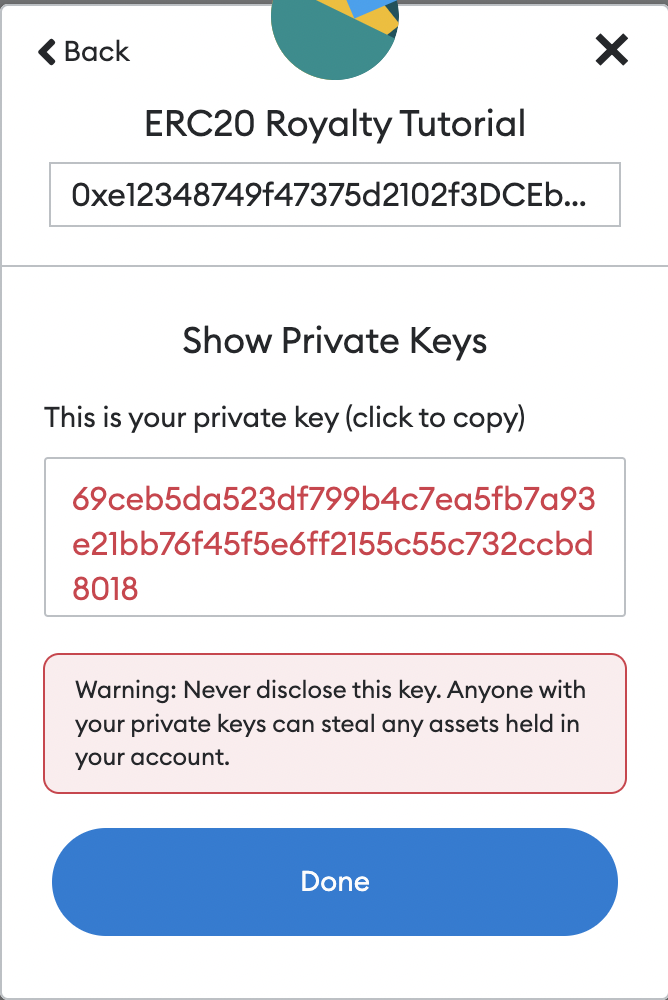
Now that we've set up our MetaMask, we'll now connect to the blockchain using Alchemy.
🧙 Connecting To Alchemy
1. The first thing that we need to do is get an RPC endpoint from Alchemy. Head over to Alchemy.com and make an account.
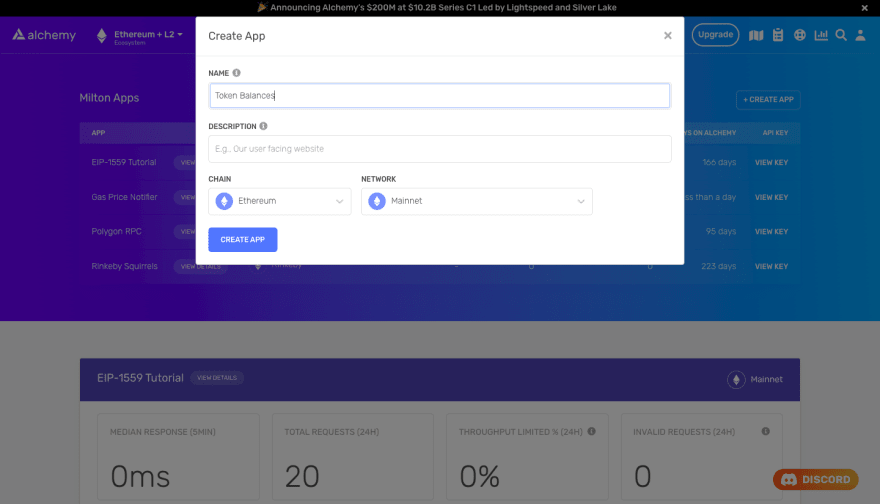
2. You should then be taken to the dashboard! Click on +Create App.
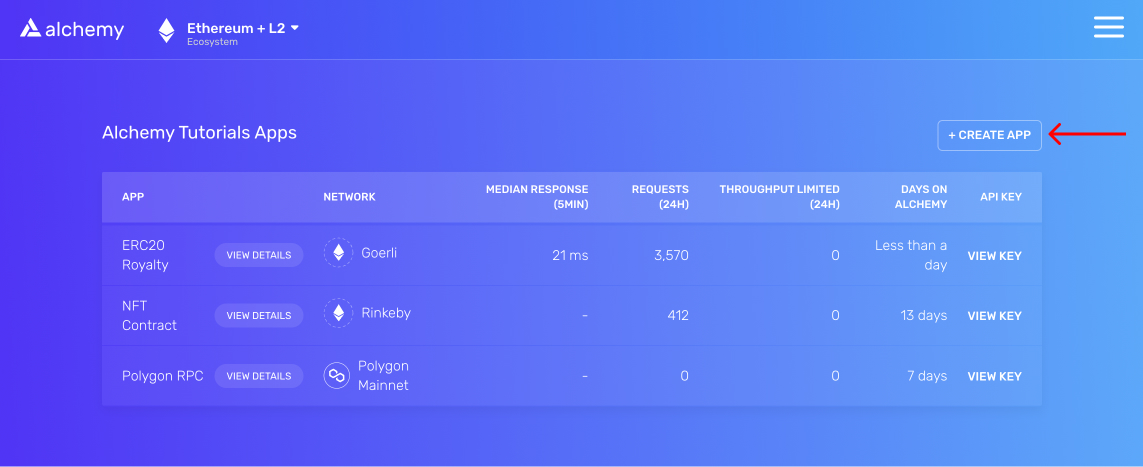
3. Fill in the Create App Info like below:

4. Click on the new app you created and navigate to this page. It should look like this:
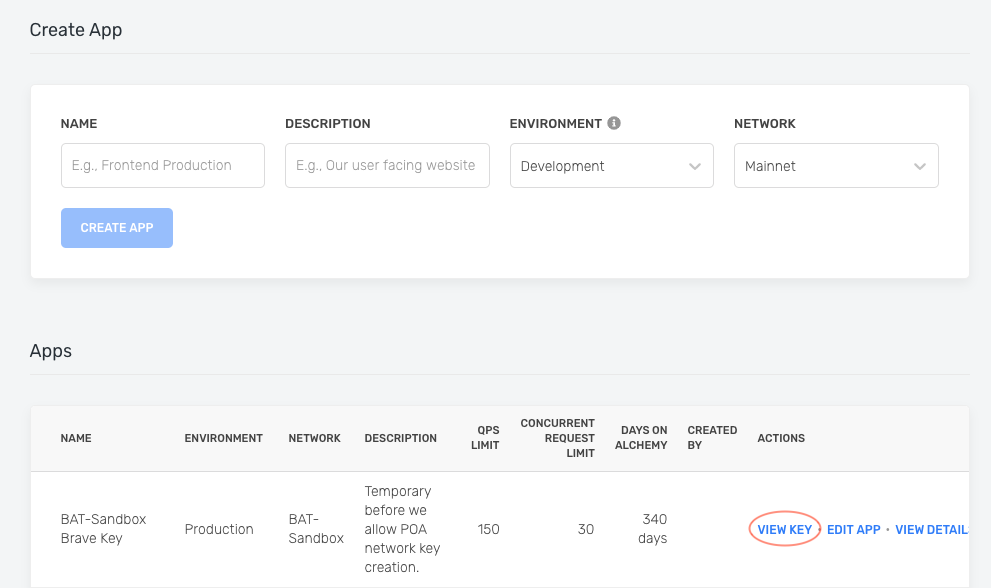
5. Click on VIEW KEY. Copy down the HTTPS key.
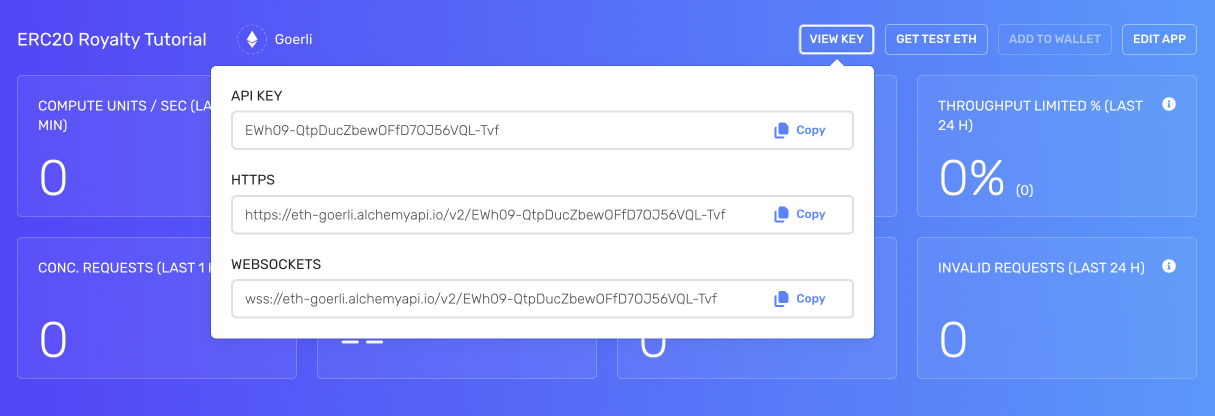
7. Open up your MetaMask extension and click on the Ethereum Mainnet toggle dropdown.
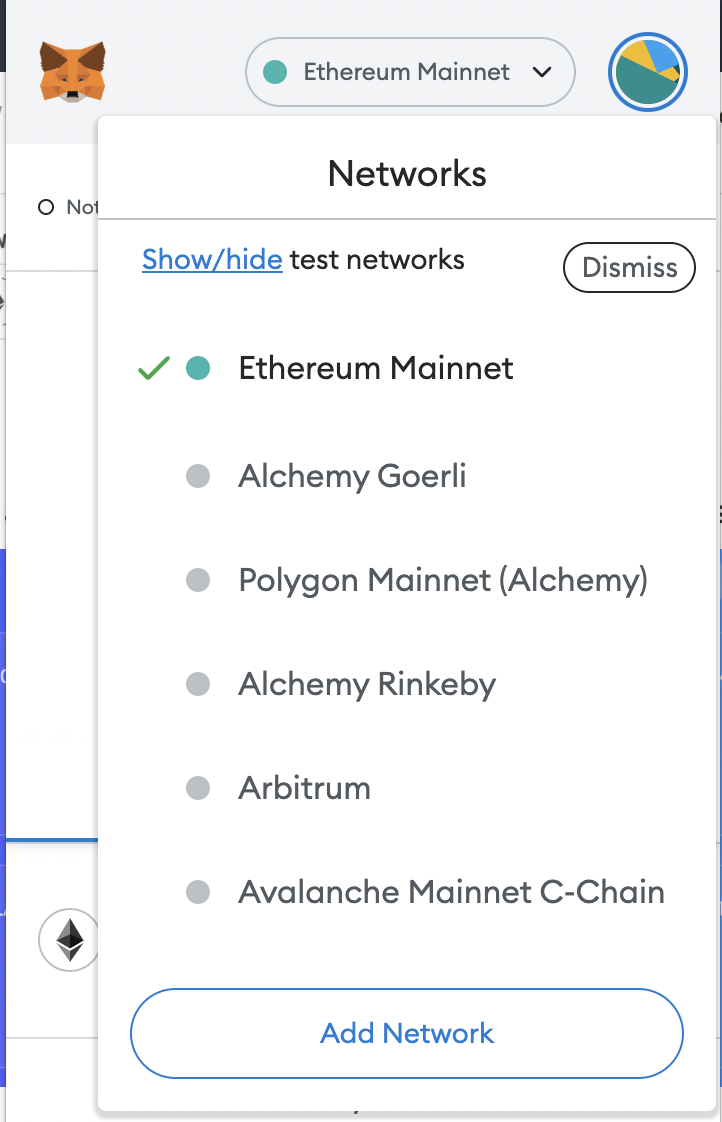
Hit Add Network and fill in the form with the following fields:
- Network Name: Alchemy Goerli
- New RPC URL: Your HTTPS key
- Chain ID: 5
- Currency Symbol: ETH
Hit save and switch your network to Alchemy Goerli.
8. Go back to the Alchemy dashboard and click Get Test Eth.

From goerlifaucet.com, enter your public address that we wrote down earlier and click Send Me ETH.
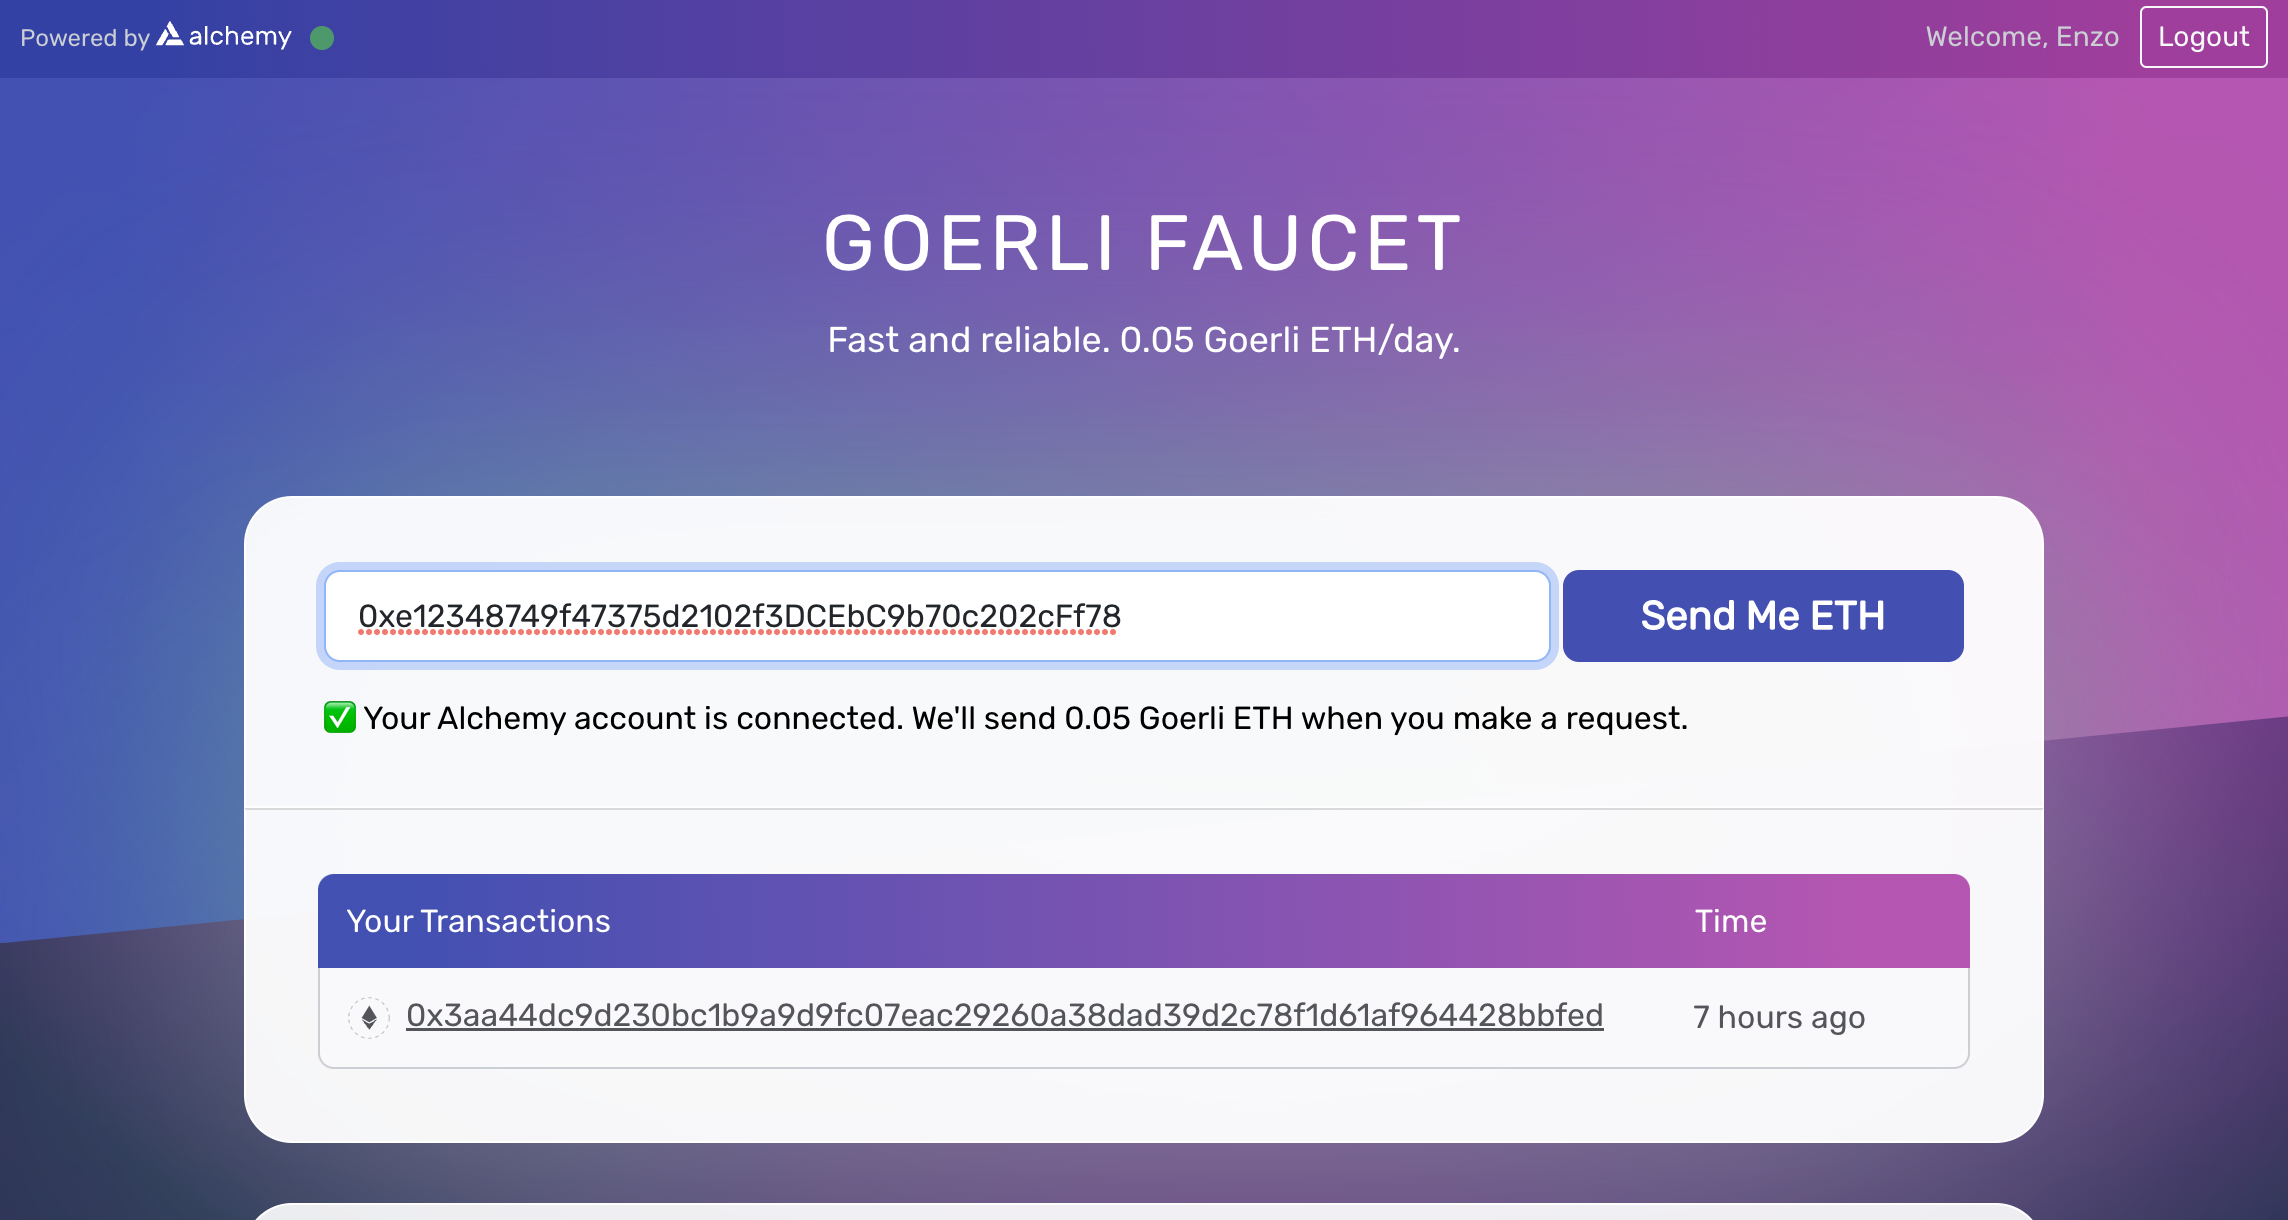
Afterward, check that you received your Goerli Test ETH. You should have .05 ETH in your MetaMask.
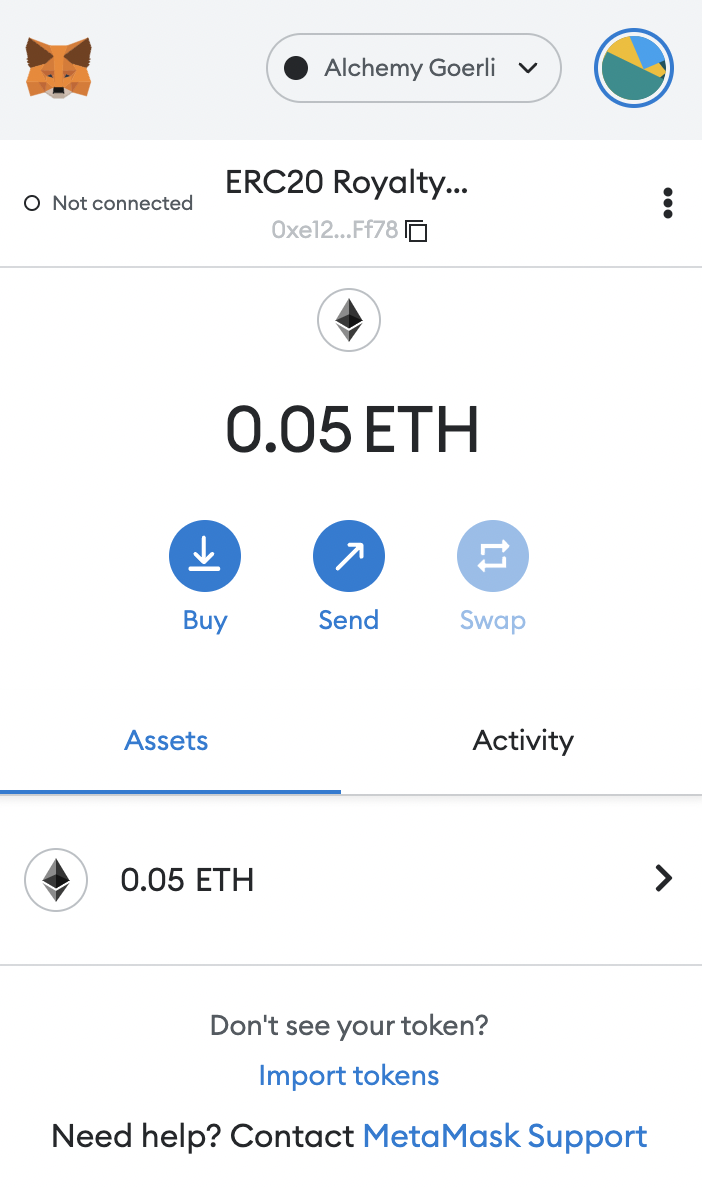
We've now successfully set up our MetaMask, created an Alchemy dApp, and funded our MetaMask with test ETH! We've got everything we need to deploy our contract to the blockchain now.
⚡️ Deploying Our Contract
Head back to your terminal window to complete deployment.
1. **** Open up the terminal and type the following command, replacing [PASTE YOUR RPC URL HERE] and [PASTE YOUR PRIVATE KEY HERE] with the HTTP key from your Alchemy app and MetaMask private key respectively:
forge create --rpc-url [PASTE YOUR RPC URL HERE] --private-key [PASTE YOUR PRIVATE KEY HERE] src/RoyaltyToken.sol:RoyaltyToken --constructor-args "RoyaltyToken" "ROYT" 18 2 1000000000000000000000
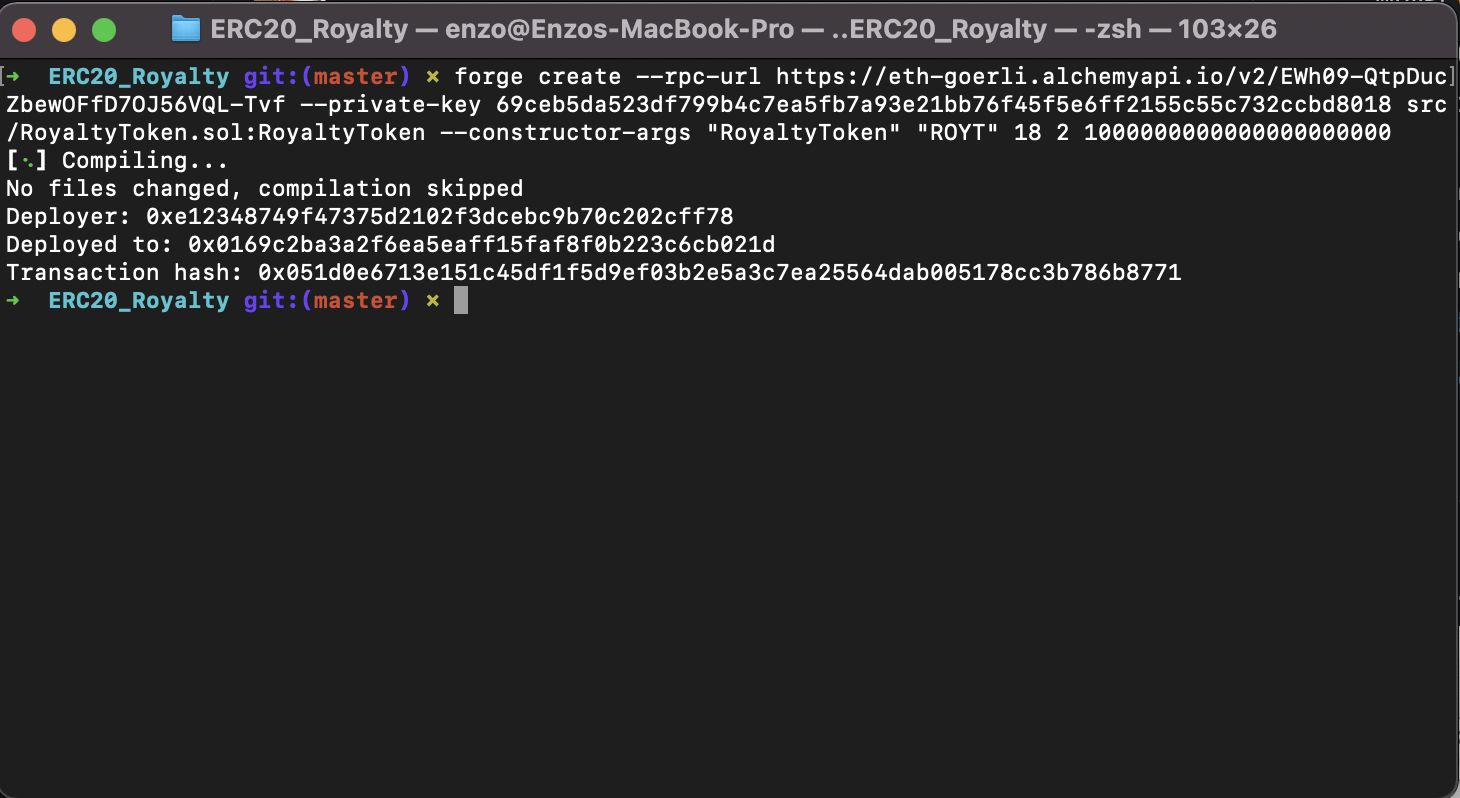
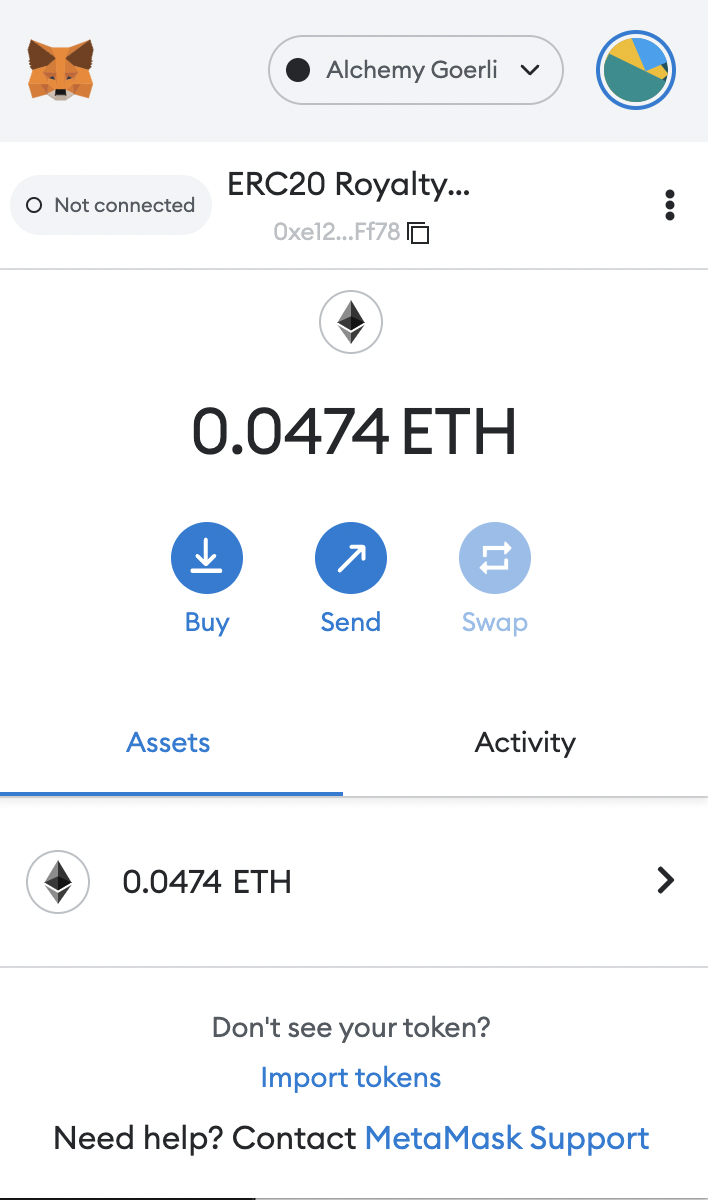
We can now see that our contract is deployed to the blockchain! If I copy the address in Deployed to, we can view the contract on Etherscan! Similarly, if you check your MetaMask, we can see that we no longer have .05 ETH since we used some ETH to pay for the gas to deploy our contract.
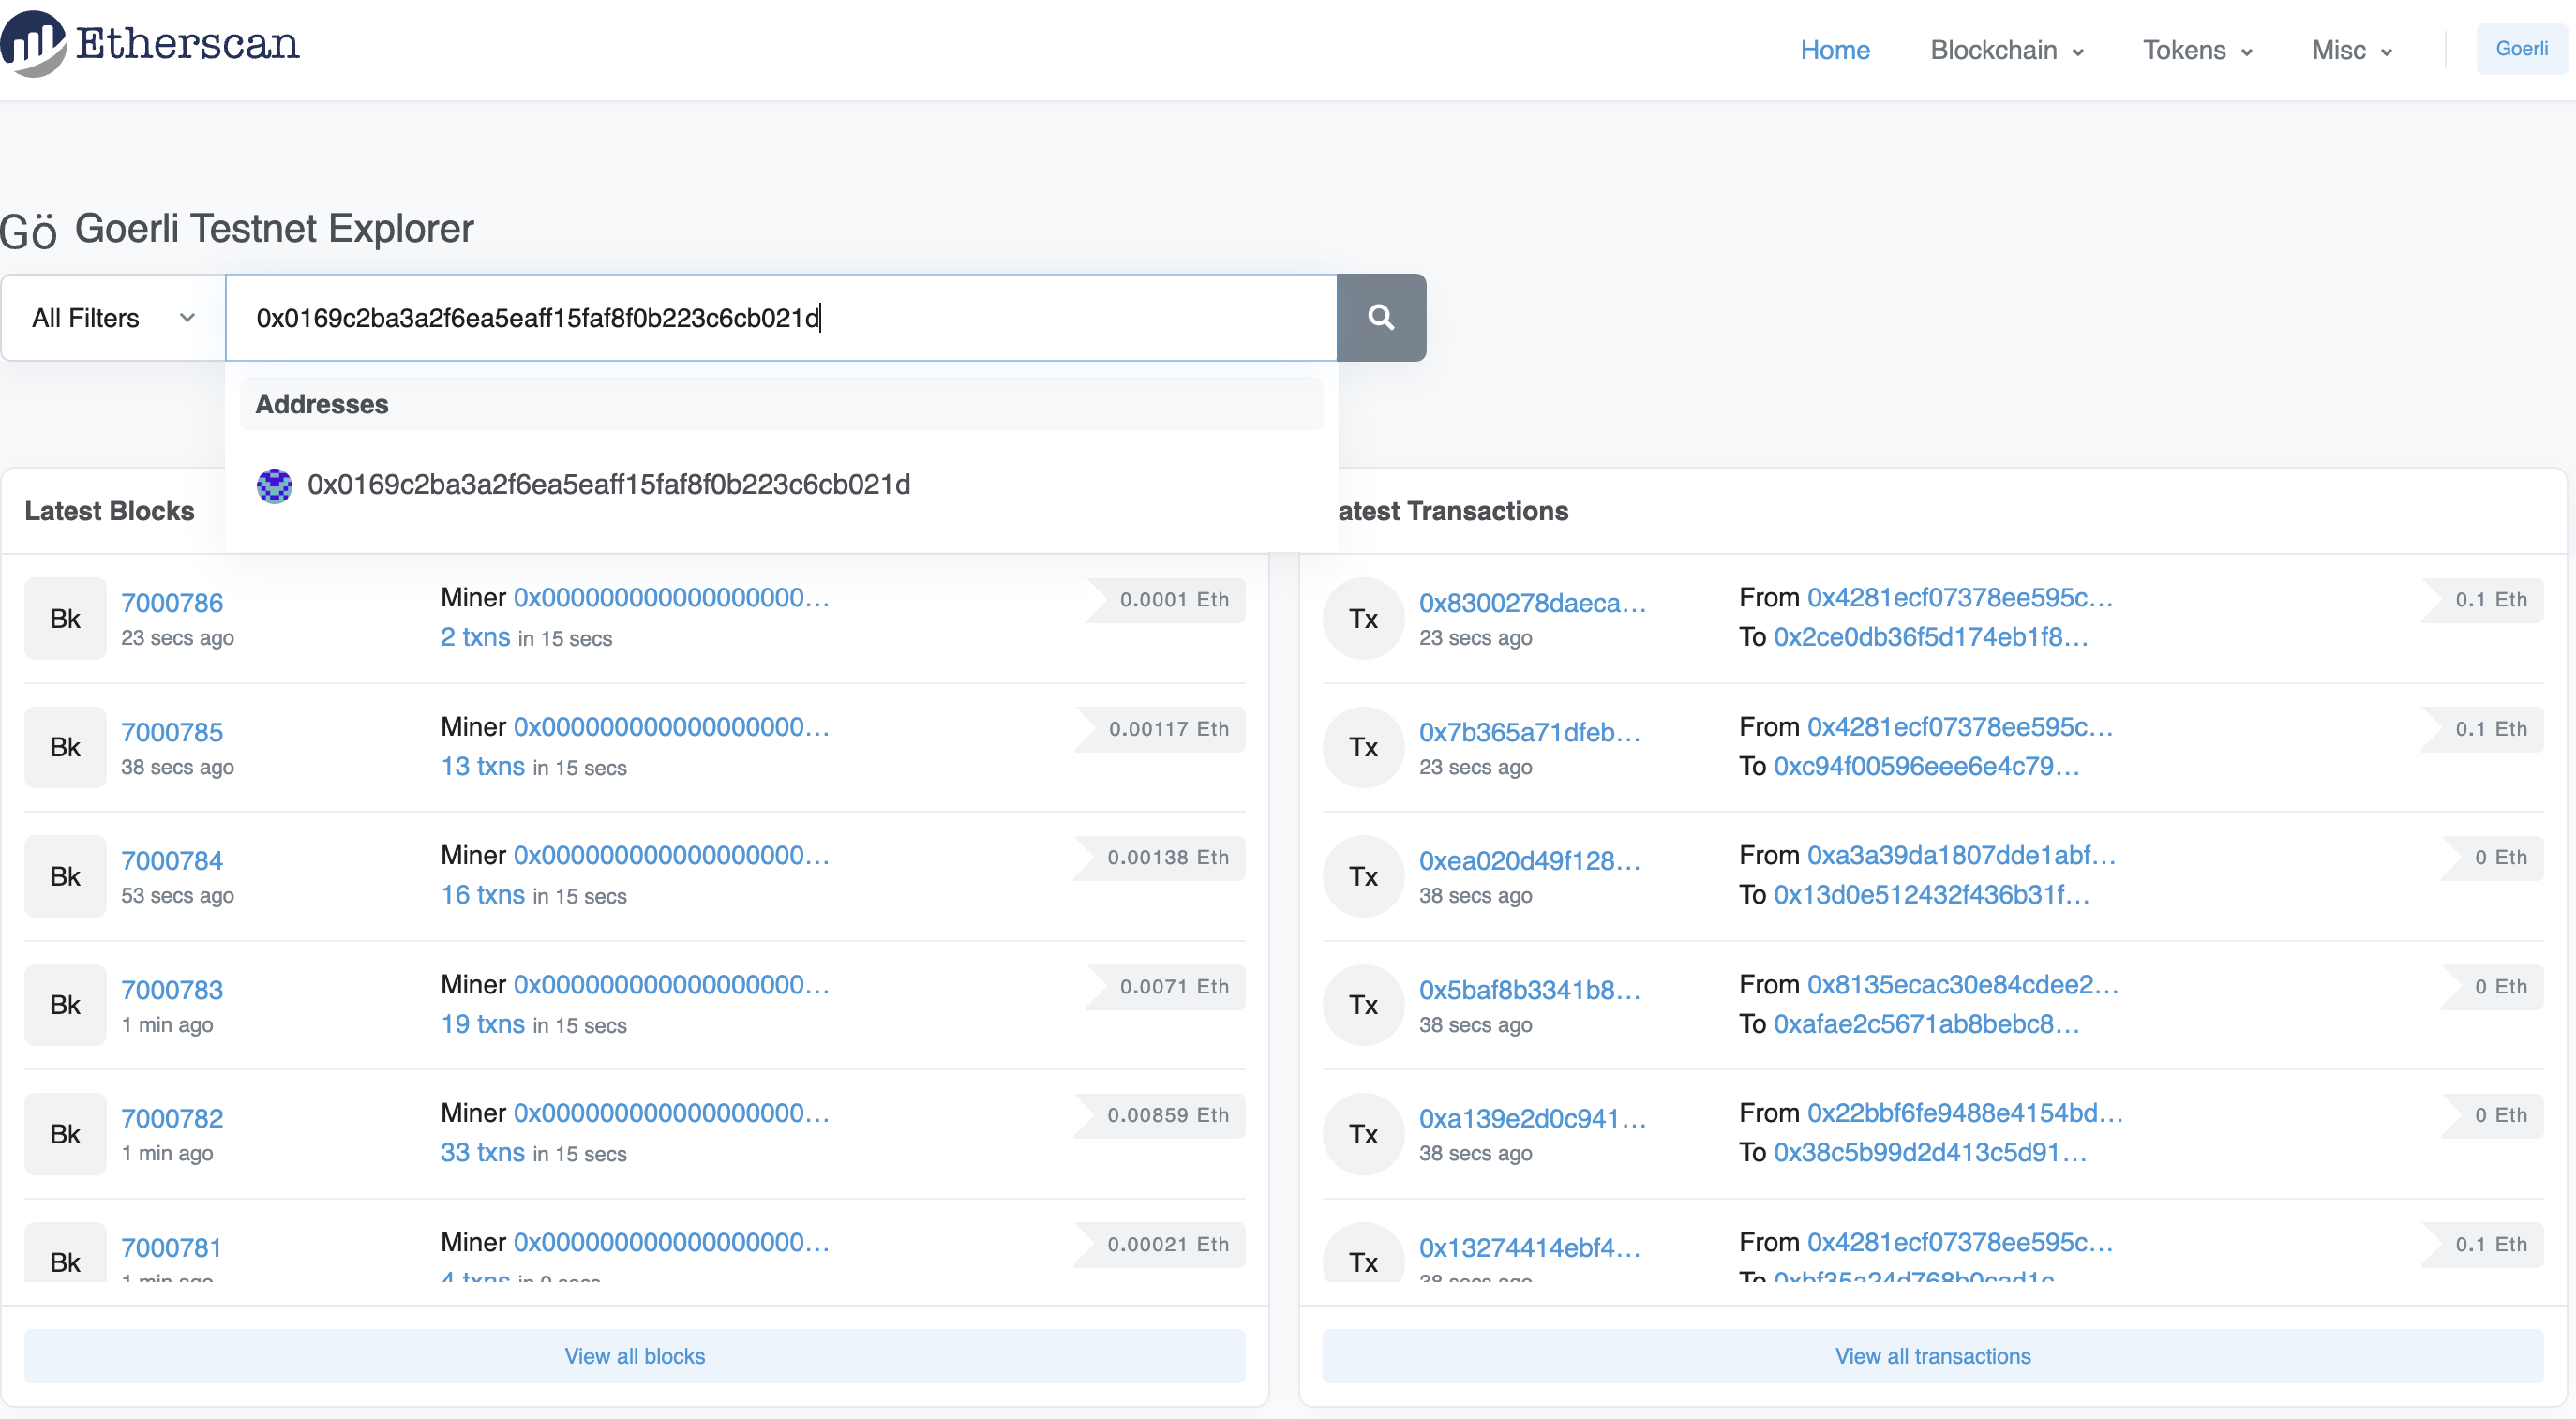
2. Go to goerli.etherscan.com and paste your deployed contract into the Goreli explorer. Click the search icon and paste the contract address that we got from our terminal before.
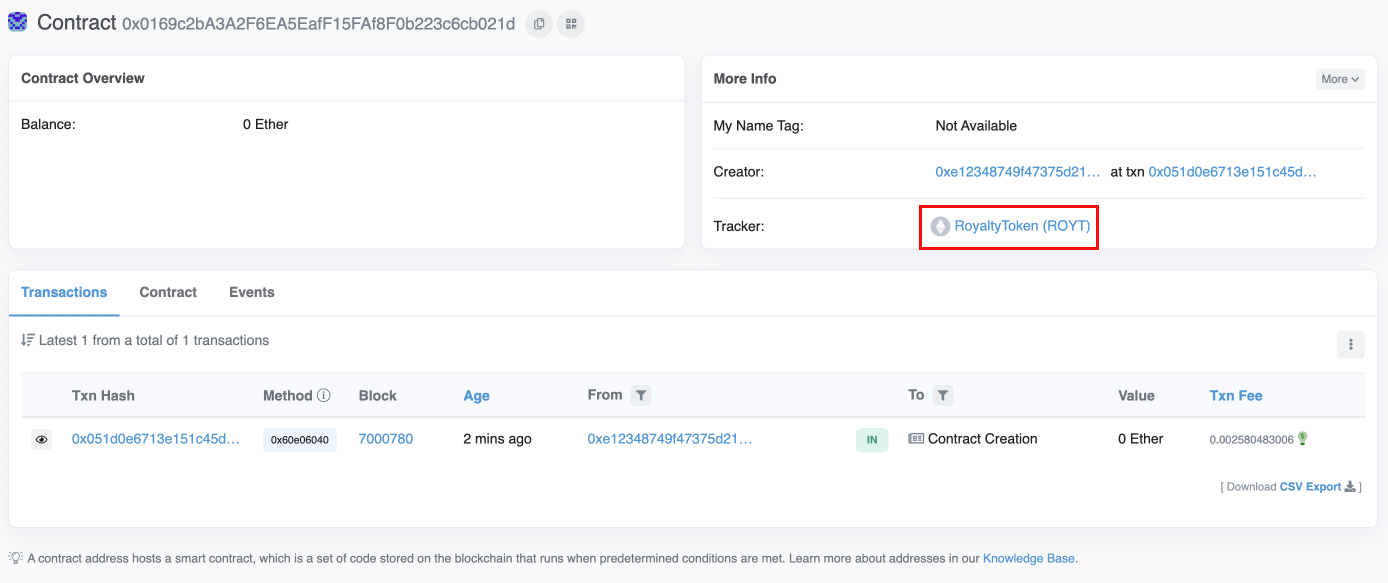
3. Click on RoyaltyToken (ROYT).
4. Copy the contract address and open up your MetaMask.
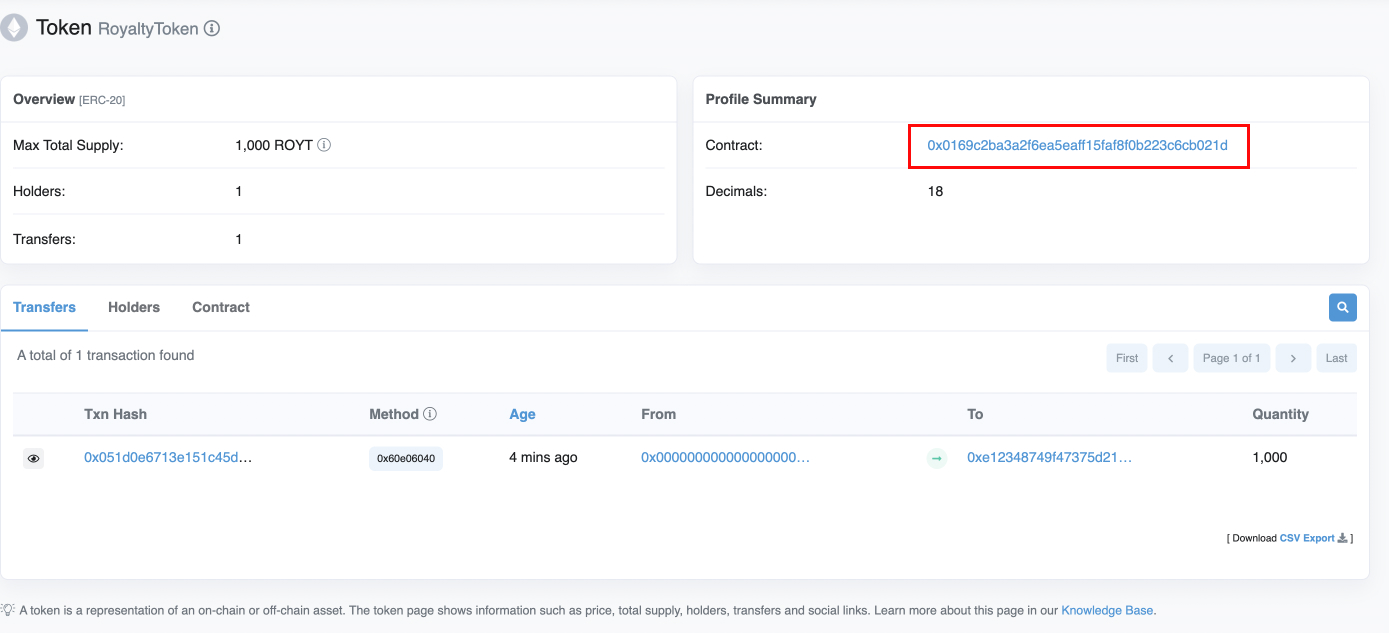
In MetaMask, click Import tokens and paste the contract address. Then click Add Custom Token.
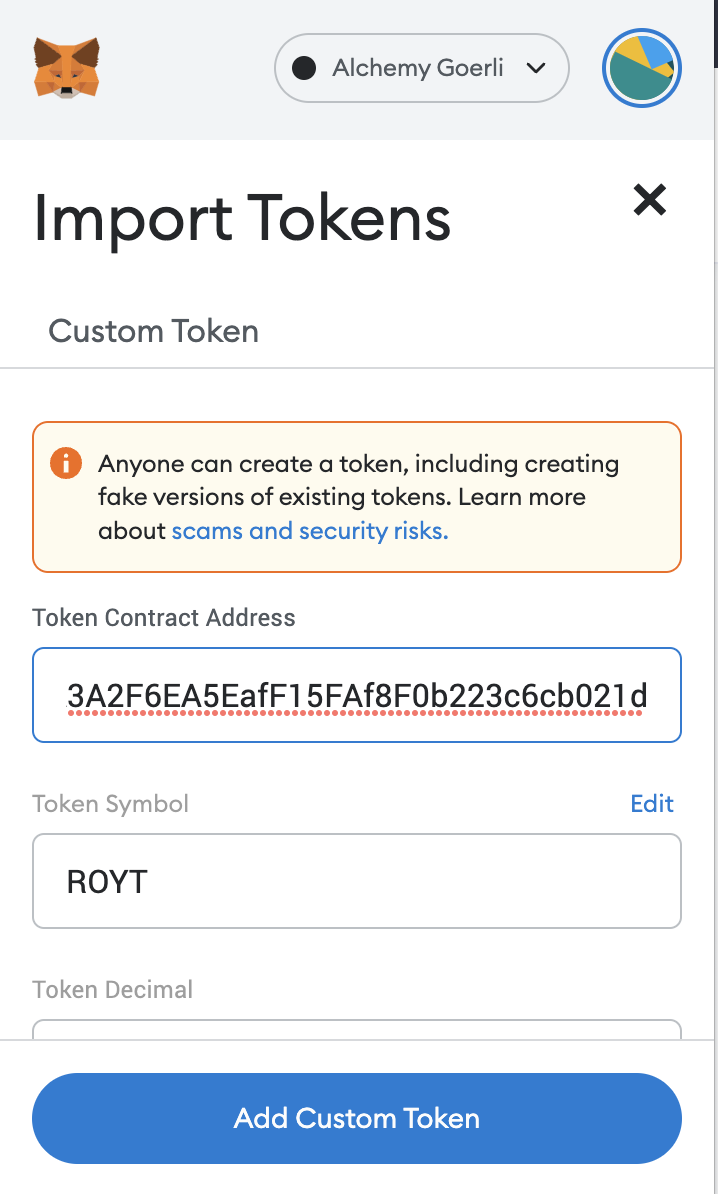
5. We now have the Royalty Tokens in our MetaMask! These can be sent to any wallet address on the Goerli network. If another wallet sends the ROYT token to any other wallet, we will always get 2% of the amount sent!
Conclusion
In this tutorial, we installed Forge, added the Solmate library, created a custom ERC20 token with royalties built-in, set up a MetaMask account, connected it to the Goerli test network, filled it up with some test ETH, created an Alchemy dApp, deployed our contract to the blockchain, and saw our token in our wallet!
If you made it this far, thank you for finishing this tutorial!
Updated over 2 years ago
