Part 2: How to Create an NFT Game Frontend
Learn how to create a Next.js frontend that powers an on-chain game similar to Cryptokitties and Axie Infinity
In the last tutorial on Part 1: How to Create an NFT Game Smart Contract, we leveraged Hardhat, Solidity, and Alchemy to deploy an NFT game smart contract that allowed users to breed and collect creatures called Alchemon.

Cryptokitties, a breeding game that Alchemon is based on
In this tutorial, we will build a frontend using Next.js that is capable of interacting with our smart contract and allows users to breed and view their Alchemons directly from a web app. In case you haven't already, we suggest that you complete Part I of the tutorial first before proceeding with Part II.
About the Frontend
Through our game's frontend, users will be able to do the following:
- Breed new Alchemons using the Alchemons they already have (genesis or otherwise).
- View all the Alchemons they own.
- View all other projects created by the creators of Alchemon.
- View a few sample Alchemons.
We will achieve this by interfacing with our smart contract using ethers, wagmi, and Alchemy. Additionally, we will use the Alchemy NFT API to easily extract useful data such as NFT ownership and metadata.
Creating the NFT Game Frontend
Step 1: Create an Alchemy App
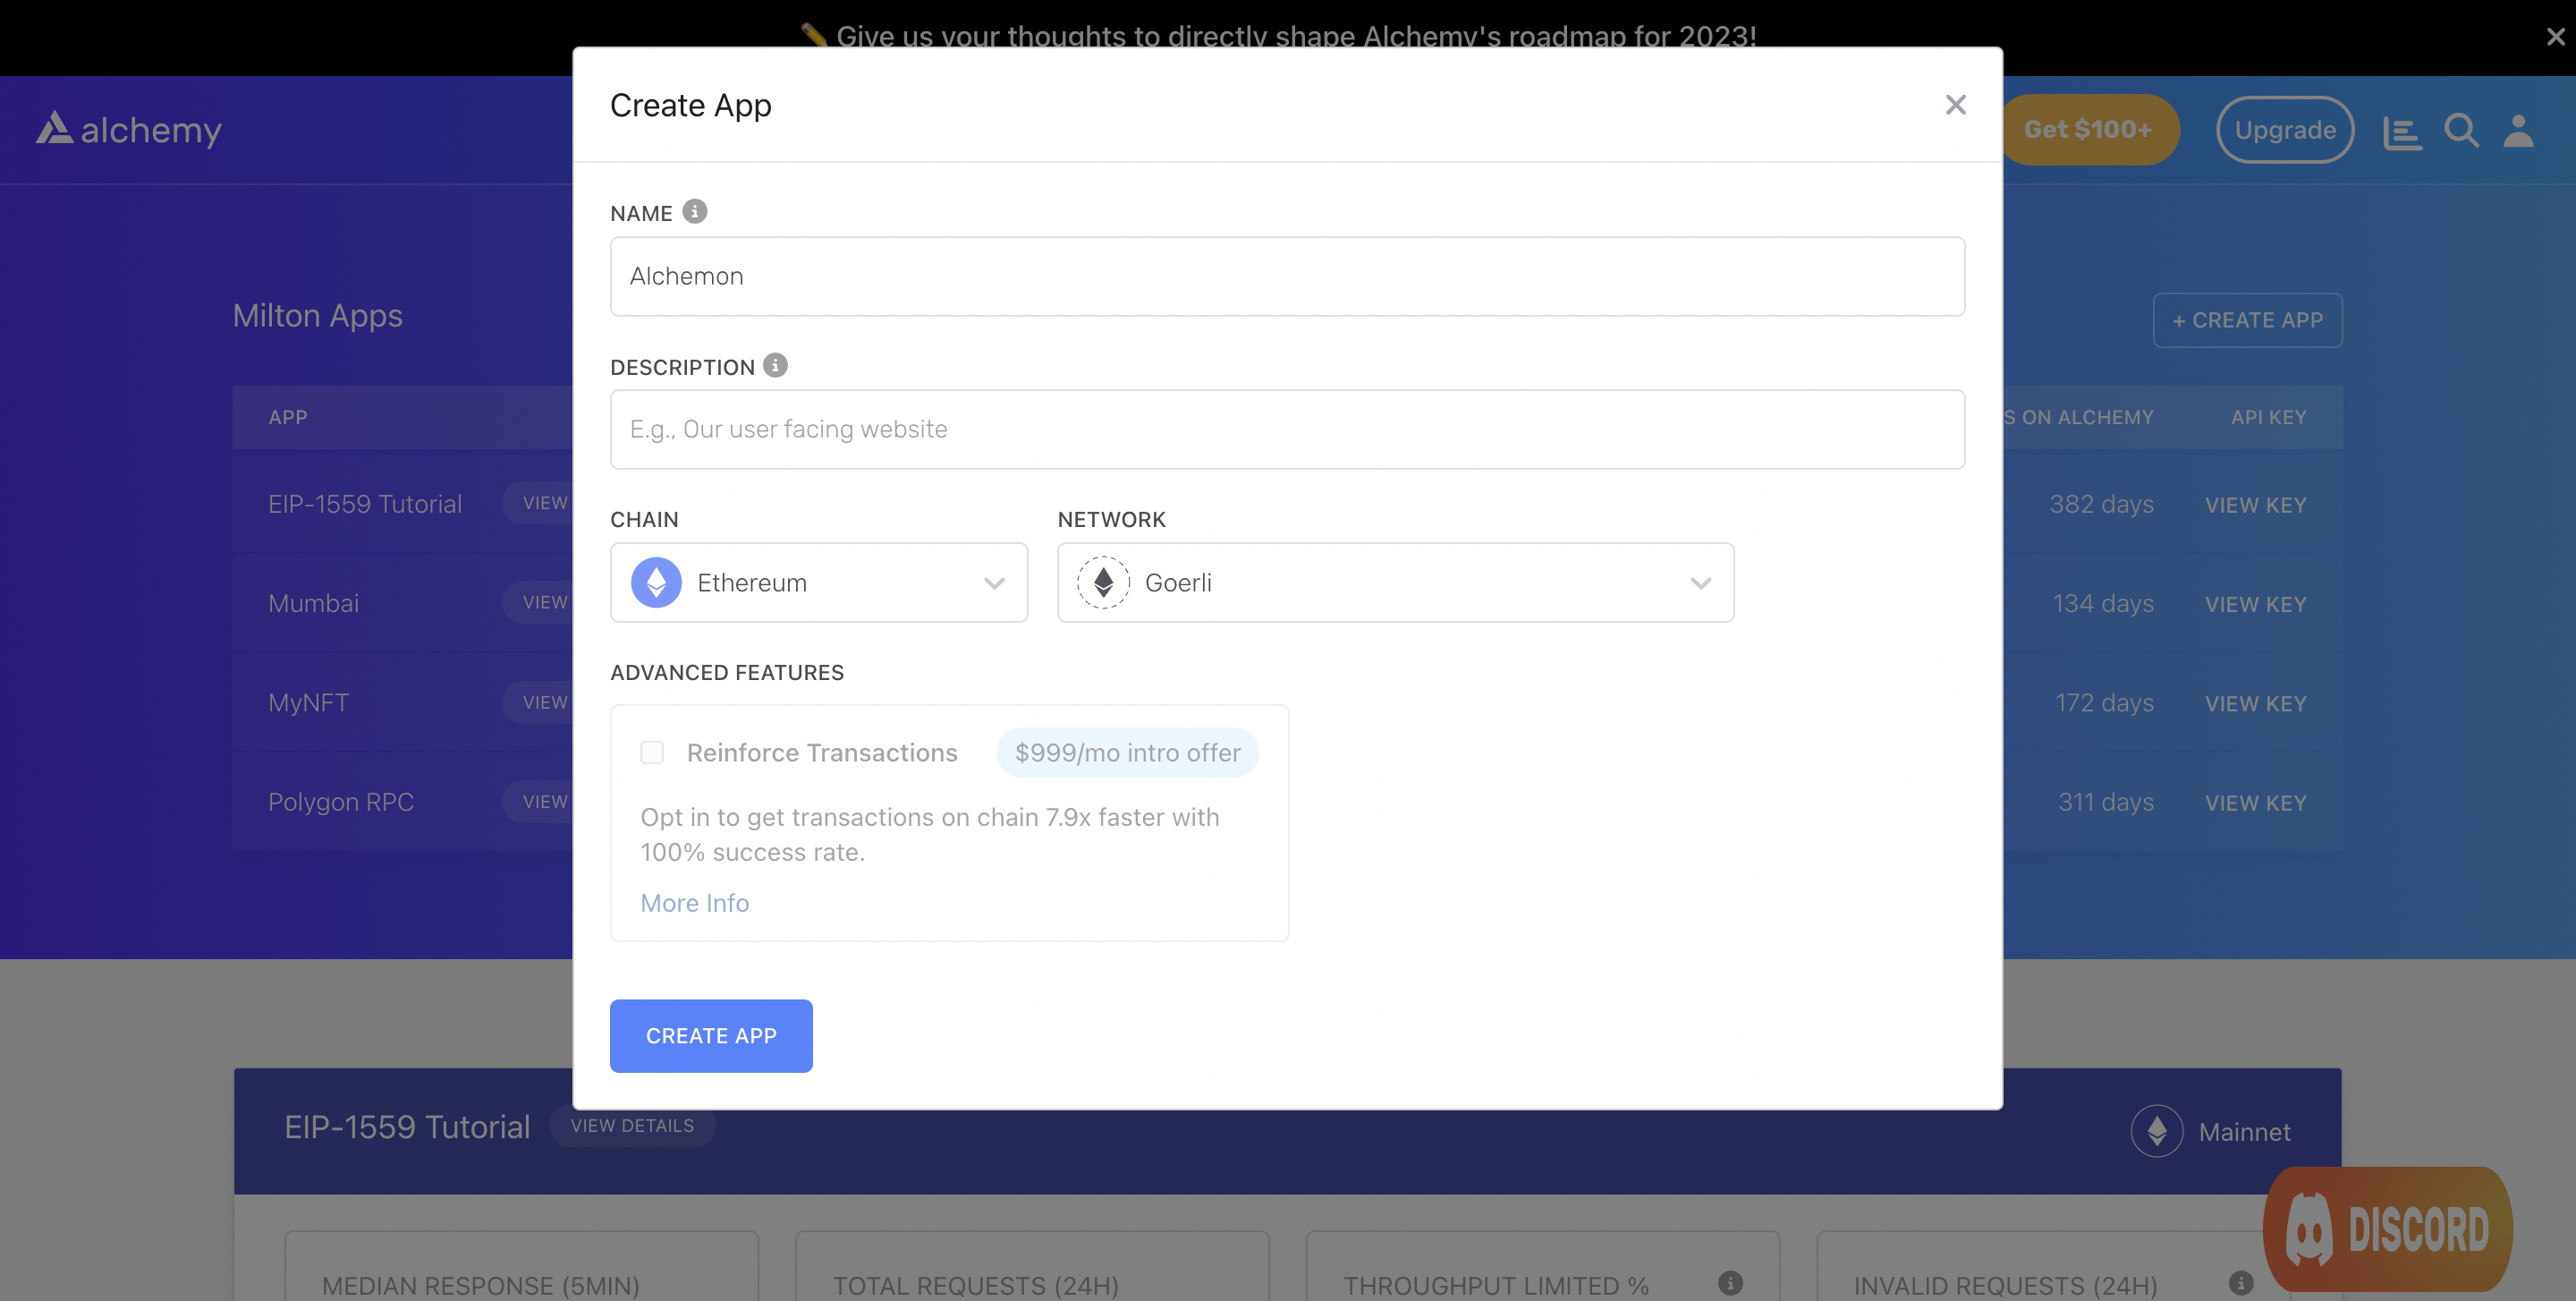
We will need an Alchemy app to use the NFT API, implement connect wallet functionality, and send transactions to the Goerli blockchain. You can use the same app that you created in Part I. To re-iterate, this is how you go about creating an app:
- From Alchemy's dashboard, hover over the Apps drop-down menu and choose Create App.
- Provide a Name and Description for your app. For Chain, select Ethereum and for Network select Goerli.
- Click the Create App button.

Creating an app on the Alchemy Dashboard
Once you have created your app, click on your app's View Key button in the dashboard and save the HTTP URL. We will use this later.
Step 2: Download the starter repository
We have already created a starter repository for you that implements helpful functionality such as the connect wallet feature.
Download or clone the repository here.
Once this is done, open the repository in a Terminal and run the following command:
npm install
This will install Next.js as well as all other libraries we will be using including the Alchemy SDK, ethers, and wagmi.
Once the installation is complete, open the repository in your favorite code editor (e.g. VS Code).
Step 3: Populate the constants.js file
constants.js fileIn the data folder of the project, there is a constants.js file. This file will contain all the values required by us to interface with the NFT API and our smart contract. Populate the contents of the file with the following:
const alchemyApiKey = "<-- ALCHEMY APP API KEY -->";
const ownerAddress = "<-- WALLET ADDRESS USED TO DEPLOY CONTRACT IN PART I -->";
const contractAddress = "<-- DEPLOYED ALCHEMON CONTRACT ADDRESS FROM PART I -->";

export { alchemyApiKey, ownerAddress, contractAddress }
Step 4: Obtain the contract ABI file
In order to invoke functions on the contract from our frontend, the latter requires an ABI file which gives it information on all the functions in the contract such as its view scope, inputs, outputs, name, etc.
Fortunately for us, our Hardhat project from Part I generates this file automatically upon compilation of our contract.
In the alchemon project from Part I, navigate to artifacts/contracts/AlchemonNft.sol and copy the AlchemonNft.json file.
Next, in our current alchemon-frontend repository, create a new folder called contracts and paste this file into it.
Step 5: Create the main breeding page
We are now in a good place to write code for the main page. On this page, users will be able to do the following:
- Choose 2 distinct Alchemons they own to breed a new Alchemon. We will use the getNftsForOwner function of the NFT API along with ethers to achieve this.
- View a few sample Alchemons that already exist using the getNftsForContract function.
- View a few other projects that have been launched by the Alchemon creators using the getContractsForOwner function.
This page assumes that your MetaMask wallet is already connected to the app. If it isn't, the page redirects you to the Connect page.
Open the index.js file in the pages folder and add the following code:
// Standard Next and CSS imports
import Head from 'next/head'
import styles from '@/styles/Home.module.css'
import { useRouter } from "next/router";
import { useState, useEffect, Fragment } from "react";

// Alchemy SDK imports for NFT API
import { Network, Alchemy } from "alchemy-sdk";

// Imports from the constants.js file
import { alchemyApiKey, contractAddress } from "@/data/constants";

// Wagmi import for connected wallet info
import { useAccount } from "wagmi";

// Contract ABI import
import contract from '@/contracts/AlchemonNft.json';

// Ethers for invoking functions on smart contract
import { ethers } from 'ethers';

// Extract ABI from the ABI JSON file
const abi = contract.abi;

export default function Home() {

  // Standard Next router definition
  const router = useRouter();

  // Get connected wallet address and connection status
  const { address, isConnected } = useAccount();

  // Page mounting info to prevent hydration errors
  const [hasMounted, setHasMounted] = useState(false);

  // Variable that holds sample Alchemon NFTs
  const [samples, setSamples] = useState([]);

  // Variable that holds contracts created by Owner address
  const [contracts, setContracts] = useState([]);

  // Variable that holds all Alchemons created by connected wallet
  const [nfts, setNfts] = useState([]);

  // Parent Alchemons
  const [parent1, setParent1] = useState('none');
  const [parent2, setParent2] = useState('none');

  // Initialize Alchemy SDK
  const settings = {
    apiKey: alchemyApiKey,
    network: Network.ETH_GOERLI,
  };

  const alchemy = new Alchemy(settings);

  // Mounting fix to avoid hydration errors
  useEffect(() => {
    setHasMounted(true)
  }, []);

  // Get all Alchemon NFTs owned by the connected wallet
  useEffect(() => {
    const getNfts = async () => {
      const response = await alchemy.nft.getNftsForOwner(address);
      const nfts = response.ownedNfts.filter(nft => nft.contract.address.toUpperCase() === contractAddress.toUpperCase());
      setNfts(nfts);
    }
    getNfts();
  }, [])

  // Get sample Alchemon NFTs
  useEffect(() => {
    const getSamples = async () => {
      const response = await alchemy.nft.getNftsForContract(contractAddress);
      const nfts = response.nfts.slice(0, 3);
      setSamples(nfts);
    }
    getSamples();
  }, [])

  // Get all contracts for owner
  useEffect(() => {
    const options = { method: 'GET', headers: { accept: 'application/json' } };

    fetch(`https://eth-mainnet.g.alchemy.com/nft/v2/${alchemyApiKey}/getContractsForOwner?owner=${address}`, options)
      .then(response => response.json())
      .then(response => setContracts(response.contracts))
      .catch(err => console.error(err));
  }, [])

  // Do not render until entire UI is mounted
  if (!hasMounted) return null;

  // Redirect to Connect page if wallet is not connected
  if (!isConnected) {
    router.replace('/connect');
  }

  // Form handlers
  const parent1Handler = (e) => {
    setParent1(e.target.value);
  }

  const parent2Handler = (e) => {
    setParent2(e.target.value);
  }


  // Function that allows breeding of NFTs using 2 parent NFTs
  const mintNft = async (e) => {

    e.preventDefault();

    // Only allow breeding if the parents are distinct
    if (parent1 === 'none' || parent2 === 'none' || parent1 === parent2) {
      console.log("Incorrect parents");
      return;
    }

    // Call the breed function from connected wallet
    try {
      const { ethereum } = window;

      if (ethereum) {
        const provider = new ethers.providers.Web3Provider(ethereum);
        const signer = provider.getSigner();
        const nftContract = new ethers.Contract(contractAddress, abi, signer);

        console.log("Initialize payment");
        let nftTxn = await nftContract.breed(parseInt(parent1), parseInt(parent2));

        console.log("Mining... please wait");
        await nftTxn.wait();

        console.log(`Mined, see transaction: https://goerli.etherscan.io/tx/${nftTxn.hash}`);
        router.replace('/dashboard');

      } else {
        console.log("Ethereum object does not exist");
      }

    } catch (err) {
      console.log(err);
    }
  }

  return (
    <Fragment>

      <Head>
        <title>Alchemon</title>
        <meta name="description" content="A simple NFT based game" />
        <meta name="viewport" content="width=device-width, initial-scale=1" />
        <link rel="icon" href="/favicon.ico" />
      </Head>

      <main className={styles.main}>
        <h1>Alchemon</h1>

        <button onClick={() => router.push('/dashboard')}>
          Profile Dashboard
        </button>

        <h2>Breed a New Alchemon</h2>

        <form className={styles.breed_form} onSubmit={mintNft}>
          <select name="parent1" id="parent1" value={parent1} onChange={parent1Handler}>
            <option value="none">---</option>
            {nfts.map(nft => {
              return <option value={nft.tokenId} key={nft.tokenId}>{nft.title}</option>
            })}
          </select>
          <select name="parent2" id="parent2" value={parent2} onChange={parent2Handler}>
            <option value="none">---</option>
            {nfts.map(nft => {
              return <option value={nft.tokenId} key={nft.tokenId}>{nft.title}</option>
            })}
          </select>
          <button type='submit'>Breed</button>
        </form>

        <h2>Sample Alchemon NFTs</h2>
        <div className={styles.sample_nfts}>
          {samples.map(nft => {
            return (
              <div className={styles.nft} key={nft.tokenId}>
                <h3>{nft.title}</h3>
                <img src={nft.media[0].raw} />
              </div>
            )
          })}
        </div>

        <h2>Projects by Alchemon Creators</h2>
        <ul className={styles.contract_container}>
          {contracts.map(contract => {
            return (
              <li key={contract.address}>
                <a href={`https://goerli.etherscan.io/address/${contract.address}`} target="_blank">
                  {contract.address}
                </a>
              </li>
            )
          })}
        </ul>

      </main>
    </Fragment>
  )
}
In the main breeding page:
- We use getNftsForOwner to get a list of all Alchemon NFTs owner by the wallet.
- We use getNftsForContract to get a few sample NFTs from the Alchemon collection.
- We use getContractsForOwner to get a list of projects created by the owners of Alchemon.
Source Code Comments
In order to understand what various parts of the code does, do make sure to read the comments associated with each section.
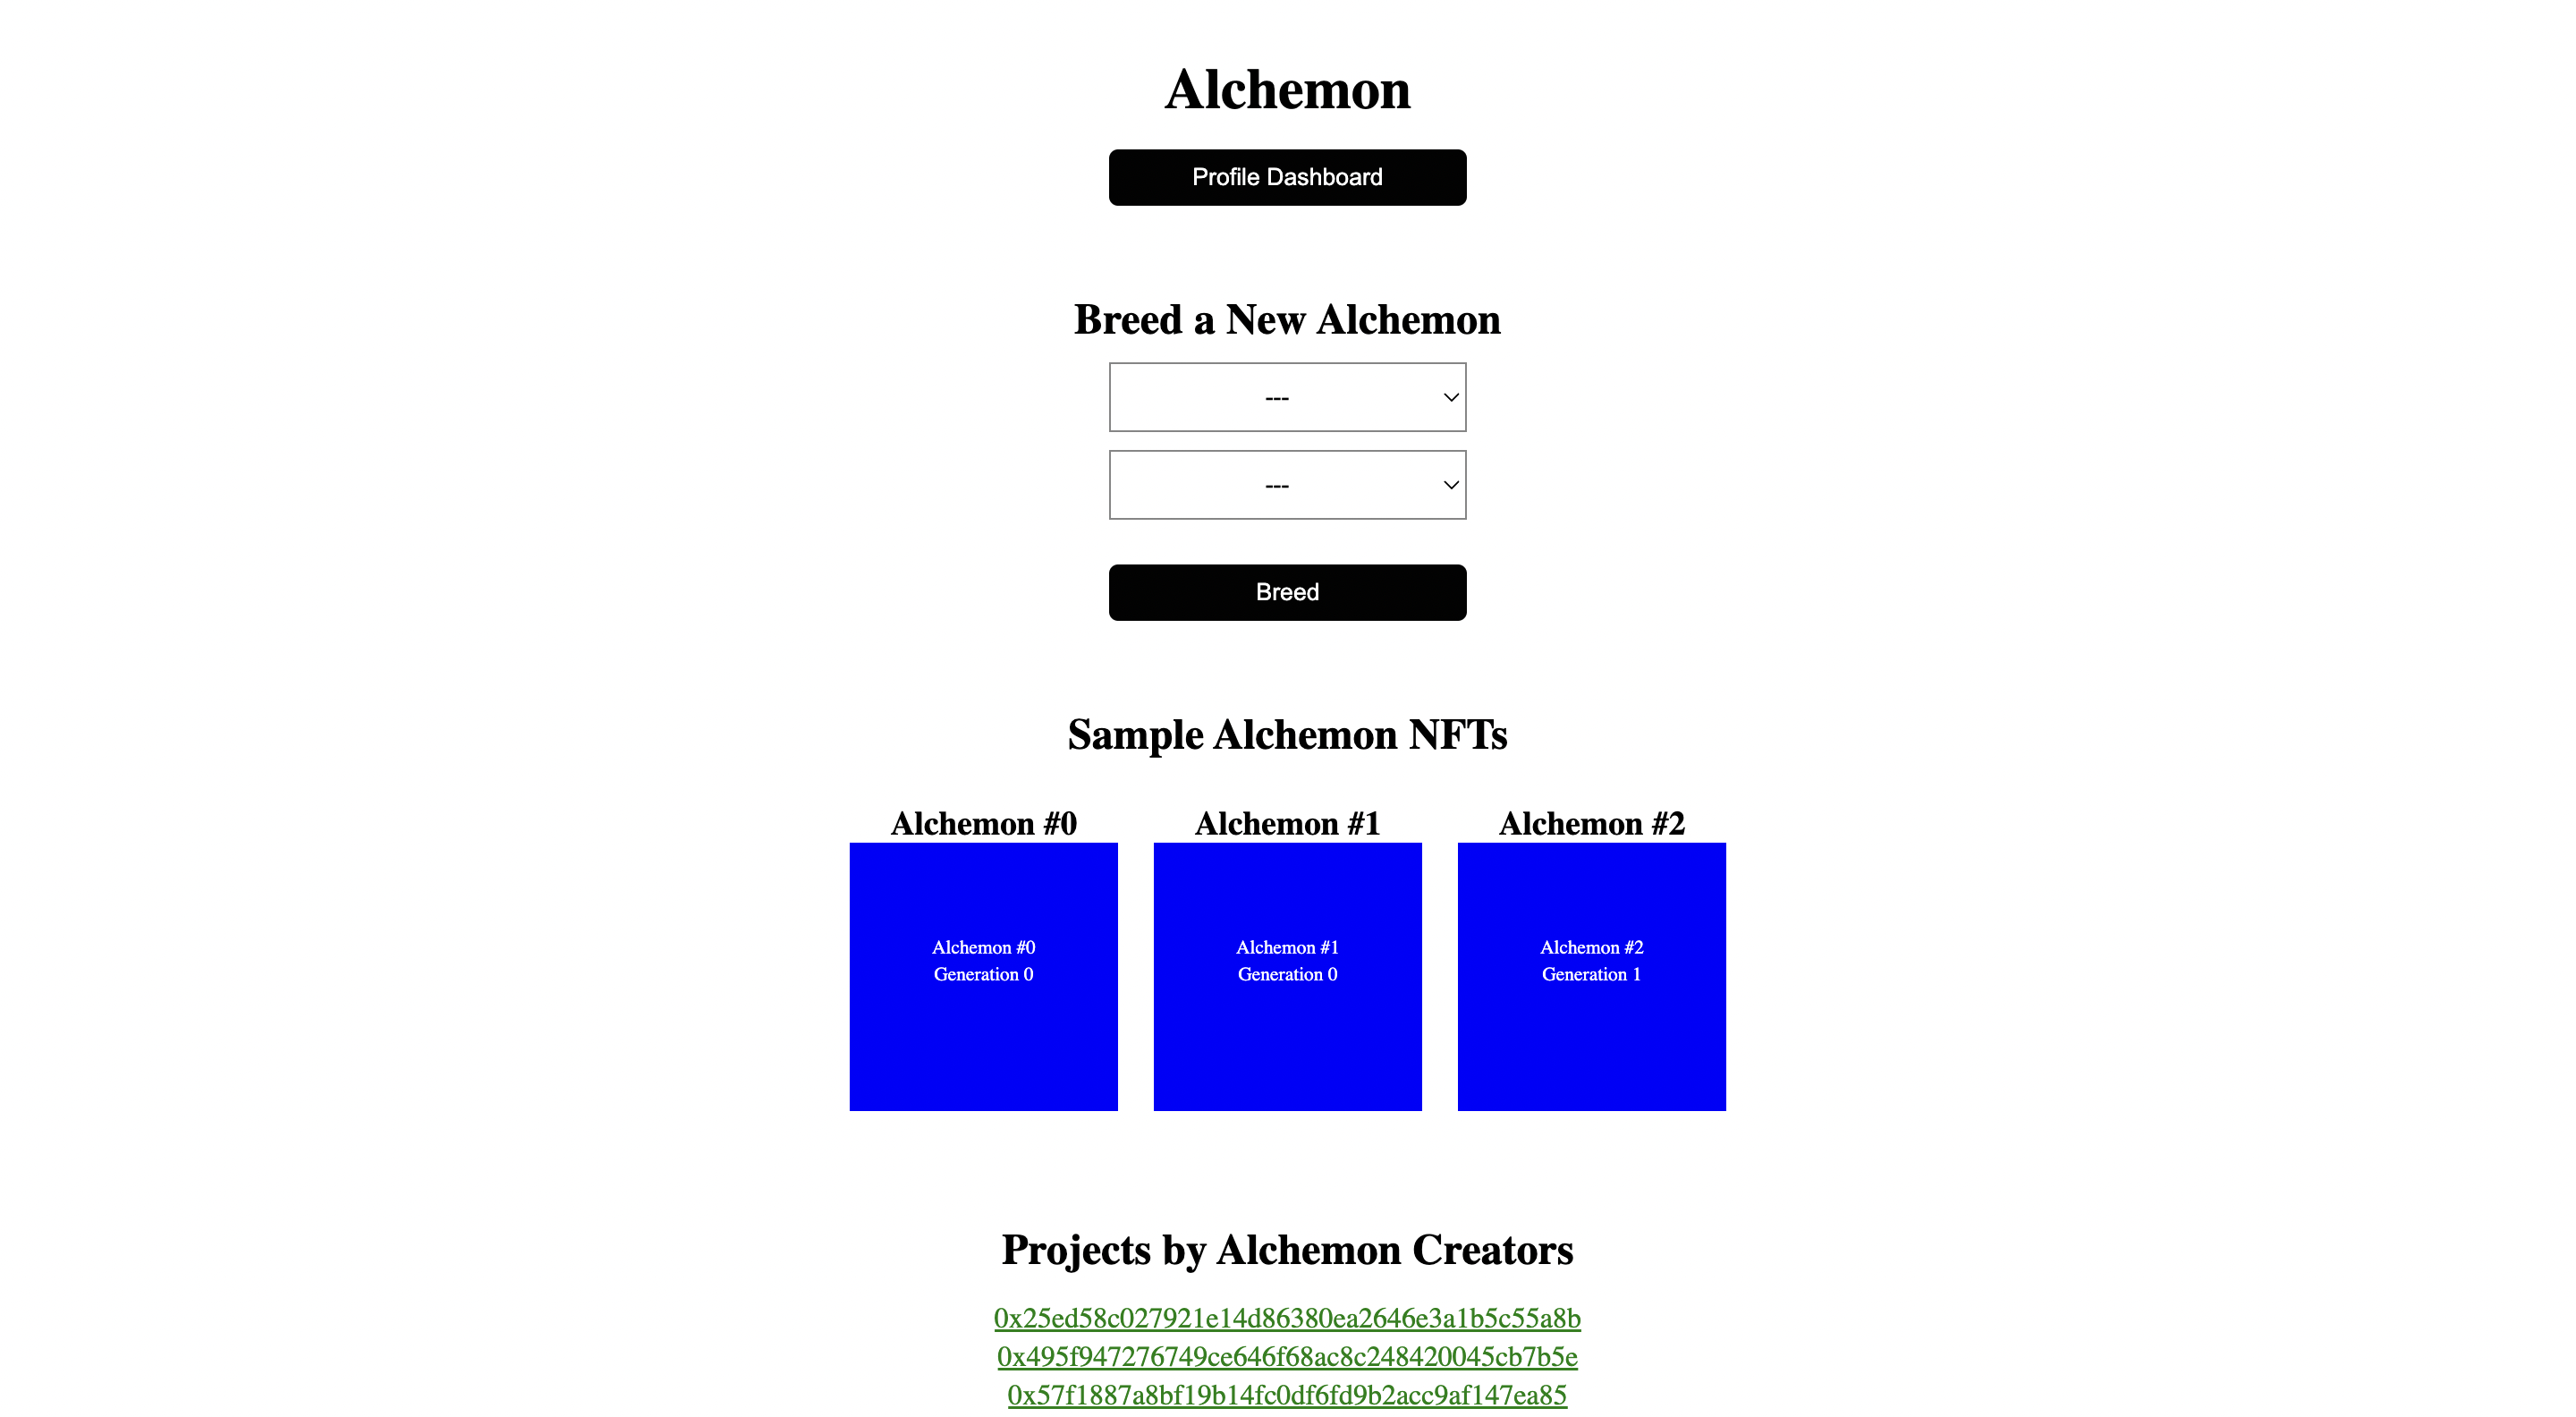
Once we wire up the remaining components of the app, this page should look something like this:

The main Alchemon breeding page
Step 6: Create the profile dashboard page
In the profile dashboard page, users will be able to see their connected wallet address and all the Alchemons that they own. For the latter, we will be using the getNftsForOwner function of the Alchemy NFT API.
In the dashboard.js file within the pages folder, add the following code:
// Standard Next and CSS imports
import Head from "next/head";
import { Fragment, useState, useEffect } from "react";
import styles from "../styles/dashboard.module.css";
import { useRouter } from "next/router";

// Alchemy SDK imports for NFT API
import { Network, Alchemy } from "alchemy-sdk";

// Imports from the constants.js file
import { alchemyApiKey, contractAddress } from "@/data/constants";

// Wagmi import for connected wallet info
import { useAccount } from "wagmi";

export default function Dashboard() {

    // Standard Next router definition
    const router = useRouter();

    // Get connected wallet address and connection status
    const { address, isConnected } = useAccount();

    // Page mounting info to prevent hydration errors
    const [hasMounted, setHasMounted] = useState(false);

    // Variable that holds all Alchemons created by connected wallet
    const [nfts, setNfts] = useState([]);

    // Initialize Alchemy SDK
    const settings = {
        apiKey: alchemyApiKey,
        network: Network.ETH_GOERLI,
    };

    const alchemy = new Alchemy(settings);

    // Mounting fix to avoid hydration errors
    useEffect(() => {
        setHasMounted(true);
    }, []);

    // Get all Alchemon NFTs owned by the connected wallet
    useEffect(() => {
        const getNfts = async () => {
            const response = await alchemy.nft.getNftsForOwner(address);
            const nfts = response.ownedNfts.filter(nft => nft.contract.address.toUpperCase() === contractAddress.toUpperCase());
            setNfts(nfts);
        }

        getNfts();
    }, [])

    // Do not render until entire UI is mounted
    if (!hasMounted) return null;

    // Redirect to Connect page if wallet is not connected
    if (!isConnected) {
        router.replace('/connect');
    }

    return (
        <Fragment>
            <Head>
                <title>Profile Dashboard</title>
            </Head>

            <div className={styles.jumbotron}>

                <h1>Dashboard</h1>

                <h2>Contract Address</h2>
                <p>{address}</p>

                <h2 className={styles.nft_heading}>My NFTs</h2>
                <div className={styles.nft_container}>
                    {nfts.map(nft => {
                        return (
                            <div className={styles.nft} key={nft.tokenId}>
                                <h3>{nft.rawMetadata.name}</h3>
                                <img src={nft.media[0].raw} />
                            </div>
                        )
                    })}
                </div>

                <button onClick={() => router.replace('/')}>
                    Back to Main Page
                </button>

            </div>
        </Fragment>
    )
}
In the dashboard page, we use getNftsForOwner to get a list of all Alchemon NFTs owned by the wallet.
Source Code Comments
In order to understand what various parts of the code does, do make sure to read the comments associated with each section.
We are all set to go! Let's launch our app on localhost using the following command:
npm run dev
Playing the game
-
When you open localhost:3000, you will first be prompted to visit the localhost:3000/connect page. Here, connect your MetaMask wallet to be redirected back to the main breeding page at localhost:3000.
-
For breeding to work, you must choose two different Alchemons as parents. In case you don't have 2 Alchemons, you can simply mint Genesis NFTs by visiting localhost:3000/mint-genesis. Make sure you've got enough Goerli ETH from the Goerli Faucet before you mint.
-
You will be redirected back on the main page. Select an Alchemon in both the first and the second dropdown, then click on breed. Metamask will prompt you to pay gas for the transaction.
-
Mining the transaction will roughly take 15 seconds after which you will be re-directed to a Dashboard page where you can see your new Alchemon NFT! This completes the game.
-
You can keep doing this indefinitely to create newer generations of Alchemons from the main breeding page.
Conclusion
Congratulations! You now know how to create a Next.js frontend that interacts with gaming smart contracts and implements an on-chain breeding game.
As a learning exercise we would love for you to give more functionality to these alchemons. For example, you could give certain skillsets and skill levels to these alchemons and then have 2 Alchemons fight each other - so one of them wins.
If you enjoyed this tutorial about creating NFT games or happen to build more functionality on top of this, tweet us at @AlchemyPlatform!
Don't forget to join our Discord server to meet other blockchain devs, builders, and entrepreneurs!
Ready to start building your NFT game?
Create a free Alchemy account and do share your project with us!
Updated about 2 years ago
