Building a Discord Notification Bot with Alchemy's Notifications Webhook
In this guide, we'll walk you through building an app that monitors the blockchain for an on-chain event. When that event occurs, you'll receive a notification on Discord. This could be anything from a deposit in a DeFi app to a sale on an NFT marketplace – the choice is yours.
In this guide, we'll walk you through building an app that monitors the blockchain for an on-chain event. When that event occurs, you'll receive a notification on Discord. This could be anything from a deposit in a DeFi app to a sale on an NFT marketplace – the choice is yours.
Prerequisites
Before we begin, make sure you have the following:
- An Alchemy account: Sign up here
- A Discord server
- A Replit account
- Familiarity with Python
Overview
Here's a brief outline of the steps we'll cover in this guide:
- Creating a new Alchemy project
- Finding and understanding the event you want to track
- Configuring Alchemy's Notifications Webhook
- Writing the Python code for the bot
- Setting up the Discord bot
Let's dive in!
Step 1: Creating a new Alchemy project
- Log in to your Alchemy Dashboard.
- Click "Create App" and fill in the required details.
- Once the app is created, note down the API key for future reference.
Step 2: Find the details of the event you want to track
To create a notification bot for on-chain events, we first need to understand how to interpret blockchain data.
We'll be focusing on EVM (Ethereum Virtual Machine) data, the decentralized operating system employed by Ethereum, Arbitrum, Polygon, Binance Smart Chain, and numerous other chains and Layer 2 solutions.
Understanding Blockchain Data
Blockchain transactions can be broadly categorized into four types: sending ETH (or a different native token depending on the chain/L2) to another user, creating a smart contract, destroying a smart contract, and most importantly for our purpose, calling a function on a smart contract.
Smart contract functions are where the magic happens:
- To send someone an ERC20 token or an NFT, you would call the transfer() function on that token's smart contract.
- To perform a swap on a decentralized exchange, you would call the swap() function on the DEX's router contract.
- To deposit tokens into a yield farm, you would call the deposit() function on the farm’s smart contract.
When using a crypto protocol's website, you may not directly see that a function is being called when you make a transaction, but that's what is happening in the background.
Function calls can emit events when executed. For instance, calling the transfer() function of a token's smart contract typically emits a Transfer event. These events are stored on the blockchain as logs.
Why is this Important?
Our goal in this tutorial is to choose an event log that interests us, use Alchemy to monitor the blockchain for new occurrences of that log, and then write code to process the log data into a neatly formatted Telegram message.
Let's look at an example of how to interpret logs. The understanding you gain here will be important for configuring Alchemy to the event we need to track and writing the code that will translate it into a human-readable message.
Example: DAI Transfer Logs
Let's assume we want our notification bot to inform us when a DAI token has been transferred and surface the details of that transfer. We will use the event logs stored on the blockchain to extract this information.
i. Examine the contract's transactions on Etherscan
Start by looking at the contract's transactions on Etherscan. You can find the DAI token contract address in its documentation. Most protocols include their contract deployment addresses in their documentation.
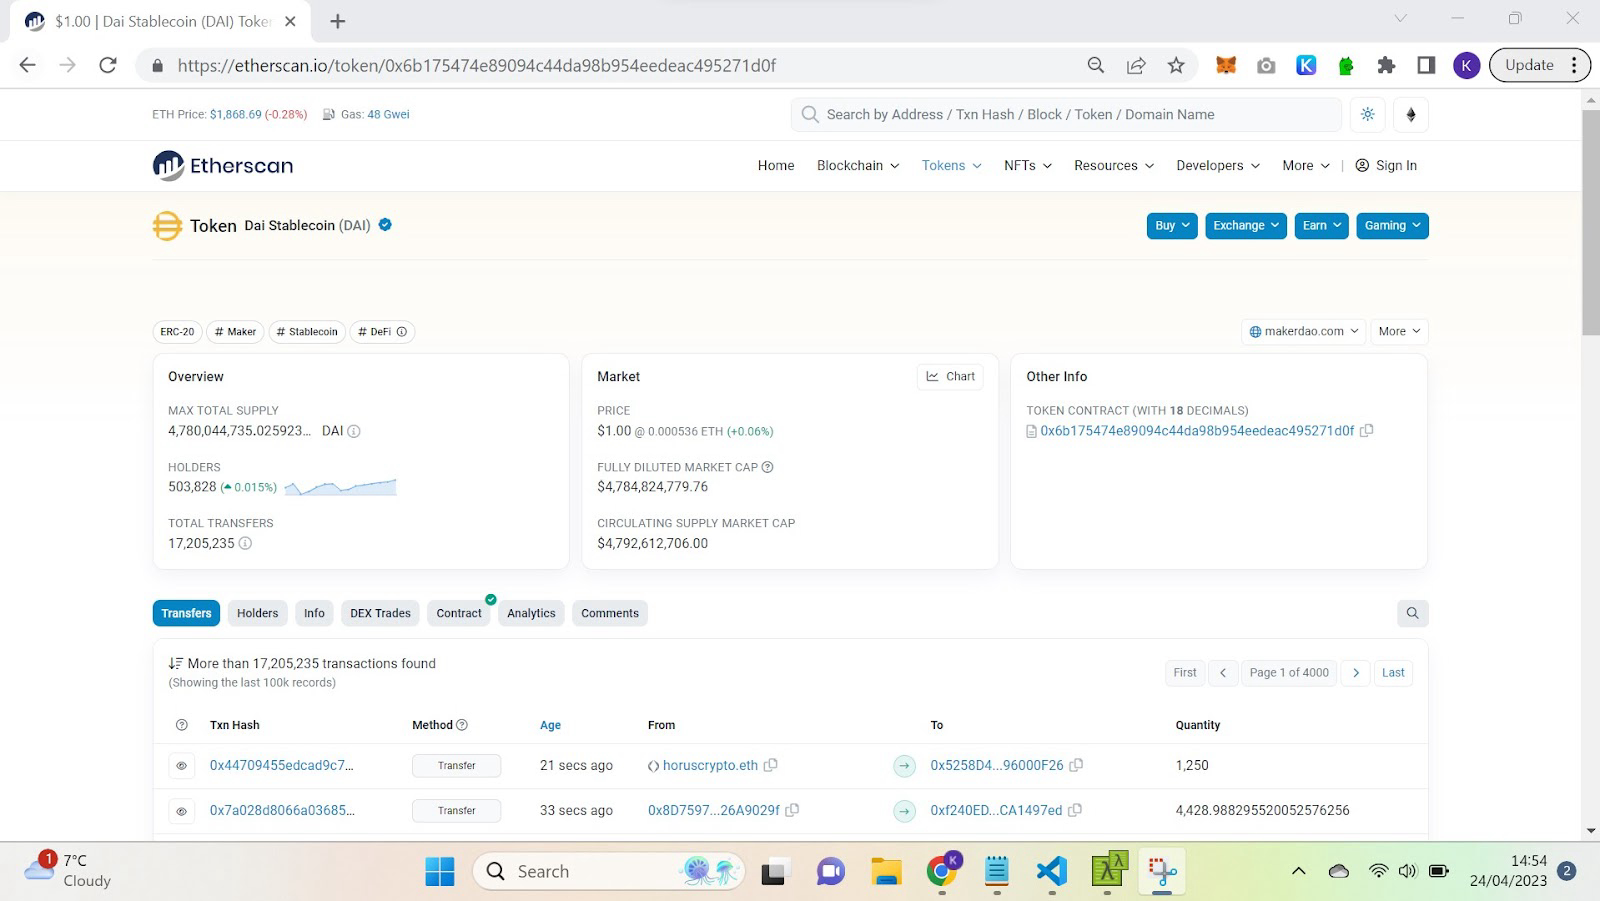
ii. Open a transaction page that matches your goal
Etherscan conveniently labels transactions based on the function called to execute them. Open the transaction page of one of the transfer transactions, as that matches the event type we want to track.
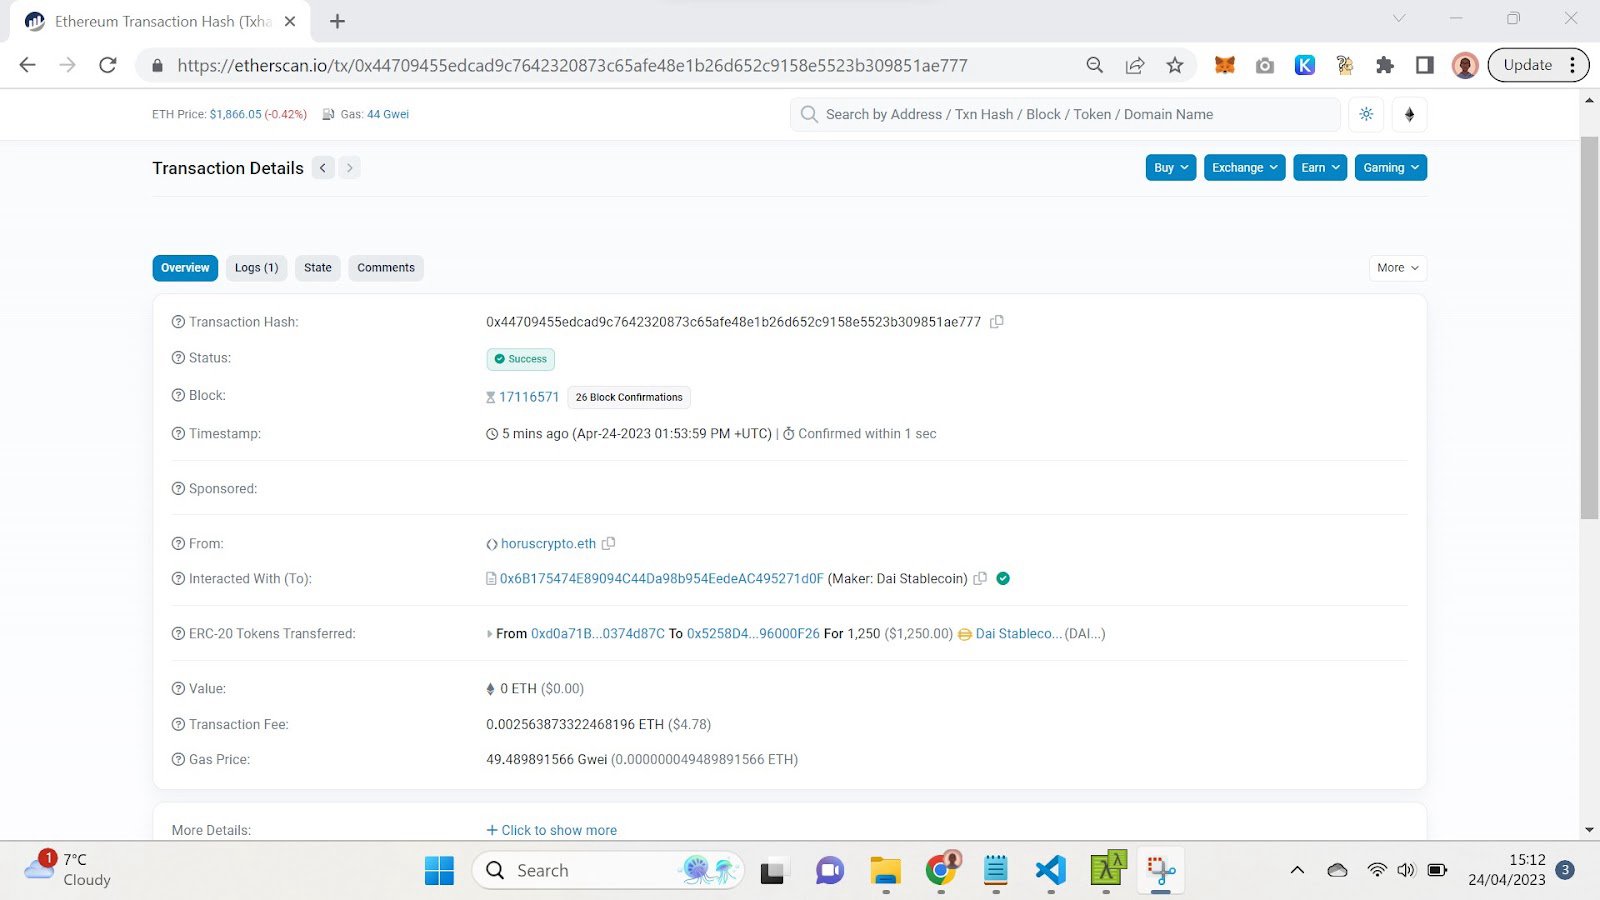
The transaction overview page provides helpful information, such as the amount of DAI transferred.
iii. Interpret the logs of the example transaction
Click the "Logs" tab on the transaction page to view the raw data of the events emitted during this transaction.
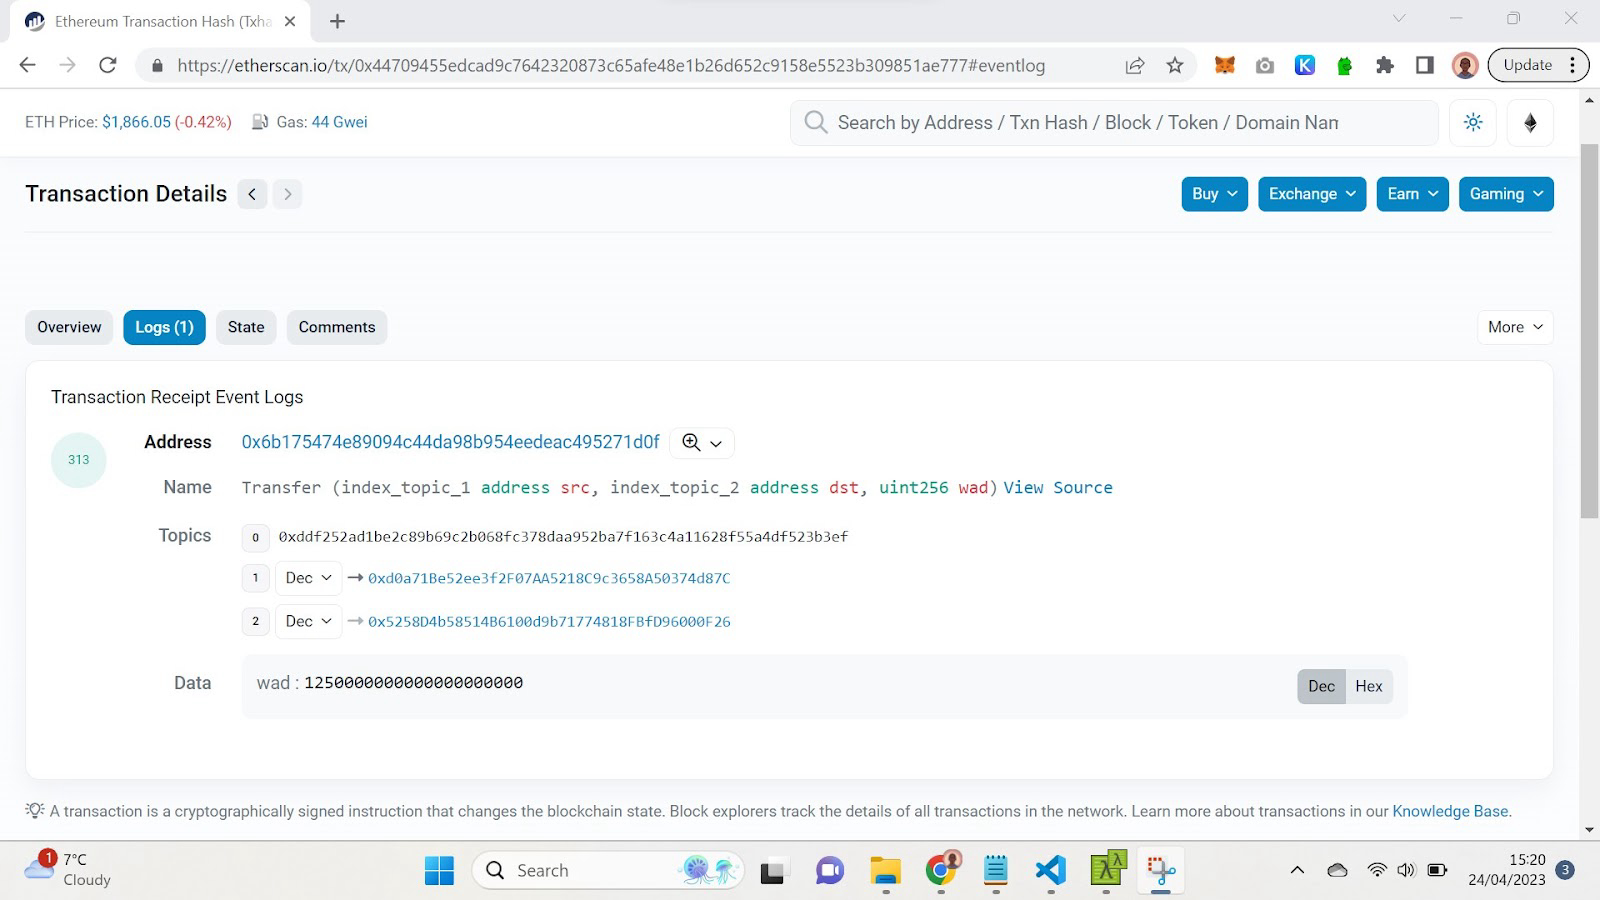
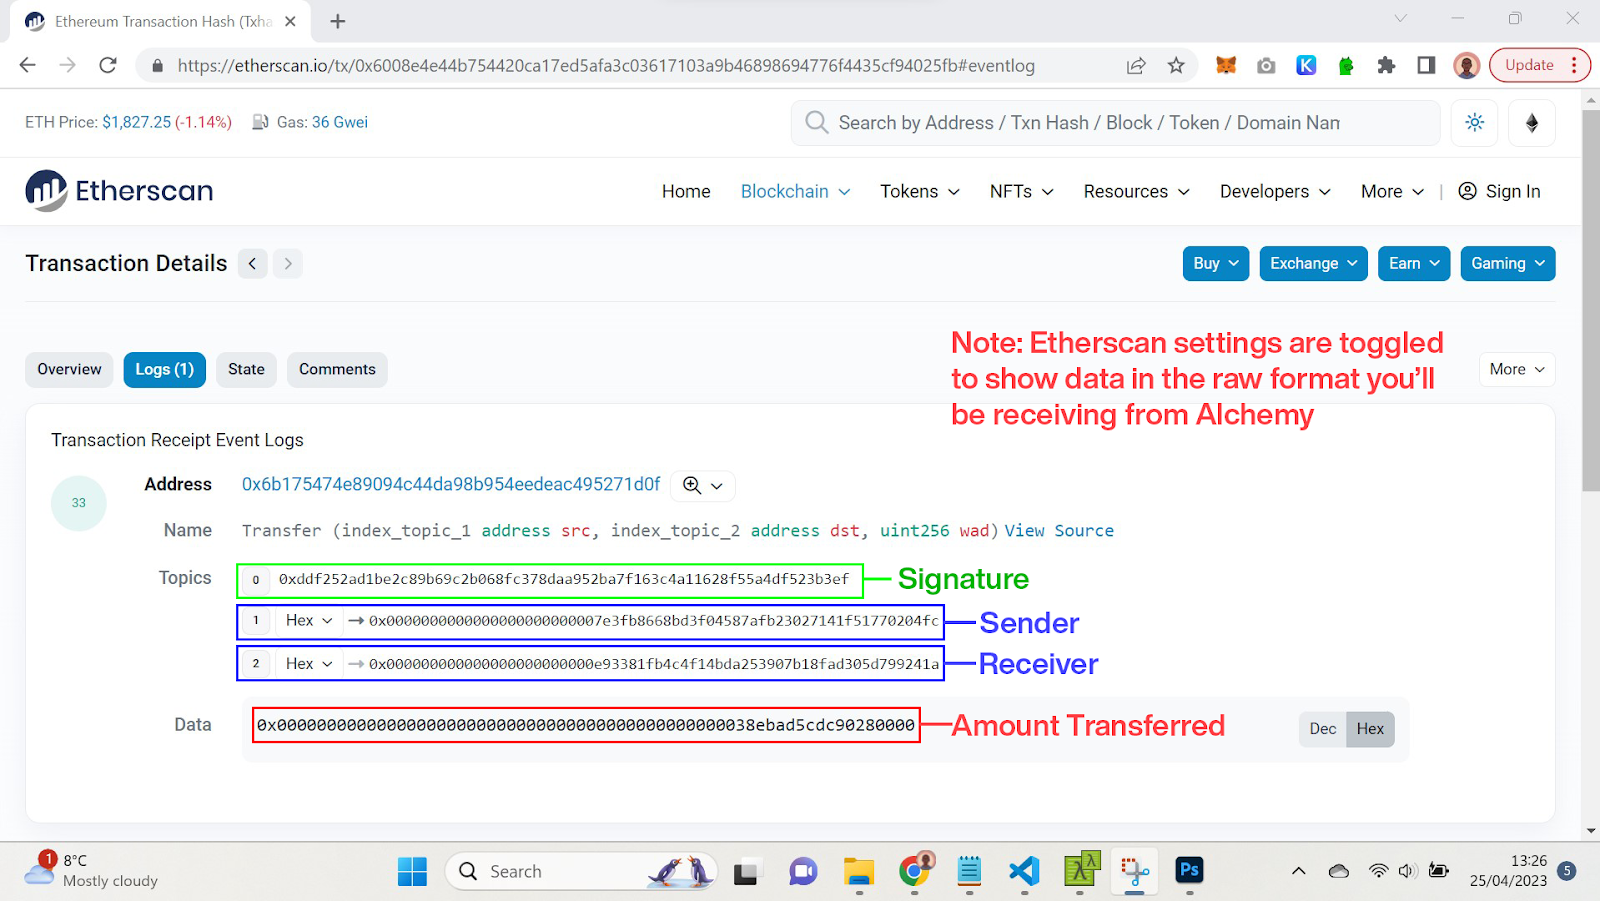
At first glance, the logs may appear intimidating. Lots of byte arrays! Etherscan provides some helpful labels, but when we receive data from Alchemy, we'll only see the raw byte arrays.
Using the Etherscan labels we can tell that the log in the screenshot is the Transfer event emitted by the transfer() function.
The byte array in topic0 is the event's signature, which uniquely identifies the event type. Any Transfer log with three parameters of the same datatype as our highlighted log will have the same signature regardless of what contract emitted it.
Indexed parameters go in the topic fields, while non-indexed parameters are stored in the data field.
To better understand these parameters, refer to the protocol's documentation. The DAI documentation states that the contract follows the ERC20 standard and links to a detailed breakdown of the standard’s functions and events.
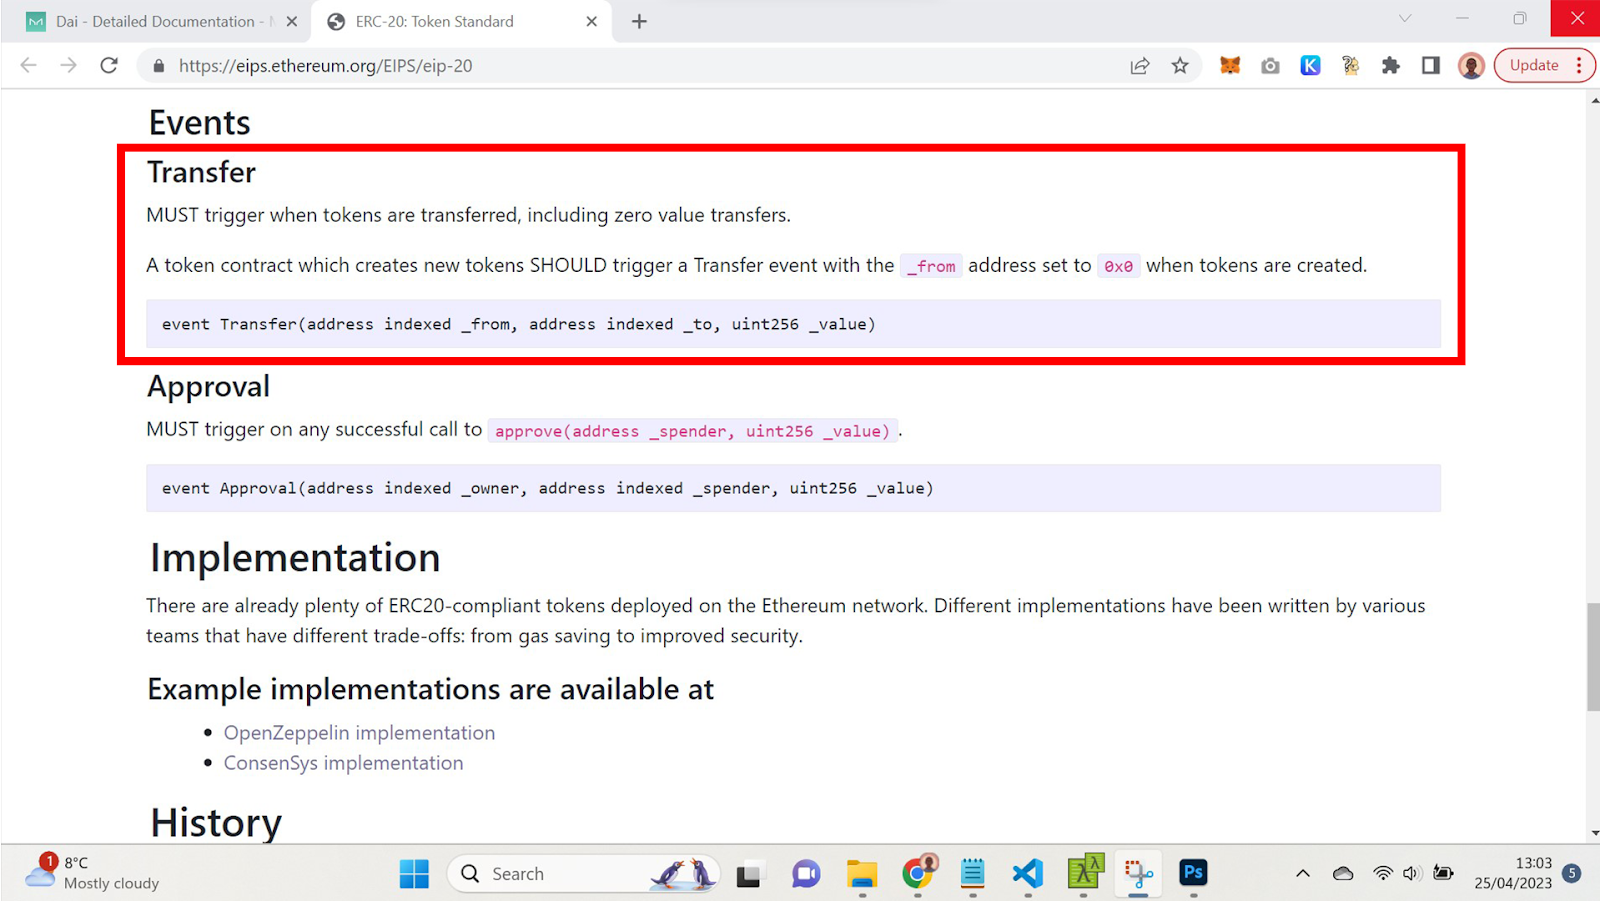
As you can see, the Transfer event’s parameters are the sender address, receiver address, and transferred amount. The first two parameters are indexed, so they appear in the topics, while the transfer amount is in the data field (Etherscan shows it as a decimal number but we will receive it from Alchemy in its original hexadecimal format).
If a project lacks comprehensive documentation that explains contract events, you may need to consult the development team or read the contract.
With this knowledge, we can now filter a stream of blockchain data for DAI token Transfer events and interpret those events.
Filtering - To obtain DAI token transfer event data, filter for logs where the contract address is the DAI contract and the signature (topic0) is 0xddf252ad1be2c89b69c2b068fc378daa952ba7f163c4a11628f55a4df523b3ef.
Interpreting - Once you have the filtered logs, you can interpret them. You know that topic1 is the sender's address, topic2 is the receiver's address, and the data field contains the transfer amount in hexadecimal format.
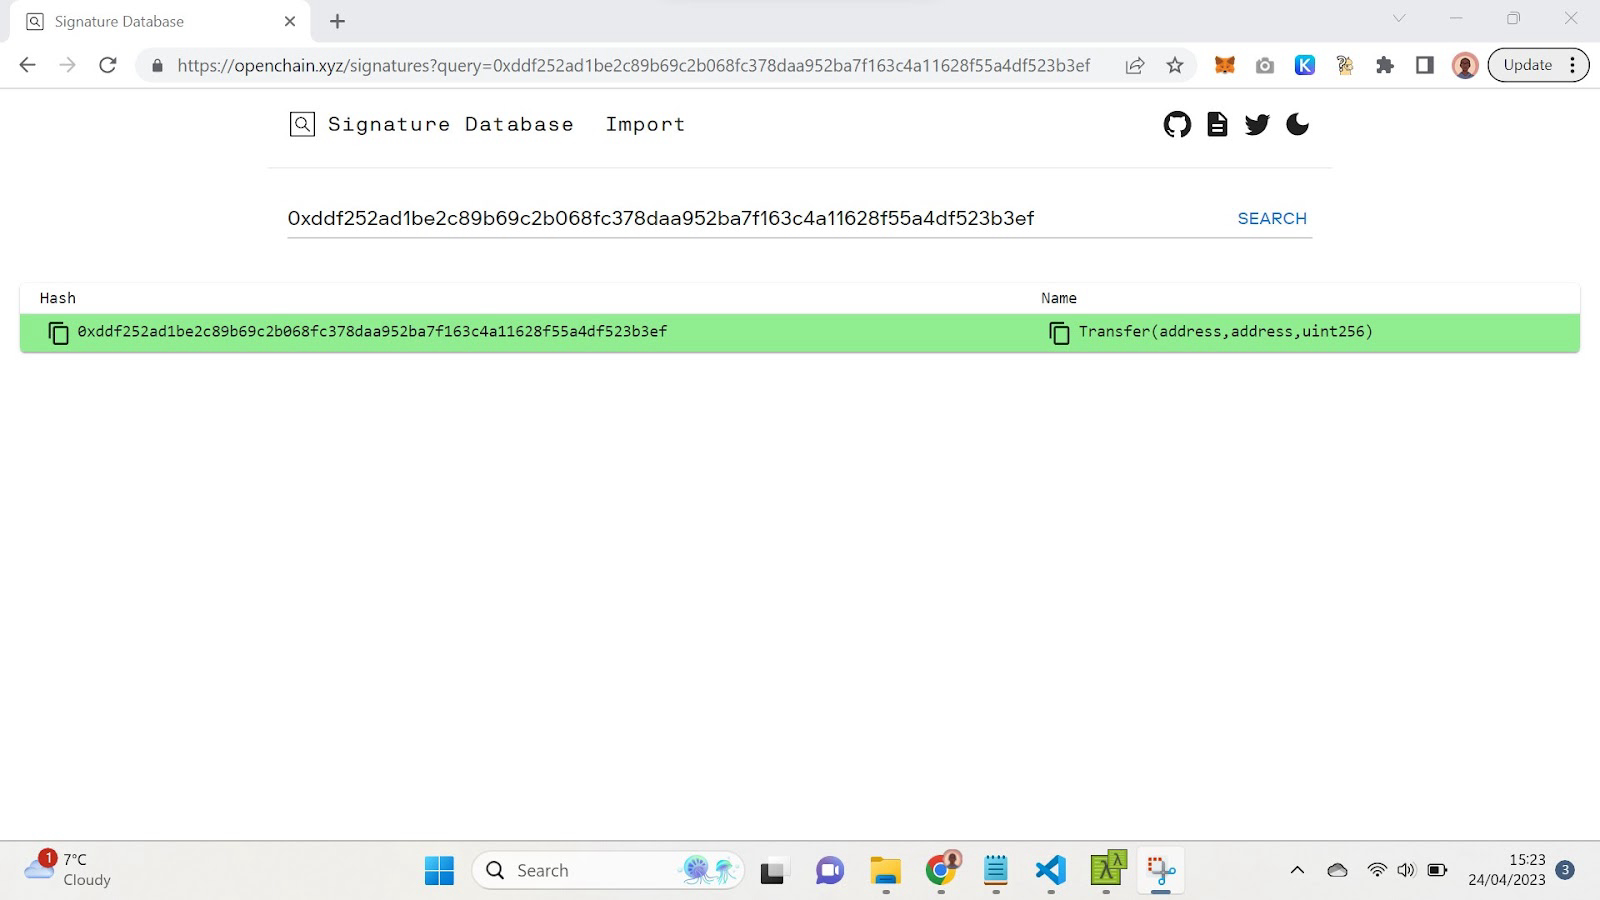
Note on translating signatures without Etherscan labels
Some events don't have helpful labels on Etherscan. If you're examining a transaction and the event logs are unlabeled, you can decode them using Openchain.xyz.
On Openchain, open the signature database and copy the topic0 of the event you're investigating to see its human-readable version.
Now that we have a basic understanding of how to interpret raw event logs, let's automate the process of listening for specific types of logs using Alchemy.
Step 3: Configure Alchemy's Notifications Webhook
- In your Alchemy Dashboard, navigate to the "Notifications" tab.
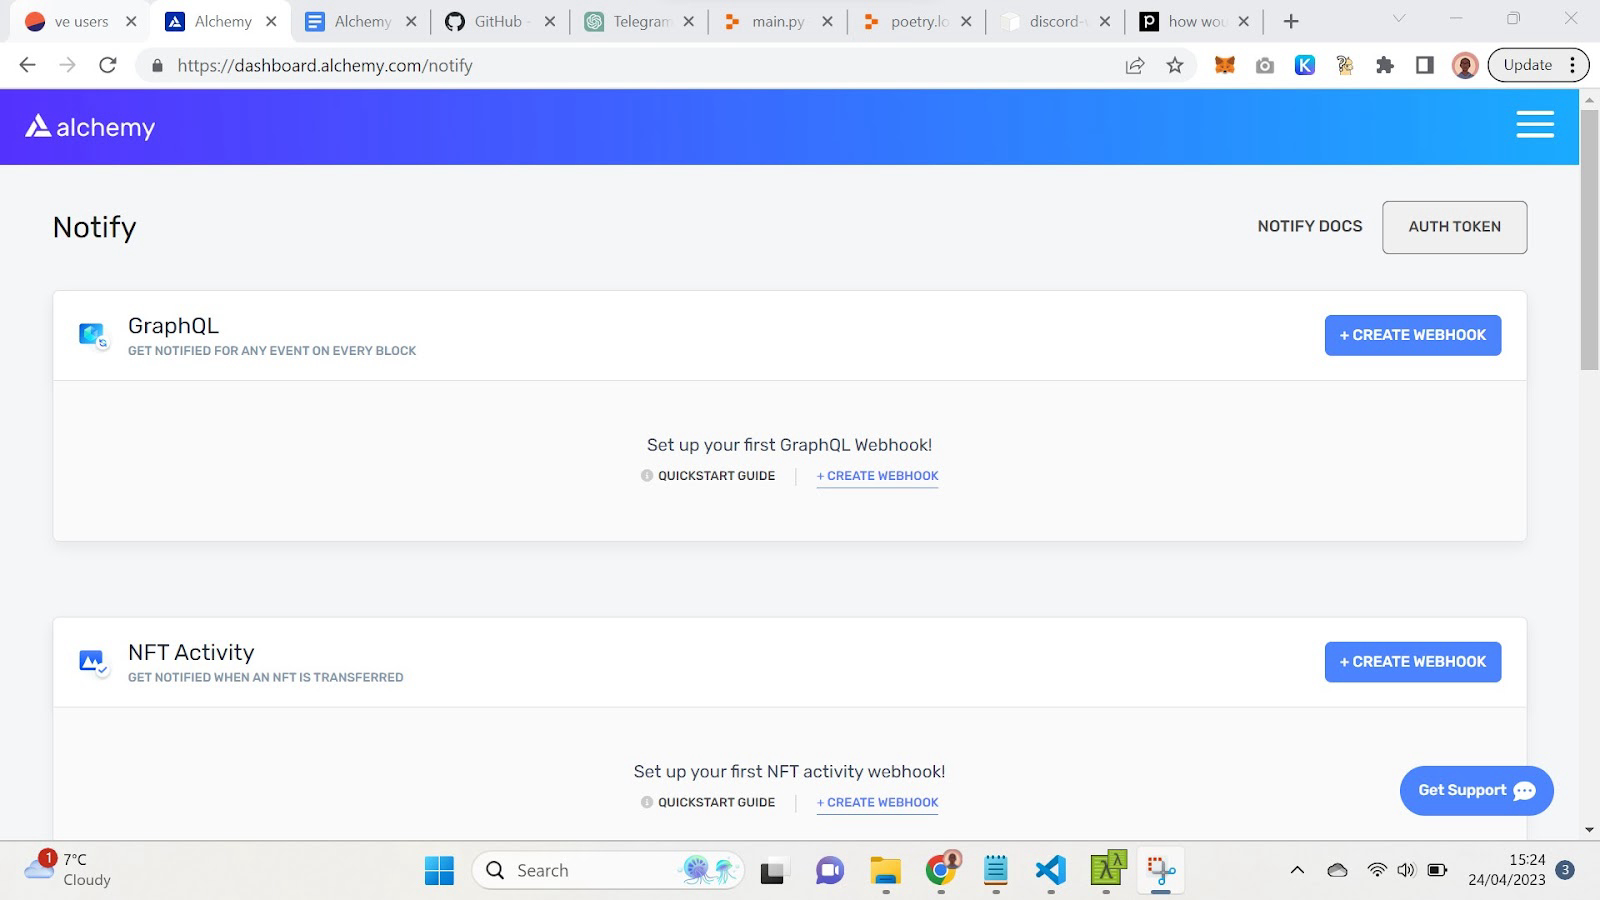
- Go to the “GraphQL” options and click "Create Webhook".
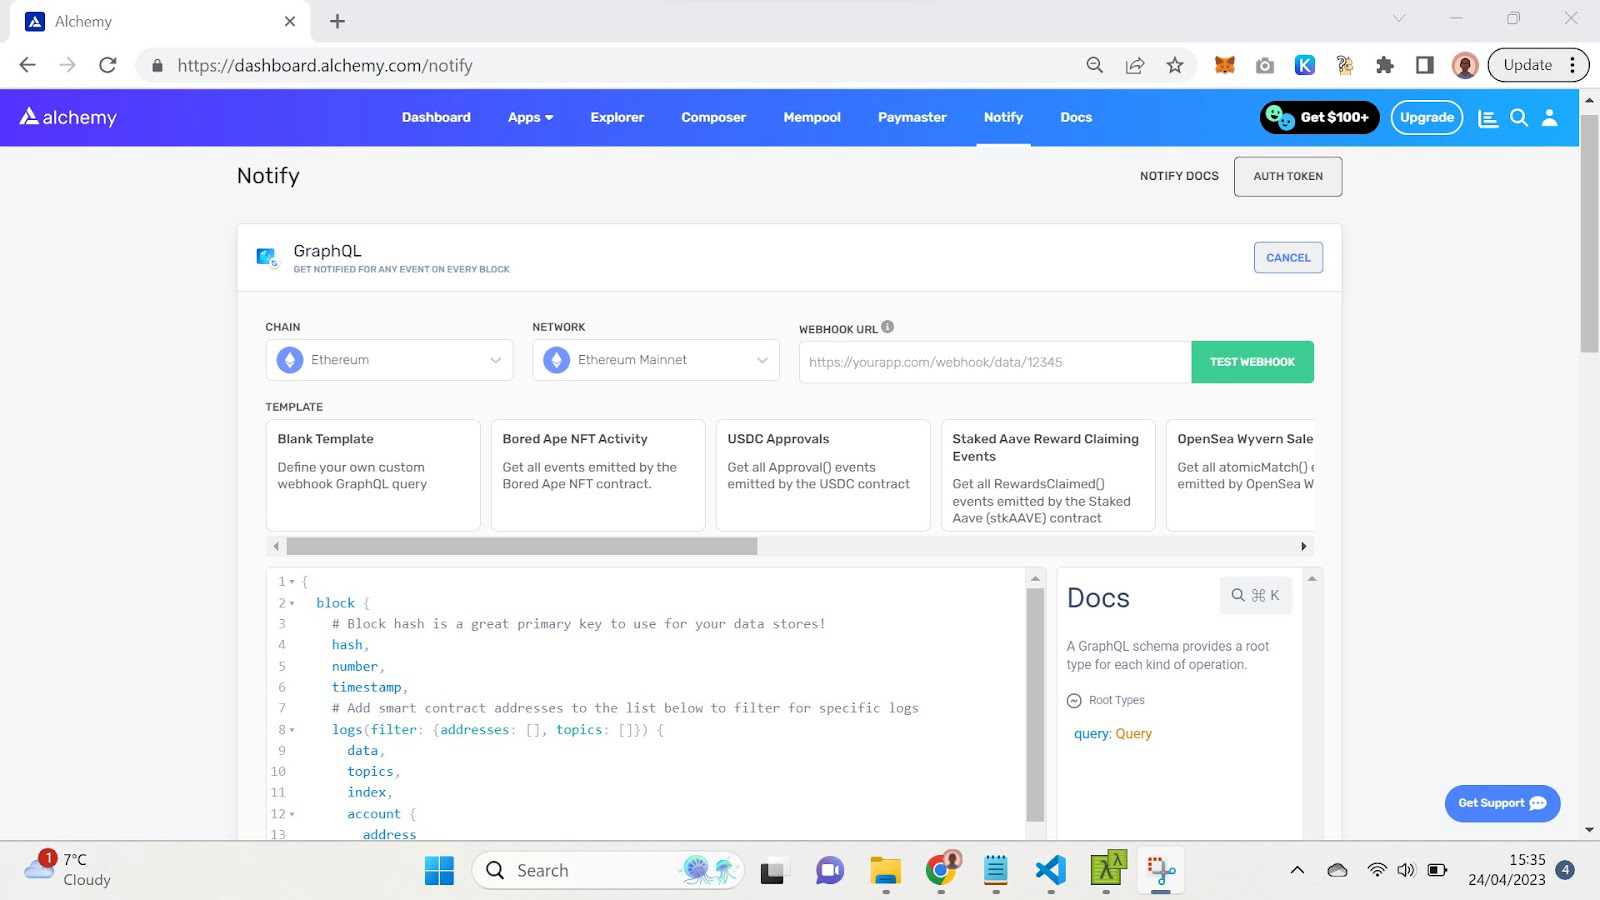
- Provide the required filters, including the contract address, the signature of the log you're interested in, and any parameters you want to watch for.
Here is an example of how you could filter for Transfer logs created by the DAI token contract.
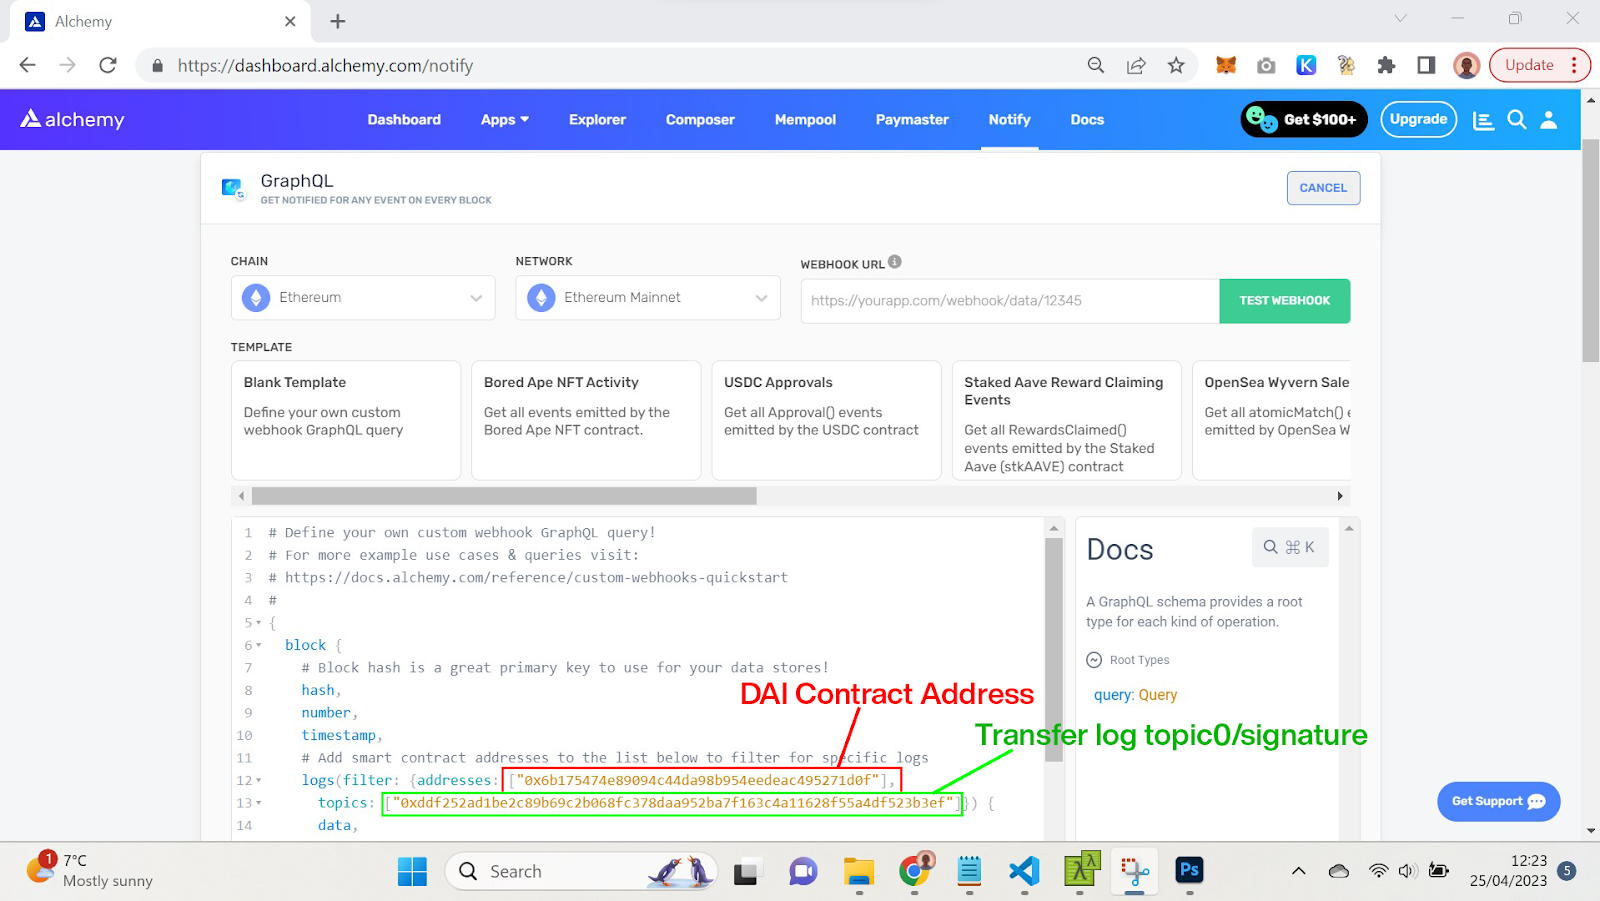
This example could be expanded by adding more topics to the topics array. For example, if you wanted to filter for transfers where address A was the sender you could achieve this by adding address A to the topics array. Because in the Transfer log, topic1 (the second topic) is the sender address.
You can apply the method we used to make this DAI Transfer log filter to any use case. For example, if you wanted to track deposits to a Curve veToken contract you could:
- Find the contract address in the documentation.
- Open the contract’s page on Etherscan and inspect one of the deposit transactions.
- Open the Logs tab of the transaction to find the Deposit event log.
- Copy the signature (topic0) of the Deposit log to use in the filter.
- Use the contract address and the signature to filter for Curve veToken deposit logs on Alchemy.
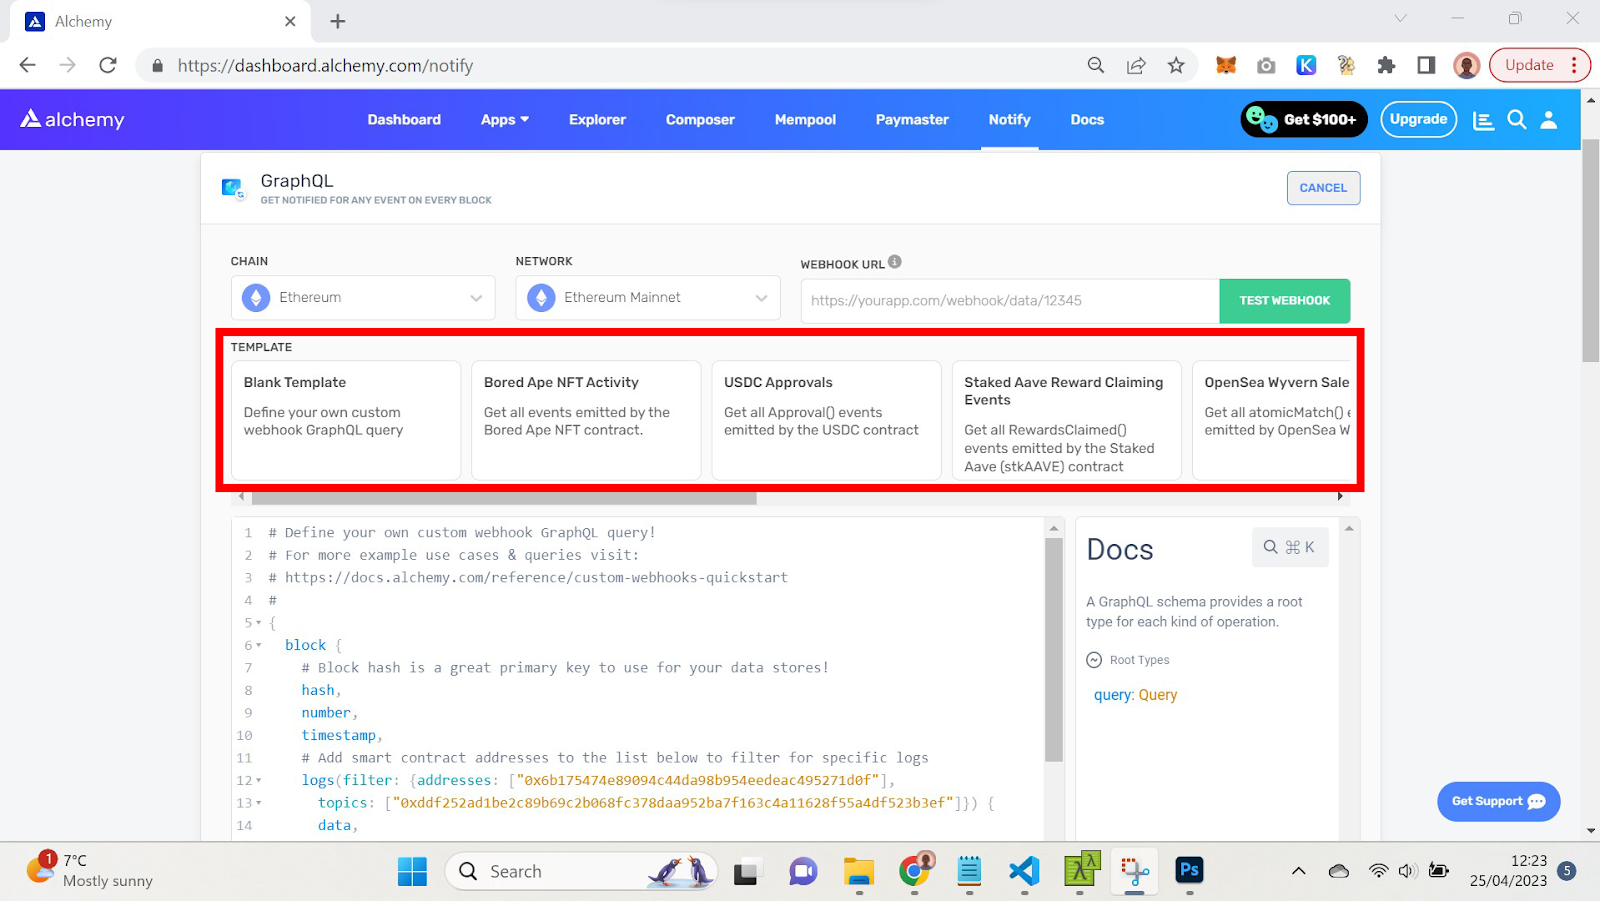
You could also use one of the template filters provided.
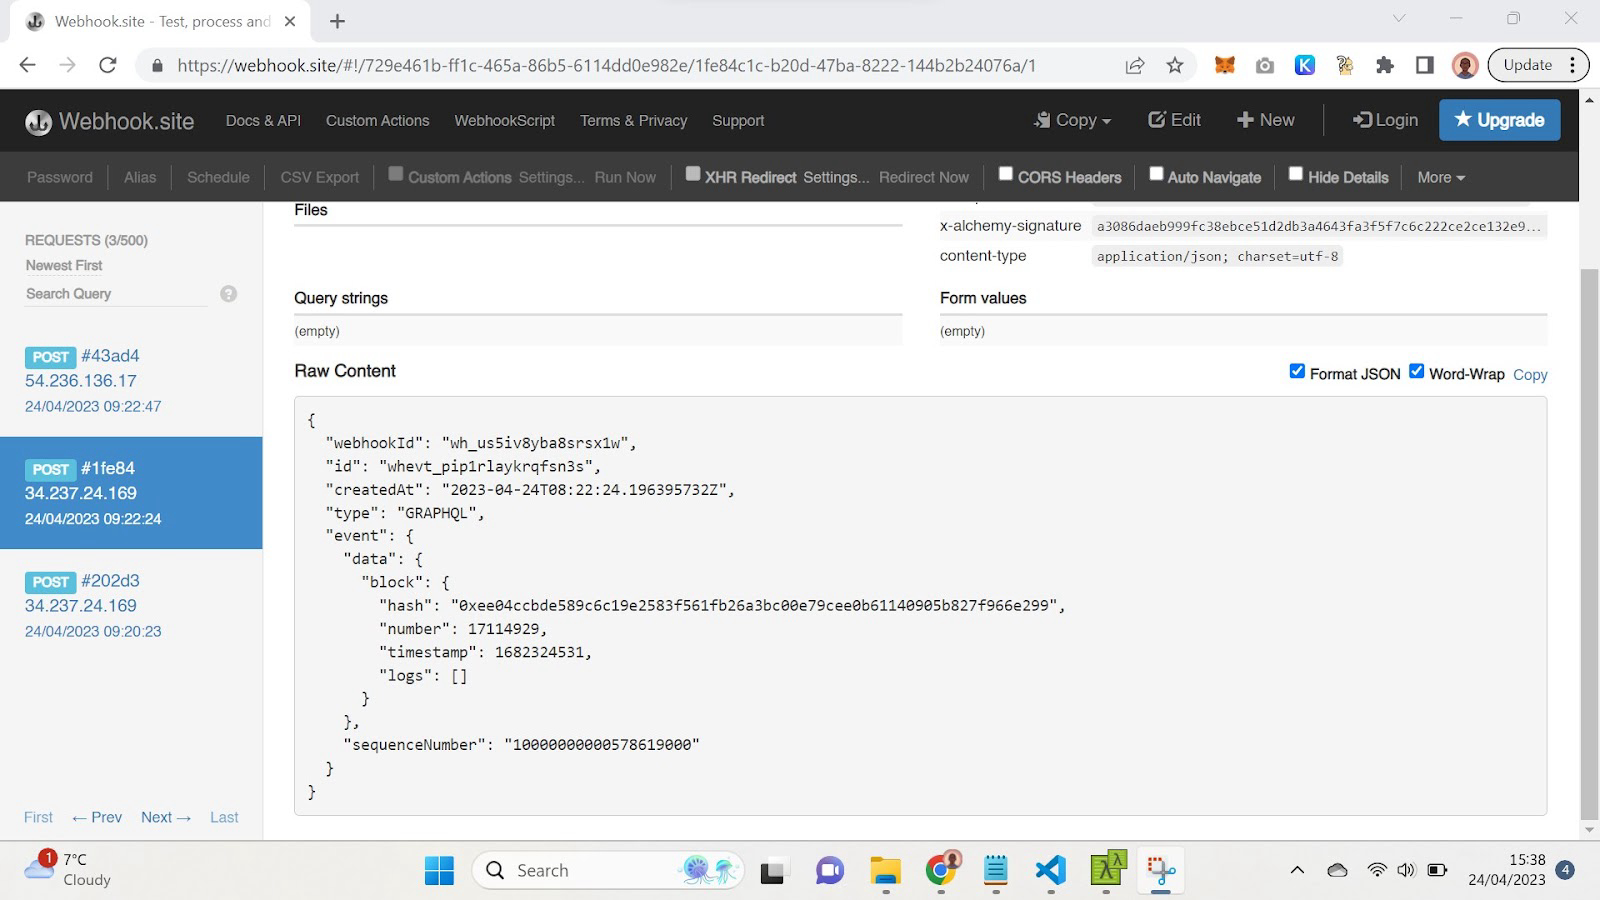
Test the webhook with webhook.site.
Visit webhook.site and copy the URL it gives you.
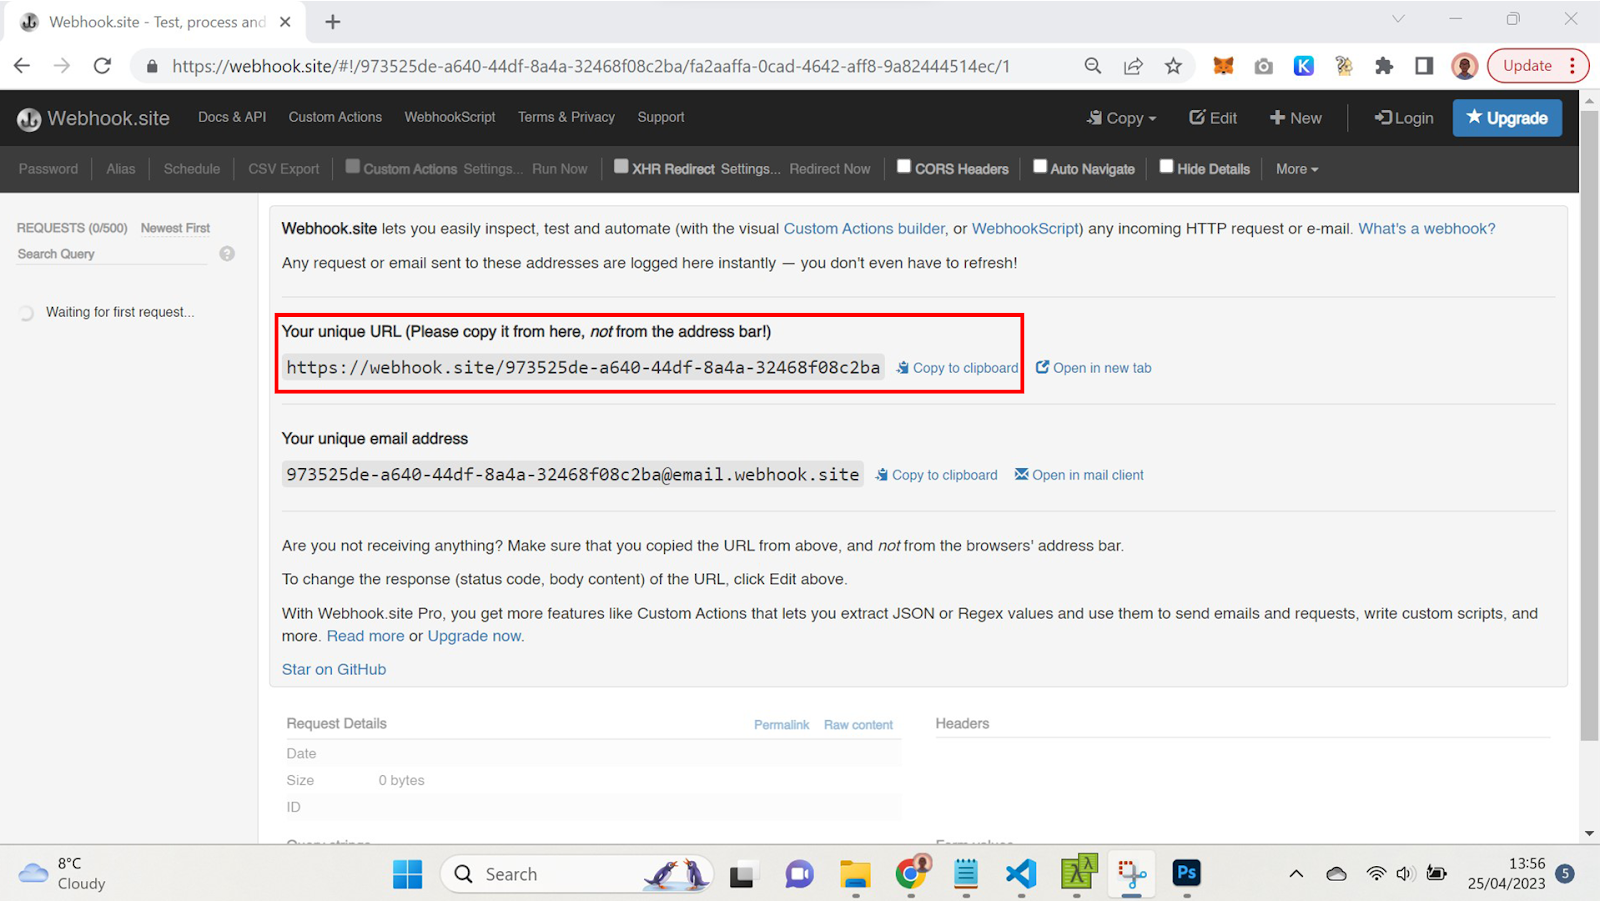
Paste that into the URL field of your webhook creator. Click the “Test Webhook” button to get a test result sent to webhook.site
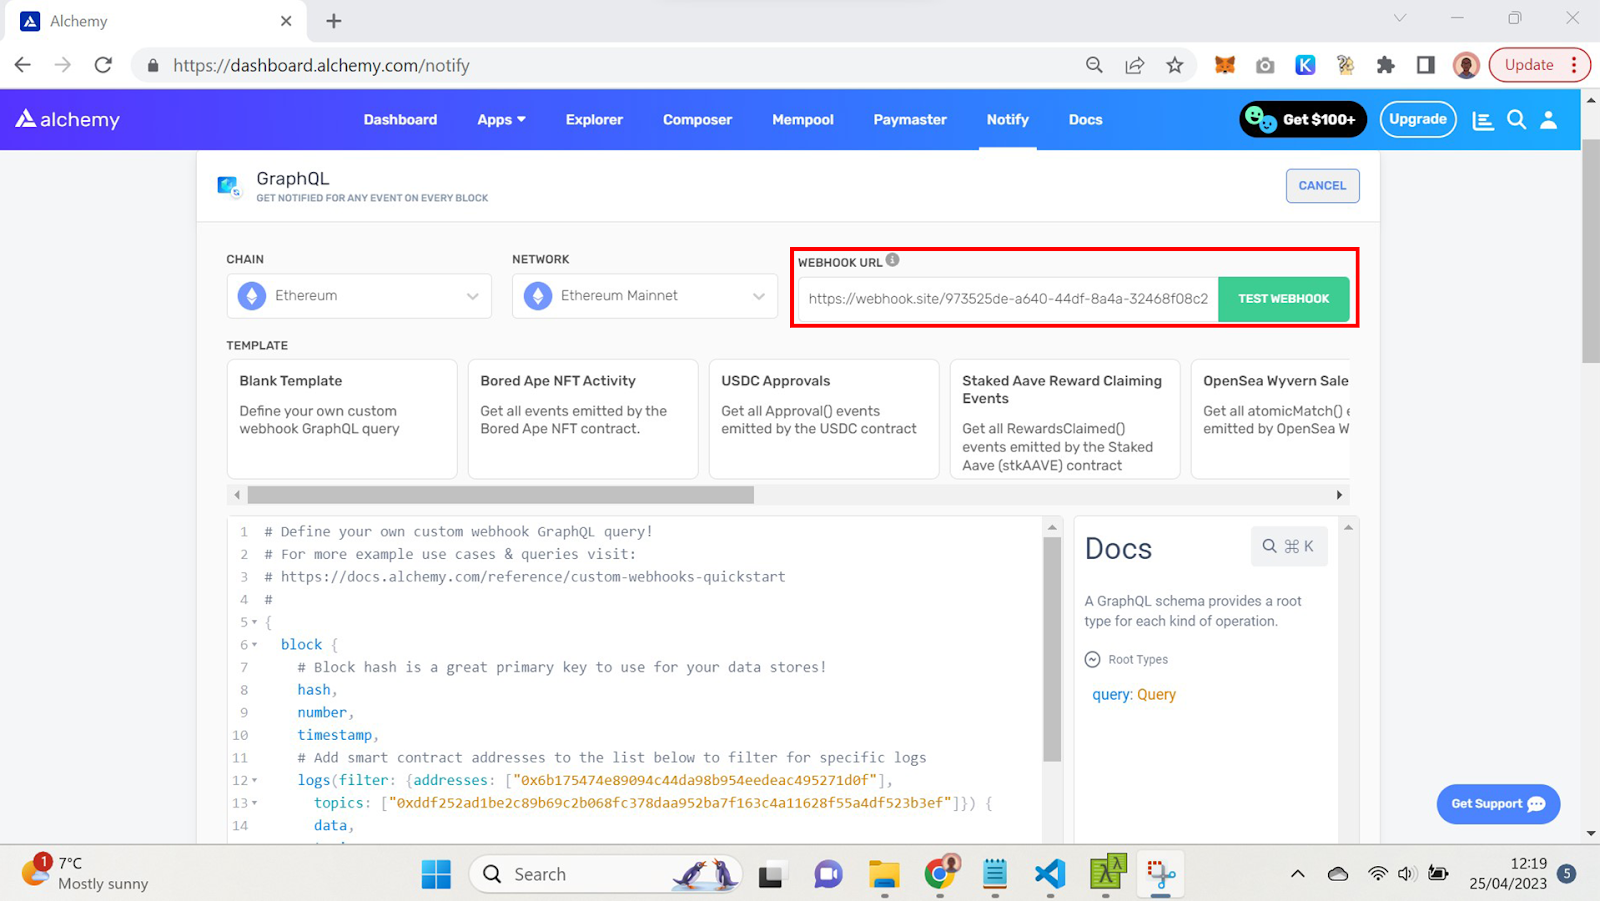
If your target event was emitted in the most recent block on the blockchain (.eg. your tracking DAI transfers and some DAI transfers happened in that block) then you will receive data on those logs

If the most recent block did not contain any of your logs then you will receive an empty response like this:
Now that you know how to configure a notifications webhook we are going to build the server that will receive the webhook responses and transform them into a Discord message
Step 4: Building the Discord Bot with Python
We've reached the exciting part - building our Discord app using Python and Flask, a popular framework for building web applications and APIs. Flask provides all the functionality needed to receive HTTP requests from Alchemy and respond accordingly. We'll write and host this new app on Replit.
Setting up the Python App on Replit
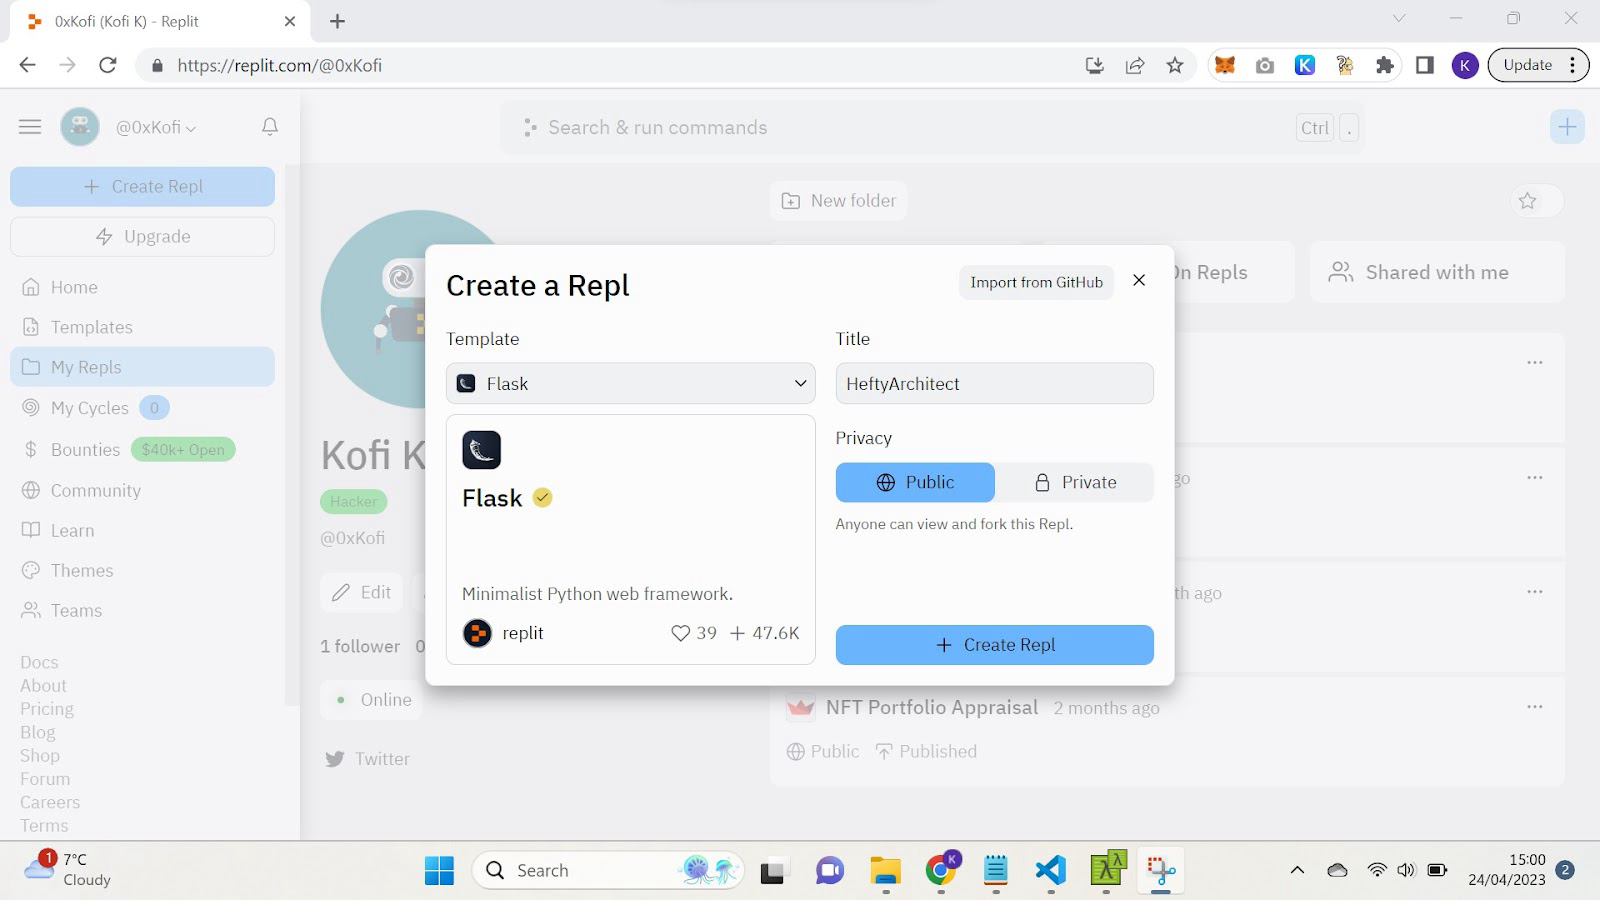
- Log into Replit and click the "Create Repl" button in your menu.
- Search and select the Flask template. Name the project whatever you like.
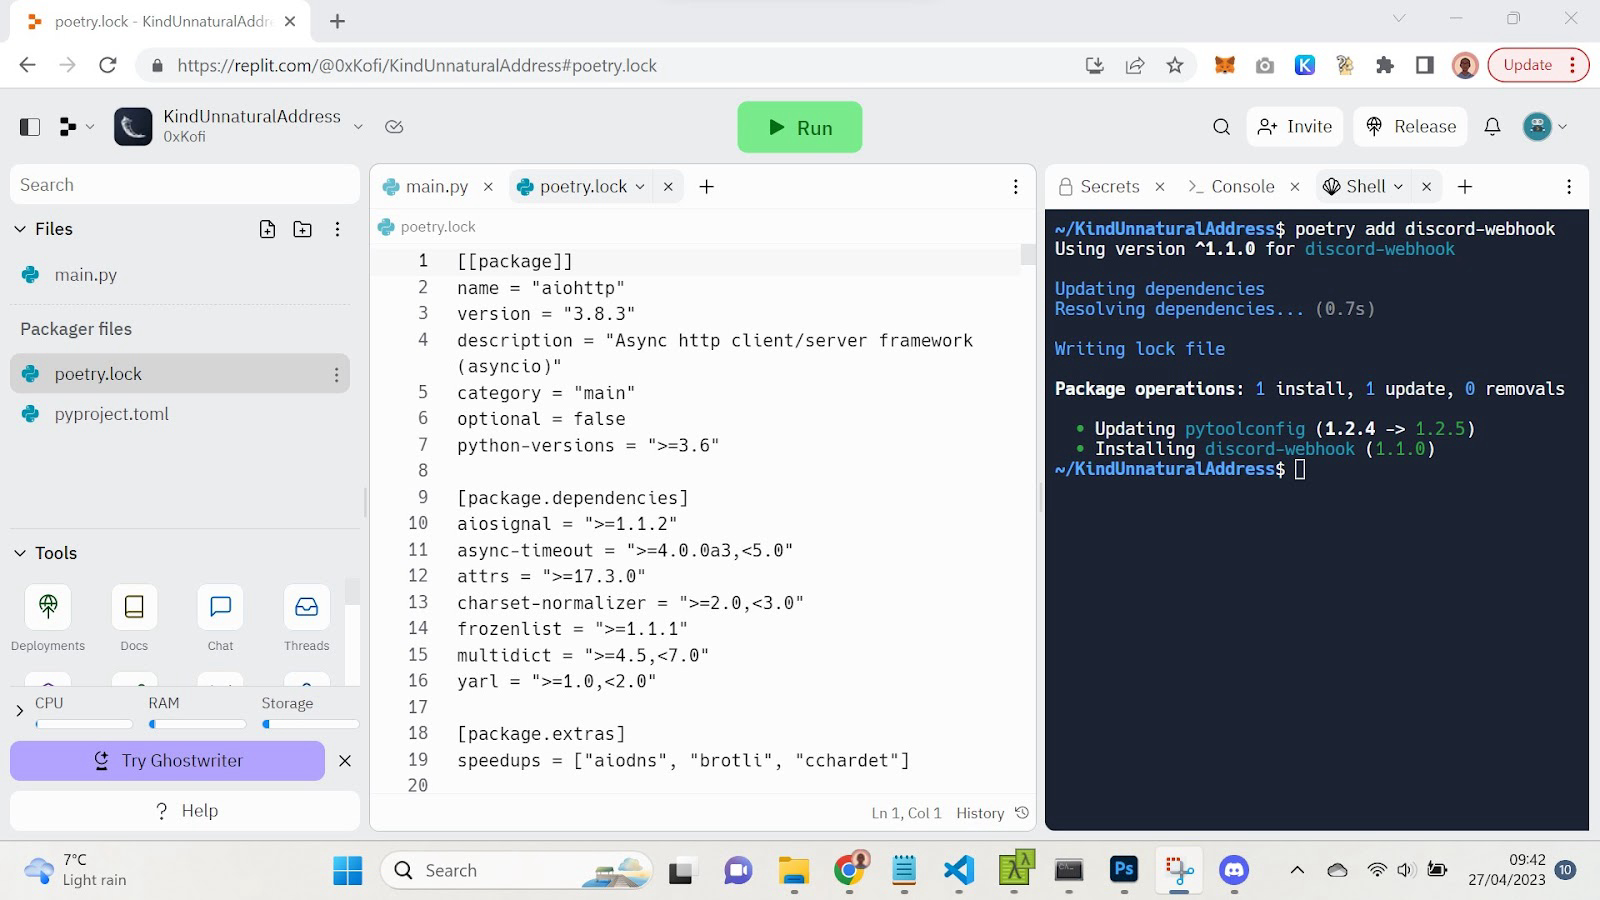
- Run
poetry add discord-webhook. This installs a package that will help you communicate with the Discord API
Write the following code in your main.py file. This script is tailored to the DAI transfer notification example we've been discussing.
import os
import requests
from flask import Flask, request, Response
from discord_webhook import DiscordWebhook

app = Flask(__name__)

# Set up Discord webhook URL
DISCORD_WEBHOOK_URL = os.environ['DISCORD_WEBHOOK_URL']

@app.route('/notify', methods=['POST'])
def notify():
  # Extract logs from request
  logs = request.json['event']['data']['block']['logs']

  # Check if logs array is empty
  if (len(logs) == 0):
    print("Empty logs array received, skipping")
  else:
    # Loop through each log in the logs array
    for i in range(0, len(logs)):
      # Extract topic1, topic2, and amount from the log
      topic1 = "0x" + logs[i]['topics'][1][26:]
      topic2 = "0x" + logs[i]['topics'][2][26:]
      amount = "{:.3f}".format(int(logs[i]['data'], 16) / float(1e18))

      # Create message to send to Discord
      message = topic1 + ' sent ' + amount + ' DAI to ' + topic2

      # Send the message to the Discord channel
      webhook = DiscordWebhook(url=DISCORD_WEBHOOK_URL, content=message)
      webhook.execute()

  # Return a success response to the request
  return Response(status=200)

# Start Flask app
if __name__ == '__main__':
  app.run(host='0.0.0.0', port=81)
Understanding the Code
The first statements import the Flask and Discord API packages that we'll need:
import os
import requests
from flask import Flask, request, Response
from discord_webhook import DiscordWebhook
Then we create a new Flask app:
app = Flask(__name__)
These next lines set up the interface for communicating with our Discord bot. We need to give it the unique key that grants it control of the bot.
Soon I'll show you how to create a new webhook on the Discord side and get the URL for it.
For safety reasons, we don't just copy-paste that URL out in the open here where everyone can see it; we store it secretly in an environment variable called DISCORD_WEBHOOK_URL. Because anyone who has the URL for our webhook will be able to send messages to our Discord channel.
DISCORD_WEBHOOK_URL = os.environ['DISCORD_WEBHOOK_URL']
Next, we write the handler that actually receives and processes the raw data we get from Alchemy. This handler has logic that is specifically written for the DAI Transfer use case, but you can edit it to fit any other event use case.
@app.route('/notify', methods=['POST'])
def notify():
Here's what happens. The Alchemy webhook sends a request to the /notify endpoint.
The handler logic extracts log data from the request.
logs = request.json['event']['data']['block']['logs']
If there aren't any Transfer logs in that block, then Alchemy will just send us an empty logs dataset. We'll note that and move on.
 if (len(logs) == 0):
    print("Empty logs array received, skipping")
If there are "Transfer" logs, we will loop through all of them. For each log, we will save the sender address ( which we know will be in topic1) and the receiver address, which we know will be in topic2 (there's logic here for getting rid of extra leading 0s).
And we will save the amount, which we know will be in the data field. There's a logic here for converting it from hexadecimal to decimal and dividing it by 1e18 (standard multiplier for token quantities).
topic1 = "0x" + logs[i]['topics'][1][26:]
topic2 = "0x" + logs[i]['topics'][2][26:]
amount = "{:.3f}".format(int(logs[i]['data'], 16) / float(1e18))
Then we craft a message with those three data points: Wallet A sends X amount of DAI to Wallet B.
message = topic1 + ' sent ' + amount + ' DAI to ' + topic2
We will then send the message to the Discord channel using the Discord webhook.
webhook = DiscordWebhook(url=DISCORD_WEBHOOK_URL, content=message)
webhook.execute()
Finally, we will respond to Alchemy with this 200 message to let Alchemy know that we got their message ok. If Alchemy doesn't get that 200 message, it'll keep retrying to send us the message.
return Response(status=200)
This statement runs our main Flask app when the script is called.
if __name__ == '__main__':
  app.run(host='0.0.0.0', port=81)
That's how this app works!
Next, we're going to create a new webhook on the Discord side and link it to this server by providing the server with its URL.
Step 5: Setting up a Discord Webhook
To create a webhook on Discord and link it to your server, follow these steps:
- Open the Discord server where you'd like to receive notifications.
- Select a channel for your notifications, or create a new channel for this purpose.
- Click on the gear icon next to the channel name to access the channel settings.
- Navigate to the "Integrations" tab.
- Click on the "Create Webhook" button.
You can customize the webhook's name, avatar, and the channel it will post to. Once you're satisfied with your settings, click on "Copy Webhook URL" at the bottom of the window. This URL is what you'll use in the Python script to send messages to the Discord channel.

Now that you have the webhook URL, you'll need to set it as an environment variable in Replit. Open the Secrets tool in Replit. Create a new Secrets variable named DISCORD_WEBHOOK_URL and paste the webhook URL you copied earlier.
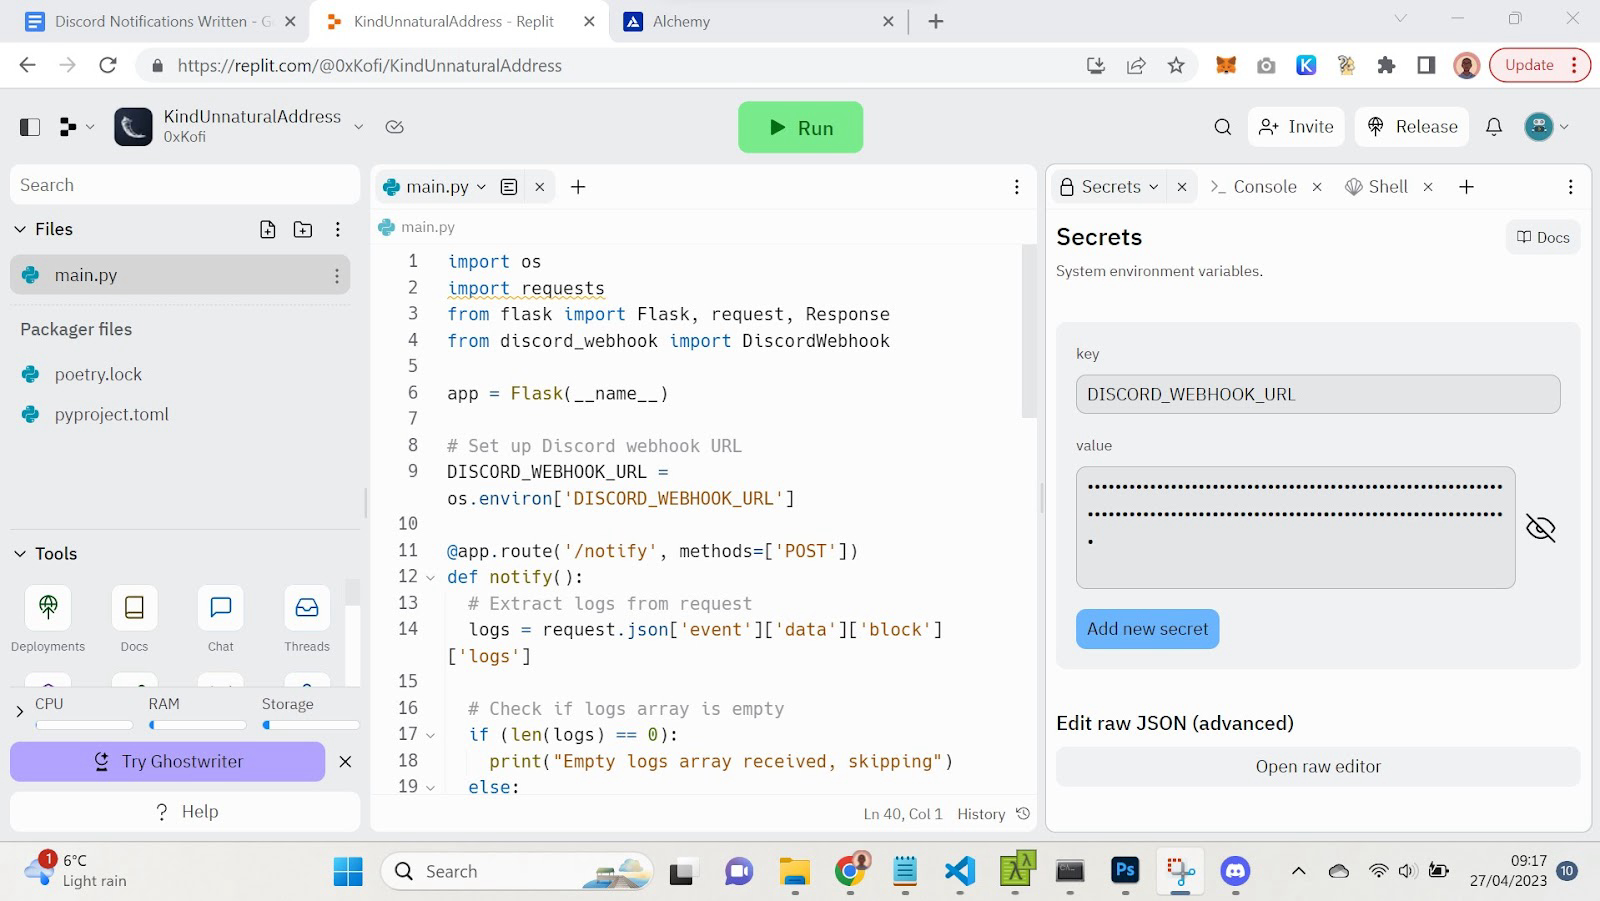
With the environment variable set, your Python script will be able to access the Discord webhook and send notifications to the specified channel.
To complete the app, we'll need Alchemy to begin sending notifications to our Flask server. Set up a new Alchemy webhook for the event you're interested in tracking and provide the URL of your replit project. The server’s URL will follow the pattern <project_name>.<user_name>.repl.co/notify (where notify is the endpoint specified in our code for receiving alchemy data).
Once you've entered the URL, click "Create Webhook" to activate it, and you'll start receiving notifications from Alchemy whenever the specified on-chain event takes place.
Run your script on Replit, and you should start receiving notifications in the Discord channel whenever the specified on-chain event occurs.
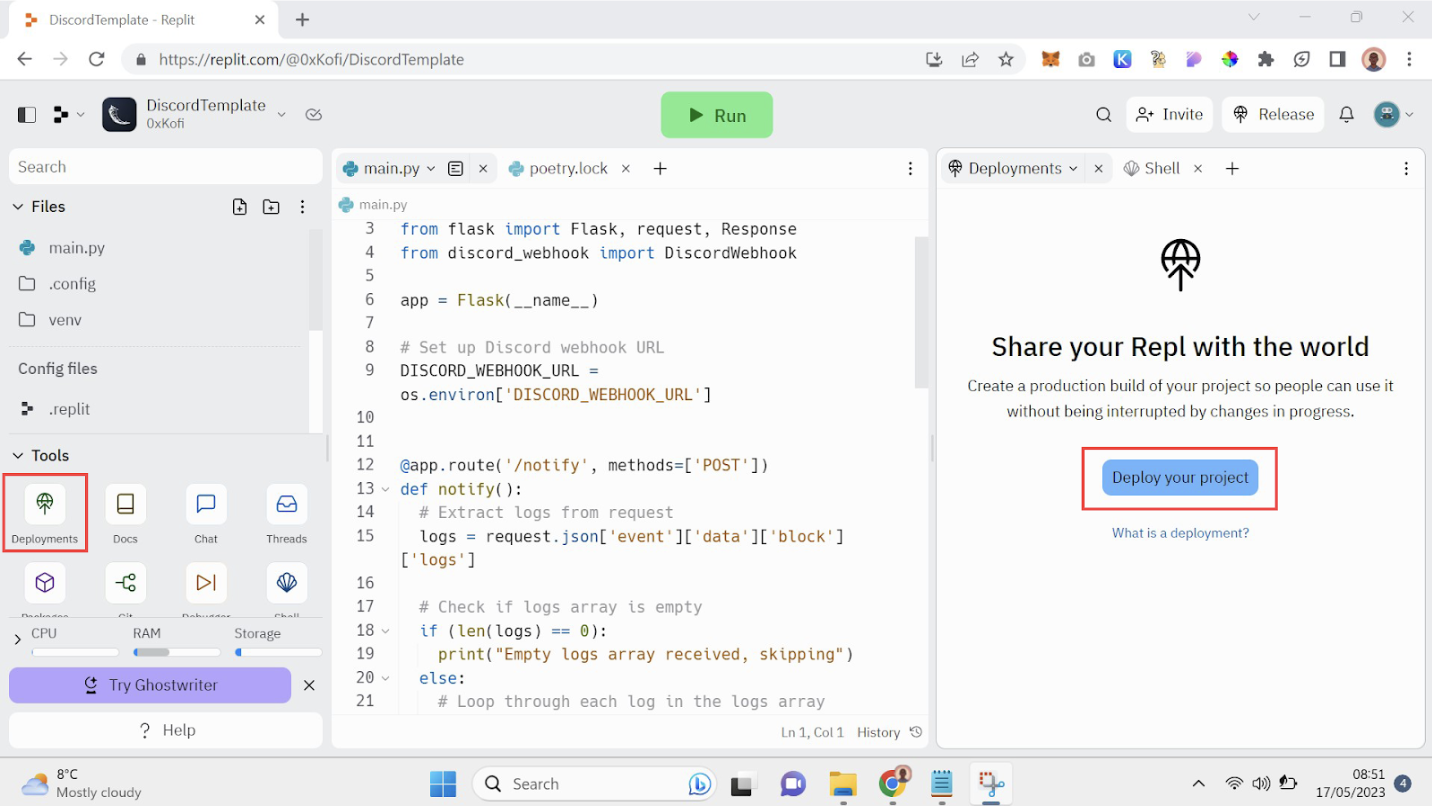
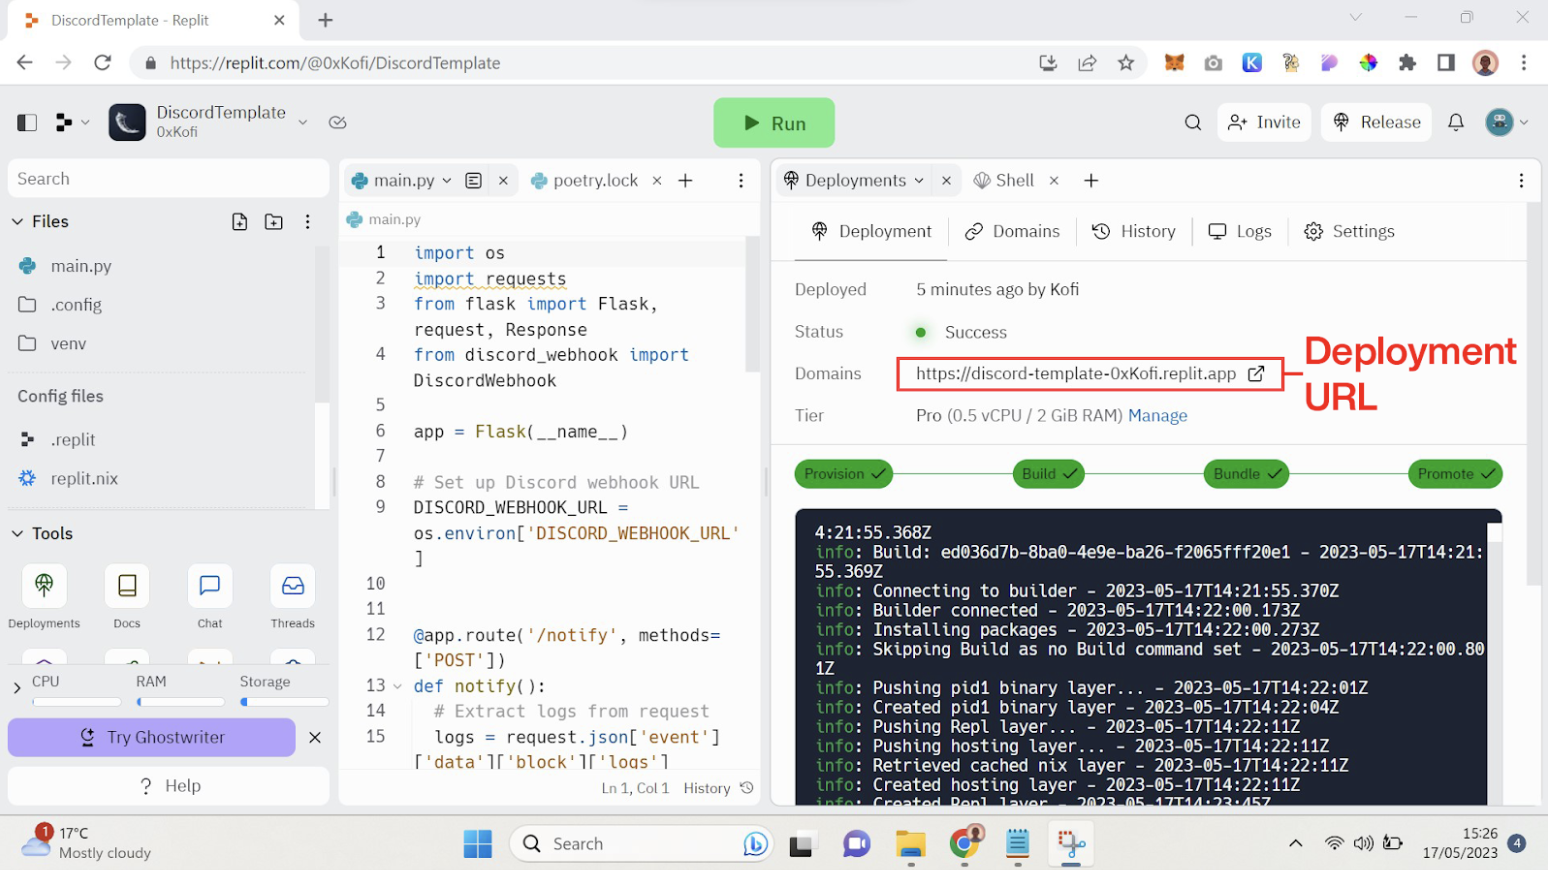
Development
Your development server will stop running when you close the Replit window. To keep it live all the time, you can use Replit Deployments.
If you use a Deployment, make sure to use the Deployment URL in your Alchemy webhook instead of the development URL.
You made it 🥳
Congratulations! You've successfully created a Discord notification bot using Alchemy's Notifications Webhook product. You can now customize your bot further, modify the events it listens for and expand its functionality based on your requirements.
You can also use Alchemy Notifications to create bots for other platforms such as Slack and email. Here is an example of how to make a Telegram bot for on-chain events.
This guide focused on Ethereum but Alchemy Notifications also supports Polygon, Optimism, and Arbitrum.
Let me know on Twitter (@0xKofi) if you have any feedback about this tutorial. Can't wait to see all the cool stuff you guys make!
Happy coding!
Updated over 1 year ago