How to Integrate a Solana Program with a Web3 Application
This tutorial walks through creating a frontend application that will read and write data from your very first Solana Program using Phantom and Alchemy. It’s the best way to introduce yourself to Solana development.
1. Introduction
Congrats on making it this far! You’ve already deployed your Solana program, and now we’ll build a frontend application that will interact with the program to allow you write and update a message you’ll store on the Solana blockchain! By the end of this tutorial, you’ll know how to connect your web3 app to a user’s Phantom Wallet and use your previously deployed Solana program to store a message that anyone can change. And we’re going to get through it together!
Like before, you can find the finished product here on Github, and the visual below is what you're gonna build:.
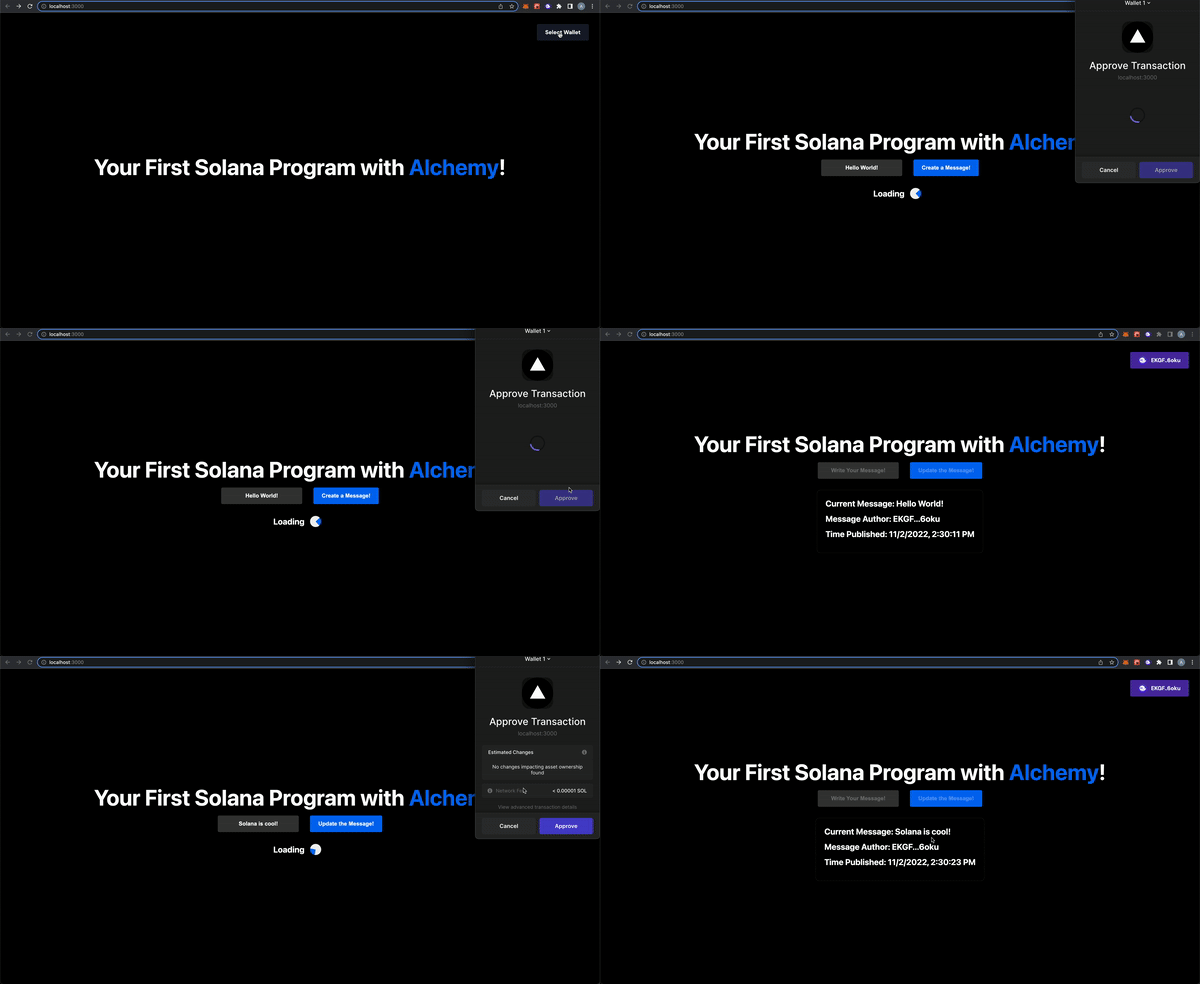
You’ll see that each step of this tutorial corresponds to a git commit, like a progress checkpoint to help guide you through. If you have questions at any point feel free to reach out in the Alchemy Discord or post questions in our Discussion Forum! You ready? Let’s go 😎!
2. Setup Your Application
Creating the Application
In the Hello World Solana Program tutorial, we setup our Anchor project named solana-hello-world. From the terminal make you’re in that project directory. In that project, you’ll find an empty app folder. We will overwrite that empty app folder with a Next.js Typescript starter code template that will be the base for our web3 application!
yarn create next-app --typescript app
Now, the app folder will have a few different subfolders and files, which you can view with your favorite code editor like VSCode. The most important ones for us are:
- A
pagesfolder that contains the actually application code we are going to write.- The
pages/apifolder is where our code that will connect to our Solana program will live. - The
_app.tsxandindex.tsxis where our frontend code will live.
- The
- A
stylesfolder that contains the CSS files for our application. We’ll edit theHome.module.cssonce and then you don’t have to worry about it!
Next, let’s get into the app folder and install the dependencies we'll need for Anchor, Solana, and Phantom:
cd app
yarn add @project-serum/anchor @solana/web3.js @solana/wallet-adapter-react @solana/wallet-adapter-react-ui @solana/wallet-adapter-wallets @solana/wallet-adapter-base
This git commit is a checkpoint for you to make sure you’ve successfully created your application! By now, you should have been able to create your Next.js project add the relevant dependency libraries we’ll use later. If so, let’s keep going!
Setting Up Your Initial Frontend
Using your favorite code editor (like VSCode), look at your app/pages/index.tsx. It has a lot of boilerplate that we don’t need, so delete all the code and add this to start:
import styles from "../styles/Home.module.css";

export default function Home() {
  return (
    <div className={styles.container}>
      <div className={styles.main}>
        <h1 className={styles.title}>
          Your First Solana Program with{" "}
          <a href="https://alchemy.com/solana/?a=d0c917f7ef">Alchemy</a>!
        </h1>
      </div>
    </div>
  );
}
All this is doing is rendering a giant title for your application! Next, look at your app/styles/Home.module.css file. Same thing - there’s a lot of boiler plate here. Delete the code and add this:
.container {
  padding: 2rem;
}

.navbar {
  display: flex;
  justify-content: flex-end;
  width: 100%;
}

.main {
  min-height: 80vh;
  padding: 64px 0;
  flex: 1;
  display: flex;
  flex-direction: column;
  justify-content: center;
  align-items: center;
}

.title {
  margin: 0;
  line-height: 1.15;
  font-size: 64px;
  text-align: center;
}

.title a {
  color: #0070f3;
}

.title a:hover,
.title a:focus,
.title a:active {
  text-decoration: underline;
  border-color: #0070f3;
}

.message_bar {
  display: flex;
  justify-content: center;
}

.message_input {
  border: none;
  font-size: 16px;
  font-weight: 600;
  height: 48px;
  padding: 0 24px;
  border-radius: 4px;
  margin: 16px;
  text-align: center;
}

.message_button {
  background-color: #0070f3;
  border: none;
  cursor: pointer;
  font-size: 16px;
  font-weight: 600;
  height: 48px;
  padding: 0 24px;
  border-radius: 4px;
  margin: 16px;
  text-align: center;
}

.card {
  margin: 16px;
  padding: 24px;
  text-align: left;
  color: inherit;
  border: 1px solid #eaeaea;
  border-radius: 10px;
  transition: color 0.15s ease, border-color 0.15s ease;
  max-width: 600px;
}

.card h2 {
  margin: 0 0 16px 0;
  font-size: 24px;
}

@media (prefers-color-scheme: dark) {
  .card {
    border-color: #222;
  }
}

.loader_bar {
  display: flex;
  justify-content: center;
  align-items: center;
}

.loader {
  border: 16px solid #f3f3f3;
  border-top: 16px solid #0070f3;
  border-radius: 50%;
  width: 30px;
  height: 30px;
  animation: spin 2s linear infinite;
  margin: 16px;
}

@keyframes spin {
  0% {
    transform: rotate(0deg);
  }
  100% {
    transform: rotate(360deg);
  }
}
Don’t worry too much about CSS! All this is doing is making our application look pretty. We don’t need CSS to use our Solana program and create our web3 application. It just looks nicer 😅. If you’re still curious, you can learn more about it here.
Awesome! We’re ready to look at our app! You can view your application on [http://localhost:3000/](http://localhost:3000/) by running the following from your app directory on your terminal:
yarn dev
You should see something like this:
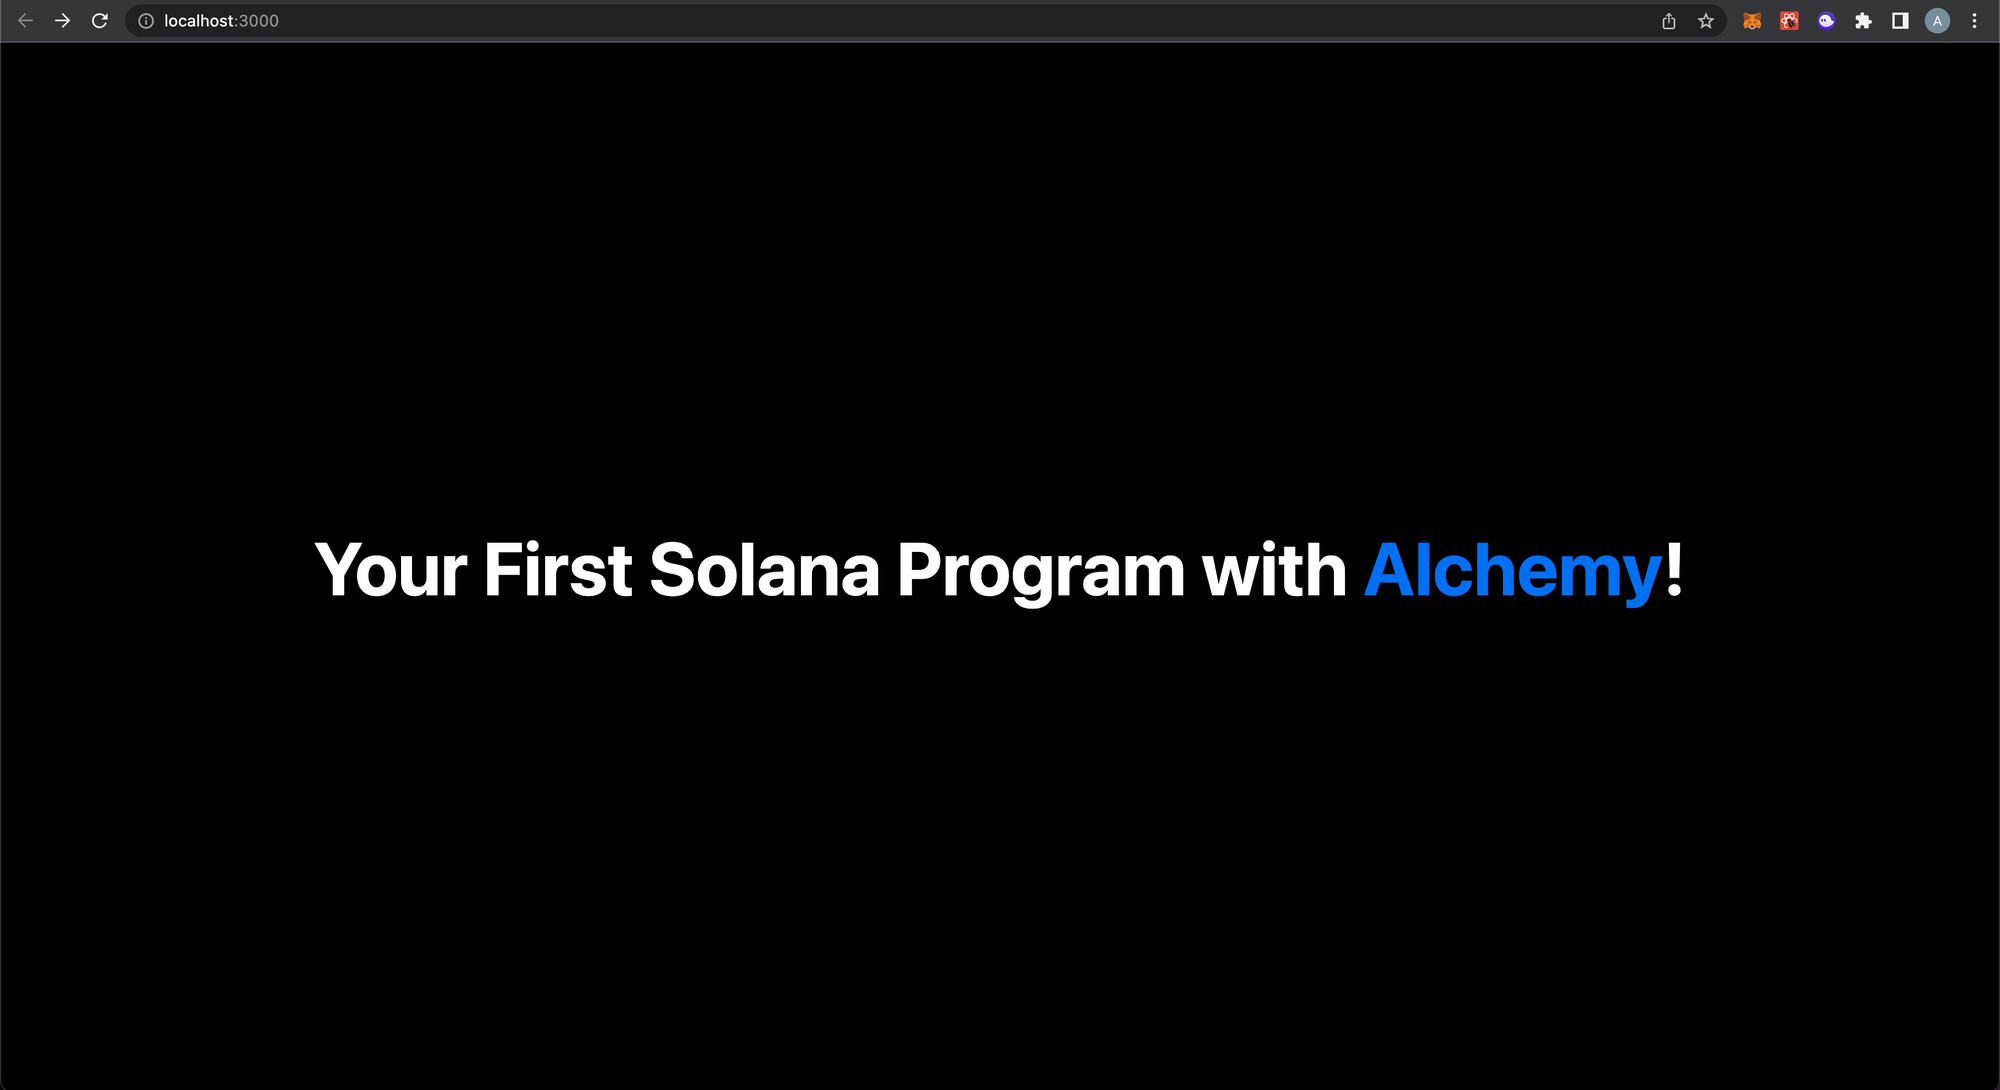
Amazing 🤩! You have a working web3 application. We haven’t added anything blockchain specific yet, but we’re about to! Make sure your code lines up with this git commit checkpoint. Alright, now CTRL+C from your terminal to stop your app from running for now. We have some changes to make.
Add the Solana Program IDL
To eventually connect to our Solana program, we’re going to need to add the IDL files that were generated when we ran anchor build in the last tutorial. Since you’re still in your app folder on your terminal, use this command to add the IDL and types files to our web3 application code to use later:
cp -r ../target/idl ./pages/api/idl
cp -r ../target/types ./pages/api/types
One more git commit checkpoint here to make sure you’re good to go! You should make sure your web3 application looks as amazing as the screenshot above! Your code should match this exactly - if not, copy and paste from it to make sure you’re up-to-date. Things are about to get interesting 😏
3. Connect Alchemy And Your Phantom Wallet
Adding the Alchemy RPC URL
Alright! Let’s add a way for users to connect to your application using their wallet. A reminder, most people in the Solana ecosystem use Phantom as their wallet of choice. When a wallet connects to an application, it’s giving the app permission to send transaction on its behalf. To send transactions on behalf of our users, we’ll need our Alchemy RPC URL again.
Forgot to get an Alchemy account and Phantom wallet?
You should have an Alchemy account and Phantom wallet from the previous tutorials! If you didn’t make them, you can go here to create an Alchemy Account, and follow this setup tutorial to download Phantom.
We’ll use our Alchemy RPC URL as an environment variable in our Next.js application, so we’ll need to create an .env.local file at the top-level app folder. Add this line and you’re golden:
NEXT_PUBLIC_ALCHEMY_RPC_URL="https://solana-devnet.g.alchemy.com/v2/<YOUR-API-KEY>"
Why are we making a special file for our Alchemy RPC URL?
Eventually, you’re going to want to push your code to a Github repository, you don’t want to hardcode private information like your Alchemy RPC URL in your application. Otherwise, someone can find it and then spam your connection if they’re not very nice. So instead, we use
.env.localto hide your Alchemy RPC URL and its API KEY. And thanks to yourapp/.gitignorefile, this specific file.emv.localwon’t ever be pushed to Github. Problem solved!
Here’s a quick git commit checkpoint for you to confirm you did this right! To clarify, I added a .env.local.example file, but locally you should have a.env.local file (it won’t be tracked by Github). You should also have added your API Key.
Adding Constants and Helper Functions
Now that we set up our Alchemy RPC URL, we need to add some other variables that the rest of our application will use on top of this private environment variable. With app as our home directory,, under the api folder, let’s make a new folder called utils and then create a file called constants.ts to add the following:
import idl from "../idl/solana_hello_world.json";
import { Connection, PublicKey, clusterApiUrl } from "@solana/web3.js";

/* Constants for RPC Connection the Solana Blockchain */
export const commitmentLevel = "processed";
export const endpoint =
  process.env.NEXT_PUBLIC_ALCHEMY_RPC_URL || clusterApiUrl("devnet");
export const connection = new Connection(endpoint, commitmentLevel);

/* Constants for the Deployed "Hello World" Program */
export const helloWorldprogramId = new PublicKey(idl.metadata.address);
export const helloWorldprogramInterface = JSON.parse(JSON.stringify(idl));
Walking through this line-by-line:
- First, we imported the IDL and then some relevant classes from the Solana web3 library.
- We then create some constants to denote the
commitmentLevelwe’ll look for in ourconnectionto the Solana blockchain through our Alchemy RPC URLendpoint. - Lastly, we’ll add constants from the IDL we imported earlier to have easy access to our
helloWorldprogramIdandhelloWorldprogramInterface. We’ll keep them in the same file, and they’ll be useful when we make calls to our Solana program in the next step.
What is a commitment level?
The commitment describes how finalized a block containing transactions is at that point in time. You may know that blockchains are just a chain of bundles of transactions, called blocks. Before being appended to the chain to be read by applications, blocks that require confirmation from nodes in the network, which takes time. The commitment level determines how many nodes in the network need to confirm the block before it’s ready to be read through a client for a web3 application. The more nodes that confirmed, the more likely the block was truly appended to the blockchain.
Essentially, it’s a tradeoff how fast vs. safe you want your application to be when it comes to reading transactions from Solana, where
processedis fastest andfinalizedis most safe. Typically, people go in the middle withconfirmed, but for this application we can useprocessed.You can read more here about this!
While we’re in app/pages/api/utils, let’s add one more file called useIsMounted.ts and this content:
import { useEffect, useState } from "react";

export default function useIsMounted() {
  const [mounted, setMounted] = useState(false);

  useEffect(() => {
    setMounted(true);
  }, []);

  return mounted;
}
Without this, you’re going to run into a Hydration Error when integrating your Phantom wallet. This isn’t too important - the main takeaway we need to access the window.solana object, which won’t be accessible to our application until after our component mounts. Through the React useEffect hook, we’re able to bypass this! (You can watch this video for a similar explanation with a different wallet library if you’re curious!).
Okay! Make sure your app constants and helper function are looking good - we'll have a git commit checkpoint after we add our Phantom wallet code now😁!
Integrating Your Phantom Wallet
First thing we have to do is go to our Phantom Wallet and adjust the network cluster to Devnet for it to work with our application. Click on the “Settings” button in the top left, then go to “Developer Settings.” Then click on “Change Network” to adjust the network to “Devnet.” Check out my screen recording GIF below:
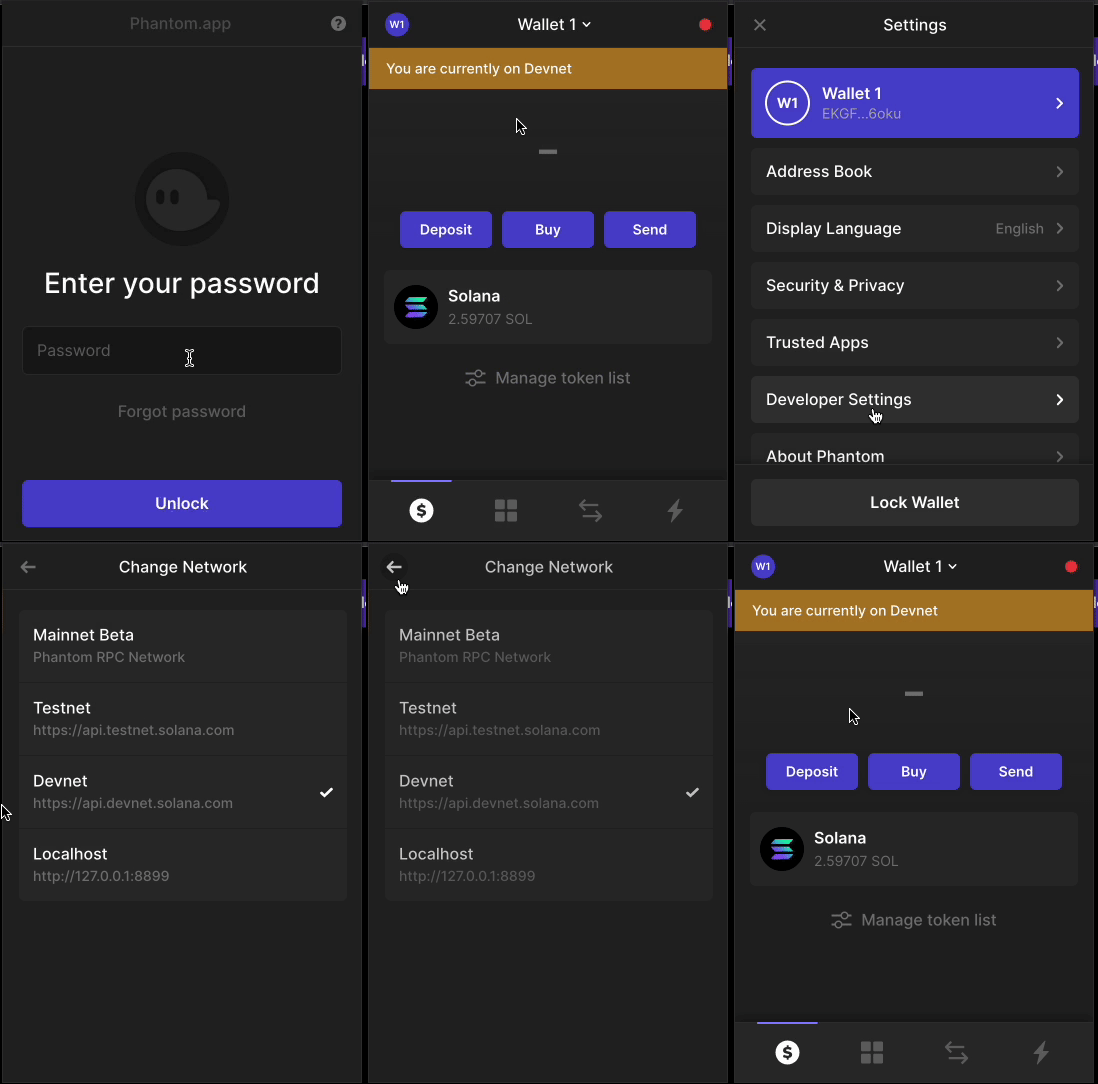
Now, let’s add some providers to our app/pages/_app.ts file to help support integrating a Phantom Wallet. Delete the boilerplate code in there and then add this:
import type { AppProps } from "next/app";
import { PhantomWalletAdapter } from "@solana/wallet-adapter-phantom";
import {
  ConnectionProvider,
  WalletProvider,
} from "@solana/wallet-adapter-react";
import { WalletModalProvider } from "@solana/wallet-adapter-react-ui";
import { endpoint } from "./api/utils/constants";
import "@solana/wallet-adapter-react-ui/styles.css";
import "../styles/globals.css";

function MyApp({ Component, pageProps }: AppProps) {
  const phantomWallet = new PhantomWalletAdapter();

  return (
    <ConnectionProvider endpoint={endpoint}>
      <WalletProvider wallets={[phantomWallet]}>
        <WalletModalProvider>
          <Component {...pageProps} />
        </WalletModalProvider>
      </WalletProvider>
    </ConnectionProvider>
  );
}

export default MyApp;
Let’s walk through each section:
- The first few lines are just importing the relevant libraries we installed in Step 1 to help with support different kinds of Solana wallets in our application.
- The
MyAppfunction is the top-level component that will render our application. We instantiated a variablephantomWalletto represent a way to connect to a user’s Phantom wallet in our app. We then render our application’s components. - A React Provider is just a wrapper around our application code, providing the context of what RPC URL endpoint we are using (Alchemy) and what wallets we want to show (Phantom). to our app from the Solana wallet libraries we installed. There’s a lot of detail that these libraries abstract away from us to be able to integrate a wallet seamlessly! Pretty cool 😄!
Cool! Now let’s add the Phantom Wallet to app/pages/index.tsx by editing it as so:
import { WalletMultiButton } from "@solana/wallet-adapter-react-ui";
import useIsMounted from "./api/utils/useIsMounted";
import styles from "../styles/Home.module.css";

export default function Home() {
  const mounted = useIsMounted();

  return (
    <div className={styles.container}>
      <div className={styles.navbar}>{mounted && <WalletMultiButton />}</div>

      <div className={styles.main}>
        <h1 className={styles.title}>
          Your First Solana Program with{" "}
          <a href="https://alchemy.com/solana/?a=d0c917f7ef">Alchemy</a>!
        </h1>
      </div>
    </div>
  );
}
Some small changes from last time we touched this file:
- We imported some libraries to help with our wallet button.
- We added the
mountedfunction to make sure our wallet button renders only until after the component has mounted, as described earlier. - We added our wallet button to appear at the top right of our app using the
WalletMultiButtoncomponent!
At this your app should look like this:
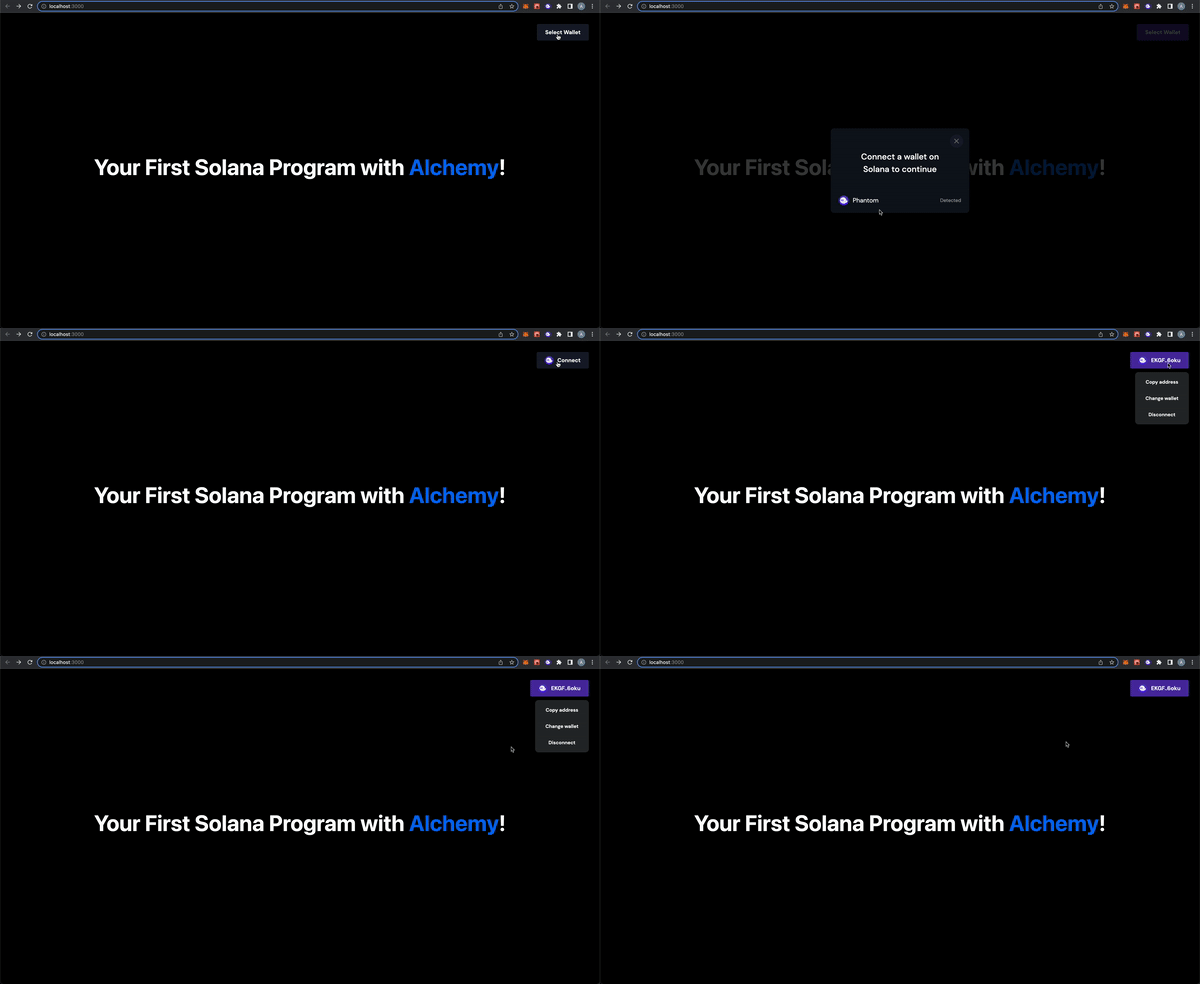
Nice 🥳! We’ve successfully connected a Phantom wallet to your application! Now, you can write code that sends transactions on behalf of the user (with their approval) to write data to the Solana blockchain. Here’s a git commit checkpoint. Let’s keep going!
4. Connect the App to Your Solana Program
Now we made it to the cool part - connecting to the Solana program we deployed 😤! Really quickly, airdrop some SOL to your Wallet since we’re going to need it soon.
solana airdrop 3
Making a Create Message API
Let’s go over what we want our app to do:
- When a user successfully connects their wallet, we want to show an input form for a user to write a message.
- Then, a user should press a button to write that message to the Solana blockchain.
- Once it’s written, we should display on our application the details of the message, including its content, author (the user), and the time it was published.
We can actually do all of this by making calls to our Solana program. In our app/pages/api folder let’s rename hello.ts to createMessage.ts and then remove all the code and replace it with this:
import { Program, AnchorProvider, web3 } from "@project-serum/anchor";
import { SolanaHelloWorld } from "./types/solana_hello_world";
import {
  connection,
  commitmentLevel,
  helloWorldprogramId,
  helloWorldprogramInterface,
} from "./utils/constants";
import { AnchorWallet } from "@solana/wallet-adapter-react";

export default async function createMessage(
  inputtedMessage: string,
  wallet: AnchorWallet,
  messageAccount: web3.Keypair
) {
  const provider = new AnchorProvider(connection, wallet, {
    preflightCommitment: commitmentLevel,
  });

  if (!provider) return;

  /* create the program interface combining the idl, program Id, and provider */
  const program = new Program(
    helloWorldprogramInterface,
    helloWorldprogramId,
    provider
  ) as Program<SolanaHelloWorld>;

  try {
    /* interact with the program via rpc */
    const txn = await program.rpc.createMessage(inputtedMessage, {
      accounts: {
        message: messageAccount.publicKey,
        author: provider.wallet.publicKey,
        systemProgram: web3.SystemProgram.programId,
      },
      signers: [messageAccount],
    });

    const message = await program.account.message.fetch(
      messageAccount.publicKey
    );
    console.log("messageAccount Data: ", message);
    return message;
  } catch (err) {
    console.log("Transaction error: ", err);
    return;
  }
}
You’ll notice the code is actually very similar to what we wrote in our tests in the last tutorial! Let’s walk through it briefly:
- After importing relevant libraries and constants, our function will take in the
inputtedMessagefrom the user, the user’swallet, and theaccountthat our Program will initialize to save the message in. - We create a
providerobject, which if you remember from last tutorial, is our connection to Solana through 1) an RPC provider and 2) a Solana wallet address. Connection + Wallet = Provider! We also specify the same commitment level as before. - Lastly, we make a call to our Solana program to create the Message. Like in our tests in the last tutorial, we include the relevant accounts and signatures needed, along with the
inputtedMessageto make the call. We then fetch and return that message to use in our frontend!
Let’s incorporate this new API endpoint in our frontend code now! The full app/pages/index.tsx file should look like this now:
import { useState } from "react";
import { Keypair } from "@solana/web3.js";
import { useAnchorWallet } from "@solana/wallet-adapter-react";
import { WalletMultiButton } from "@solana/wallet-adapter-react-ui";
import useIsMounted from "./api/utils/useIsMounted";
import createMessage from "./api/createMessage";
import styles from "../styles/Home.module.css";

export default function Home() {
  const [messageAccount, _] = useState(Keypair.generate());
  const [message, setMessage] = useState("");
  const [messageAuthor, setMessageAuthor] = useState("");
  const [messageTime, setMessageTime] = useState(0);
  const [inputtedMessage, setInputtedMessage] = useState("");

  const wallet = useAnchorWallet();
  const mounted = useIsMounted();

  return (
    <div className={styles.container}>
      <div className={styles.navbar}>{mounted && <WalletMultiButton />}</div>

      <div className={styles.main}>
        <h1 className={styles.title}>
          Your First Solana Program with{" "}
          <a href="https://alchemy.com/solana/?a=d0c917f7ef">Alchemy</a>!
        </h1>

        {wallet && (
          <div className={styles.message_bar}>
            <input
              className={styles.message_input}
              placeholder="Write Your Message!"
              onChange={(e) => setInputtedMessage(e.target.value)}
              value={inputtedMessage}
            />
            <button
              className={styles.message_button}
              disabled={!inputtedMessage}
              onClick={async () => {
                const message = await createMessage(
                  inputtedMessage,
                  wallet,
                  messageAccount
                );
                if (message) {
                  setMessage(message.content.toString());
                  setMessageAuthor(message.author.toString());
                  setMessageTime(message.timestamp.toNumber() * 1000);
                  setInputtedMessage("");
                }
              }}
            >
              Create a Message!
            </button>
          </div>
        )}

        {wallet && message && (
          <div className={styles.card}>
            <h2>Current Message: {message}</h2>
            <h2>
              Message Author: {messageAuthor.substring(0, 4)}
              ...
              {messageAuthor.slice(-4)}
            </h2>
            <h2>Time Published: {new Date(messageTime).toLocaleString()}</h2>
          </div>
        )}
      </div>
    </div>
  );
}
We added a few things - let’s review:
- We imported more relevant libraries and our newly created
createMessagefunction - We included a few state variables that will be used.
messageAccountis the generated public-private keypair that will represent storage on the Solana blockchain for our message. We initialized it withKeypair.generate()message,messageAuthor,messageTimewill store the three corresponding components of a message - it’s content, author, and timestamp. We’ll use this to render ainputtedMessagewill track what the user inputs as a message in the newly created inputted field below until they submit it. When a message is written, we will clear this variable out.
- We then added an input field and button to our page so our user can input and submit a message if their wallet is connected.
- Lastly, if there is a message that was submitted and the user’s wallet is still connected, we’ll render the message’s content, author, and date published.
Now your app should look like this:
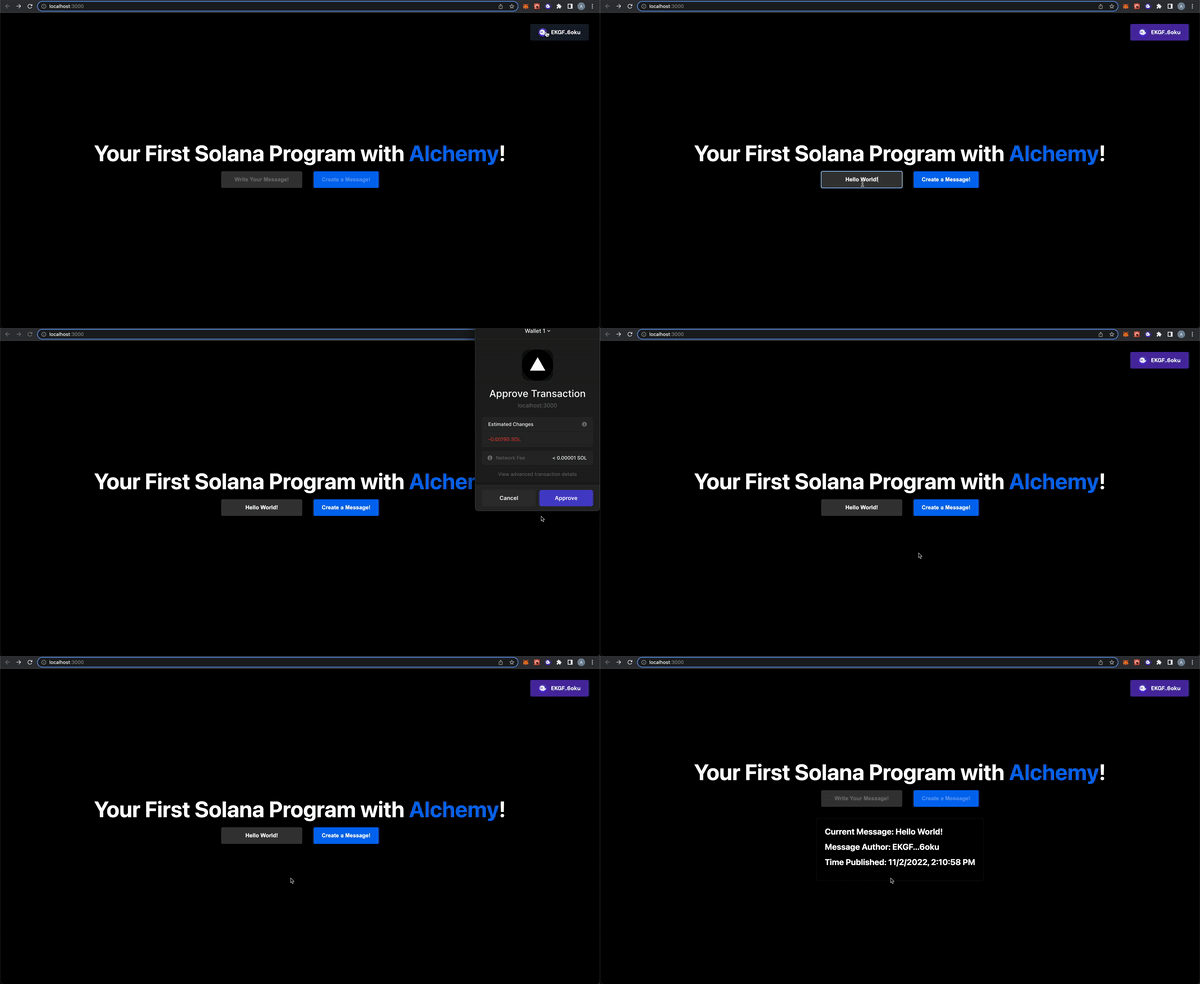
Look how far you’ve come 👨🎓! You’ve made an app that can connect a user’s wallet and submit to the blockchain a message they write, AND you’re able to show it on your application. So impressive. We’re 99% there - here’s a git commit checkpoint to make sure your code is all there.
Making an Update Message API
There is one thing left to do. If you try to write a message, and then write another message, you’ll get an error saying the message account was already initialized. We need to call the separate updateMessage function on our Solana program to edit the data in the message’s account.
In our app/pages/api folder, let’s add a updateMessage.ts file and then add this:
import { Program, AnchorProvider, web3 } from "@project-serum/anchor";
import { SolanaHelloWorld } from "./types/solana_hello_world";
import {
  connection,
  commitmentLevel,
  helloWorldprogramId,
  helloWorldprogramInterface,
} from "./utils/constants";
import { AnchorWallet } from "@solana/wallet-adapter-react";

export default async function updateMessage(
  inputtedMessage: string,
  wallet: AnchorWallet,
  messageAccount: web3.Keypair
) {
  const provider = new AnchorProvider(connection, wallet, {
    preflightCommitment: commitmentLevel,
  });

  if (!provider) return;

  /* create the program interface combining the idl, program Id, and provider */
  const program = new Program(
    helloWorldprogramInterface,
    helloWorldprogramId,
    provider
  ) as Program<SolanaHelloWorld>;

  try {
    /* interact with the program via rpc */
    const txn = await program.rpc.updateMessage(inputtedMessage, {
      accounts: {
        message: messageAccount.publicKey,
        author: provider.wallet.publicKey,
        systemProgram: web3.SystemProgram.programId,
      },
    });

    const message = await program.account.message.fetch(
      messageAccount.publicKey
    );
    console.log("updated messageAccount Data: ", message);
    return message;
  } catch (err) {
    console.log("Transaction error: ", err);
    return;
  }
}
This is nearly identical to createMessage, the only difference is the function we call on our Solana program now is updateMessage which doesn’t need the message account’s signature, just the signer (author), which is implicitly added. Everything else is the same!
Let’s integrate this in our app/pages/index.tsx file. The full code should look like this:
import { useState } from "react";
import { Keypair } from "@solana/web3.js";
import { useAnchorWallet } from "@solana/wallet-adapter-react";
import { WalletMultiButton } from "@solana/wallet-adapter-react-ui";
import useIsMounted from "./api/utils/useIsMounted";
import createMessage from "./api/createMessage";
import updateMessage from "./api/updateMessage";
import styles from "../styles/Home.module.css";

export default function Home() {
  const [messageAccount, _] = useState(Keypair.generate());
  const [message, setMessage] = useState("");
  const [messageAuthor, setMessageAuthor] = useState("");
  const [messageTime, setMessageTime] = useState(0);
  const [inputtedMessage, setInputtedMessage] = useState("");

  const wallet = useAnchorWallet();
  const mounted = useIsMounted();

  return (
    <div className={styles.container}>
      <div className={styles.navbar}>{mounted && <WalletMultiButton />}</div>

      <div className={styles.main}>
        <h1 className={styles.title}>
          Your First Solana Program with{" "}
          <a href="https://alchemy.com/solana/?a=d0c917f7ef">Alchemy</a>!
        </h1>

        {wallet && (
          <div className={styles.message_bar}>
            <input
              className={styles.message_input}
              placeholder="Write Your Message!"
              onChange={(e) => setInputtedMessage(e.target.value)}
              value={inputtedMessage}
            />
            <button
              className={styles.message_button}
              disabled={!inputtedMessage}
              onClick={async () => {
                const deployedMessage = message
                  ? await updateMessage(inputtedMessage, wallet, messageAccount)
                  : await createMessage(
                      inputtedMessage,
                      wallet,
                      messageAccount
                    );

                if (deployedMessage) {
                  setMessage(deployedMessage.content.toString());
                  setMessageAuthor(deployedMessage.author.toString());
                  setMessageTime(deployedMessage.timestamp.toNumber() * 1000);
                  setInputtedMessage("");
                }
              }}
            >
              {message ? "Update the Message!" : "Create a Message!"}
            </button>
          </div>
        )}

        {wallet && message && (
          <div className={styles.card}>
            <h2>Current Message: {message}</h2>
            <h2>
              Message Author: {messageAuthor.substring(0, 4)}
              ...
              {messageAuthor.slice(-4)}
            </h2>
            <h2>Time Published: {new Date(messageTime).toLocaleString()}</h2>
          </div>
        )}
      </div>
    </div>
  );
}
Let’s walk through the minor changes we made:
- Now, if there isn’t yet a message published, the button will use the
createMessagefunction. If there is a message published, the button will use theupdateMessagefunction.
Your app should now look like this:
Congrats! You now have the entire web3 app! Users can now write a message to the Solana blockchain, and later edit that same message! Here’s a git commit checkpoint to make sure your app is fully function.
[Optional] Prettifying Your Web3 App
You’ll notice it takes a while to update the UI while the message is being published. To make sure people don’t get confused starting at a screen that isn’t moving, let’s add a loading spinner. This is totally optional, but it’ll make the user experience much better!
In your app/pages/index.tsx let’s edit it to look like this:
import { useState } from "react";
import { Keypair } from "@solana/web3.js";
import { useAnchorWallet } from "@solana/wallet-adapter-react";
import { WalletMultiButton } from "@solana/wallet-adapter-react-ui";
import useIsMounted from "./api/utils/useIsMounted";
import createMessage from "./api/createMessage";
import updateMessage from "./api/updateMessage";
import styles from "../styles/Home.module.css";

export default function Home() {
  const [messageAccount, _] = useState(Keypair.generate());
  const [message, setMessage] = useState("");
  const [messageAuthor, setMessageAuthor] = useState("");
  const [messageTime, setMessageTime] = useState(0);
  const [inputtedMessage, setInputtedMessage] = useState("");
  const [loading, setLoading] = useState(false);

  const wallet = useAnchorWallet();
  const mounted = useIsMounted();

  return (
    <div className={styles.container}>
      <div className={styles.navbar}>{mounted && <WalletMultiButton />}</div>

      <div className={styles.main}>
        <h1 className={styles.title}>
          Your First Solana Program with{" "}
          <a href="https://alchemy.com/solana/?a=d0c917f7ef">Alchemy</a>!
        </h1>

        {wallet && (
          <div className={styles.message_bar}>
            <input
              className={styles.message_input}
              placeholder="Write Your Message!"
              onChange={(e) => setInputtedMessage(e.target.value)}
              value={inputtedMessage}
            />
            <button
              className={styles.message_button}
              disabled={!inputtedMessage}
              onClick={async () => {
                setLoading(true);
                const deployedMessage = message
                  ? await updateMessage(inputtedMessage, wallet, messageAccount)
                  : await createMessage(
                      inputtedMessage,
                      wallet,
                      messageAccount
                    );

                if (deployedMessage) {
                  setMessage(deployedMessage.content.toString());
                  setMessageAuthor(deployedMessage.author.toString());
                  setMessageTime(deployedMessage.timestamp.toNumber() * 1000);
                  setInputtedMessage("");
                }
                setLoading(false);
              }}
            >
              {message ? "Update the Message!" : "Create a Message!"}
            </button>
          </div>
        )}

        {loading ? (
          <div className={styles.loader_bar}>
            <h2> Loading</h2>
            <div className={styles.loader} />
          </div>
        ) : (
          wallet &&
          message && (
            <div className={styles.card}>
              <h2>Current Message: {message}</h2>
              <h2>
                Message Author: {messageAuthor.substring(0, 4)}
                ...
                {messageAuthor.slice(-4)}
              </h2>
              <h2>Time Published: {new Date(messageTime).toLocaleString()}</h2>
            </div>
          )
        )}
      </div>
    </div>
  );
}
This was a minor change:
- We added a state variable to see if our application
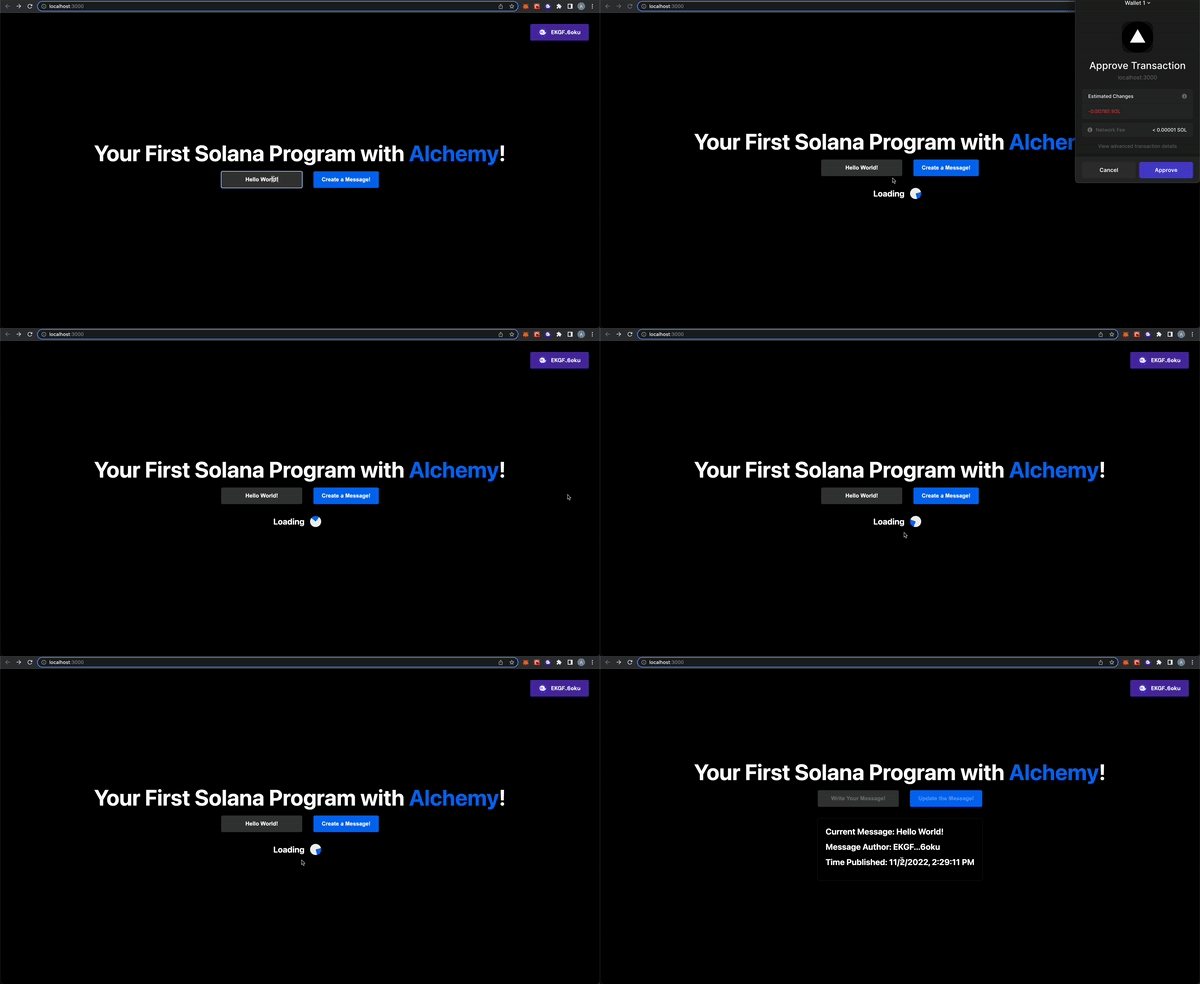
isLoading. - When a user clicks a button to submit or update a message, it’ll show a loading spinner while the user approves the transaction our app will send on their behalf.
- When we get the message back, we replace the loading spinner with the message details, like what we were showing before!
You'll see we added the spinner now:
This is the last git commit checkpoint. You made it to the end 🤩! Congratulations! You’ll see the finished product in the next section!
5. You’re Done!
Hooray 🎉! You made it to the end of the tutorial! To recap, you learned how to:
- Connect a Phantom wallet to your web3 app
- Read data from your Solana program using the Alchemy Web3 API
- Send Solana transactions for a user through their Phantom Wallet
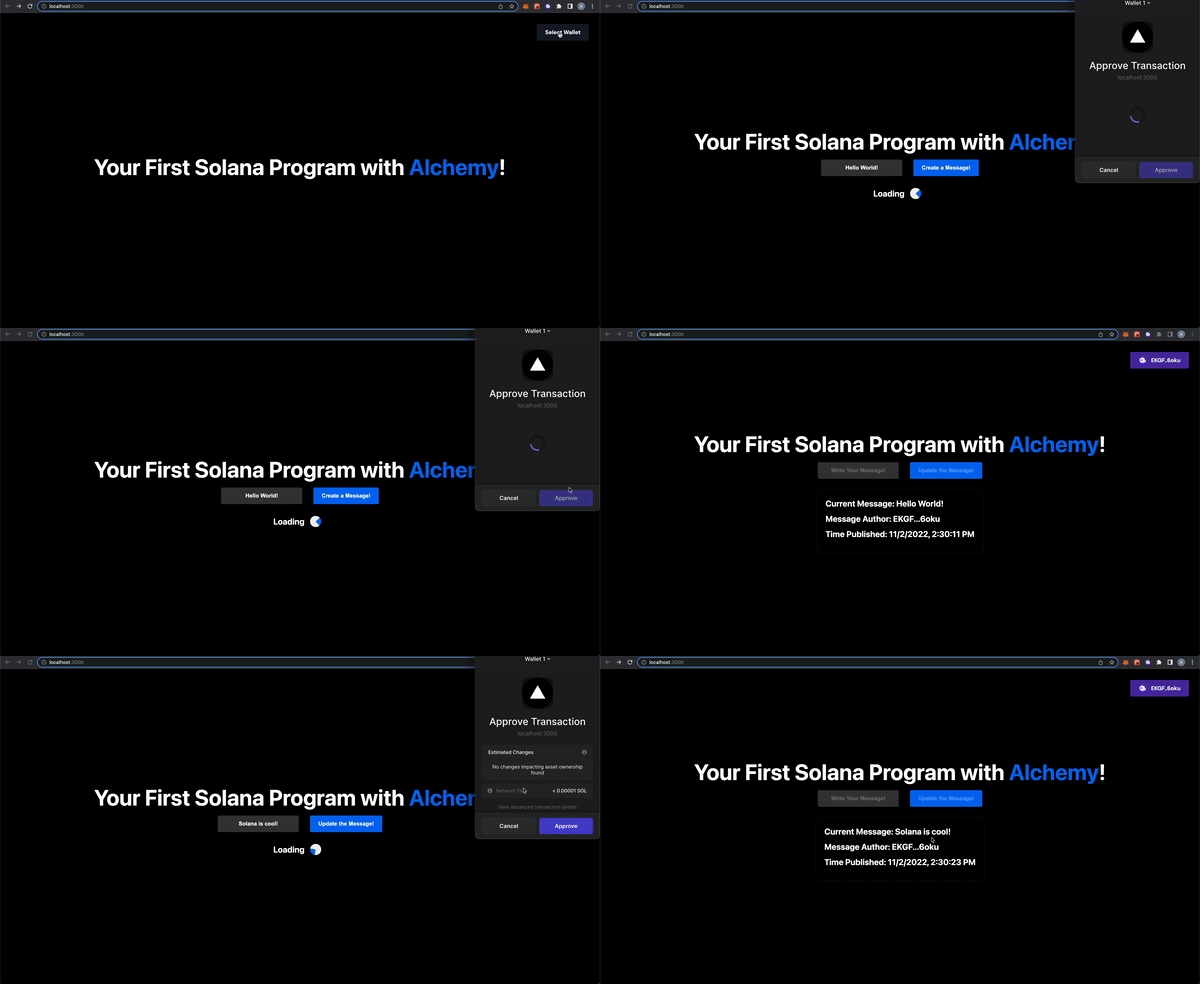
Here’s the full code, and this is what the finished product should look like:
Now you're fully equipped to apply the skills from this tutorial to build out your own custom web3 App! As always, if you have any questions, don't hesitate to reach out to us for help in the Alchemy Discord or post questions in our Discussion Forum and we’ll make more tutorials about this! Happy Building 😀!
Updated over 2 years ago
