1. How to Develop an NFT Smart Contract (ERC721) with Alchemy
Learn how to build an NFT smart contract
Developing a Smart Contract with Solidity and deploying it on the blockchain might sound daunting at first: solidity, security, gas optimization, developer environment, and gas fees, are only some of the things you’ll need to go through to host your code on the blockchain.
Luckily though, in the last few months, a lot of tools have been released for developers to make their Smart contracts development jobs much easier.
Tools like the OpenZeppelin Wizard that offers developers click and write functionalities to create composable and secure smart contracts in no time, used with Web3 developer tools like Alchemy, make the experience of writing and deploying code on the blockchain easy, fast, and reliable like never before.
In this tutorial, you're going to learn how to develop and deploy an ERC721 (NFT) smart contract using Alchemy, OpenZeppelin, Remix, and Ethereum Sepolia.
Choosing a testnet
While you can use the Ethereum Goerli testnet, we caution against it as the Ethereum Foundation has announced that Goerli will soon be deprecated.
We therefore recommend using Sepolia testnet for tis tutorial as Alchemy has full Sepolia support and a free Sepolia faucet also.
More precisely, you will learn:
- How to write and modify the smart contract using OpenZeppelin and Remix
- Get free Goerli ETH using https://sepoliafaucet.com/
- Deploy it on the Ethereum Sepolia testnet blockchain to save on gas fees.
- Host the NFT tokens metadata on IPFS using Filebase.
- Mint an NFT and visualize it on OpenSea.
You can also follow the video tutorial:
Let’s start by creating the smart contract.
Develop the ERC721 Smart Contract With the OpenZeppelin Contract Wizard.
As said before, in this tutorial, you're going to use the OpenZeppelin Wizard to create the smart contract, for two main reasons:
- It’s secure.
- It offers standard smart contracts.
When it comes to writing smart contracts, security is key. There are tons of examples of smart contract exploits that have seen hundreds of millions of dollars stolen by malicious actors due to bad security.
You don’t want someone to steal all of your precious cryptos or NFTs once you’ll deploy on the blockchain right?
OpenZeppelin serves this purpose, being one of the biggest maintainers of smart contract standards (ERC20, ERC721, etc), allowing developers to use thoroughly audited code to develop reliable contracts.
The first thing you'll need to do to develop our ERC721 NFT smart contract is to go on the Open Zeppelin Smart contract wizard page.
Once on the page, you will see the following editor:

Click on the ERC721 button on the top left corner, to select the type of ERC standard to use and the kind of contract you want to write:

Now that you've selected the contract standard, on the left-hand side menu you should see a number of options:
Let’s start by choosing the name and the symbol of our Tokens. Click on the text box with “MyToken” and give it a name, do the same with the Symbol, and leave the base URI field blank (the token name will be used by OpenSea and Rarible as the name of the collection).

Select the NFT (ERC721) Token Features
Now you'll need to select the features that you want to integrate into our Smart contract, right after the settings section, you’ll find the features section where you’ll be able to select the different modules to include in your smart contract.

In this case, you're going to select the following integrations:
- Mintable will create a mint function only callable by privileged accounts
- Autoincrement IDs will automatically assign incremental IDs to your NFTs
- Enumerable will give you access to on-chain Tokens enumeration and functions such as “totalSupply”, not present in the default ERC721 integration URI storage, to associate metadata and images to each of your NFTs
- URI Storage to be able to associate URIs to our NFTs

For the sake of this tutorial, and because you don’t want to create any kind of Tokenomic around our NFTs, leave the following modules unticked:
- Burnable - to burn tokens
- Pausable - to pause tokens transfers, sales, etc
- Votes - gives access to governance-like features like delegates and votes
If you want to learn more about these modules, check the official OpenZeppelin documentation about the ERC721 standard.
Now that you've selected the features you want, OpenZeppelin Wizard will populate the code of the Smart Contract, it should look as follow:
// SPDX-License-Identifier: MIT
pragma solidity ^0.8.4;

import "@openzeppelin/contracts/token/ERC721/ERC721.sol";
import "@openzeppelin/contracts/token/ERC721/extensions/ERC721Enumerable.sol";
import "@openzeppelin/contracts/token/ERC721/extensions/ERC721URIStorage.sol";
import "@openzeppelin/contracts/access/Ownable.sol";

contract Alchemy is ERC721, ERC721Enumerable, ERC721URIStorage, Ownable {
    constructor() ERC721("Alchemy", "ALC") {}

    function safeMint(address to, uint256 tokenId, string memory uri)
        public
        onlyOwner
    {
        _safeMint(to, tokenId);
        _setTokenURI(tokenId, uri);
    }

    // The following functions are overrides required by Solidity.

    function _beforeTokenTransfer(address from, address to, uint256 tokenId)
        internal
        override(ERC721, ERC721Enumerable)
    {
        super._beforeTokenTransfer(from, to, tokenId);
    }

    function _burn(uint256 tokenId) internal override(ERC721, ERC721URIStorage) {
        super._burn(tokenId);
    }

    function tokenURI(uint256 tokenId)
        public
        view
        override(ERC721, ERC721URIStorage)
        returns (string memory)
    {
        return super.tokenURI(tokenId);
    }

    function supportsInterface(bytes4 interfaceId)
        public
        view
        override(ERC721, ERC721Enumerable)
        returns (bool)
    {
        return super.supportsInterface(interfaceId);
    }
}
It’s time to copy our code and bring it on Remix IDE to modify and deploy it on the Blockchain.
Modify and Deploy your ERC721 contract with REMIX IDE
Now that you have your ERC721 smart contract, let's modify, and deploy it on the Sepolia Testnet. To do so, you'll use Remix IDE, a free and web-based integrated development environment specifically designed for smart contract development with Solidity.
First of all, as you might have noticed, on top of the OpenZeppelin Wizard editor, there’s the button “Open in Remix”:

Clicking on it will open REMIX IDE in a new tab of your browser.
Using Remix to Modify the NFT Smart Contract
Starting from the top of the contract, there's the “SPDX-License-Identifier” that specifies the type of license your code will be published under - it’s good practice in web3 applications to keep the code open source as it will ensure trustworthiness.
// SPDX-License-Identifier: MIT
Then there's the pragma - the version of the compiler you'll want to use to compile the smart contract code. The little “^” symbol, tells the compiler that every version between 0.8.0 to 0.8.9 is suitable to compile our code.
pragma solidity ^0.8.9;
Then we're importing a bunch of libraries and initializing the smart contract.
import "@openzeppelin/contracts/token/ERC721/ERC721.sol";
import "@openzeppelin/contracts/token/ERC721/extensions/ERC721Enumerable.sol";
import "@openzeppelin/contracts/token/ERC721/extensions/ERC721URIStorage.sol";
import "@openzeppelin/contracts/access/Ownable.sol";
import "@openzeppelin/contracts/utils/Counters.sol";
We're then initializing the contract, inheriting from all the standards we're importing from the OpenZeppelin repository:
contract Alchemy is ERC721, ERC721Enumerable, ERC721URIStorage, Ownable {...}
As you can notice, the safeMint function has the “only owner” modifier - this will allow only the owner of the smart contract (the wallet address that deployed the smart contract) to mint NFTs. Chances are you want anyone to mint NFTs, to do so you'll need to remove the onlyOwner modifier from the Mint function.
function safeMint(address to, string memory uri) public onlyOwner{
        uint256 tokenId = _tokenIdCounter.current();
        _tokenIdCounter.increment();
        _safeMint(to, tokenId);
        _setTokenURI(tokenId, uri);
    }
You can also remove it from the contract declaration "Ownable", and the library imports
import "@openzeppelin/contracts/access/Ownable.sol";
Now that everyone will be able to mint our NFTs, you'll need to avoid people from minting more NFTs than the max number of NFTs in our collection. To do so let's specify the max number of mintable NFTs.
Let’s say the users want to be able to mint up to a total of 10,000 NFTs. To do so, let’s create a new uint256 variable, call it MAX_SUPPLY, and assign it 10,000.
Counters.Counter private _tokenIdCounter;
    uint256 MAX_SUPPLY = 100000;

    constructor() ERC721("Alchemy", "ALCH") {}
Next, let’s move into the safeMint function and add a require statement:
require(_tokenIdCounter.current() <= MAX_SUPPLY, "I'm sorry we reached the cap");
Let's spend a couple of words to better understand what is the "require" statement in Solidity.
You can read more about the Solidity "require" statement, in the official documentation.
Now that you've limited the max supply of our NFTs, is time to compile the smart contract and deploy it on the Goerli Testnet. To do so, you'll need to create a free account on Alchemy.com, add it as a node provider on Metamask, and get some free Sepolia ETH.
Create a Free Alchemy Account
First of all, let's need to navigate to alchemy.com click on “Login” and create a new account:

Select the Ethereum ecosystem:

Give your application app and team a name, choose the Sepolia network and click on create App:
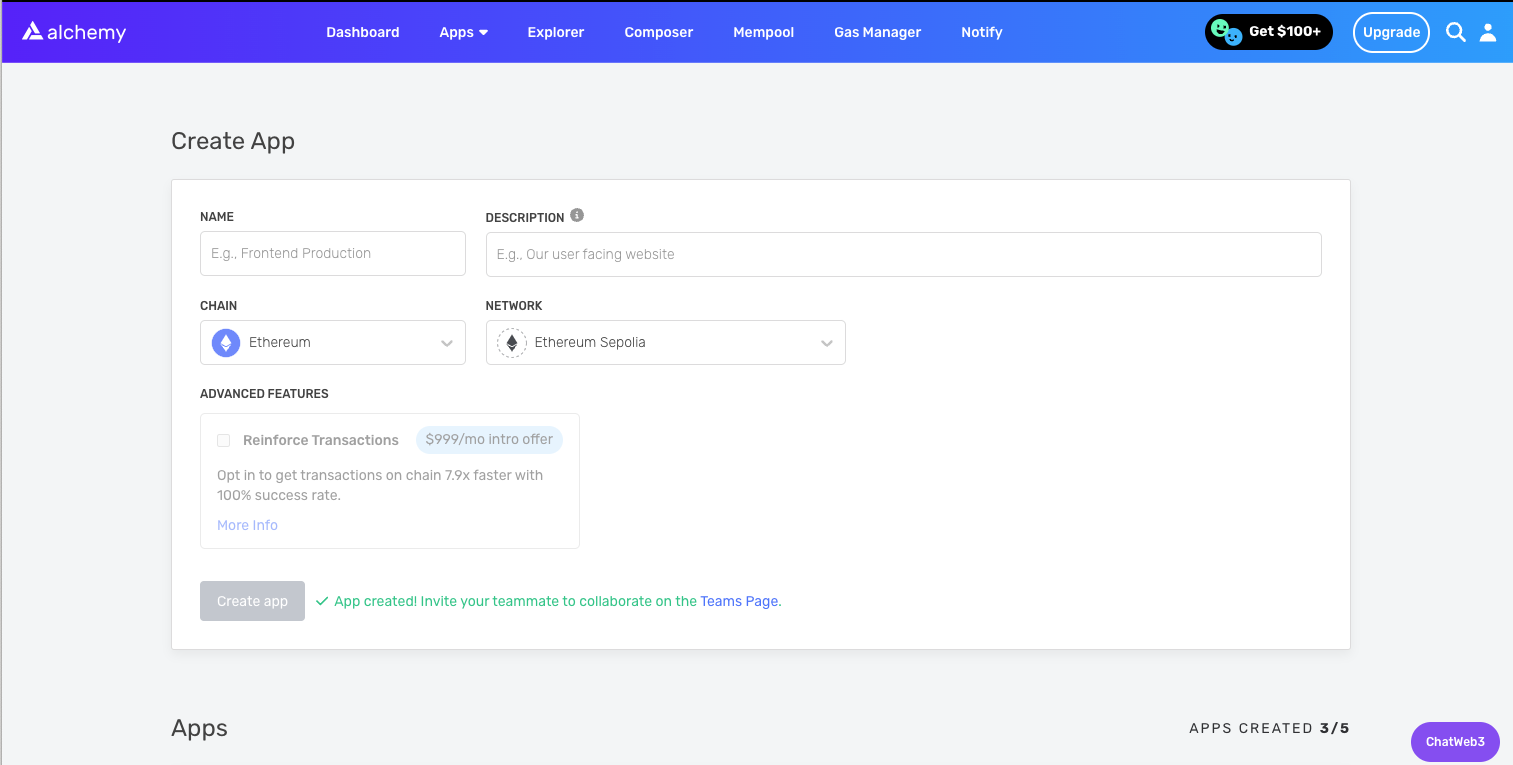
Create App
Once you'll have completed the onboarding process, we'll be redirected to the dashboard. Click on the application with the name you decided, in this case, “test”, click on the “VIEW KEY” button on the top right corner, and copy the HTTP URL:
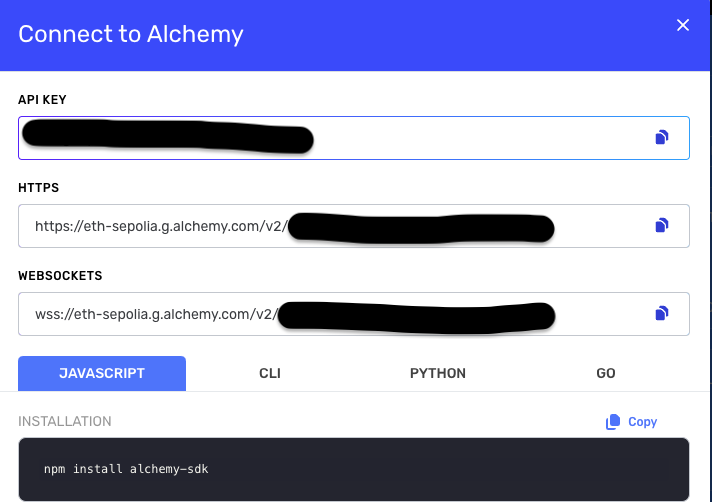
Your Application Details
Next, you'll need to add Alchemy to Metamask as a Sepolia RPC Provider. If you don’t have Metamask installed, make sure to follow this guide to add it to your browser and create a new wallet.
Add Alchemy Sepolia to Your Metamask Wallet
Once Metamask will be installed, click on the Network dropdown menu, and on “add network”!
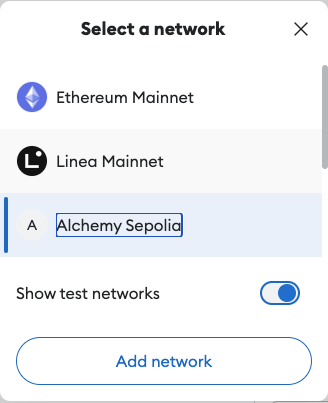
You'll be redirected to the following page, where you'll need to fill in the Sepolia Network and RPC URL info.
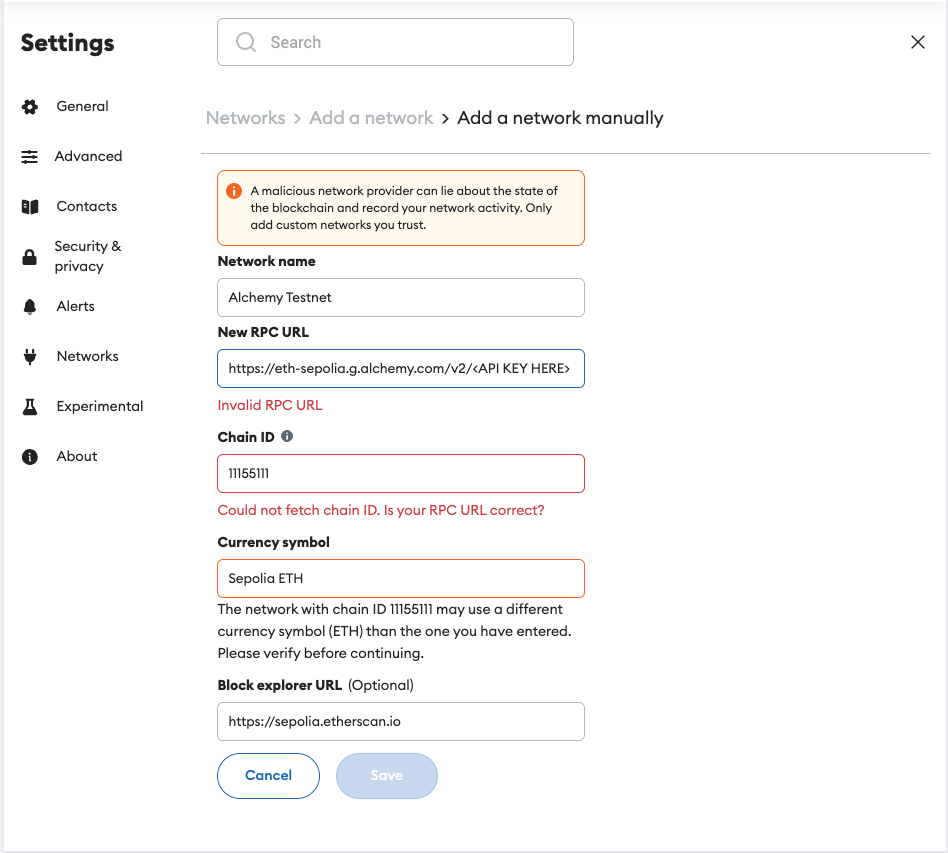
Fill in the Sepolia Network and RPC Url
Add the following information to the form:
- Network name: Alchemy Sepolia
- New RPC URL: the HTTP URL of the Sepolia Alchemy Application
- Chain ID: 11155111
- Currency Symbol: Sepolia ETH
- Block Explorer: https://sepolia.etherscan.io/
Amazing, you just added Sepolia to Metamask, using Alchemy! 🎉
It’s now time to deploy our Smart Contract on Sepolia, but first, you'll need to get some Sepolia Test ETH.
Get Free Sepolia Test ETH
Getting Sepolia Test ETH is super simple, just navigate to sepoliafaucet.com, copy the wallet address into the text bar, and click on “Send Me ETH”:
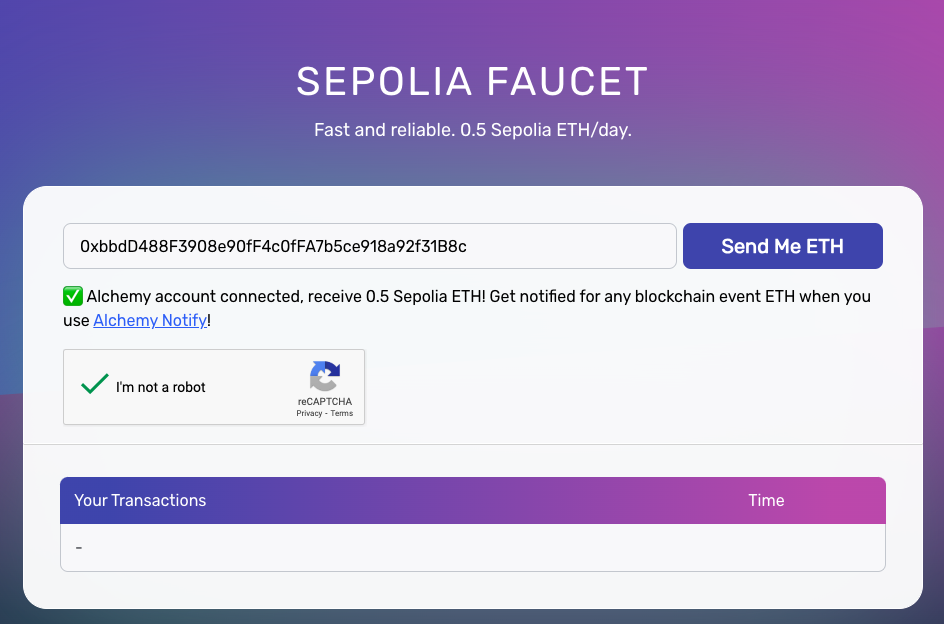
After 10-20 seconds you'll see the Sepolia ETH appearing in the Metamask Wallet.
You will be able to come back to this faucet everyday and receive test ETH to help you test your applications.
Now that you have the test ETH, it’s time to compile and deploy our NFT smart contract on the blockchain.
Compile and Deploy the NFT Smart Contract on the Sepolia Testnet
Back to Remix, let’s click on the compiler menu on the left-hand side of the page and click on The blue “Compile” button:

Then click on the “Deploy and Run Transactions menu, click on the Environment dropdown menu and select “injected Web3”:
Make sure the Metamask wallet is on the Alchemy Sepolia network, select the NFT Smart contract from the Contract dropdown menu, and click on Deploy.

A Metamask pop-up window will appear, click on "sign", and proceed to pay the gas fees.
If everything worked as expected, after 10 seconds you should see the contract listed under Deployed Contracts:

Now that the Smart contract is deployed on the Sepolia testnet, it’s time to mint our NFTs, but first, you'll need to create and upload the metadata on IPFS, let’s understand what we mean by the term “metadata”.
What is NFTs Metadata?

For OpenSea to pull in off-chain metadata for ERC721 tokens, the contract will need to return a URI pointing to the hosted metadata. To find this URI, OpenSea, Rarible and other popular marketplaces will use the tokenURI method contained in the ERC721Uristorage standard.
The tokenURI function in the ERC721 should return an HTTP or IPFS URL, such as ipfs://bafkreig4rdq3nvyg2yra5x363gdo4xtbcfjlhshw63we7vtlldyyvwagbq. When queried, this URL should return a JSON blob of data with the metadata for your token.
You can read more about metadata standards on the official OpenSea documentation.
How to Format Your NFT Metadata
According to the OpenSea documentation, the NFT Metadata should be stored in a .json file and structured as follow:
{
  "description": "YOUR DESCRIPTION",
  "external_url": "YOUR URL",
  "image": "IMAGE URL",
  "name": "TITLE",
  "attributes": [
    {
      "trait_type": "Base",
      "value": "Starfish"
    },
    {
      "trait_type": "Eyes",
      "value": "Big"
    },
    {
      "trait_type": "Mouth",
      "value": "Surprised"
    },
    {
      "trait_type": "Level",
      "value": 5
    },
    {
      "trait_type": "Stamina",
      "value": 1.4
    },
    {
      "trait_type": "Personality",
      "value": "Sad"
    },
    {
      "display_type": "boost_number",
      "trait_type": "Aqua Power",
      "value": 40
    },
    {
      "display_type": "boost_percentage",
      "trait_type": "Stamina Increase",
      "value": 10
    },
    {
      "display_type": "number",
      "trait_type": "Generation",
      "value": 2
    }]
  }
Here's a brief explanation of what each property stores:
| Property | Explanation |
|---|---|
| image | This is the URL to the image of the item. Can be just about any type of image (including SVGs, which will be cached into PNGs by OpenSea), and can be IPFS URLs or paths. We recommend using a 350 x 350 image. |
| image_data | Raw SVG image data, if you want to generate images on the fly (not recommended). Only use this if you're not including the image parameter. |
| external_url: | This is the URL that will appear below the asset's image on OpenSea and will allow users to leave OpenSea and view the item on your site. |
| description | A human-readable description of the item. Markdown is supported. |
| name | Name of the item |
| attributes | These are the attributes for the item, which will show up on the OpenSea page for the item. (see below) |
| background_color | Background color of the item on OpenSea. Must be six-character hexadecimal without a pre-pended |
| animation_url | A URL to a multi-media attachment for the item. The file extensions GLTF, GLB, WEBM, MP4, M4V, OGV, and OGG are supported, along with the audio-only extensions MP3, WAV, and OGA. Animation_url also supports HTML pages, allowing us to build rich experiences and interactive NFTs using JavaScript canvas, WebGL, and more. Scripts and relative paths within the HTML page are now supported. However, access to browser extensions is not supported. youtube_url A URL to a YouTube video |
Now that we have a brief understanding of what will be contained in your tokens metadata, let's learn how to create it and store it on IPFS.
Creating and Uploading the Metadata on IPFS
First of all, navigate to filebase.com and create a new account.
Once logged in, click on the bucket button on the left-hand side menu, and create a new bucket:

Navigate into the bucket, click on the upload button, and upload the image you want to use for your NFT, I’ll use the following.
Once uploaded click on it and copy the IPFS Gateway URL:

Using any text editor, paste the following JSON code:
{
  "description": "This NFT proves I've created and deployed my first ERC20 smart contract on Goerli with Alchemy Road to Web3",
  "external_url": "Alchemy.com/?a=roadtoweb3weekone",
  "image": "https://ipfs.filebase.io/ipfs/bafybeihyvhgbcov2nmvbnveunoodokme5eb42uekrqowxdennt2qyeculm",
  "name": "A cool NFT",
  "attributes": [
    {
      "trait_type": "Base",
      "value": "Starfish"
    },
    {
      "trait_type": "Eyes",
      "value": "Big"
    },
    {
      "trait_type": "Mouth",
      "value": "Surprised"
    },
    {
      "trait_type": "Level",
      "value": 5
    },
    {
      "trait_type": "Stamina",
      "value": 1.4
    },
    {
      "trait_type": "Personality",
      "value": "Sad"
    },
    {
      "display_type": "boost_number",
      "trait_type": "Aqua Power",
      "value": 40
    },
    {
      "display_type": "boost_percentage",
      "trait_type": "Stamina Increase",
      "value": 10
    },
    {
      "display_type": "number",
      "trait_type": "Generation",
      "value": 2
    }]
  }
And save the file as "metadata.json". Move back to Filebase and upload the metadata.json file in the same bucket where we uploaded the Image.

Lastly, click on the CID and copy it, we’ll need it in the next part to build the token URI when minting out NFT:

Mint Your Sepolia NFT
Go back to Remix and in the Deploy & Run Transactions menu, go under “deployed contracts” - and click on the contract we just deployed, it will open up a list of all the methods contained in your Smart contact:

Orange methods are methods that actually write on the blockchain whereas Blue methods are methods learning from the blockchain.
Click on the safeMint method dropdown icon and paste your address and the following string into the uri field:
ipfs://\<your\_metadata\_cid>
Clicking on transact will create a Metamask popup prompting you to pay the gas fees.
Click on "sign" and go on minting your first NFT!
Wait a couple of seconds and, to make sure the mint went through successfully, copy and paste your address in the balanceOf method input, and run it - it should show you have 1 NFT.
Do the same with the tokenUri method, inserting “0” as the id argument - it should display your tokenURI.
Great! You just minted your first NFT! 🎉
Now it’s time to move to OpenSea to check if the metadata begins to read.
Visualize Your NFT on OpenSea
Navigate to testnets.opensea.io and log in with your Metamask wallet. Then click on your profile picture, you should see your newly minted NFT there. If the image is not yet visible, click on it, and click on the “refresh metadata” button.

Sometimes OpenSea has hard times recognizing testnet metadata - and could take up to 6 hours to see it. After some time your NFT should be visible as follow:

Congratulations, you have successfully created, modified, and deployed your first smart contract. Minted your first NFT, and published your image on IPFS! 🔥
Next step? Why don’t you modify your smart contract to allow users to only mint only up to a certain number of NFTs? 5 per user should be enough, or someone might start minting thousands of NFTs!
To do so, look into the mapping type, here there’s an amazing guide to walk you through it.
Want the video version of this tutorial? Subscribe to the Alchemy YouTube channel and join our Discord community to find thousands of developers ready to help you out!
We are always looking to improve this learning journey, please share any feedback you have with us! You can tweet at the community by tagging @AlchemyLearn, or you can suggest edits to this document by clicking on "Suggest Edits" in the top right.
See you in the next challenge!
Updated 10 months ago