9. How to Build a Token Swap Dapp With 0x API
Learn how to build a token swapping dapp (a simple Matcha.xyz) using the 0x swap API endpoint. This app aggregates liquidity across the greater DEX ecosystem and surfaces the best price to the user.
Have you ever gone onto your favorite token trading dapp to trade ETH for DAI and wondered how did it find the best price for you?

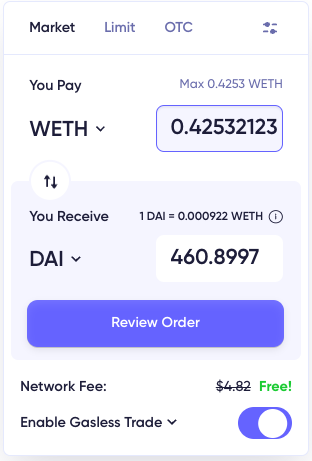
Trading WETH<>DAI using Matcha.xyz, a DEX aggregator.
It's more than likely that it uses a liquidity aggregator which sources all the possible prices across off-chain (e.g. Market Makers, Orderbooks) and on-chain (e.g. DEXs, AMMs) and routes the best price for the user.
In this tutorial, we will learn how to use the 0x API swap endpoint which allows users to fetch available quotes across the liquidity supply and uses smart order routing to split up a transaction across decentralized exchange networks to be filled with the lowest slippage possible while minimizing transaction costs.
This is the same endpoint that is behind swaps in major wallets and exchanges such as MetaMask, Coinbase wallet, Zapper, and many more.
Note that we won’t need to write any smart contracts to find and settle the trade! Instead, the 0x API allows web3 developers to easily tap into the 0x Protocol smart contracts which take care of all the logic used to settle a trade, allowing web developers to focus on building the best trade experience.
By the end of this tutorial, you will learn how to do the following:
- Understand why Liquidity Aggregation is important
- Query and display an ERC20 token list
- Use 0x API /swap Endpoint
- Set a Token Allowance
- Build a Simple Token Swap DApp that connects to MetaMask using web3.js
Video tutorial version here:
Prerequisites
To prepare for the rest of this tutorial, you need to have:
npm(npx) version 8.5.5nodeversion 16.13.1- MetaMask
The following is not required, but extremely useful:
- some familiarity with a command line
- some familiarity with JavaScript
- Visual Studio Code, my recommend coding IDE
Here is the github repo if you ever need help.
Now let's get started building our swap dapp!
Part 1. Walk-through Starter Code
The first thing you'll need to do is to clone the project starter code. We will be building on this starter UI to add token trading functionality.
git clone git clone https://github.com/0xProject/swap-demo-tutorial/tree/main/swap-demo-tutorial-part-1
cd swap-demo-tutorial-part-1
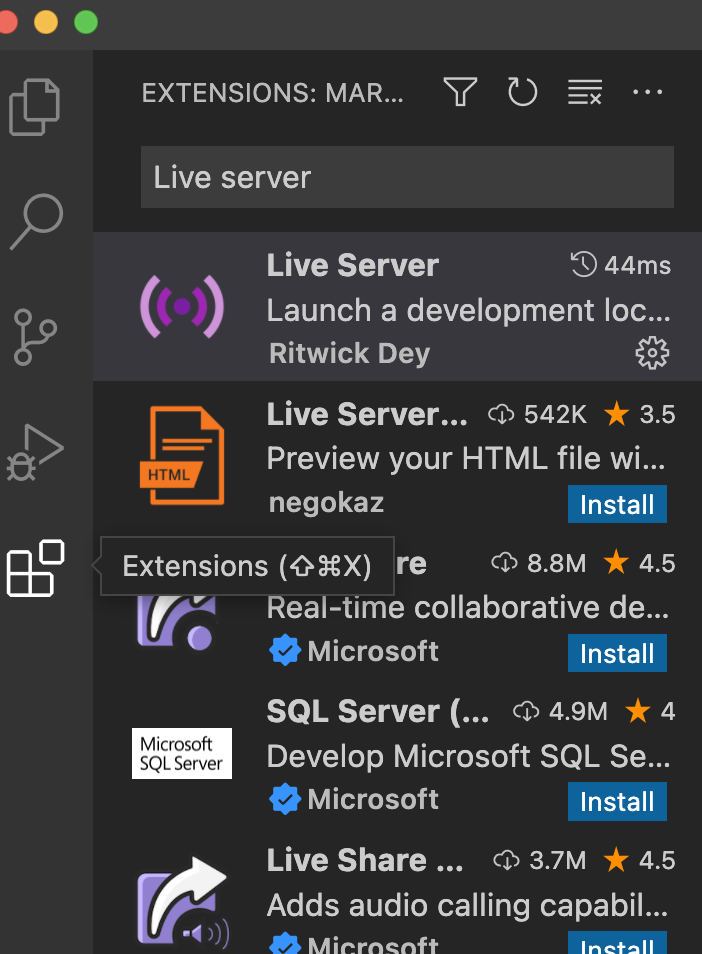
Open up the project in your favorite IDE and launch a local development server. If you are using Visual Studio Code, one way to do this is to install the Live Server from extensions on the left-hand panel. Then, right click on the index.html file from Explorer Window and click on Open with Live Server to open the DEX Aggregator skeleton.


A couple of key features to call out (code found in index.html):
- Sign-in with MetaMask button - When this app is complete, clicking this button will enable the user to connect to their MetaMask wallet and enable the "Swap" button.
- Swap Box
- SELECT A TOKEN - Currently these sections just change color when a cursor hovers over them; by the end, users will be able to click and display a list of available tokens to swap.
- amount - This is an input form that allows user to input a number.
- Estimated Gas - The swap endpoint will return back estimated gas for the swap to go through. We will display that here.
- Swap Button - As mentioned above, the "Swap" button is currently disabled, but we will enable it when the user has signed into MetaMask.
Take a look around these elements in index.js taking note of their ids, class well as their corresponding styling in style.css.
Part 2. Connect to MetaMask
Now let's enable the user to connect to MetaMask.
First download MetaMask on your browser. MetaMask is a crypto wallet that allows you to interact with blockchain apps. It will hold our funds for us that we will use for the trade. In this app, we only want users to have the ability to carry out a swap if they have a MetaMask wallet installed.
Next, index.js, create a connect() function and connect it to the login_button element. Please read the comments to understand how we check that MetaMask is connected:\
async  function  connect() {
/** MetaMask injects a global API into websites visited by its users at `window.ethereum`. This API allows websites to request users' Ethereum accounts, read data from blockchains the user is connected to, and suggest that the user sign messages and transactions. The presence of the provider object indicates an Ethereum user. Read more: https://ethereum.stackexchange.com/a/68294/85979**/

// Check if MetaMask is installed, if it is, try connecting to an account
	if (typeof  window.ethereum !== "undefined") {
		try {
			console.log("connecting");
			// Requests that the user provides an Ethereum address to be identified by. The request causes a MetaMask popup to appear. Read more: https://docs.metamask.io/guide/rpc-api.html#eth-requestaccounts
			await  ethereum.request({ method:  "eth_requestAccounts" });
		} catch (error) {
		console.log(error);
		}
		// If connected, change button to "Connected"
		document.getElementById("login_button").innerHTML = "Connected";
		// If connected, enable "Swap" button
		document.getElementById("swap_button").disabled = false;
		}
		// Ask user to install MetaMask if it's not detected
		else {
		document.getElementById("login_button").innerHTML =
			"Please install MetaMask";
		}
	}
// Call the connect function when the login_button is clicked
document.getElementById("login_button").onclick = connect;
Now when you open index.html with the LiveServer, and click the "Sign-In with MetaMask" button, that button should automatically update to "Connected" as show below:
\

If MetaMask is not, the text will change to "Please install MetaMask":
\

Great! Now our app can detect when a user has a wallet connect.
Final Code for Part 2
git clone https://github.com/0xProject/swap-demo-tutorial/tree/main/swap-demo-tutorial-part-2
Part 3. Create a Modal for the Token List
Now let's take a look at how to create a token list when a user clicks on "SELECT A TOKEN". We can use Bootstrap's Modal component to help with this.
Copy and paste the example Modal code from here, and paste it below the last </div>. You can remove the save and close buttons. Also, make sure to add the id="token_modal" so we can reference this modal later. The first line of the modal should look like:
<div class="modal" id="token_modal" tabindex="-1" role="dialog">
Your index.html should now look like this:
<!DOCTYPE html>
<html>
<head>
<meta charset="utf-8">
<meta name="viewport" content="width=device-width, initial-scale=1, shrink-to-fit=no">
<title>Javascript Test</title>
<script src="https://cdn.jsdelivr.net/npm/web3@latest/dist/web3.min.js"></script>
<script src="https://code.jquery.com/jquery-3.6.0.min.js" integrity="sha256-/xUj+3OJU5yExlq6GSYGSHk7tPXikynS7ogEvDej/m4=" crossorigin="anonymous"></script>
<script src="https://unpkg.com/moralis/dist/moralis.js"></script>
<script src="https://stackpath.bootstrapcdn.com/bootstrap/4.4.1/js/bootstrap.min.js" integrity="sha384-wfSDF2E50Y2D1uUdj0O3uMBJnjuUD4Ih7YwaYd1iqfktj0Uod8GCExl3Og8ifwB6" crossorigin="anonymous"></script>
<link rel="stylesheet" href="https://stackpath.bootstrapcdn.com/bootstrap/4.4.1/css/bootstrap.min.css" integrity="sha384-Vkoo8x4CGsO3+Hhxv8T/Q5PaXtkKtu6ug5TOeNV6gBiFeWPGFN9MuhOf23Q9Ifjh" crossorigin="anonymous">
<link rel="stylesheet" href="./style.css">
</head>
<body>
<nav class="navbar navbar-expand-lg navbar-light bg-light">
<a class="navbar-brand" href="#">My DEX Aggregator</a>
<ul class="navbar-nav ml-auto">
<li class="nav-item">
<button id="login_button" class="btn btn-outline-primary my-2 my-sm-0" type="submit">Sign in with MetaMask</button>
</li>
</nav>
<div class ="container">
<div class="row">
<div class="col col-md-6 offset-md-3" id="window">
<h4>Swap</h4>
<div id="form">
<div class="swapbox">
<div class="swapbox_select token_select" id="from_token_select">
SELECT A TOKEN
</div>
<div class="swapbox_select">
<input class="number form-control" placeholder="amount" id="from_amount">
</div>
</div>
<div class="swapbox">
<div class="swapbox_select token_select" id="to_token_select">
SELECT A TOKEN
</div>
<div class="swapbox_select">
<input class="number form-control" placeholder="amount" id="to_amount">
</div>
</div>
<div class="gas_estimate_label">Estimated Gas: <span id="gas_estimate"></span></div>
<button disabled class="btn btn-large btn-primary btn-block" id="swap_button">Swap</button>
</div>
</div>
</div>
</div>
<!-- Add the new modal body here. Note we added id="token_modal" and updated the modal-title -->
<div class="modal" id="token_modal" tabindex="-1" role="dialog">
<div class="modal-dialog" role="document">
<div class="modal-content">
<div class="modal-header">
<h5 class="modal-title">Select a Token</h5>
<button id="modal_close" type="button" class="close" data-dismiss="modal" aria-label="Close">
<span aria-hidden="true">×</span>
</button>
</div>
<div class="modal-body">
<p>Modal body text goes here.</p>
</div>
</div>
</div>
</div>
<script src="./index.js" type="text/javascript"></script>
</body>
</html>
Now, we need a way to open our modal when we click SELECT A TOKEN, the html element with the id='from_token_select' .
In index.js, let's create a function called openModal() that opens the modal when that element is clicked. Add the following line:
document.getElementById("from_token_select").onclick = openModal;
Next, create the openModal() function:
function  openModal(){
document.getElementById("token_modal").style.display = "block";
}
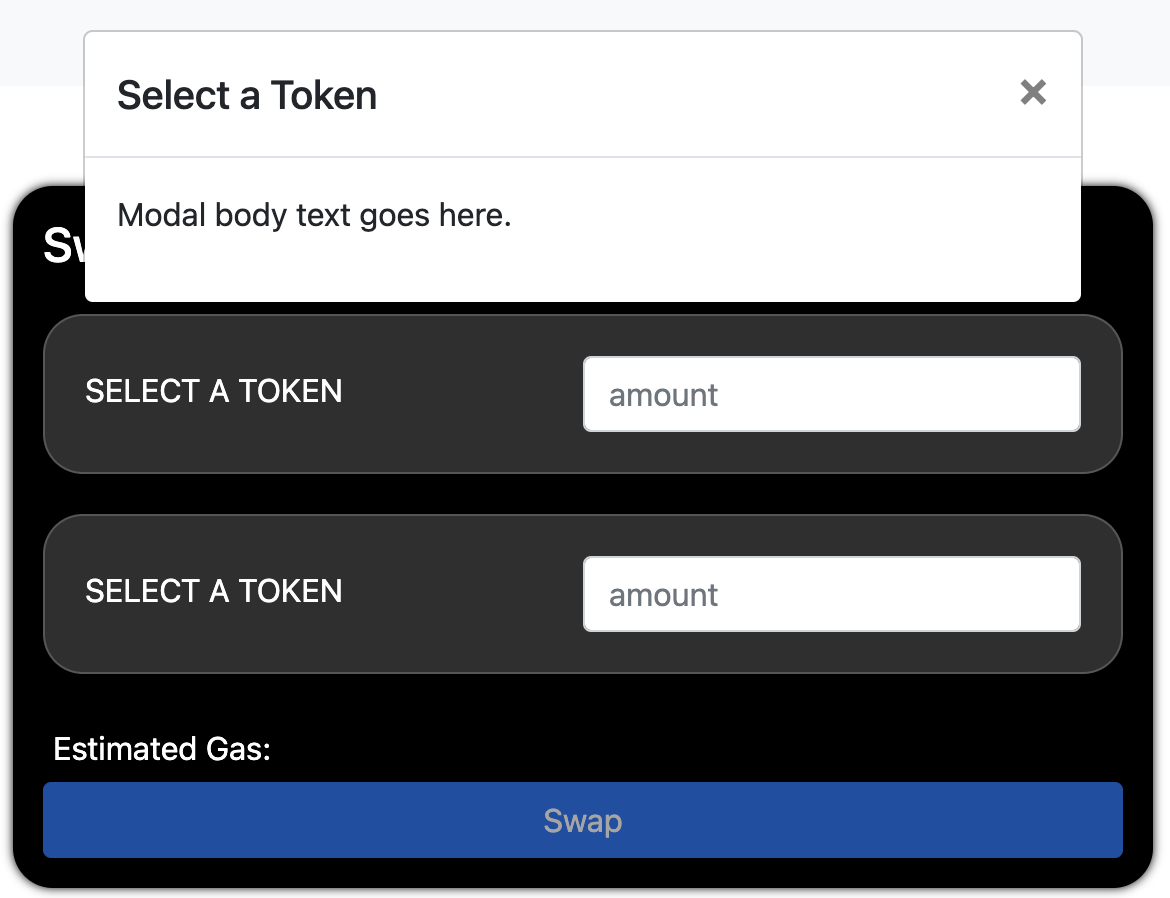
Now, when you click "SELECT A TOKEN", this modal appears:
There's no way to close the modal now, so let's add that. The modal already has a modal_close element in index.html, this is the X in the top right corner. We will connect it to a function that closes the modal.
In index.js, create a function called closeModal() that closes the modal when that element is clicked. Add the following line:
document.getElementById("modal_close").onclick = closeModal;
Next, create the closeModal() function:
function  closeModal(){
document.getElementById("token_modal").style.display = "none";
}
Final Code for Part 3
git clone https://github.com/0xProject/swap-demo-tutorial/tree/main/swap-demo-tutorial-part-3
Part 4. Fetch and Display Token List from CoinGecko API
We currently have a modal, but nothing inside. Let's retrieve a list of ERC20 tokens to populate the modal, so that a user can select a token to trade.
Uniswap has the Token Lists project, a standard for creating lists of ERC20 tokens to filter out high-quality, legitimate tokens from scams, fakes, and duplicates. Read more about the importance of token lists here.
The CoinGecko list is one of the more robust ones, so we will use this query https://tokens.coingecko.com/uniswap/all.json. I recommend you directly run that in your browser to see what is returned back. You should see a JSON object containing each token's name, logoURI, symbol, and decimals. We will use all these parameters as we build this dapp.

Now, we want to load the token list before the modal is actually called up; otherwise, the user has to wait for it to load. We can do so by loading it in the init() function which is initialized when the page is first loaded up.
In index.js, create an init() function. Inside, add the following fetch to the CoinGecko API. Also be sure to call it from index.js, for example, I've added it above our onclick calls at the bottom of the index.js file:
async function init(){
    console.log("initializing");
    let response = await fetch('https://tokens.coingecko.com/uniswap/all.json');
    let tokenListJSON = await response.json();
    console.log("listing available tokens: ", tokenListJSON);
}
...

// Add init() call
init();

document.getElementById("login_button").onclick = connect;
document.getElementById("from_token_select").onclick = openModal;
document.getElementById("to_token_select").onclick = openModal;
document.getElementById("modal_close").onclick = closeModal;
Now, when you serve yourdapp, and inspect it, you should see the token list json object printed out. If this is your first time using Chrome's Inspect DevTool, checkout this article to learn more about it.

Notice that the token list JSON Object that's returned contains a tokens key, which contains an Array of 4954 JSON objects. We will pull the information from here to populate our token list.

Now, rather than creating our token list directly inside init(), we will create a new function listAvailableTokens() to create a list of just what we need - token address, symbol, image, decimals - and call it from init().
Add the following to listAvailableTokens() inside index.js. Make sure to read the comments:
async function listAvailableTokens(){
  console.log("initializing");
  let response = await fetch('https://tokens.coingecko.com/uniswap/all.json');
  let tokenListJSON = await response.json();
  console.log("listing available tokens: ", tokenListJSON);
  tokens = tokenListJSON.tokens
  console.log("tokens:", tokens);

  // Create a token list for the modal
  let parent = document.getElementById("token_list");
  // Loop through all the tokens inside the token list JSON object
  for (const i in tokens){
    // Create a row for each token in the list
    let div = document.createElement("div");
    div.className = "token_row";
    // For each row, display the token image and symbol
    let html = `
    <img class="token_list_img" src="${tokens[i].logoURI}">
      <span class="token_list_text">${tokens[i].symbol}</span>
      `;
    div.innerHTML = html;
    parent.appendChild(div);
  }
}
Also, let's replace the modal body dummy text with the "token_list" element we've just created:
<div class="modal" id="token_modal" tabindex="-1" role="dialog">
<div class="modal-dialog" role="document">
<div class="modal-content">
<div class="modal-header">
<h5 class="modal-title">Select a Token</h5>
<button id="modal_close" type="button" class="close" data-dismiss="modal" aria-label="Close">
<span aria-hidden="true">×</span>
</button>
</div>
<div class="modal-body">
< !-- Replace the modal text with token_list -->
<div id="token_list"></div>
</div>
</div>
</div>
</div>
Lastly, add this styling for the modal to style.css so that the token list doesn't flow indefinitely, and there's a scrollbar:
.modal-body{
height: 500px;
overflow: scroll;
}
Now your app should look like this when a user clicks "SELECT A TOKEN" and the modal appears:

Note
You won’t find ETH in this list because it’s not actually an ERC20 token. Needs to be wrapped, WETH. Learn more about WETH. Some apps have a curated list rather than showing all options.
Final Code for Part 4
git clone https://github.com/0xProject/swap-demo-tutorial/tree/main/swap-demo-tutorial-part-4
Part 5. Display Selected Token Image and Symbol in Swap Box
Now that we have a list of tokens for the user to select, we want to display the selected token image and symbol in the swap box.
First, create a selectToken() function. Call it from the bottom of listAvailableTokens() using an anonymous function when one of the div rows that indicates a token is clicked:
async function listAvailableTokens(){
  // ... the rest of the function
    div.innerHTML = html;
    // selectToken() will be called when a token is clicked
    div.onclick = () => {
      selectToken(tokens[i]);
    };
    parent.appendChild(div);
  }
}
Before we create the selectToken() function, we need a way to track which side of the token selector we are on. Are we on the from-side or the to-side?
To track this, create a global currentTrade object and currentSelectSide variable at the very top of the code in index.js:
// top of index.js
let  currentTrade = {};
let  currentSelectSide;
Now that we have this global object, we should track whether the user is on the from-side or the to-side depending on which token selector is clicked. Set up this anonymous function that passes "from" when the "from_token_select" is selected at the bottom of index.js:
document.getElementById("from_token_select").onclick = () => {
openModal("from");
};
And update openModal() with the following code:
// index.js
function  openModal(side){
	// Store whether the user has selected a token on the from or to side
	currentSelectSide = side;
	document.getElementById("token_modal").style.display = "block";
}
Now, create aselectToken() function and add the following code:
function  selectToken(token) {
	// When a token is selected, automatically close the modal
	closeModal();
	// Track which side of the trade we are on - from/to
	currentTrade[currentSelectSide] = token;
	// Log the selected token
	console.log("currentTrade:" , currentTrade);
}
Run the program and check that currentTrade is logging properly.

Now to display the image and token symbols.
First, add in "from_token_img" , "from_token_text" , "to_token_img" , and"to_token_text" into the index.html: Create a renderInterface() underneath selectToken() and call it from within selectToken().
< !-- Replace the SELECT A TOKEN text -->
< !-- From token -->
<div  class="swapbox_select token_select"  id="from_token_select">
	<img  class="token_img"  id="from_token_img">
	<span  id="from_token_text"></span>
</div>

< !-- To token -->
<div  class="swapbox_select token_select"  id="to_token_select">
	<img  class="token_img"  id="to_token_img">
	<span  id="to_token_text"></span>
</div>
Inside renderInterface(), we will set the from/to token images and symbol text by calling the associated elements in index.html. Recall that logoURI and symbol are both returned by CoinGeckoAPI:
function selectToken(token) {
  closeModal();
  currentTrade[currentSelectSide] = token;
  console.log("currentTrade:" , currentTrade);
  renderInterface();
}

// Function to display the image and token symbols
function renderInterface(){
  if (currentTrade.from) {
    console.log(currentTrade.from)
    // Set the from token image
    document.getElementById("from_token_img").src = currentTrade.from.logoURI;
     // Set the from token symbol text
    document.getElementById("from_token_text").innerHTML = currentTrade.from.symbol;
  }
  if (currentTrade.to) {
      // Set the to token image
    document.getElementById("to_token_img").src = currentTrade.to.logoURI;
      // Set the to token symbol text
    document.getElementById("to_token_text").innerHTML = currentTrade.to.symbol;
  }
}
Lastly, add renderInterface() at the end ofselectToken() function:
function  selectToken(token) {
	closeModal();
	currentTrade[currentSelectSide] = token;
	console.log("currentTrade:" , currentTrade);
	// Display token image and symbol in swapbox
}
Users can now select both from and to tokens as well as input the amount they would like to trade in our dapp!

Final Code for Part 5
git clone https://github.com/0xProject/swap-demo-tutorial/tree/main/swap-demo-tutorial-part-5
Part 6. Get Price
Now that users can select their tokens and set the token amount to trade, let's help them find the best price!
One functionality that's common in DeFi trading dapps that's really intuitive is automatically generating a price when the amount is inputted and the user's cursor leaves the focus on the amount box. Check it out here in Matcha.xyz.
The DAI price is automatically generated once the WETH price is entered: To do this, we can listen for a Javascript event called onblur. Use it here when the user leaves focus from the "from_amount" element:
// at the bottom of index.js add this
document.getElementById("from_amount").onblur = getPrice;
/price vs /quote Endpoints
Now we need to create a function called getPrice(). Inside, we will be calling the GET /swap/v1/price endpoint.
/price is nearly identical to /quote, but with a few key differences. /price does not return a transaction that can be submitted on-chain; it simply provides us the same information. Think of it as the "read-only" version of /quote".
This is also important because /quote returns back an order in which a Market Maker has committed their assets to. So if we ping /quote too much when we really are just asking for a price and not ready to submit an order, then this can clog up the system!
Here is an example of a GET HTTP /price request. The call is almost identical to /quote: https://api.0x.org/swap/v1/price?sellToken=ETH&buyToken=DAI&sellAmount=1000000000000000000
This API endpoint is using the Ethereum (mainnet) as indicated by
https://api.0x.org
\Here is a list of all API endpoints for the supported networks.
To use this in our index.js, we need to import the qs module. Add the require statement at the top of the file:
const qs = require('qs');
Browserify to Use Node Modules in Browser
Now, because we've installed a module using require, our browser will throw a fit if we try to load our index.html now. In order fix this, install Browserify by running this in the terminal:
npm install -g browserify`
Install the qs module module with npm:
npm i qs
Now recursively bundle up all the required modules starting at main.js into a single file called bundle.js with the browserify command (Note: You might need to explicitly state the paths for ./index.js and ./bundle.js as specific to your setup).
browserify index.js --standalone bundle -o bundle.js
Note
Moving forward, make sure to re-run the Browerify command to generate an updated
bundle.jswhenever you need to serve theindex.html
And make sure to update the src of the script in index.html from src=./index.js to src=./bundles.js:
< !-- Make sure your script now sources from the correct file -->
<script  src="./bundle.js"  type="text/javascript"></script>
Build getPrice() Function
Inside index.js, create getPrice(). I will break down the different sections in this function and then show a complete function code snippet at the end.
We add an if statement because we only want to run the /price query if both the from and to tokens have been selected as well as a from token amount has been filled in. We also get the amount inputted from the user and multiply it by 10 to the power of the number of decimals of the from token. For example, if the user inputted they want to trade 1 WETH, WETH has 18 decimal places. The smallest unit of WETH is wei. So the amount they want to trade is (1 x 10 to the power of 18) wei. You can double-check decimals places by looking on EtherScan under Profile Summary here.
async  function  getPrice(){
	console.log("Getting Price");
	// Only fetch price if from token, to token, and from token amount have been filled in
	if (!currentTrade.from || !currentTrade.to || !document.getElementById("from_amount").value) return;
	// The amount is calculated from the smallest base unit of the token. We get this by multiplying the (from amount) x (10 to the power of the number of decimal places)
	let  amount = Number(document.getElementById("from_amount").value * 10 ** currentTrade.from.decimals);
	...
}
Next, inside getPrice() we will set our params and fill them into our price quote:
async  function  getPrice(){
...
const params = {
    sellToken: currentTrade.from.address,
    buyToken: currentTrade.to.address,
    sellAmount: amount,
  }
  // Fetch the swap price.
  const response = await fetch(
    `https://api.0x.org/swap/v1/price?${qs.stringify(params)}`
    );
...
}
And lastly, once the response is returned, we will parse out the JSON. The JSON object contains the key/value pairs for buyAmount and estimatedGas which we can directly populate into the "to_amount" and "gas_estimate" html elements appropriately in the UI:
async  function  getPrice(){
...
	// Await and parse the JSON response
	swapPriceJSON = await  response.json();
	console.log("Price: ", swapPriceJSON);
	// Use the returned values to populate the buy Amount and the estimated gas in the UI
	document.getElementById("to_amount").value = swapPriceJSON.buyAmount / (10 ** currentTrade.to.decimals);
	document.getElementById("gas_estimate").innerHTML = swapPriceJSON.estimatedGas;
...
}
Now in order to run it, make sure to rerun the Browerify command to generate an updated bundle.js.
Your project should now auto-populate the to-amount and Estimated Gas like this!

Final Code for Part 6
git clone https://github.com/0xProject/swap-demo-tutorial/tree/main/swap-demo-tutorial-part-6
Part 7. Get Quote
Now for getting Quote setup!
Here is the gameplan for what's left:
- ✅ Enable the "Swap" button only when MetaMask is connected
- ⚪ Use the users's MetaMask account address to fetch a quote
- ⚪ Set a token allowance
- ⚪ Perform the swap
We have completed the first step in Part (2. Connect to MetaMask) above. Let's create a function to fetch the quote.
getQuote() - Use the Users's MetaMask Account Address to Fetch a Quote
This function will be very similar to getPrice(), the only difference is is that we will pass in a takerAddress, which is the address which will fill the quote. In our case, this is our MetaMask account. You can read more about the takerAddress parameter here.
I will copy and paste the getPrice() code and made the following modifications into getQuote() to pass in and set the takerAddress:
// index.js

// Function to get a quote using /swap/v1/quote. We will pass in the user's MetaMask account to use as the takerAddress
async function getQuote(account){
  console.log("Getting Quote");

  if (!currentTrade.from || !currentTrade.to || !document.getElementById("from_amount").value) return;
  let amount = Number(document.getElementById("from_amount").value * 10 ** currentTrade.from.decimals);

  const params = {
    sellToken: currentTrade.from.address,
    buyToken: currentTrade.to.address,
    sellAmount: amount,
    // Set takerAddress to account
    takerAddress: account,
  }

  // Fetch the swap quote.
  const response = await fetch(
    `https://api.0x.org/swap/v1/quote?${qs.stringify(params)}`
    );

  swapQuoteJSON = await response.json();
  console.log("Quote: ", swapQuoteJSON);

  document.getElementById("to_amount").value = swapQuoteJSON.buyAmount / (10 ** currentTrade.to.decimals);
  document.getElementById("gas_estimate").innerHTML = swapQuoteJSON.estimatedGas;

  return swapQuoteJSON;
}
Step 2 done!
- ✅ Enable the "Swap" button only when MetaMask is connect
- ✅ Use the users's MetaMask account address to fetch a quote
- ⚪ Set a token allowance
- ⚪ Perform the swap
Now let's take a look at setting a token allowance
Final Code for Part 7
git clone https://github.com/0xProject/swap-demo-tutorial/tree/main/swap-demo-tutorial-part-7
Part 8. Set a Token Allowance
Set a Token Allowance
A token allowance is required if you want a third-party to move funds on your behalf. In short, you are allowing them to move your tokens.
In our case, we would like the 0x Exchange Proxy smart contract to trade our ERC20 tokens for us, so we will need to approve an allowance (a certain amount) for this contract to move a certain amount of our ERC20 tokens on our behalf.
What's needed to do this:
- (i) Connect with the ERC20 token's
approve()method using a web3 object - (ii) Set the approval amount to
maxApproval - (iii) Use
approve()to give ourallowanceTargetan allowance for a max amount
(i) Connect with the ERC20 Token's approve() Method Using a web3 Object
All ERC20 tokens are required to implement the approve(address spender, uint256 amount) function. This function sets amount as the allowance of spender over the caller’s tokens (i.e. how many of these ERC20 tokens can the third-party move on the caller's behalf).
It returns a boolean value indicating whether the operation succeeded.
Read more about setting token allowances here.
As seen in approve(address spender, uint256 amount) function above, in order to call the token allowance, we need a couple of things:
- spender address- This will be the 0x Exchange Proxy Smart Contract address. We can get this from the JSON response as the
allowanceTargetparameter returned in our/quotequery - amount - How much allowance do we want to give the contract? In this case, I will demo with the max amount (
maxApproval) possible; however, I highly recommend setting only what you need if possible. Check out this example here for how to implement that (hint, weekly challenge, hint) - caller - The user's MetaMask account will be the caller address (aka takerAddress)
Build trySwap()
Let's start building out trySwap() and I will explain each piece along the way. I will post the full code at the end
First, let's get the takerAddress and pass it to getQuote(address) so we can get swapQuoteJSON back to use from the /quote request:
// index.js
async  function  trySwap(){
  // The address, if any, of the most recently used account that the caller is permitted to access
  let accounts = await ethereum.request({ method: "eth_accounts" });
  let takerAddress = accounts[0];
  // Log the the most recently used address in our MetaMask wallet
  console.log("takerAddress: ", takerAddress);
    // Pass this as the account param into getQuote() we built out earlier. This will return a JSON object trade order.
const  swapQuoteJSON = await  getQuote(takerAddress);
}
Now let's call the ERC20 token's approve() method. Since will need to interact with the ERC20's contract methods, we need to setup a web3 object.
In order for us to interact with an ERC20 contract's method's, need to create a web3 object, specifically web3.eth.Contract:
const ERC20TokenContract = new web3.eth.Contract(erc20abi, fromTokenAddress);
This object needs a erc20abi which is the json representation of an erc20 contract. The erc20abi is our blueprint for interacting with any token that follows the ERC20 standard. It is represented in JSON format. A quick search should pull up a erc20abi.json since it is a standard. I'm using this one.
The object also needs the specific token address we are interested in interacting with, in this case, it's the fromTokenAddrss because we want the third-party (i.e the 0x Smart Contract) to act on the tokens we want to trade from.
Add the following into trySwap():
// index.js
async  function  trySwap(){
...
// Setup the erc20abi in json format so we can interact with the approve method below
const erc20abi= [{ "inputs": [ { "internalType": "string", "name": "name", "type": "string" }, { "internalType": "string", "name": "symbol", "type": "string" }, { "internalType": "uint256", "name": "max_supply", "type": "uint256" } ], "stateMutability": "nonpayable", "type": "constructor" }, { "anonymous": false, "inputs": [ { "indexed": true, "internalType": "address", "name": "owner", "type": "address" }, { "indexed": true, "internalType": "address", "name": "spender", "type": "address" }, { "indexed": false, "internalType": "uint256", "name": "value", "type": "uint256" } ], "name": "Approval", "type": "event" }, { "anonymous": false, "inputs": [ { "indexed": true, "internalType": "address", "name": "from", "type": "address" }, { "indexed": true, "internalType": "address", "name": "to", "type": "address" }, { "indexed": false, "internalType": "uint256", "name": "value", "type": "uint256" } ], "name": "Transfer", "type": "event" }, { "inputs": [ { "internalType": "address", "name": "owner", "type": "address" }, { "internalType": "address", "name": "spender", "type": "address" } ], "name": "allowance", "outputs": [ { "internalType": "uint256", "name": "", "type": "uint256" } ], "stateMutability": "view", "type": "function" }, { "inputs": [ { "internalType": "address", "name": "spender", "type": "address" }, { "internalType": "uint256", "name": "amount", "type": "uint256" } ], "name": "approve", "outputs": [ { "internalType": "bool", "name": "", "type": "bool" } ], "stateMutability": "nonpayable", "type": "function" }, { "inputs": [ { "internalType": "address", "name": "account", "type": "address" } ], "name": "balanceOf", "outputs": [ { "internalType": "uint256", "name": "", "type": "uint256" } ], "stateMutability": "view", "type": "function" }, { "inputs": [ { "internalType": "uint256", "name": "amount", "type": "uint256" } ], "name": "burn", "outputs": [], "stateMutability": "nonpayable", "type": "function" }, { "inputs": [ { "internalType": "address", "name": "account", "type": "address" }, { "internalType": "uint256", "name": "amount", "type": "uint256" } ], "name": "burnFrom", "outputs": [], "stateMutability": "nonpayable", "type": "function" }, { "inputs": [], "name": "decimals", "outputs": [ { "internalType": "uint8", "name": "", "type": "uint8" } ], "stateMutability": "view", "type": "function" }, { "inputs": [ { "internalType": "address", "name": "spender", "type": "address" }, { "internalType": "uint256", "name": "subtractedValue", "type": "uint256" } ], "name": "decreaseAllowance", "outputs": [ { "internalType": "bool", "name": "", "type": "bool" } ], "stateMutability": "nonpayable", "type": "function" }, { "inputs": [ { "internalType": "address", "name": "spender", "type": "address" }, { "internalType": "uint256", "name": "addedValue", "type": "uint256" } ], "name": "increaseAllowance", "outputs": [ { "internalType": "bool", "name": "", "type": "bool" } ], "stateMutability": "nonpayable", "type": "function" }, { "inputs": [], "name": "name", "outputs": [ { "internalType": "string", "name": "", "type": "string" } ], "stateMutability": "view", "type": "function" }, { "inputs": [], "name": "symbol", "outputs": [ { "internalType": "string", "name": "", "type": "string" } ], "stateMutability": "view", "type": "function" }, { "inputs": [], "name": "totalSupply", "outputs": [ { "internalType": "uint256", "name": "", "type": "uint256" } ], "stateMutability": "view", "type": "function" }, { "inputs": [ { "internalType": "address", "name": "recipient", "type": "address" }, { "internalType": "uint256", "name": "amount", "type": "uint256" } ], "name": "transfer", "outputs": [ { "internalType": "bool", "name": "", "type": "bool" } ], "stateMutability": "nonpayable", "type": "function" }, { "inputs": [ { "internalType": "address", "name": "sender", "type": "address" }, { "internalType": "address", "name": "recipient", "type": "address" }, { "internalType": "uint256", "name": "amount", "type": "uint256" } ], "name": "transferFrom", "outputs": [ { "internalType": "bool", "name": "", "type": "bool" } ], "stateMutability": "nonpayable", "type": "function" }]
	// Set up approval amount for the token we want to trade from
	const fromTokenAddress = currentTrade.from.address;

	// In order for us to interact with a ERC20 contract's method's, need to create a web3 object. This web3.eth.Contract object needs a erc20abi which we can get from any erc20 abi as well as the specific token address we are interested in interacting with, in this case, it's the fromTokenAddrss
// Read More: https://web3js.readthedocs.io/en/v1.2.11/web3-eth-contract.html#web3-eth-contract
	const  web3 = new  Web3(Web3.givenProvider);
	const ERC20TokenContract = new web3.eth.Contract(erc20abi, fromTokenAddress);
	console.log("setup ERC20TokenContract: ", ERC20TokenContract);
...
}
(ii) Set the approval amount to maxApproval
In this example, I'll show you how to set the maximum approval amount. I'd recommend checking out this example to see how to set only what's needed.
We will use the BigNumber library to create a really large number. Then we set this to a maxApproval variable. Plug this in at the bottom of trySwap() in index.js
	// The max approval is set here. Using Bignumber to handle large numbers and account for overflow (https://github.com/MikeMcl/bignumber.js/)
	const maxApproval = new BigNumber(2).pow(256).minus(1);
	console.log("approval amount: ", maxApproval);
(iii) Use approve() to give our allowanceTarget an allowance for a max amount
Now that we can interact with the approve() method and the approval amount, let's use it to grant the allowanceTarget (i.e. the 0x Exchange Proxy smart contract address), an allowance to spend our ERC20 tokens. We can get the allowanceTarget address directly from the JSON object that's returned from our /quote response:
// index.js
async  function  trySwap(){
...
 // Grant the allowance target (the 0x Exchange Proxy) an  allowance to spend our tokens. Note that this is a txn that incurs fees.
  const tx = await ERC20TokenContract.methods.approve(
    swapQuoteJSON.allowanceTarget,
    maxApproval,
  )
  .send({ from: takerAddress })
  .then(tx => {
    console.log("tx: ", tx)
  });
...
}
Test It Out
Now give this a test run!
- Select a from token (make sure your wallet has enough of that token; otherwise you will get an error)
- Select a to token
- Input a from amount (make sure your wallet has at least that amount; otherwise the quote won't carry through)
- Connect your MetaMask wallet, the "Swap" button should be enabled
- If you click "Swap" you should get a MetaMask pop-up asking if you approve the allowanceTarget, 0x Exchange Proxy contract address:
0xdef1c0ded9bec7f1a1670819833240f027b25eff!
Note
This transaction does require fees. Read before you sign.

Almost done!
- ✅ Enable the "Swap" button only when MetaMask is connected.
- ✅ Use the users' MetaMask account address to fetch a quote
- ✅ Set a token allowance
- ⚪ Perform the swap
Final Code for Part 8
git clone https://github.com/0xProject/swap-demo-tutorial/tree/main/swap-demo-tutorial-part-8
Part 9. Perform the Swap
Now for the last part, performing the swap. This part should be very straightforward since what's passed back from /quote is a JSON object that's ready to be signed and submitted as a valid transaction on the blockchain.
Add this at the end of trySwap():
// index.js
async  function  trySwap(){
...
	// Perform the swap
	const  receipt = await  web3.eth.sendTransaction(swapQuoteJSON);
	console.log("receipt: ", receipt);
}
The reason we can directly pass in the /quote response is because it contains all the necessary parameters for web3.eth.setTransaction() - from, to, value, gas, data, etc.
Now if you select a token pair (with a from token that you own), input a from amount, and connect your MetaMask wallet, and hit "Swap", you should get this popup asking if you'd like to make the trade! And with that, your app is complete!

- ✅ Enable the "Swap" button only when MetaMask is connected
- ✅ Use the users' MetaMask account address to fetch a quote
- ✅ Set a token allowance
- 🥳 Perform the swap
If you go through the entire flow, you will be able to approve the token allowance and perform the swap and receive your newly swapped tokens inside your wallet!
You can also check your transaction on Etherscan!

Final Code for Part 9
git clone https://github.com/0xProject/swap-demo-tutorial/tree/main/swap-demo-tutorial-part-9
Learn More
- Introduction to 0x
- Learn more about 0x API /swap
- 0x API References
- Guides and Code Examples to Build with 0x
Challenges
Now to take your dapp to the next level! Here are some challenges to try on your own to test your understanding! (Some hints offered in the YouTube video if you need help)
- Show the percentage breakdown where a swap was sourced from using the
sourcesresponse param (ex: the best price comes from 50% Uniswap, 50% Kyber) - Currently we set the token allowance is set to the max amount. Change this to be safer so the user only approves just the amount needed.
- Calculate price when a user enters new “to” token (right now it only auto-calculates when a user enters a new "from" token)
- Show estimated gas in $
- Filter down the long tokens list
- Allows users to switch chains and receive a proper quote (remember the tokenlist will change as well!)
Once you're done with your challenge, tweet about it by tagging @AlchemyLearn, @0xProject, and the author @hey_its_jlin on Twitter!
Updated over 1 year ago