4. How to Create an NFT Gallery
Welcome to week 4 of the Road to Web3 series. In this tutorial, you will learn how to develop an NFT gallery that displays NFTs by wallet address and smart contract address.
Having public data stored on the blockchain doesn't make it easily accessible. Querying the blockchain is in fact one of the biggest lifts for developers that will need to start from the origin of the chain to gather the data they need to connect the dots and answer their questions.
Let's say a developer wants to answer the following question: "What NFTs does a wallet own?".
This sounds like a simple inquiry, but the answer is far from easy.
In this case, the developer would need to find all the NFTs minted on a given chain, and then follow all the transfer functions to understand who's currently owning the NFTs.
This task could take developers weeks. Luckily though, there's a solution - with a free Alchemy account and the Alchemy NFT API, that allows devs to fetch NFTs from the blockchain in milliseconds, not weeks.
Because Alchemy has already queried the full blockchain and indexed its data, the NFT API enables you to have full access to the information.
How to Create an NFT Gallery Tutorial
In this tutorial you're going to learn how to use the Alchemy NFT API to build an NFT gallery capable of fetching NFTs based on three things:
- Wallet address
- Collection address
- Wallet address + collection address
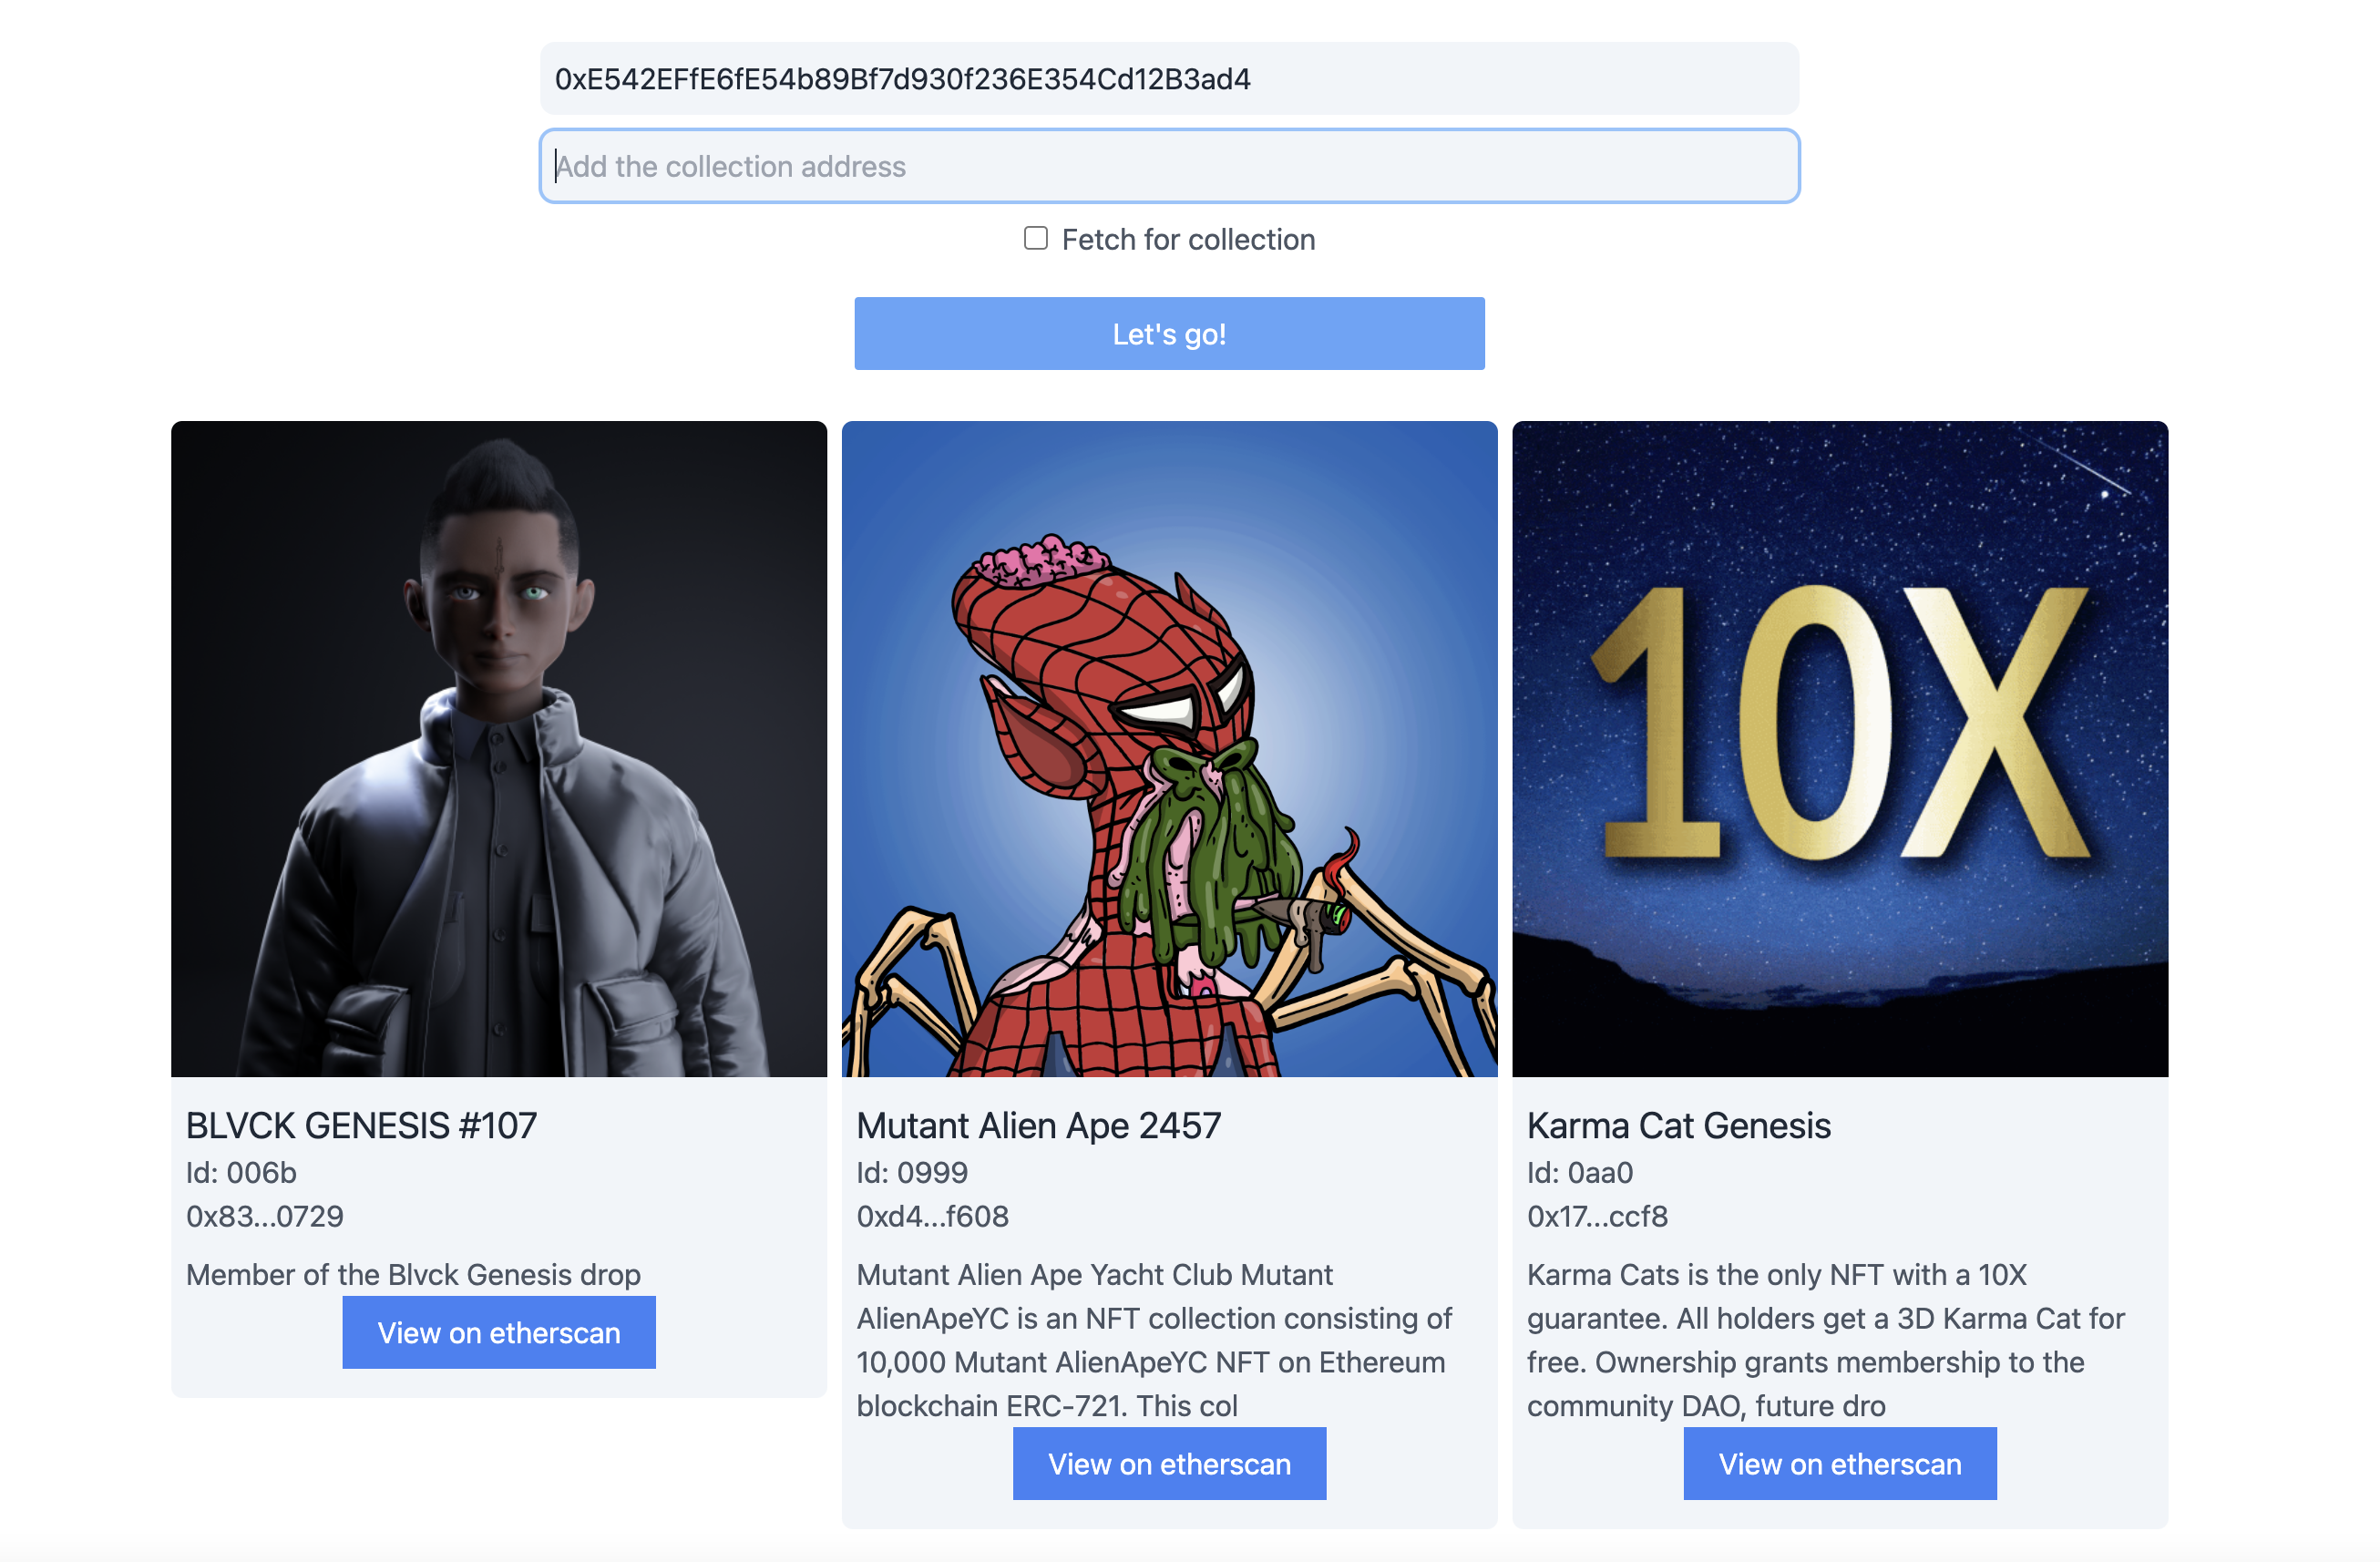
NFT Gallery Example
Required Tools
We will use the Alchemy NFT API calls to fetch NFTs, their metadata, and display images, descriptions, and IDs, in our NFT gallery, using:
- Next JS
- Tailwind CSS
- Alchemy NFT API
- Alchemy Account
Prefer watching a video?
Learn how to build an NFT gallery on the Alchemy YouTube channel!
1. Create the Project Setup
The first thing you'll need to do is to create the Next JS project boilerplate and install TailwindCSS that will take care of your styles.
Open your terminal and write the following code:
npx create-next-app -e with-tailwindcss nameoftheproject
Navigate to your project and launch VSCode:
cd nameoftheproject && code .
Now that your project boilerplates have been created, test that everything works.
Run the following code in your project directory:
npm run dev
Browsing to localhost:3000 should render the following page:
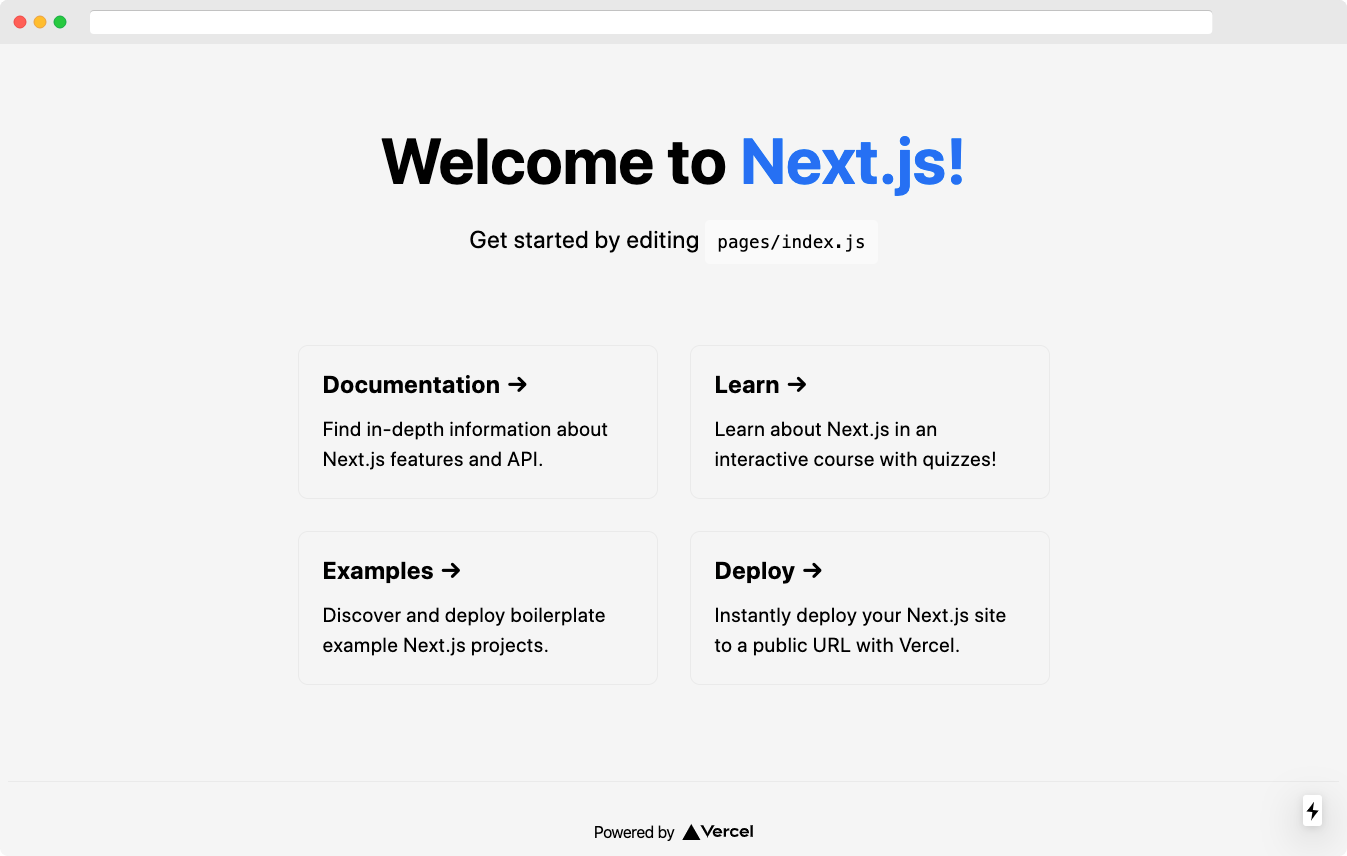
Rendered page after browsing to localhost:3000
Because we won't need it, you can delete all the code inside the <div> tags in pages/index.tsx.
Your code inside the index.tsx file should now look like this:
import type { NextPage } from 'next'
import Head from 'next/head'
import Image from 'next/image'

const Home: NextPage = () => {
  return (

  )
}

export default Home
Because this tutorial will use Javascript and not Typescript, before writing your code, convert your index.tsx and _app.tsx files from .tsx to .jsx files.
- Change both file extensions to
.jsx - Remove the types imported at the top of both files
2. Create a Home Page
The first step to creating a searchable NFT gallery is to create the text inputs where you'll add the wallet address and the collection address used to search for NFTs.
In the index.jsx page, add the following code:
const Home = () => {

  return (
    <div className="flex flex-col items-center justify-center py-8 gap-y-3">
      <div className="flex flex-col w-full justify-center items-center gap-y-2">
        <input type={"text"} placeholder="Add your wallet address"></input>
        <input type={"text"} placeholder="Add the collection address"></input>
      </div>
    </div>
  )
}

export default Home
As you can notice we're already implementing Tailwind CSS classes inside the className property of our inputs. We won't go into the details of how TailwindCSS works, if you want to learn more about it, you can refer to the official documentation.
Create Two Variables to Store Wallet and Collection Addresses
Next, we'll need to create two variables to store both the wallet address and the collection address we'll insert in the input fields, using the useState() React Hook.
Import the "useState" hook from "react" and add the following code, right above the "Home" component return statement:
  import { useState } from 'react'

  const Home = () => {
  const [wallet, setWalletAddress] = useState("");
  const [collection, setCollectionAddress] = useState("");

  return (
    <div className="flex flex-col items-center justify-center py-8 gap-y-3">
      <div className="flex flex-col w-full justify-center items-center gap-y-2">
        <input type={"text"} placeholder="Add your wallet address"></input>
        <input type={"text"} placeholder="Add the collection address"></input>
      </div>
    </div>
  )
}

export default Home
To store the value of your text inputs inside the "wallet" and "collection" variables, use the "onChange" event handler.
The "onChange" event handler will get triggered every time you change the value of your input field, taking the inputs and storing it in the respective variables using the setWallet and setCollectionAddress functions.
You'll also want to reflect the changes in your "wallet" and "collection" variables assigning their value displayed in your input.
In the text inputs tags, add the following code:
import { useState } from 'react'

const Home = () => {
  const [wallet, setWalletAddress] = useState("");
  const [collection, setCollectionAddress] = useState("");

  return (
    <div className="flex flex-col items-center justify-center py-8 gap-y-3">
      <div className="flex flex-col w-full justify-center items-center gap-y-2">
        <input onChange={(e)=>{setWalletAddress(e.target.value)}} value={wallet} type={"text"} placeholder="Add your wallet address"></input>
        <input onChange={(e)=>{setCollectionAddress(e.target.value)}} value={collection} type={"text"} placeholder="Add the collection address"></input>
      </div>
    </div>
  )
}

export default Home
Your inputs will now store in their respective variables the addresses we'll write inside.
Check that Everything Works with the "React Developer Tools" in Your Browser
We'll go through the installation process on Chrome but all of this applies also to Mozilla Firefox.
- Go to the browser extension store
- Search for the React developer tools
- Click on "Add to Chrome"
Once it is downloaded and installed, you'll be able to see the React development tools tab in the "inspect" view within Chrome Developer Tools.
Go back to the terminal, inside your application folder, and start your application again writing:
npx run dev
- go to your application page (localhost:3000)
- right-click anywhere on the page
- click on inspect
- click on the ">>" symbol
- go to "Components"
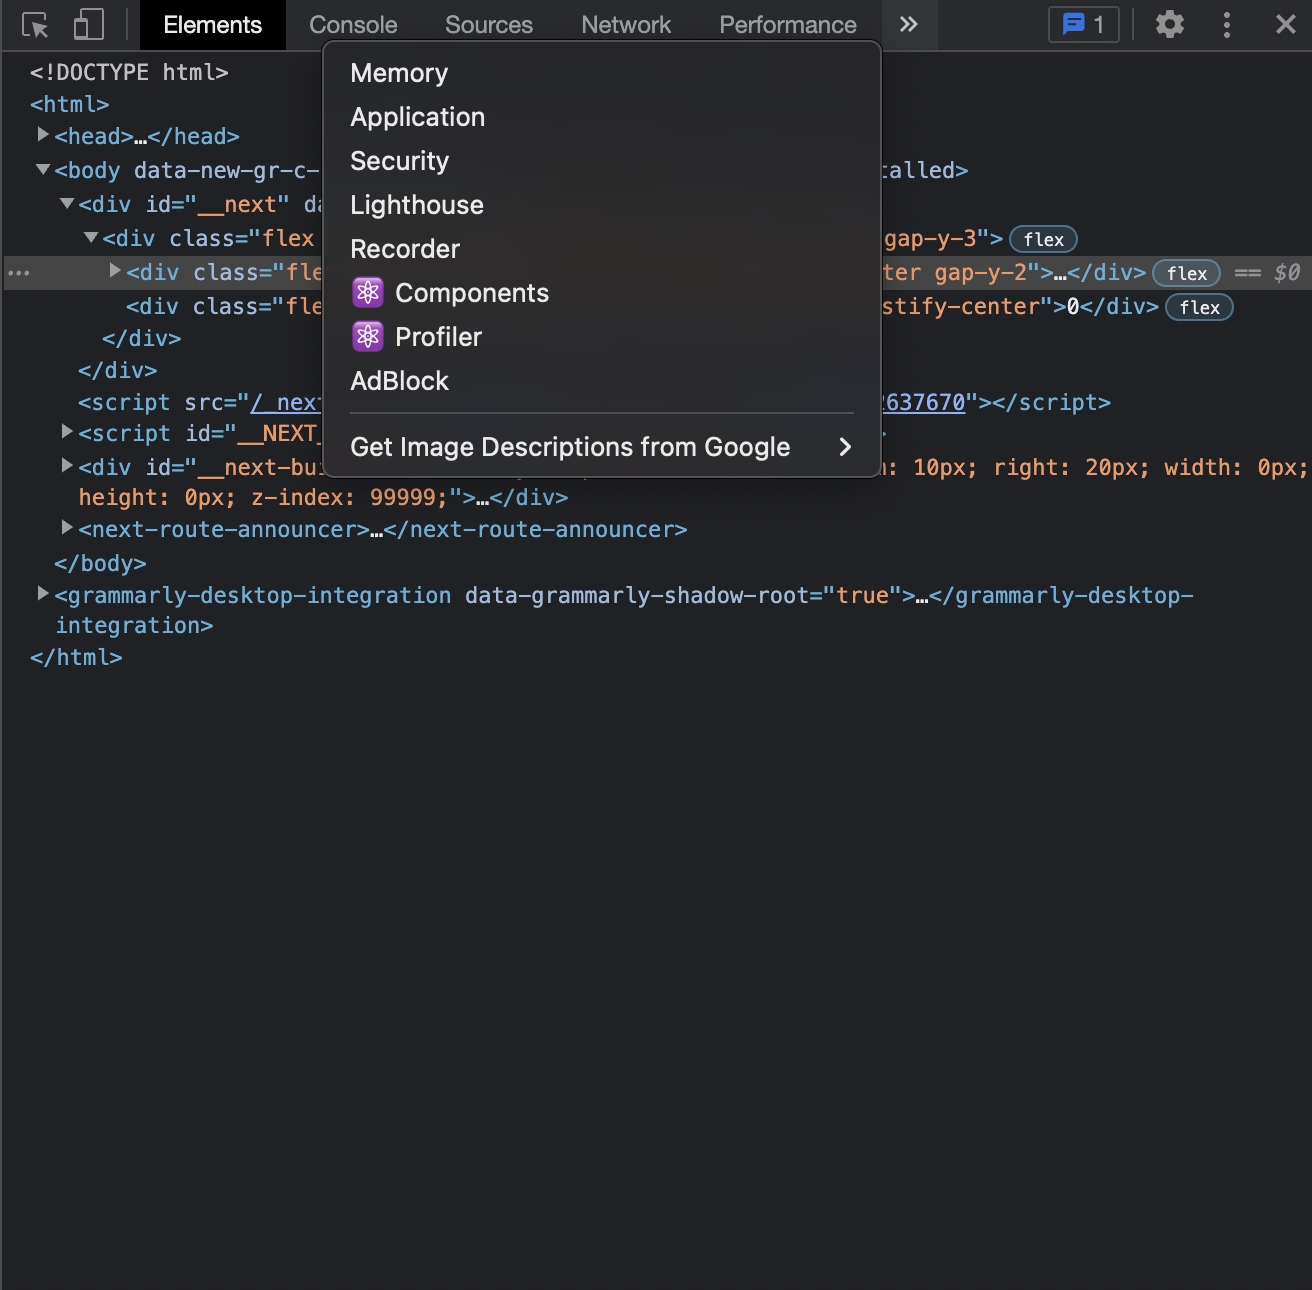
On the "Components" view, we'll be able to see a list of all the components included on our page, and, on the right side, the different states saved in the hooks and other information about the app:
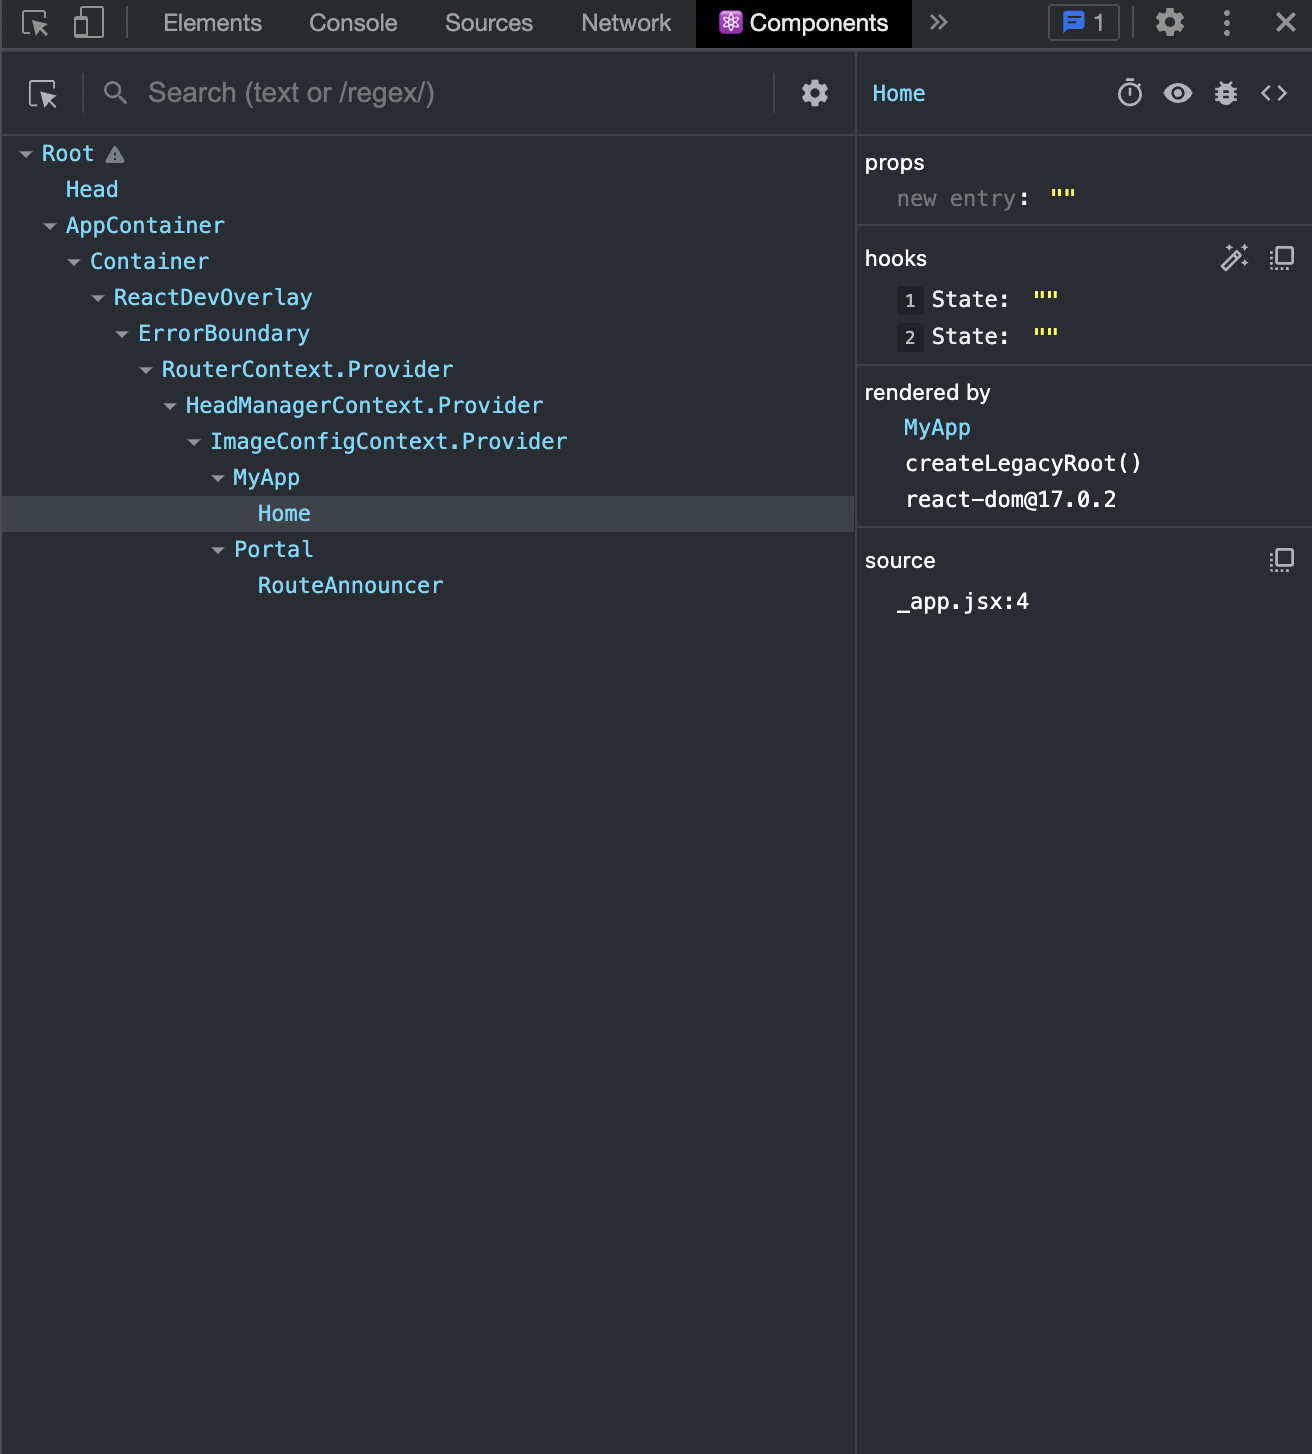
With the React developer tools installed, you can test the useState() hooks by writing in your inputs and checking if the value of your states gets updated:
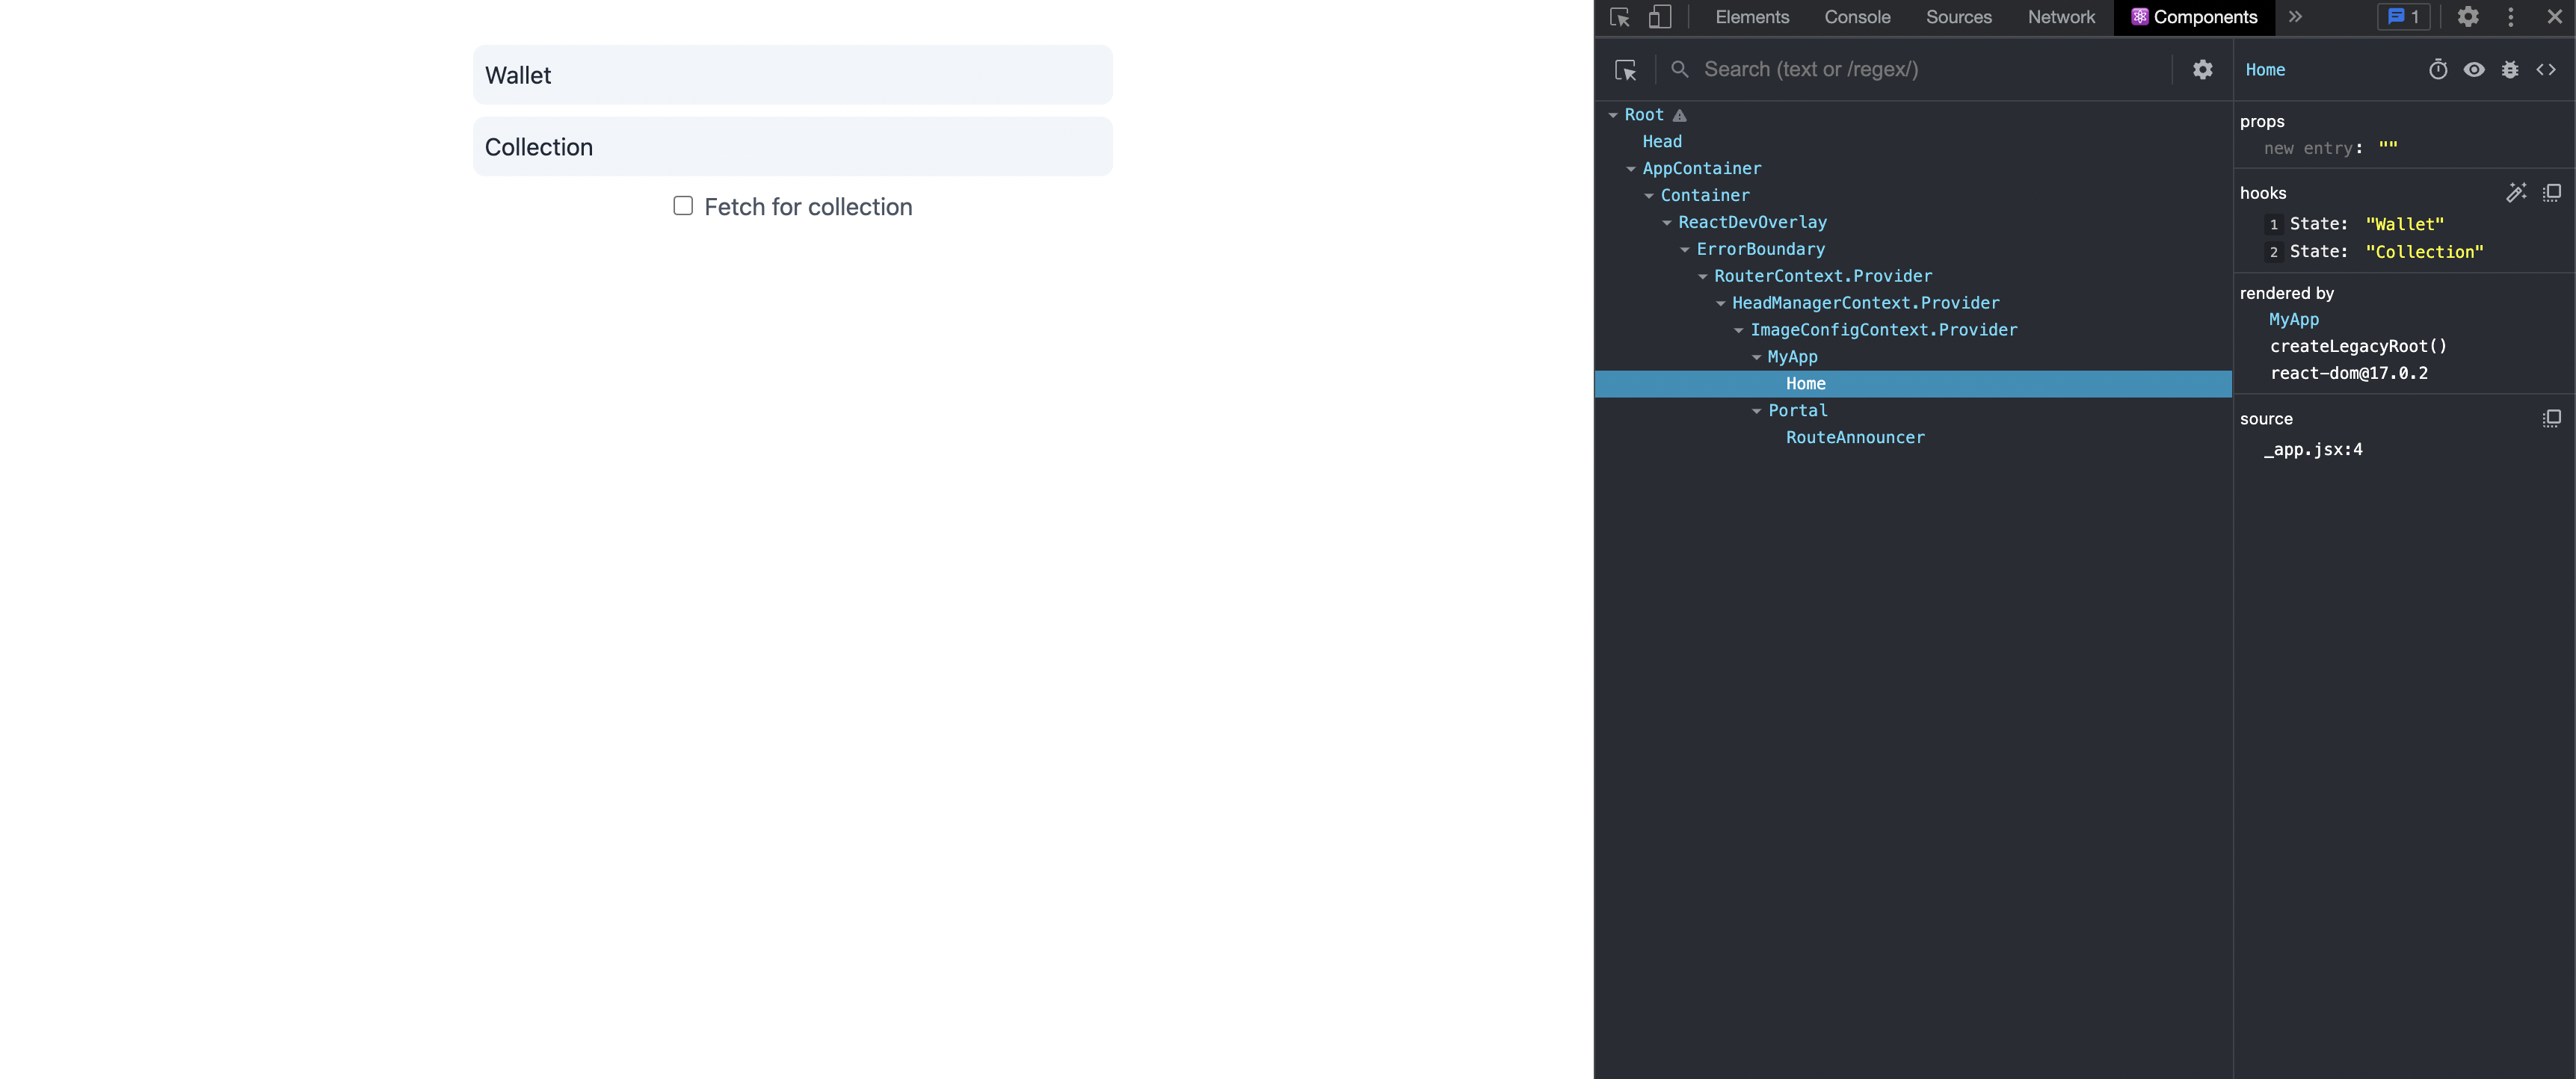
Now that you're able to store the wallet and collection address, let's finish the homepage.
Complete the Homepage
Next, you'll need to add a button that will trigger the functions to fetch the NFTs from the Alchemy NFT API, and a toggle to decide if you want to search by wallet address, collection, or both.
- under the collection text input add a new input with the "checkbox" type
- wrap it in a label to add some text
- create the button
 import { useState } from 'react'

const Home = () => {
  const [wallet, setWalletAddress] = useState("");
  const [collection, setCollectionAddress] = useState("");

  return (
    <div className="flex flex-col items-center justify-center py-8 gap-y-3">
      <div className="flex flex-col w-full justify-center items-center gap-y-2">
        <input type={"text"} placeholder="Add your wallet address"></input>
        <input type={"text"} placeholder="Add the collection address"></input>
        <label className="text-gray-600 "><input type={"checkbox"} className="mr-2"></input>Fetch for collection</label>
        <button className={"disabled:bg-slate-500 text-white bg-blue-400 px-4 py-2 mt-3 rounded-sm w-1/5"}>Let's go! </button>
      </div>
    </div>
  )
}

export default Home
Now that you have your button, add an onClick() handler that will trigger your fetchNFTs() function to fetch NFTs based on the wallet owning them:
import { useState } from 'react'

const Home = () => {
  const [wallet, setWalletAddress] = useState("");
  const [collection, setCollectionAddress] = useState("");

  return (
    <div className="flex flex-col items-center justify-center py-8 gap-y-3">
      <div className="flex flex-col w-full justify-center items-center gap-y-2">
        <input type={"text"} placeholder="Add your wallet address"></input>
        <input type={"text"} placeholder="Add the collection address"></input>
        <label className="text-gray-600 "><input type={"checkbox"} className="mr-2"></input>Fetch for collection</label>
        <button className={"disabled:bg-slate-500 text-white bg-blue-400 px-4 py-2 mt-3 rounded-sm w-1/5"} onClick={
          () => {

          }
        }>Let's go! </button>
      </div>
    </div>
  )
}

export default Home
Now, create the fetchNFTs() function to add inside the onClick handler and fetch your NFTs.
Before that though, you need to create a new application to get an Alchemy API key.
3. Create a New Alchemy Application
Navigate to Alchemy and click "Create App" to create a new app:
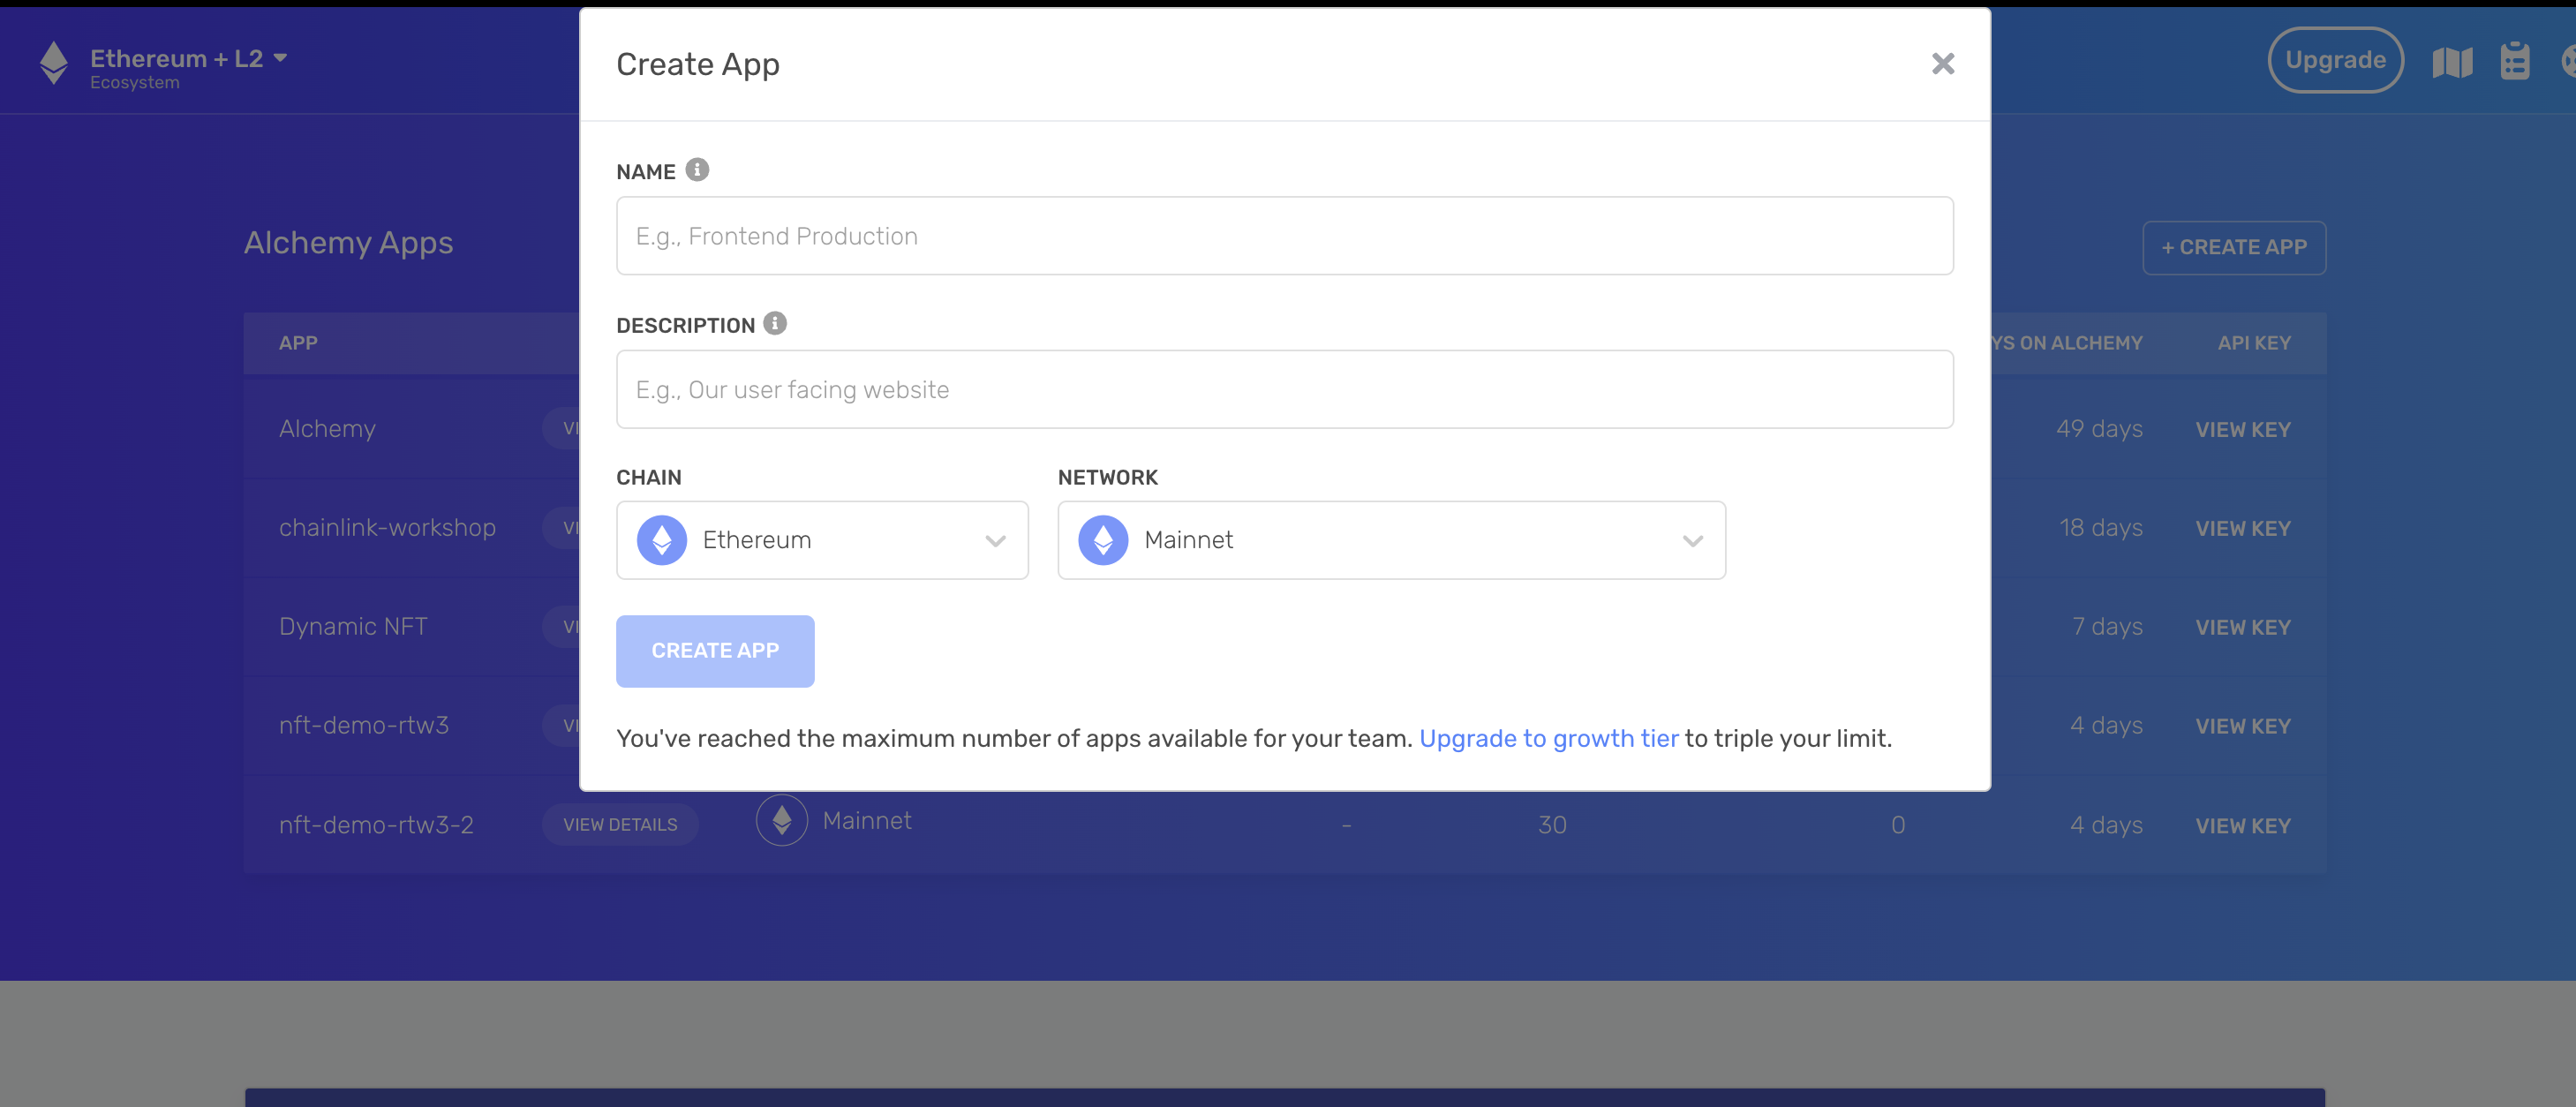
Creating a new app in the Alchemy dashboard.
Here are the details to add:
- App name
- Description
- Chain (Ethereum)
- Network (Mainnet)
Selecting the Ethereum mainnet will allow you to fetch NFTs only from Ethereum.
If you want to fetch NFTs on Polygon or other chains, you'll need to create a new application with the respective chain and change the base URL to reflect the chain you want to use, for example, Polygon's URL would be: https://polygon-mumbai.g.alchemy.com/v2/YOUR-API-KEY
Now that our Alchemy application is up and running, let's create the fetchNFTs function to fetch all NFTs owned by an address.
4. Create the FetchNFTs function
To get the NFTs owned by a wallet address, use the getNFTs endpoint of the Alchemy NFT API.
In the home component, declare a new useState() variable, as we did before with the wallet and collection addresses, to store the NFTs we'll fetch using the Alchemy NFT API:
import { useState } from 'react'

const Home = () => {
  const [wallet, setWalletAddress] = useState("");
  const [collection, setCollectionAddress] = useState("");
  const [NFTs, setNFTs] = useState([])

  return (
    <div className="flex flex-col items-center justify-center py-8 gap-y-3">
      <div className="flex flex-col w-full justify-center items-center gap-y-2">
        <input type={"text"} placeholder="Add your wallet address"></input>
        <input type={"text"} placeholder="Add the collection address"></input>
        <label className="text-gray-600 "><input type={"checkbox"} className="mr-2"></input>Fetch for collection</label>
        <button className={"disabled:bg-slate-500 text-white bg-blue-400 px-4 py-2 mt-3 rounded-sm w-1/5"} onClick={
          () => {
          }
        }>Let's go! </button>
      </div>
    </div>
  )
}

export default Home
Now, always inside the homepage component, add the fetchNFTs() function.
const fetchNFTs = async() => {
  let nfts;
  console.log("fetching nfts");
  const api_key = "A8A1Oo_UTB9IN5oNHfAc2tAxdR4UVwfM"
  const baseURL = `https://eth-mainnet.g.alchemy.com/v2/${api_key}/getNFTs/`;
  var requestOptions = {
      method: 'GET'
    };

  if (!collection.length) {

    const fetchURL = `${baseURL}?owner=${wallet}`;

    nfts = await fetch(fetchURL, requestOptions).then(data => data.json())
  } else {
    console.log("fetching nfts for collection owned by address")
    const fetchURL = `${baseURL}?owner=${wallet}&contractAddresses%5B%5D=${collection}`;
    nfts= await fetch(fetchURL, requestOptions).then(data => data.json())
  }

  if (nfts) {
    console.log("nfts:", nfts)
    setNFTs(nfts.ownedNfts)
  }
}
The first thing to notice about your fetchNFTs() function, is the async keyword, which will allow you to fetch data without blocking your entire application.
Read more about the async await JavaScript workflow.
You then declared a new variable you'll use to store the NFTs you'll fetch, to then create the base URL you'll feed in your fetch() to retrieve the nfts.
The base URL, as per Alchemy NFT API documentation, is composed by:
- Application base URL
- Your API key
- Owner address
- Collection address - optional
If the collection address is provided, the NFT API will filter the fetched NFTs by collection, if it's not provided, the API will retrieve all the NFTs owned by the provided wallet address.
Because of this, you'll need a way to understand if the collection address has been provided or not, hence: if you want to filter by collection.
To do so, you can add an "if" statement that checks if the "collection" variable is empty or not:
If it's empty, then you only provide the wallet address parameters:
const fetchURL = `${baseURL}?owner=${wallet}`;
If it's not, then you fetch all NFTs owned by a wallet and filter them out by collection:
const fetchURL = `${baseURL}?owner=${wallet}&contractAddresses%5B%5D=${collection}`;
The "5B%5D" string right after the "contractAddresses" parameters specifies that the "contractAddresses" parameter is an array and not a simple string. This is because you could actually filter by multiple "contractAddresses", not just one.
In both cases, filtering by collection or not, you want to feed your "baseURL" into a fetch() function, await for the result to come, and convert it JSON using the .json() function.
Printing the data retrieved by our fetch() functions, would log the following object:
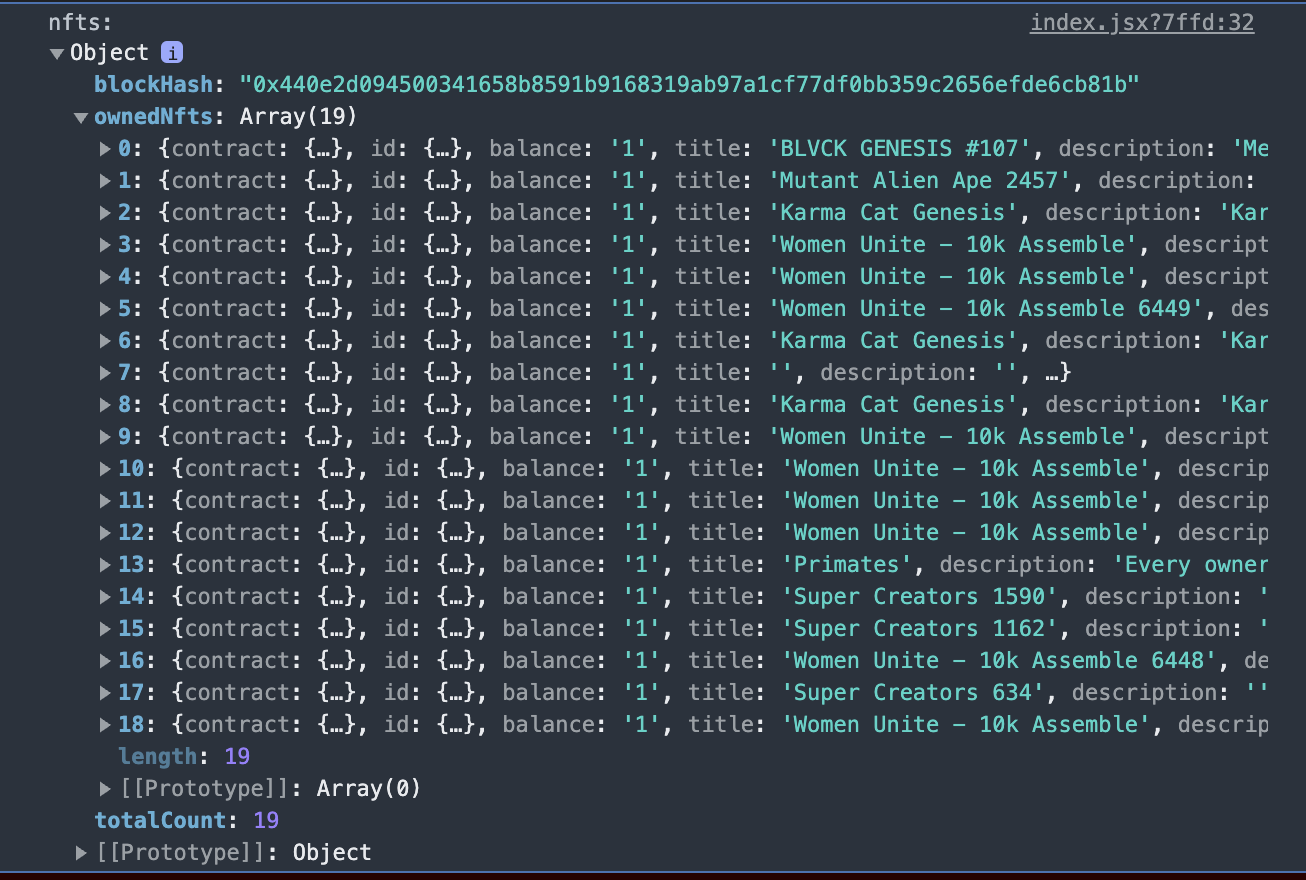
Inside the fetched object you have more info than you need as you'll only need the array containing the NFTs owned by the wallet address we provided.
That's the reason why in the setNFTs() function you're feeding nfts.ownednfts and not just nfts, as you'll need only the ownednfts array to be stored to use it later to show your NFTs.
Now that your fetchNFTs() function is ready, you'll need to implement a new function to fetch NFTs by collection without an NFT owner.
5. Create the FetchNFTs by Collection functions
To fetch NFTs by collection you can use the getNFTsForCollection Alchemy endpoint.
The getNFTsForCollection endpoint will require two parameters:
contractAddress- contract address for the NFT collection [string]withMetadata- (optional) **** if set totrue, returns NFT metadata; otherwise will only return tokenIds. Defaults tofalse[boolean]
The first argument is to specify the contract address of the collection you want to fetch.
The second argument specifies to the NFT API if you also want to fetch the metadata (e.g. title, image, description, attributes) of the NFTs contained in the collection or only their IDs.
You can read more on the Alchemy NFT API.
As we did before, let's first copy the code and understand what it does:
const fetchNFTsForCollection = async () => {
  if (collection.length) {
    var requestOptions = {
      method: 'GET'
    };
    const api_key = "A8A1Oo_UTB9IN5oNHfAc2tAxdR4UVwfM"
    const baseURL = `https://eth-mainnet.g.alchemy.com/v2/${api_key}/getNFTsForCollection/`;
    const fetchURL = `${baseURL}?contractAddress=${collection}&withMetadata=${"true"}`;
    const nfts = await fetch(fetchURL, requestOptions).then(data => data.json())
    if (nfts) {
      console.log("NFTs in collection:", nfts)
      setNFTs(nfts.nfts)
    }
  }
}
It is very similar to the fetchNFTs() function we built before, with two major differences:
- The endpoint used
- The value stored in the NFTs state variable
Here's what's happening:
- You're first verifying that the collection address is not empty
- Then you declared
requestOptionsto tell fetch() your HTTP request will be a "GET" request - Finally you built the
baseURLpassing the collection address value as thecontractAddressparameter and thewithMetadataparameter to true.
Lastly, you convert the data fetched to JSON, using the async await workflow + the json() function.
If we console.log the JSON Object containing the fetched NFTs we'll notice it contains 2 properties:
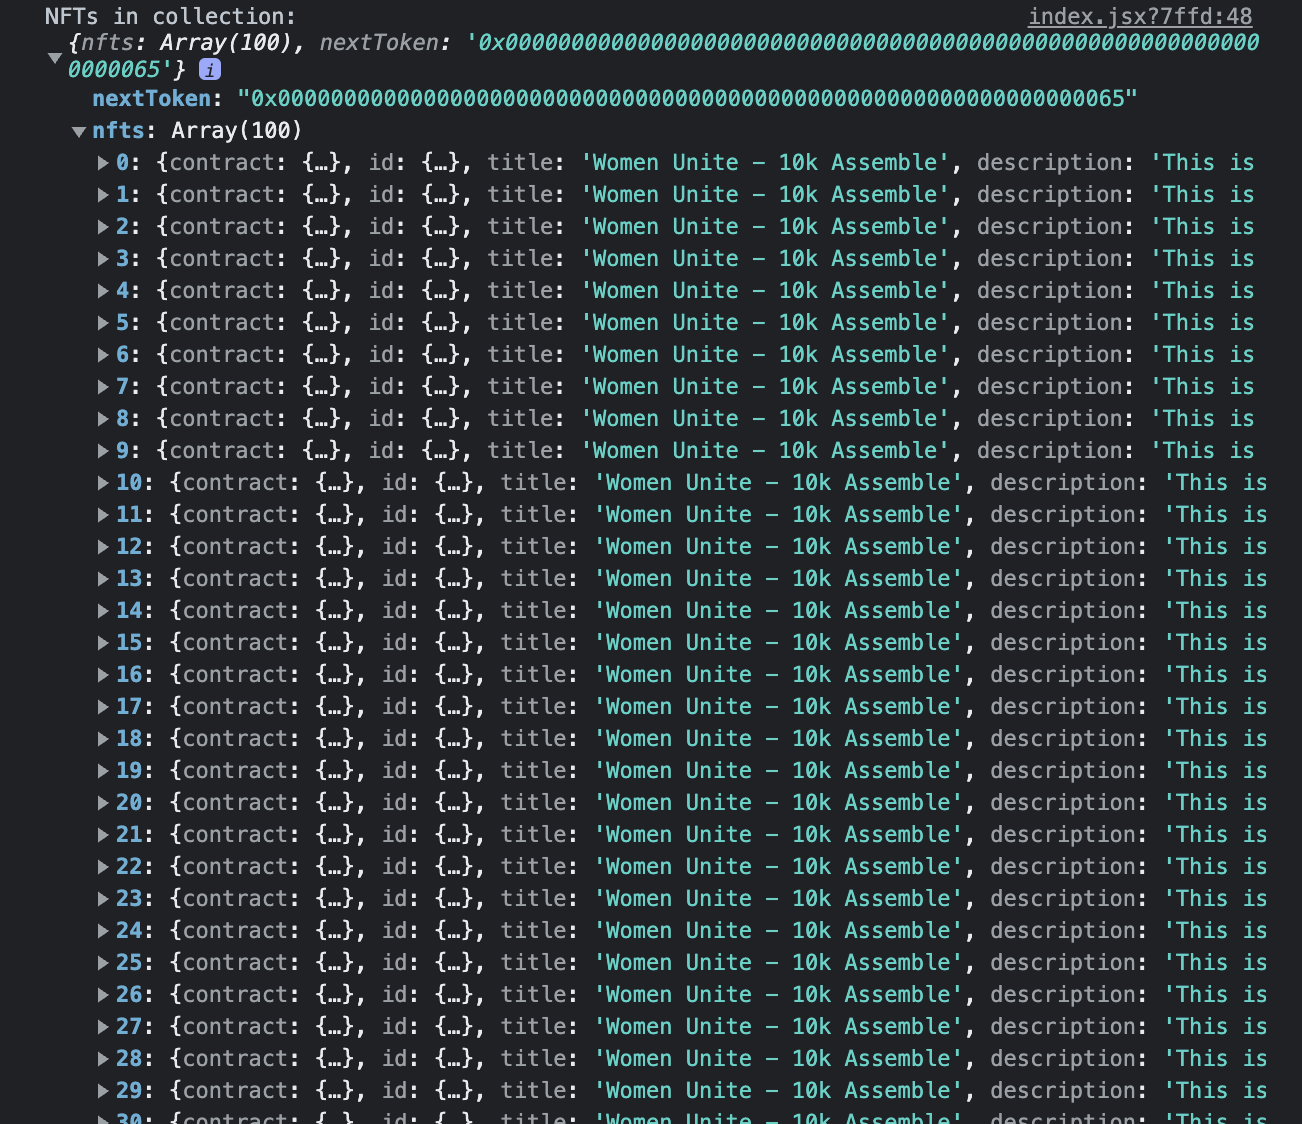
Console Log Example
- Next Token
- nfts
In this case you'll only need the "nfts" property that contains your NFTs array by passing "nfts.nfts" into the setNFTs() function.
Your code at this point should look as follow:
import { useState } from 'react'

const Home = () => {
  const [wallet, setWalletAddress] = useState("");
  const [collection, setCollectionAddress] = useState("");
  const [NFTs, setNFTs] = useState([])

  const fetchNFTs = async() => {
    let nfts;
    console.log("fetching nfts");
    const api_key = "A8A1Oo_UTB9IN5oNHfAc2tAxdR4UVwfM"
    const baseURL = `https://eth-mainnet.g.alchemy.com/v2/${api_key}/getNFTs/`;
    var requestOptions = {
        method: 'GET'
      };

    if (!collection.length) {

      const fetchURL = `${baseURL}?owner=${wallet}`;

      nfts = await fetch(fetchURL, requestOptions).then(data => data.json())
    } else {
      console.log("fetching nfts for collection owned by address")
      const fetchURL = `${baseURL}?owner=${wallet}&contractAddresses%5B%5D=${collection}`;
      nfts= await fetch(fetchURL, requestOptions).then(data => data.json())
    }

    if (nfts) {
      console.log("nfts:", nfts)
      setNFTs(nfts.ownedNfts)
    }
  }

  const fetchNFTsForCollection = async () => {
    if (collection.length) {
      var requestOptions = {
        method: 'GET'
      };
      const api_key = "A8A1Oo_UTB9IN5oNHfAc2tAxdR4UVwfM"
      const baseURL = `https://eth-mainnet.g.alchemy.com/v2/${api_key}/getNFTsForCollection/`;
      const fetchURL = `${baseURL}?contractAddress=${collection}&withMetadata=${"true"}`;
      const nfts = await fetch(fetchURL, requestOptions).then(data => data.json())
      if (nfts) {
        console.log("NFTs in collection:", nfts)
        setNFTs(nfts.nfts)
      }
    }
  }
  return (
    <div className="flex flex-col items-center justify-center py-8 gap-y-3">
      <div className="flex flex-col w-full justify-center items-center gap-y-2">
        <input type={"text"} placeholder="Add your wallet address"></input>
        <input type={"text"} placeholder="Add the collection address"></input>
        <label className="text-gray-600 "><input type={"checkbox"} className="mr-2"></input>Fetch for collection</label>
        <button className={"disabled:bg-slate-500 text-white bg-blue-400 px-4 py-2 mt-3 rounded-sm w-1/5"} onClick={
          () => {
          }
        }>Let's go! </button>
      </div>
    </div>
  )
}

export default Home
Now that your functions to fetch the NFTs are working, you'll need to attach them to the "onClick" trigger of the button you created a few sections ago.
6. Trigger the FetchNFTs and FetchNFTsByCollection Functions
The first thing you'll need to do is to add a new state variable called "fetchForCollection" that will check if you want to search by collection or wallet address:
import { useState } from 'react'

const Home = () => {
  const [wallet, setWalletAddress] = useState("");
  const [collection, setCollectionAddress] = useState("");
  const [NFTs, setNFTs] = useState([])
  const [fetchForCollection, setFetchForCollection]=useState(false)


  return (
    <div className="flex flex-col items-center justify-center py-8 gap-y-3">
      <div className="flex flex-col w-full justify-center items-center gap-y-2">
        <input type={"text"} placeholder="Add your wallet address"></input>
        <input type={"text"} placeholder="Add the collection address"></input>
        <label className="text-gray-600 "><input type={"checkbox"} className="mr-2"></input>Fetch for collection</label>
        <button className={"disabled:bg-slate-500 text-white bg-blue-400 px-4 py-2 mt-3 rounded-sm w-1/5"} onClick={
          () => {

          }
        }>Let's go! </button>
      </div>
    </div>
  )
}

export default Home
This variable will be handled by the checkbox input we created, updating its value based on if the checkbox is checked or unchecked:
- Checked: we're fetching by collection - the state variable will be true
- Unchecked: we're fetching by wallet address - the state variable will be false
To do so, you'll need to add another "onChange" handler to the input, but this time using the "e.target.checked", value as the value of the state input, instead of e.target.value:
import { useState } from 'react'

const Home = () => {
  const [wallet, setWalletAddress] = useState("");
  const [collection, setCollectionAddress] = useState("");
  const [NFTs, setNFTs] = useState([])
  const [fetchForCollection, setFetchForCollection]=useState(false)


  return (
    <div className="flex flex-col items-center justify-center py-8 gap-y-3">
      <div className="flex flex-col w-full justify-center items-center gap-y-2">
        <input type={"text"} placeholder="Add your wallet address"></input>
        <input type={"text"} placeholder="Add the collection address"></input>
        <label className="text-gray-600 "><input onChange={(e)=>{setFetchForCollection(e.target.checked)}} type={"checkbox"} className="mr-2"></input>Fetch for collection</label>
        <button className={"disabled:bg-slate-500 text-white bg-blue-400 px-4 py-2 mt-3 rounded-sm w-1/5"} onClick={
          () => {
          }
        }>Let's go! </button>
      </div>
    </div>
  )
}

export default Home
We can go back and check if the variable is updated correctly using the React developer tools.
Now that you know if you're looking for NFTs by wallet or by collection, make sure your button is able to fire the right function based on our "fetchForCollection" variable:
import { useState } from 'react'

const Home = () => {
  const [wallet, setWalletAddress] = useState("");
  const [collection, setCollectionAddress] = useState("");
  const [NFTs, setNFTs] = useState([])
  const [fetchForCollection, setFetchForCollection]=useState(false)


  return (
    <div className="flex flex-col items-center justify-center py-8 gap-y-3">
      <div className="flex flex-col w-full justify-center items-center gap-y-2">
        <input type={"text"} placeholder="Add your wallet address"></input>
        <input type={"text"} placeholder="Add the collection address"></input>
        <label className="text-gray-600 "><input onChange={(e)=>{setFetchForCollection(e.target.checked)}} type={"checkbox"} className="mr-2"></input>Fetch for collection</label>
        <button className={"disabled:bg-slate-500 text-white bg-blue-400 px-4 py-2 mt-3 rounded-sm w-1/5"} onClick={
           () => {
            if (fetchForCollection) {
              fetchNFTsForCollection()
            }else fetchNFTs()
          }
        }>Let's go! </button>
      </div>
    </div>
  )
}

export default Home
Here we're essentially telling our button:
- if "fetchForCollection" is true
- then run the fetchNFTsForCollection() function, if not, simply fetchNFTs.
To make sure you don't add the wallet address in the wallet address input when you're looking for NFTs based on the collection, you can add the "disabled" property to your wallet input, and disable it whenever fetchForCollection is true:
import { useState } from 'react'

const Home = () => {
  const [wallet, setWalletAddress] = useState("");
  const [collection, setCollectionAddress] = useState("");
  const [NFTs, setNFTs] = useState([])
  const [fetchForCollection, setFetchForCollection]=useState(false)


  return (
    <div className="flex flex-col items-center justify-center py-8 gap-y-3">
      <div className="flex flex-col w-full justify-center items-center gap-y-2">
        <input disabled={fetchForCollection} type={"text"} placeholder="Add your wallet address"></input>
        <input type={"text"} placeholder="Add the collection address"></input>
        <label className="text-gray-600 "><input onChange={(e)=>{setFetchForCollection(e.target.checked)}} type={"checkbox"} className="mr-2"></input>Fetch for collection</label>
        <button className={"disabled:bg-slate-500 text-white bg-blue-400 px-4 py-2 mt-3 rounded-sm w-1/5"} onClick={
           () => {
            if (fetchForCollection) {
              fetchNFTsForCollection()
            }else fetchNFTs()
          }
        }>Let's go! </button>
      </div>
    </div>
  )
}

export default Home
Amazing, the next step is to visualize your NFTs. To do so you need to create the NFTCard component.
7. Create the NFT Card component
In the root folder of your project, create a new folder and call it "components".
Inside this folder create a new file and name it "nftCard.jsx".
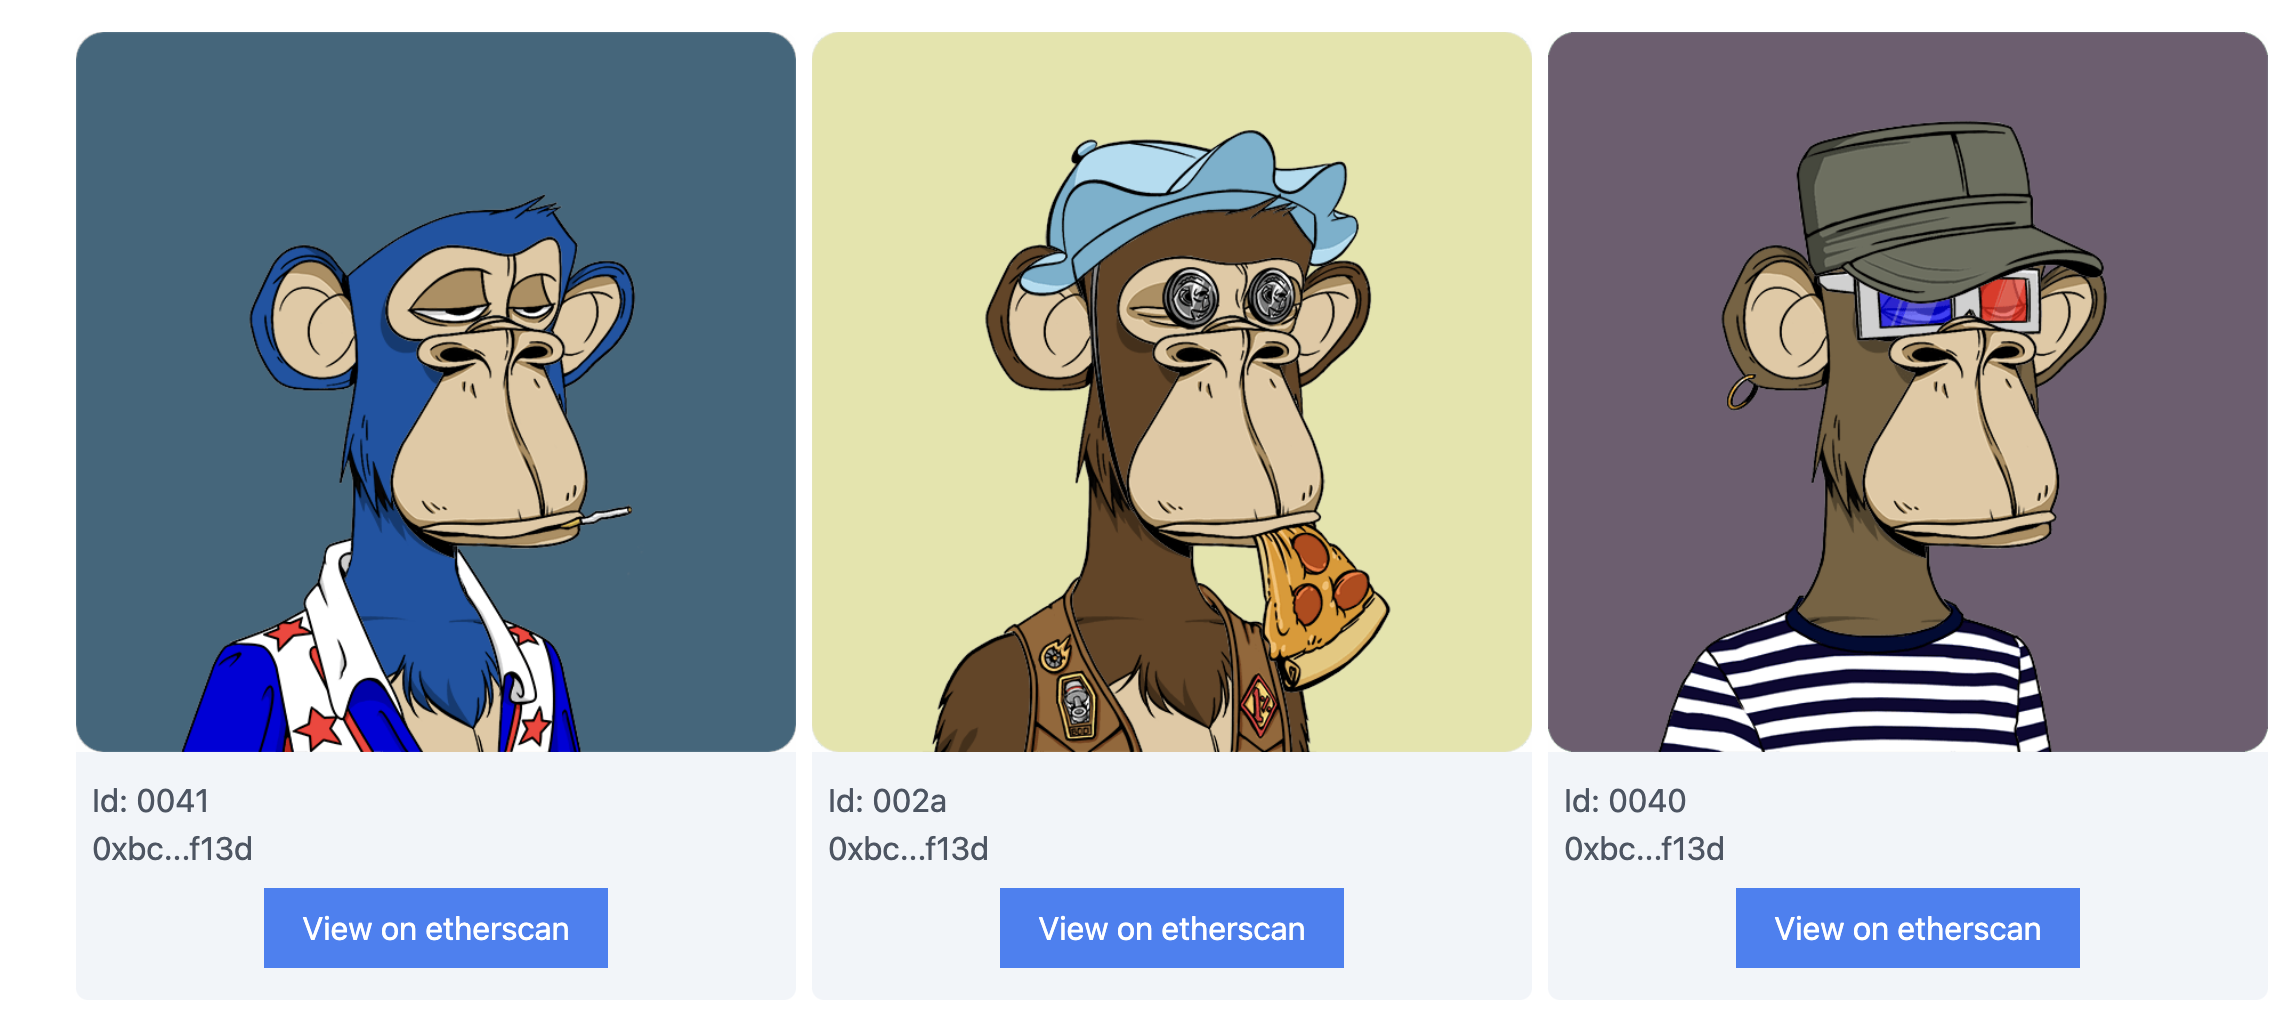
Your NFT card will take an NFT as a prop (learn more about props in the ReactJS documentation), and will get its metadata to display it in a card, that will look like the following:
To do so, in the file you just created, add the following code:
export const NFTCard = ({ nft }) => {

    return (
        <div className="w-1/4 flex flex-col ">
        <div className="rounded-md">
            <img className="object-cover h-128 w-full rounded-t-md" src={nft.media[0].gateway} ></img>
        </div>
        <div className="flex flex-col y-gap-2 px-2 py-3 bg-slate-100 rounded-b-md h-110 ">
            <div className="">
                <h2 className="text-xl text-gray-800">{nft.title}</h2>
                <p className="text-gray-600">Id: {nft.id.tokenId}</p>
                <p className="text-gray-600" >{nft.contract.address}</p>
            </div>

            <div className="flex-grow mt-2">
                <p className="text-gray-600">{nft.description}</p>
            </div>
        </div>

    </div>
    )
}
As you can notice, we're displaying 5 properties:
- Image
- Title
- TokenId
- Contract Address
- Description
To access such properties we can look again at the NFT Object:
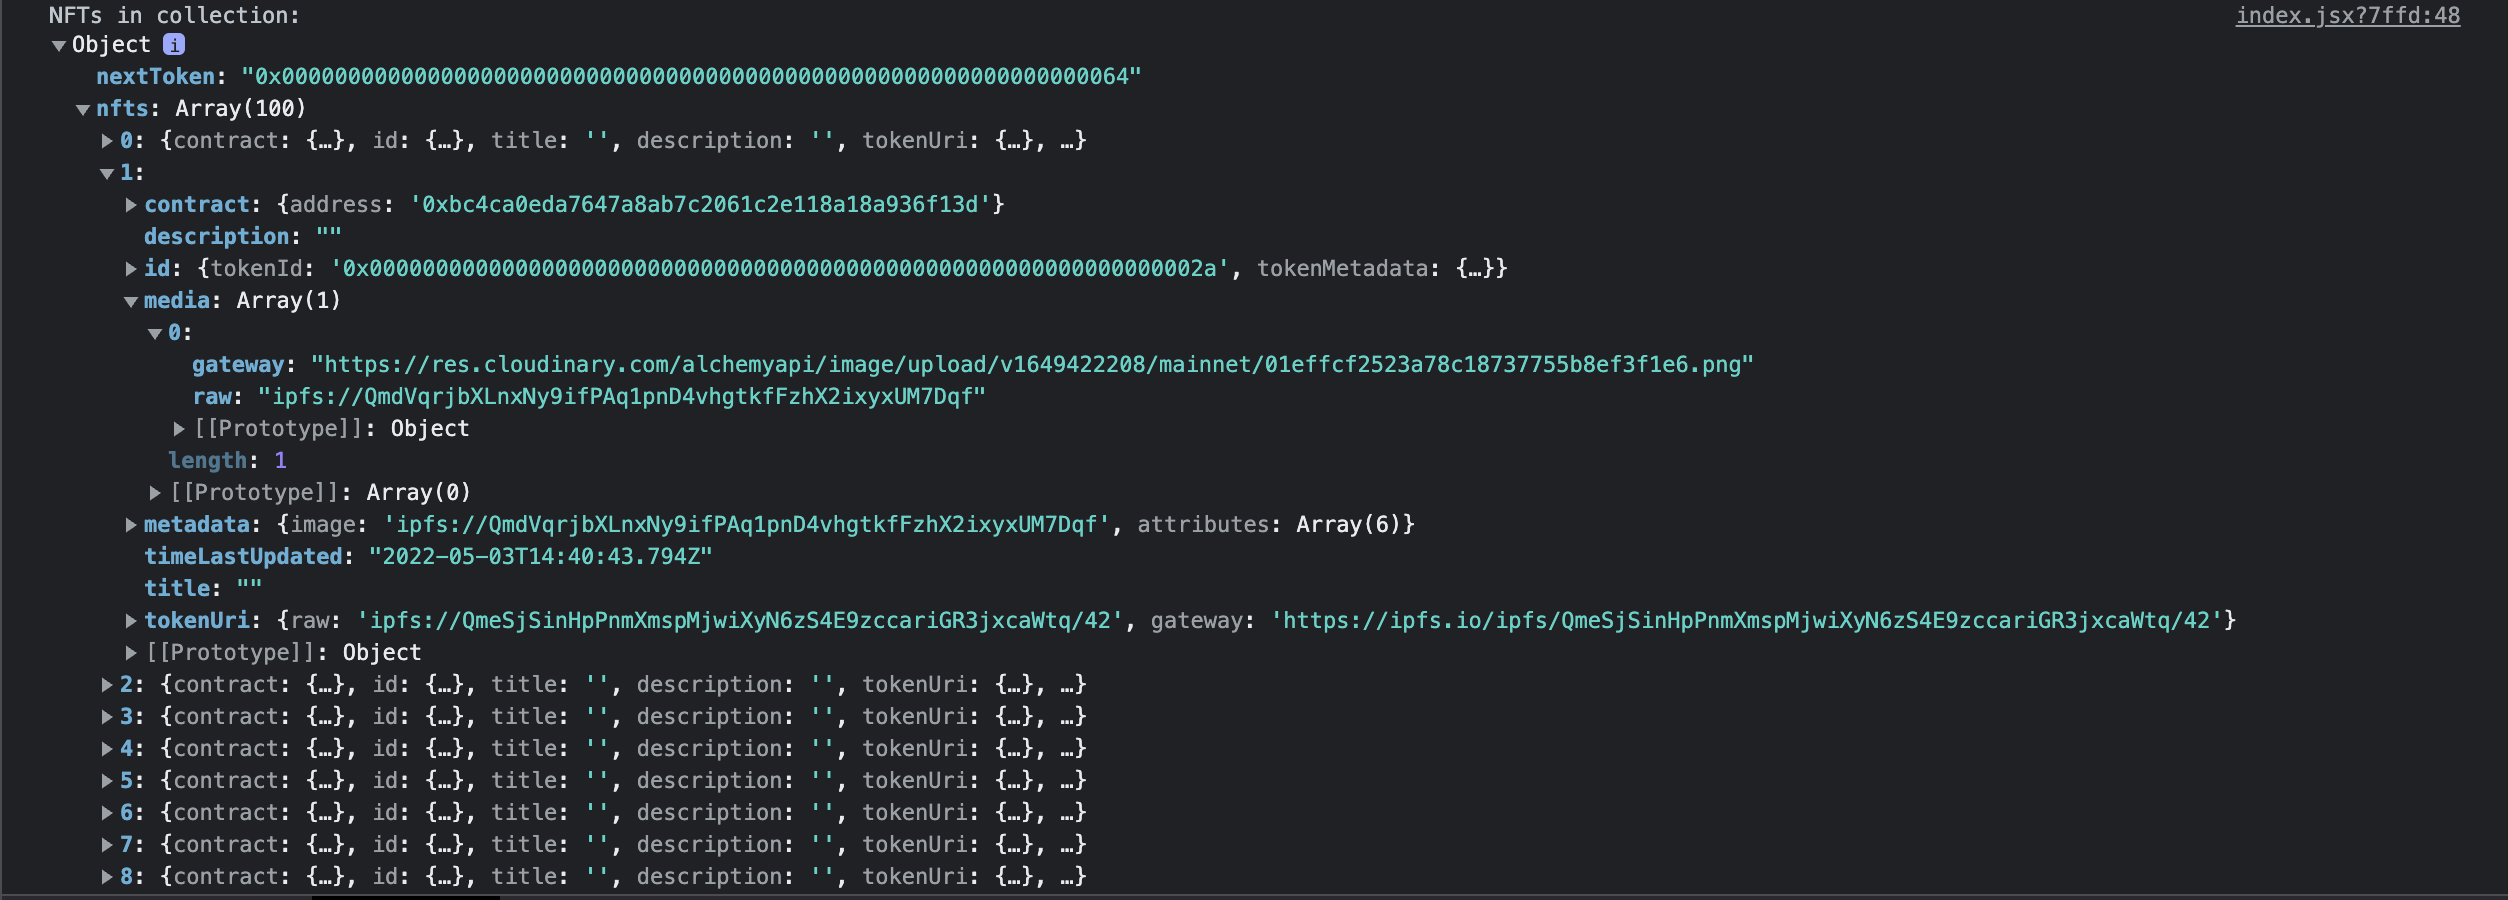
Here's how to get the NFT image:
- access the first index of the media object
- access the gateway property inside of it to get the image URL
- assign the image URL to the
imgtag in the code above "media[0].gateway"
To access the NFT title you'll only need to access the title property inside the NFT object itself.
With your NFT card, go to your home.jsx file and import it to create the NFT Gallery.
8. Create the NFT Gallery
In the pages>index.js file, right under your button, import the following code:
 import { NFTCard } from "../components/nftCard"
 import { useState } from 'react'

const Home = () => {
  const [wallet, setWalletAddress] = useState("");
  const [collection, setCollectionAddress] = useState("");
  const [NFTs, setNFTs] = useState([])
  const [fetchForCollection, setFetchForCollection]=useState(false)


  return (
    <div className="flex flex-col items-center justify-center py-8 gap-y-3">
      <div className="flex flex-col w-full justify-center items-center gap-y-2">
        <input disabled={fetchForCollection} type={"text"} placeholder="Add your wallet address"></input>
        <input type={"text"} placeholder="Add the collection address"></input>
        <label className="text-gray-600 "><input onChange={(e)=>{setFetchForCollection(e.target.checked)}} type={"checkbox"} className="mr-2"></input>Fetch for collection</label>
        <button className={"disabled:bg-slate-500 text-white bg-blue-400 px-4 py-2 mt-3 rounded-sm w-1/5"} onClick={
           () => {
            if (fetchForCollection) {
              fetchNFTsForCollection()
            }else fetchNFTs()
          }
        }>Let's go! </button>
      </div>
      <div className='flex flex-wrap gap-y-12 mt-4 w-5/6 gap-x-2 justify-center'>
        {
          NFTs.length && NFTs.map(nft => {
            return (
              <NFTCard nft={nft}></NFTCard>
            )
          })
        }
      </div>
    </div>
  )
}

export default Home
Here is what is happening in this code:
- The NFTCard was imported at the top of your file.
- Inside the home page component, a new div was created, we opened the curly braces, and checked if there are NFTs in our state variable using conditional rendering.
- We used the map function to iterate over the array of NFTs and return an NFTCard for every NFT, passing the NFT itself as a prop of the NFTCard.
Amazing, every time we'll fetch for NFTs, and store an array in the NFTs state variable
Next will now return an NFT card for every NFT, displaying its information.
And there you go! You now have a working NFT gallery :)
Now, let's add some fun challenges for you to try on your own before you submit your project:
- Add an icon next to the NFT addresses to make it easy for people viewing your site to copy the contract address.
- Add a pagination system to view more than 100 NFTs, by using the
pageKeyparameter from the getNFTs endpoint.
To build NFT galleries like this or other interesting web3 applications, sign up for a free Alchemy developer account today.
Updated over 1 year ago
