Real-world examples on how to query information from the blockchain using the most powerful Web3 SDK.
If you're looking to start using the Alchemy SDK, but want some plug-and-play examples on how to get started with common use cases, here's the place to start! We'll walk you through setting up the Alchemy SDK and a variety of basic tasks you can do.
Setting up the Alchemy SDK
This guide assumes you already have an Alchemy account and access to our Dashboard.
1. Create an Alchemy Key
To access Alchemy's free node infrastructure, you need an API key to authenticate your requests.
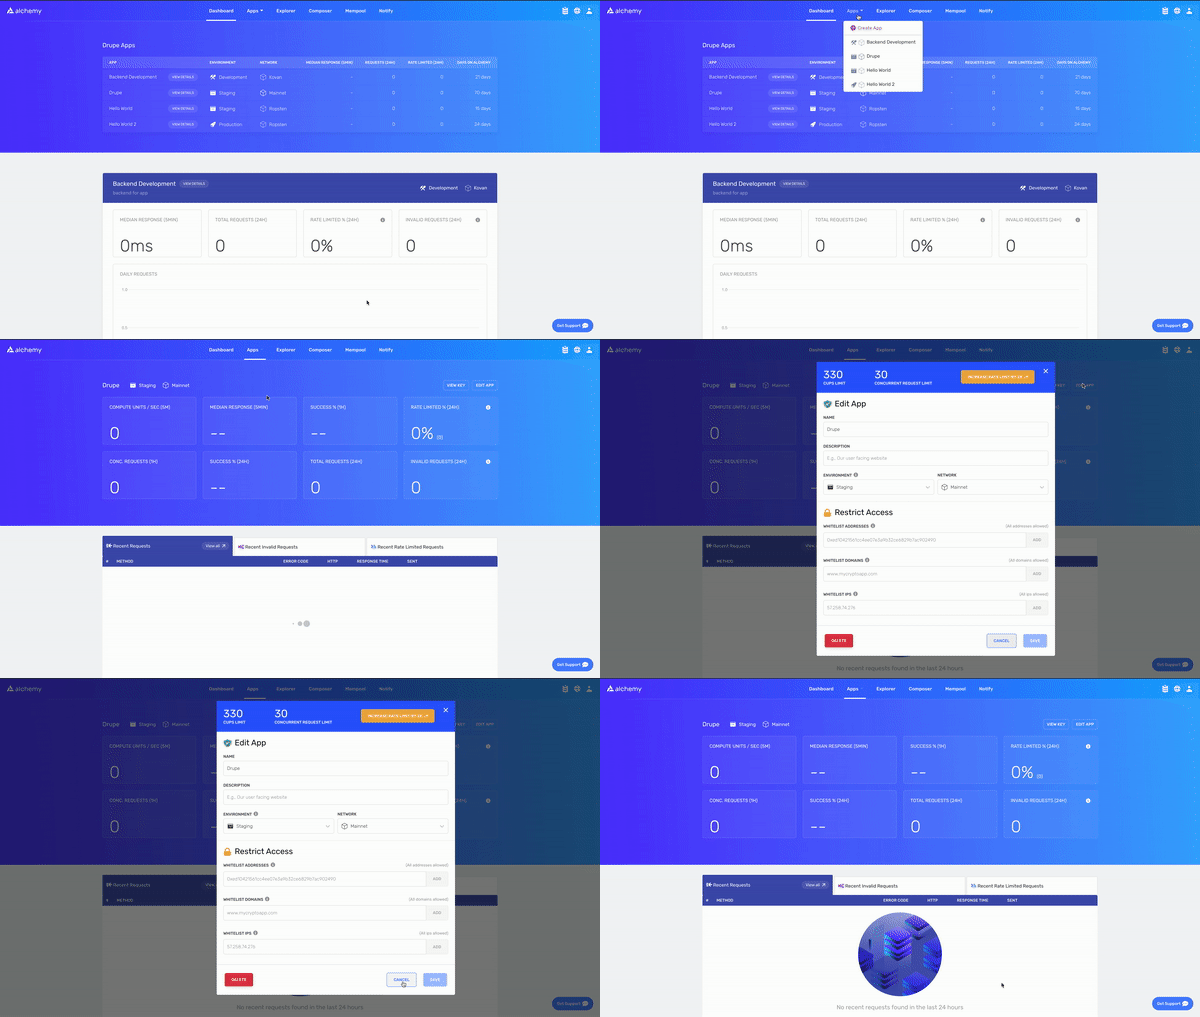
You can create API keys from the dashboard. Check out this video on how to create an app:
Or follow the written steps below:
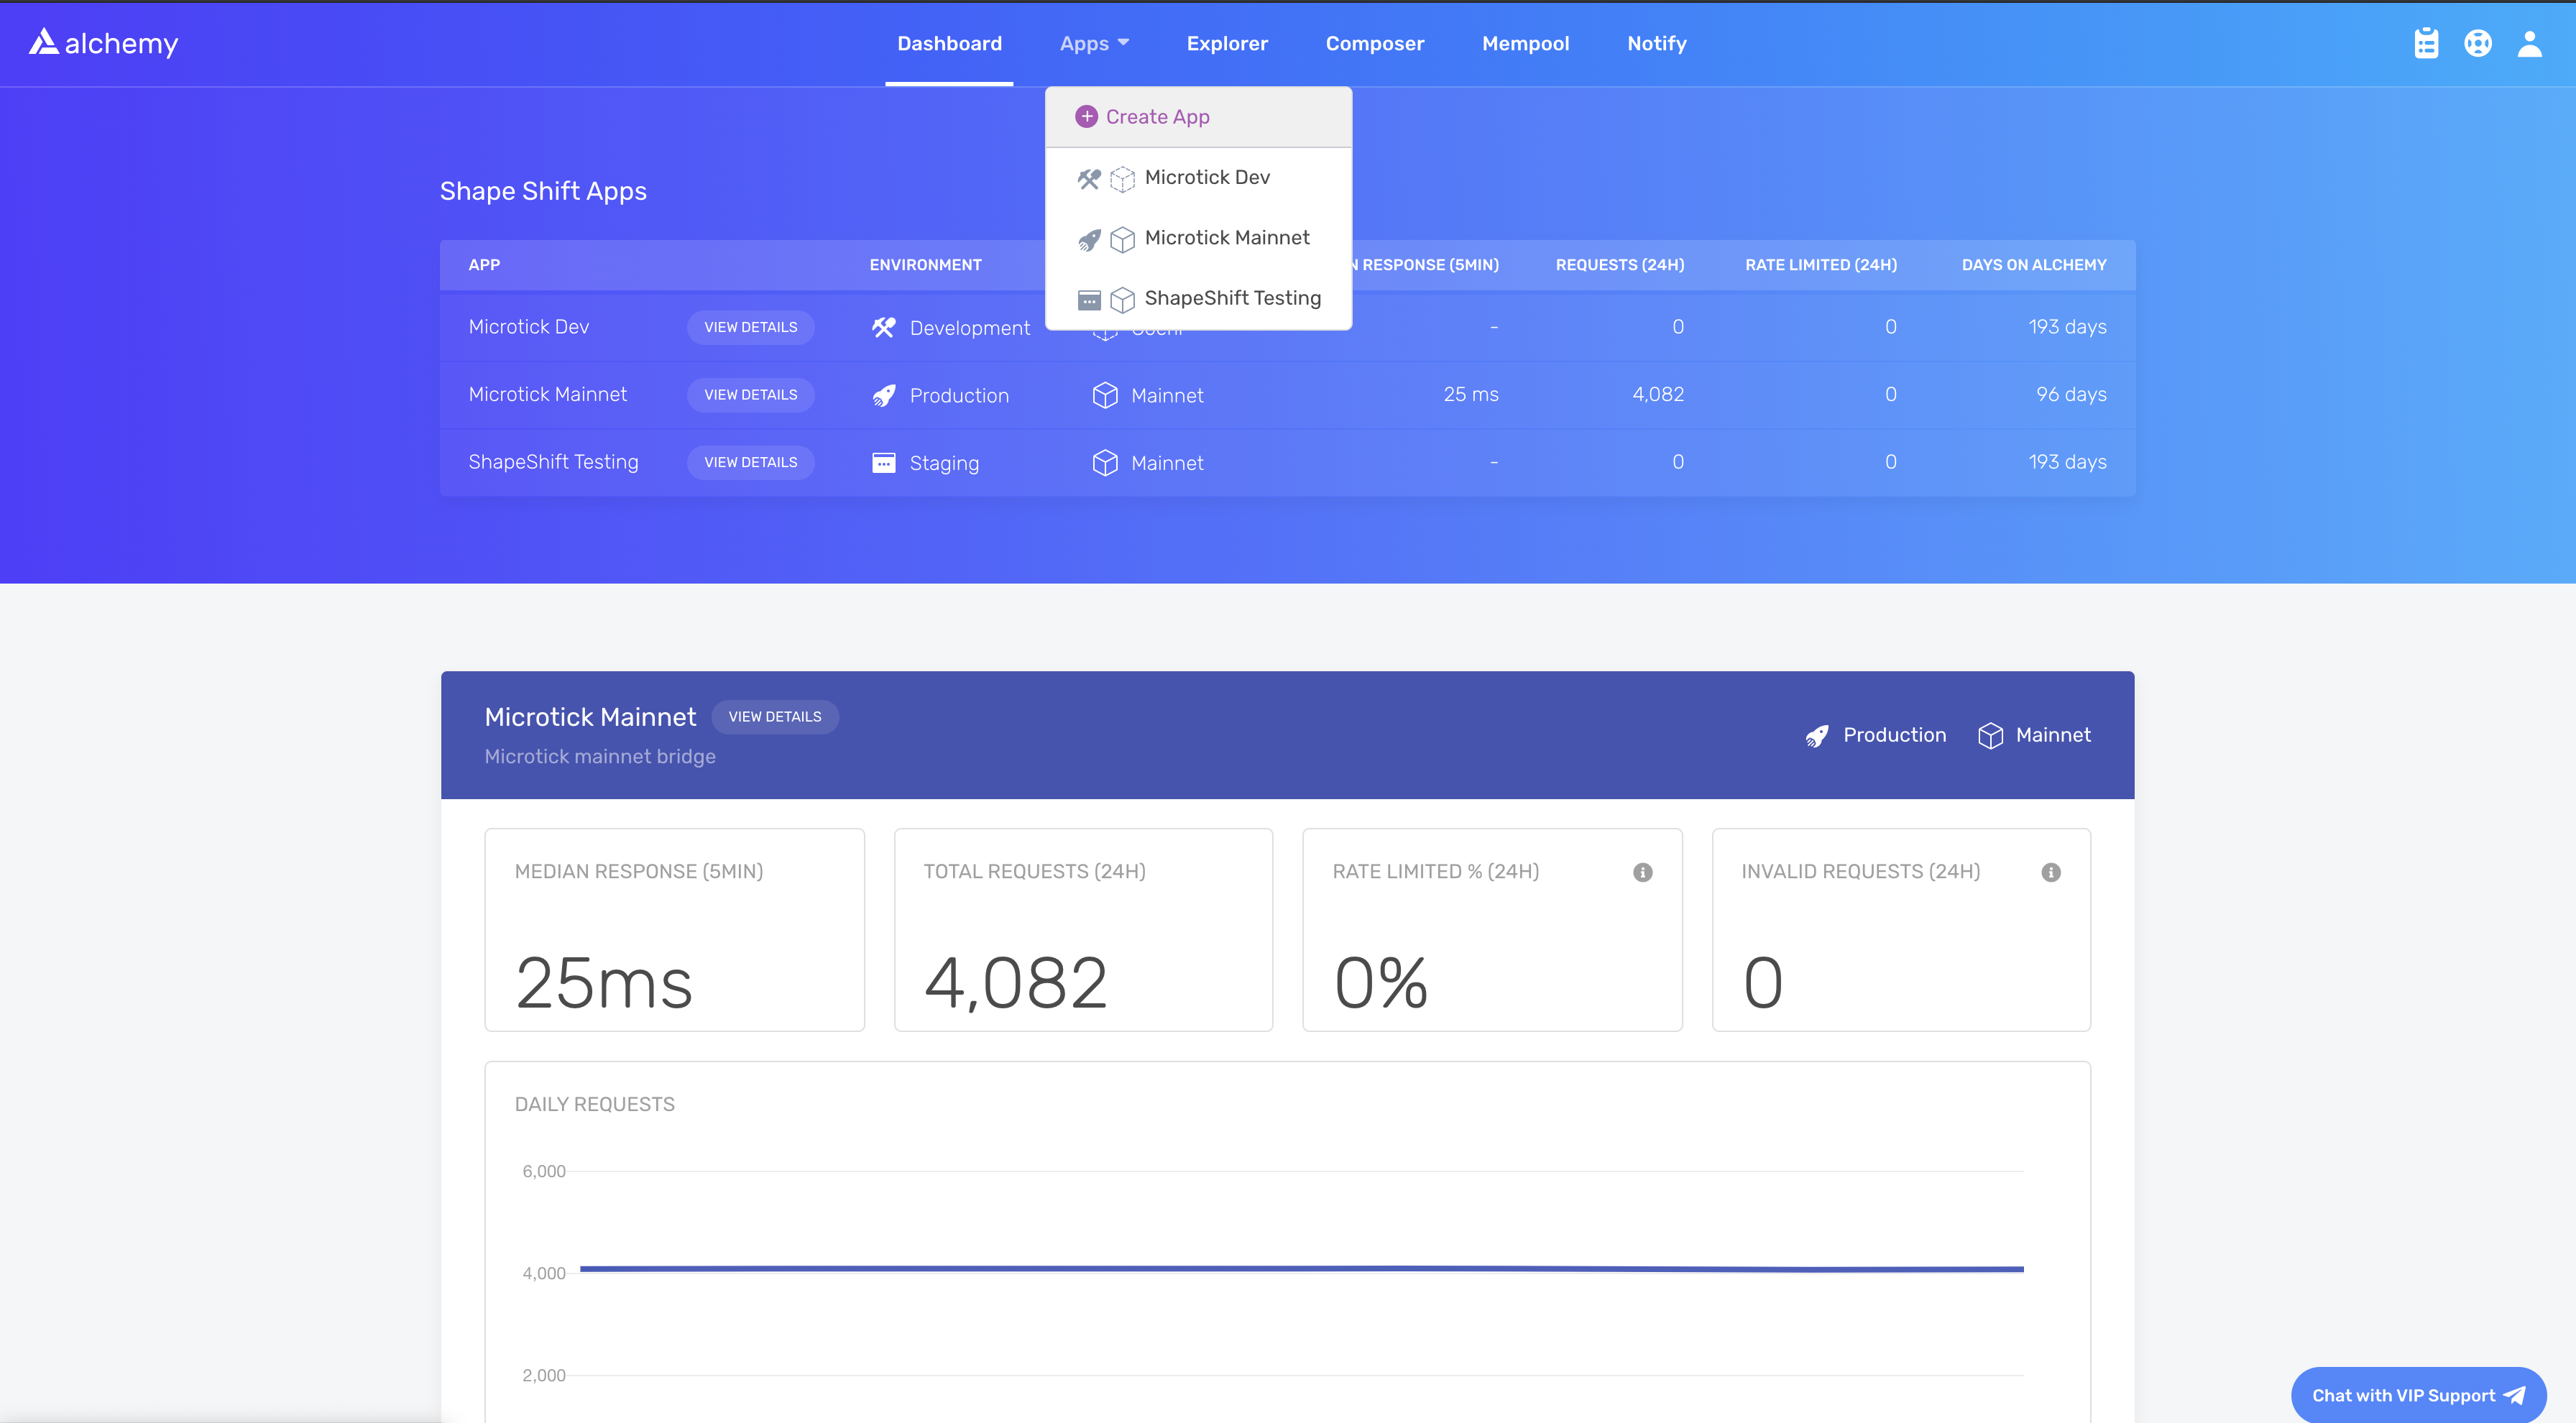
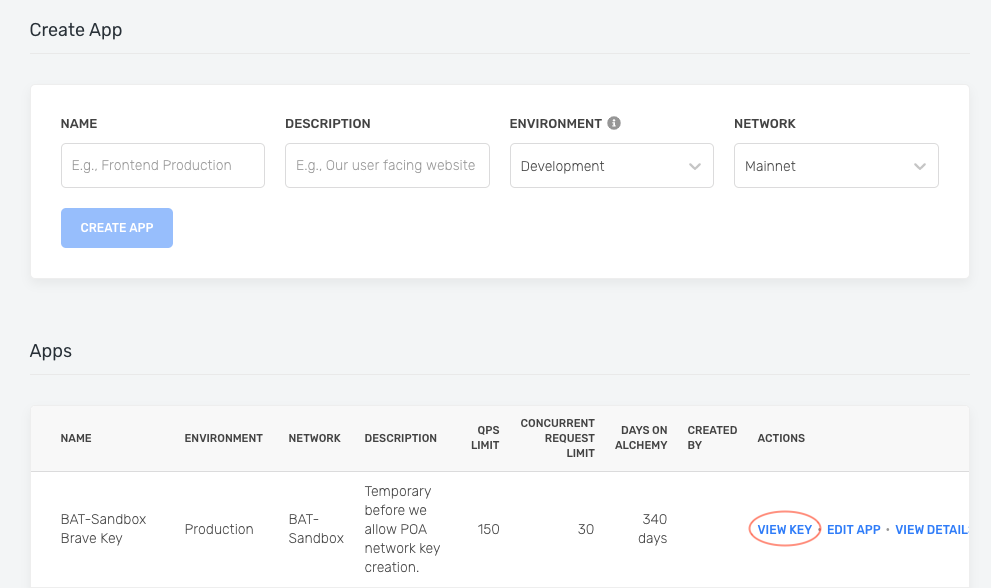
First, navigate to the "create app" button in the "Apps" tab.

Fill in the details under "Create App" to get your new key. You can also see apps you previously made and those made by your team here. Pull existing keys by clicking on "View Key" for any app.

You can also pull existing API keys by hovering over "Apps" and selecting one. You can "View Key" here, as well as "Edit App" to whitelist specific domains, see several developer tools, and view analytics.

2. Install and set up the Alchemy SDK
To install the Alchemy SDK, you want to create a project, and then navigate to your project directory to run the installation. Let's go ahead and do that! Once we're in our home directory, let's execute the following:
With NPM:
mkdir your-project-name
cd your-project-name
npm init   # (or npm init --yes)
npm install alchemy-sdk
Next, create a file named index.js and add the following contents:
Hint
You should ultimately replace
demowith your Alchemy HTTP API key.
// Setup: npm install alchemy-sdk
const { Network, Alchemy } = require("alchemy-sdk");

// Optional Config object, but defaults to demo api-key and eth-mainnet.
const settings = {
  apiKey: "demo", // Replace with your Alchemy API Key.
  network: Network.ETH_MAINNET, // Replace with your network.
};

const alchemy = new Alchemy(settings);

async function main() {
  const latestBlock = await alchemy.core.getBlockNumber();
  console.log("The latest block number is", latestBlock);
}

main();
Unfamiliar with the async stuff? Check out this Medium post.
3. Run your dApp using Node
node index.js
You should now see the latest block number output in your console!
The latest block number is 11043912
4. Import SDK Utils (Optional)
Optionally, you can import SDK utils to perform certain operations, such as parsing ETH to Wei as shown in the example below:
const { Network, Alchemy, Utils } = require("alchemy-sdk");

const settings = {
  apiKey: "demo", // Replace with your API key
  network: Network.ETH_MAINNET, // Replace with your Network
};

const alchemy = new Alchemy(settings);

async function main() {
  const gasEstimate = await alchemy.core.estimateGas({
    to: "vitalik.eth",
    // parsing 1 ETH to wei using Utils
    value: Utils.parseEther("1.0"),
  });
  console.log(gasEstimate);
}

main();
Below, we'll list a number of examples on how to make common requests on Ethereum or EVM blockchains.
SDK Core Endpoint Examples
A block is generated on Ethereum approximately every 15 seconds. If you're looking for the latest block, you can plug in the following:
async function main() {
  const latestBlock = await alchemy.core.getBlockNumber();
  console.log("The latest block number is", latestBlock);
}

main();
Every block on Ethereum correspond to a specific hash. If you'd like to look up a block by its hash, you can plug in the following code:
async function main() {
  const block = await alchemy.core.getBlock(
      "0x92fc42b9642023f2ee2e88094df80ce87e15d91afa812fef383e6e5cd96e2ed3"
  );
  console.log(block);
}

main();
Every block on Ethereum correspond to a specific number. If you'd like to look up a block by its number, you can plug in the following code:
async function main() {
	const block = await alchemy.core.getBlock(15221026);
  console.log(block);
}

main();
Logs are essentially a published list of user-defined events that have happened on the blockchain during an Ethereum transaction. You can learn more about them in Understanding Logs: Deep Dive into eth_getLogs.
Here's an example on how to write a getLogs query on Ethereum:
async function main() {
  const getLogs = await alchemy.core.getLogs({
      address: "0xdAC17F958D2ee523a2206206994597C13D831ec7",
      topics: [
        "0xddf252ad1be2c89b69c2b068fc378daa952ba7f163c4a11628f55a4df523b3ef",
      ],
      blockHash:
        "0x49664d1de6b3915d7e6fa297ff4b3d1c5328b8ecf2ff0eefb912a4dc5f6ad4a0",
  });
  console.log(getLogs);
}

main();
An eth_call in Ethereum is essentially a way to execute a message call immediately without creating a transaction on the block chain. It can be used to query internal contract state, to execute validations coded into a contract or even to test what the effect of a transaction would be without running it live.
Here's an example on how to write a call query on Ethereum:
async function main() {
  const call = await alchemy.core.call({
    to: "0x4976fb03C32e5B8cfe2b6cCB31c09Ba78EBaBa41",
    gas: "0x76c0",
    gasPrice: "0x9184e72a000",
    data: "0x3b3b57debf074faa138b72c65adbdcfb329847e4f2c04bde7f7dd7fcad5a52d2f395a558",
  });
  console.log(call);
}

main();
Every transaction on Ethereum correspond to a specific hash. If you'd like to look up a transaction by its hash, you can plug in the following code:
async function main() {
  const tx = await alchemy.core.getTransaction(
    "0x88df016429689c079f3b2f6ad39fa052532c56795b733da78a91ebe6a713944b"
  );
  console.log(tx);
}

main();
Every transaction on Ethereum has an associated receipt with metadata about the transaction, such as the gas used and logs printed during the transaction. If you'd like to look up a transaction's receipt, you can plug in the following code:
async function main() {
	const txReceipt = await alchemy.core.getTransactionReceipt(
    "0x88df016429689c079f3b2f6ad39fa052532c56795b733da78a91ebe6a713944b"
  );
  console.log(txReceipt);
}

main();
The number of transactions a user has sent is particularly important when it comes to calculating the nonce for sending new transactions on Ethereum. Without it, you'll be unable to send new transactions because your nonce won't be set correctly.
async function main() {
  const txCount = await alchemy.core.getTransactionCount(
    "0x4976fb03C32e5B8cfe2b6cCB31c09Ba78EBaBa41"
  );
  console.log(txCount);
}

main();
Oftentimes, you'll want to look up a set of transactions on Ethereum between a set of blocks, corresponding to a set of token types such as ERC20 or ERC721, or with certain attributes. Alchemy's proprietary Transfers API allows you to do so in milliseconds, rather than searching every block on the blockchain.
async function main() {
  const getTransfers = alchemy.core.getAssetTransfers({
    fromBlock: "0x0",
    toBlock: "latest",
    toAddress: ["vitalik.eth"],
    excludeZeroValue: true,
    category: ["erc721"],
  });
  console.log(getTransfers);
}

main();
Oftentimes, you'll need to calculate how much gas a particular transaction will use on the blockchain to understand the maximum amount that you'll pay on that transaction. This example will return the gas used by the specified transaction:
async function main() {
  const gasEstimate = await alchemy.core.estimateGas({
    // ETH address
    to: "vitalik.eth",
    // 1 ether
    value: Utils.parseEther("1.0"),
  });
  console.log(gasEstimate);
}

main();
You can retrieve the current gas price in wei using this method:
async function main() {
	const gasPrice = await alchemy.core.getGasPrice();
  console.log(gasPrice);
}

main();
SDK Websocket Examples
If you'd like to open a WebSocket subscription to send you a JSON object whenever a new block is published to the blockchain, you can set one up using the following syntax.
// Subscription for new blocks on Eth Mainnet.
alchemy.ws.on("block", (blockNumber) =>
  console.log("The latest block number is", blockNumber)
);
Alchemy exposes a proprietary WebSockets endpoint pendingTransactions that allows you to receive a JSON object whenever a pending transaction matching a set of requirements is submitted or confirmed on the blockchain.
In the following example, you can receive a JSON object whenever a pending transaction is submitted with the recipient as Vitalik Buterin's contract address.
// Subscription for Alchemy's pendingTransactions Enhanced API
alchemy.ws.on(
  {
    method: "alchemy_pendingTransactions",
    toAddress: "vitalik.eth",
  },
  (tx) => console.log(tx)
);
SDK NFT API Examples
If you'd like to identify which contract address currently owns a specific NFT, you can use Alchemy's proprietary NFT API to search the blockchain. See the example below:
async function main() {
  // TIMEPieces contract address
  const address = "0xDd69da9a83ceDc730bc4d3C56E96D29Acc05eCDE";

  // Safe Haven Token ID
  const tokenId = 4254;

  // Get owner of NFT
  const owner = await alchemy.nft.getOwnersForNft(address, tokenId);
  console.log(owner);
}

main();
If you'd like to print the metadata of all the NFTs in a specific collection, you can use Alchemy's proprietary NFT API to search the blockchain. See the example below:
async function main() {
  // Contract address
  const address = "0xBC4CA0EdA7647A8aB7C2061c2E118A18a936f13D";

  // Flag to omit metadata
  const omitMetadata = false;

  // Get all NFTs
  const { nfts } = await alchemy.nft.getNftsForContract(address, {
    omitMetadata: omitMetadata,
  });

  let i = 1;

  for (let nft of nfts) {
    console.log(`${i}. ${nft.rawMetadata.image}`);
    i++;
  }
}

main();
If you'd like to retrieve all the NFTs owned by a specific user address, you can use Alchemy's proprietary NFT API to search the blockchain. See these example below:
async function main() {
  // Get all NFTs
  const nfts = await alchemy.nft.getNftsForOwner("elanhalpern.eth");
  // Print NFTs
  console.log(nfts);
}

main();
SDK Transact Examples
One of the most common requests is sending a transaction to be mined onto the blockchain. Here's some example code showing you how to make a transaction from scratch, sign it, and send it to be confirmed.
import { Network, Alchemy, Wallet, Utils } from "alchemy-sdk";
import dotenv from "dotenv";
dotenv.config();

const { API_KEY, PRIVATE_KEY } = process.env;

const settings = {
  apiKey: API_KEY,
  network: Network.ETH_GOERLI, // Replace with your network.
};

const alchemy = new Alchemy(settings);
const wallet = new Wallet(PRIVATE_KEY);

const transaction = {
  to: "0xa238b6008Bc2FBd9E386A5d4784511980cE504Cd",
  value: Utils.parseEther("0.001"),
  gasLimit: "21000",
  maxPriorityFeePerGas: Utils.parseUnits("5", "gwei"),
  maxFeePerGas: Utils.parseUnits("20", "gwei"),
  nonce: await alchemy.core.getTransactionCount(wallet.getAddress()),
  type: 2,
  chainId: 5, // Corresponds to ETH_GOERLI
};

const rawTransaction = await wallet.signTransaction(transaction);
await alchemy.transact.sendTransaction(rawTransaction);
If you're worried about your transactions being front-run on Ethereum, Flashbots has created a tool to allow you to submit transactions without exposing them to the entire blockchain! It provides greater privacy while maintaining all the features of sendTransaction.
import { Network, Alchemy, Wallet, Utils } from "alchemy-sdk";
import dotenv from "dotenv";
dotenv.config();

const { API_KEY, PRIVATE_KEY } = process.env;

const settings = {
  apiKey: API_KEY,
  network: Network.ETH_MAINNET, // Replace with your network.
};

const alchemy = new Alchemy(settings);
const wallet = new Wallet(PRIVATE_KEY);

const transaction = {
  to: "0xa238b6008Bc2FBd9E386A5d4784511980cE504Cd",
  value: Utils.parseEther("0.001"),
  gasLimit: "21000",
  maxPriorityFeePerGas: Utils.parseUnits("5", "gwei"),
  maxFeePerGas: Utils.parseUnits("20", "gwei"),
  nonce: await alchemy.core.getTransactionCount(wallet.getAddress()),
  type: 2,
  chainId: 1, // Corresponds to ETH_MAINNET
};

const rawTransaction = await wallet.signTransaction(transaction);
alchemy.transact.sendPrivateTransaction(rawTransaction).then(console.log);
SDK Notify Examples
If you'd like to set up a Webhook to alert you when a pending transaction is submitted, mined, or when activity happens on an NFT address, we have a simple CRUD API that lets you create, update, and delete our Notify Webhooks programmatically.
// Setup: npm install alchemy-sdk
// Github: https://github.com/alchemyplatform/alchemy-sdk-js
import { Alchemy, Network, WebhookType } from "alchemy-sdk";

// authToken is required to use Notify APIs. Found on the top right corner of
// https://dashboard.alchemy.com/notify.
const settings = {
  authToken: "your-notify-auth-token",
  network: Network.ETH_MAINNET, // Replace with your network.
};

const alchemy = new Alchemy(settings);

const minedTxWebhook = await alchemy.notify.createWebhook(
  "https://webhook.site/your-webhook-url",
  WebhookType.MINED_TRANSACTION,
  { appId: "wq9fgv022aff81pg" }
);

const droppedTxWebhook = await alchemy.notify.createWebhook(
  "https://webhook.site/your-webhook-url",
  WebhookType.DROPPED_TRANSACTION,
  { appId: "wq9fgv022aff81pg" }
);

const addressActivityWebhook = await alchemy.notify.createWebhook(
  "https://webhook.site/your-webhook-url",
  WebhookType.ADDRESS_ACTIVITY,
  {
    addresses: ["0xd8dA6BF26964aF9D7eEd9e03E53415D37aA96010"],
    network: Network.ETH_MAINNET,
  }
);

const nftActivityWebhook = await alchemy.notify.createWebhook(
  "https://webhook.site/your-webhook-url",
  WebhookType.NFT_ACTIVITY,
  {
    filters: [
      {
        contractAddress: "0x88b48f654c30e99bc2e4a1559b4dcf1ad93fa656",
        tokenId: "234",
      },
    ],
    network: Network.ETH_MAINNET,
  }
);
