Hello World Smart Contract
This is a step-by-step introductory tutorial that will teach you how to create and deploy a smart contract on Ethereum.
Estimated time to complete this guide: ~15 minutes
Installations
Please note that certain installations need to be made before any smart contract code can be written. Steps 1-9 will guide you through these installations. The smart contract code will follow right after!
If you are new to blockchain development and don’t know where to start, or if you just want to understand how to deploy and interact with smart contracts, this guide is for you. We will walk through creating and deploying a simple smart contract on the Sepolia test network using a virtual wallet (Metamask), Solidity, Hardhat, and Alchemy (don’t worry if you don’t understand what any of this means yet, we will explain it!).
You can find Part 2: Interacting with the Smart Contract once it’s deployed and Part 3: Submitting Your Smart Contract to Etherscan on the sidebar to your left!
If you have questions at any point, feel free to reach out in the Alchemy Discord!
Hardhat
This tutorial focuses on using Hardhat. It is a development environment for building on Ethereum. Hardhat is the newer kid on the block and tends to be a bit cleaner/easier to use, they also have lots of plugins to make it more customizable.
Create and Deploy your Smart Contract using Hardhat
Step 1: Connect to the Ethereum network
There are many ways to make requests to the Ethereum chain. For simplicity, we’ll use a free account on Alchemy, a blockchain developer platform, and API that allows us to communicate with the Ethereum chain without running our own nodes. The platform also has developer tools for monitoring and analytics that we’ll use in this tutorial to understand what’s going on under the hood in our smart contract deployment. If you don’t already have an Alchemy account, you can sign up for free here.
Step 2: Create your app (and API key)
Once you’ve created an Alchemy account, you can generate an API key by creating an app. This will allow us to make requests to the Sepolia test network. If you’re not familiar with testnets, check out this guide.
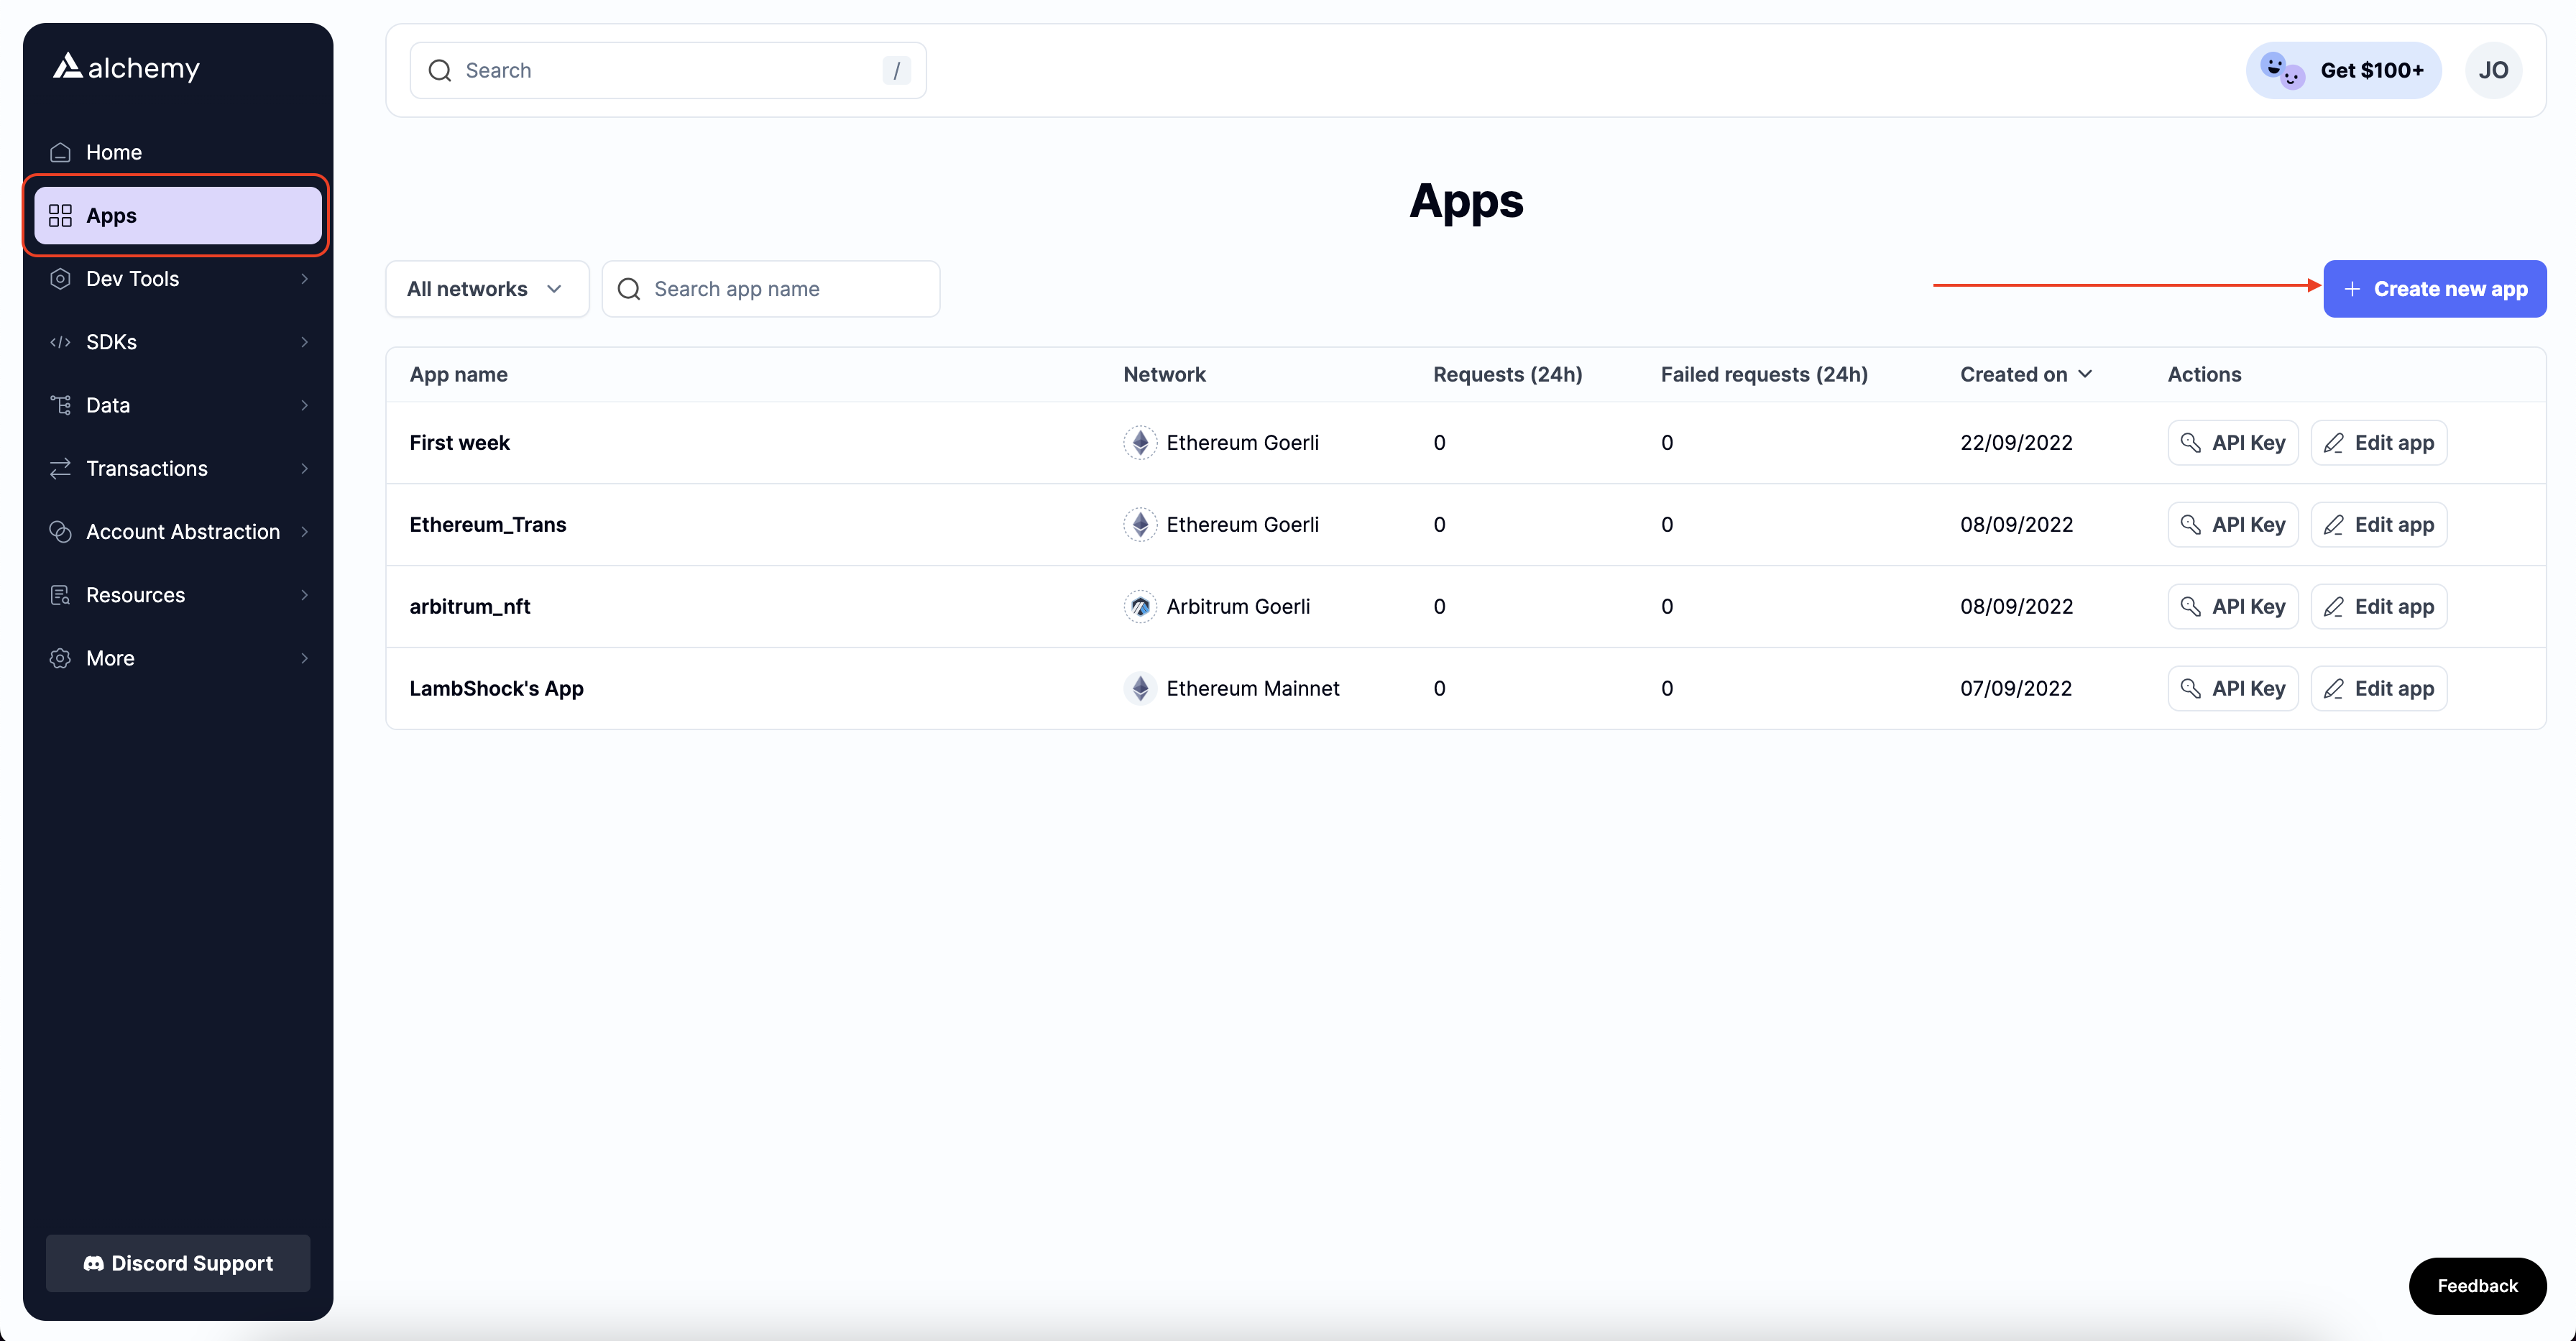
Navigate to the Apps page in your Alchemy Dashboard's navigation panel and then click the “Create new app” button.
Name your app Hello World, offer a short description, ensure you're on the Ethereum chain, and choose Sepolia for your network.
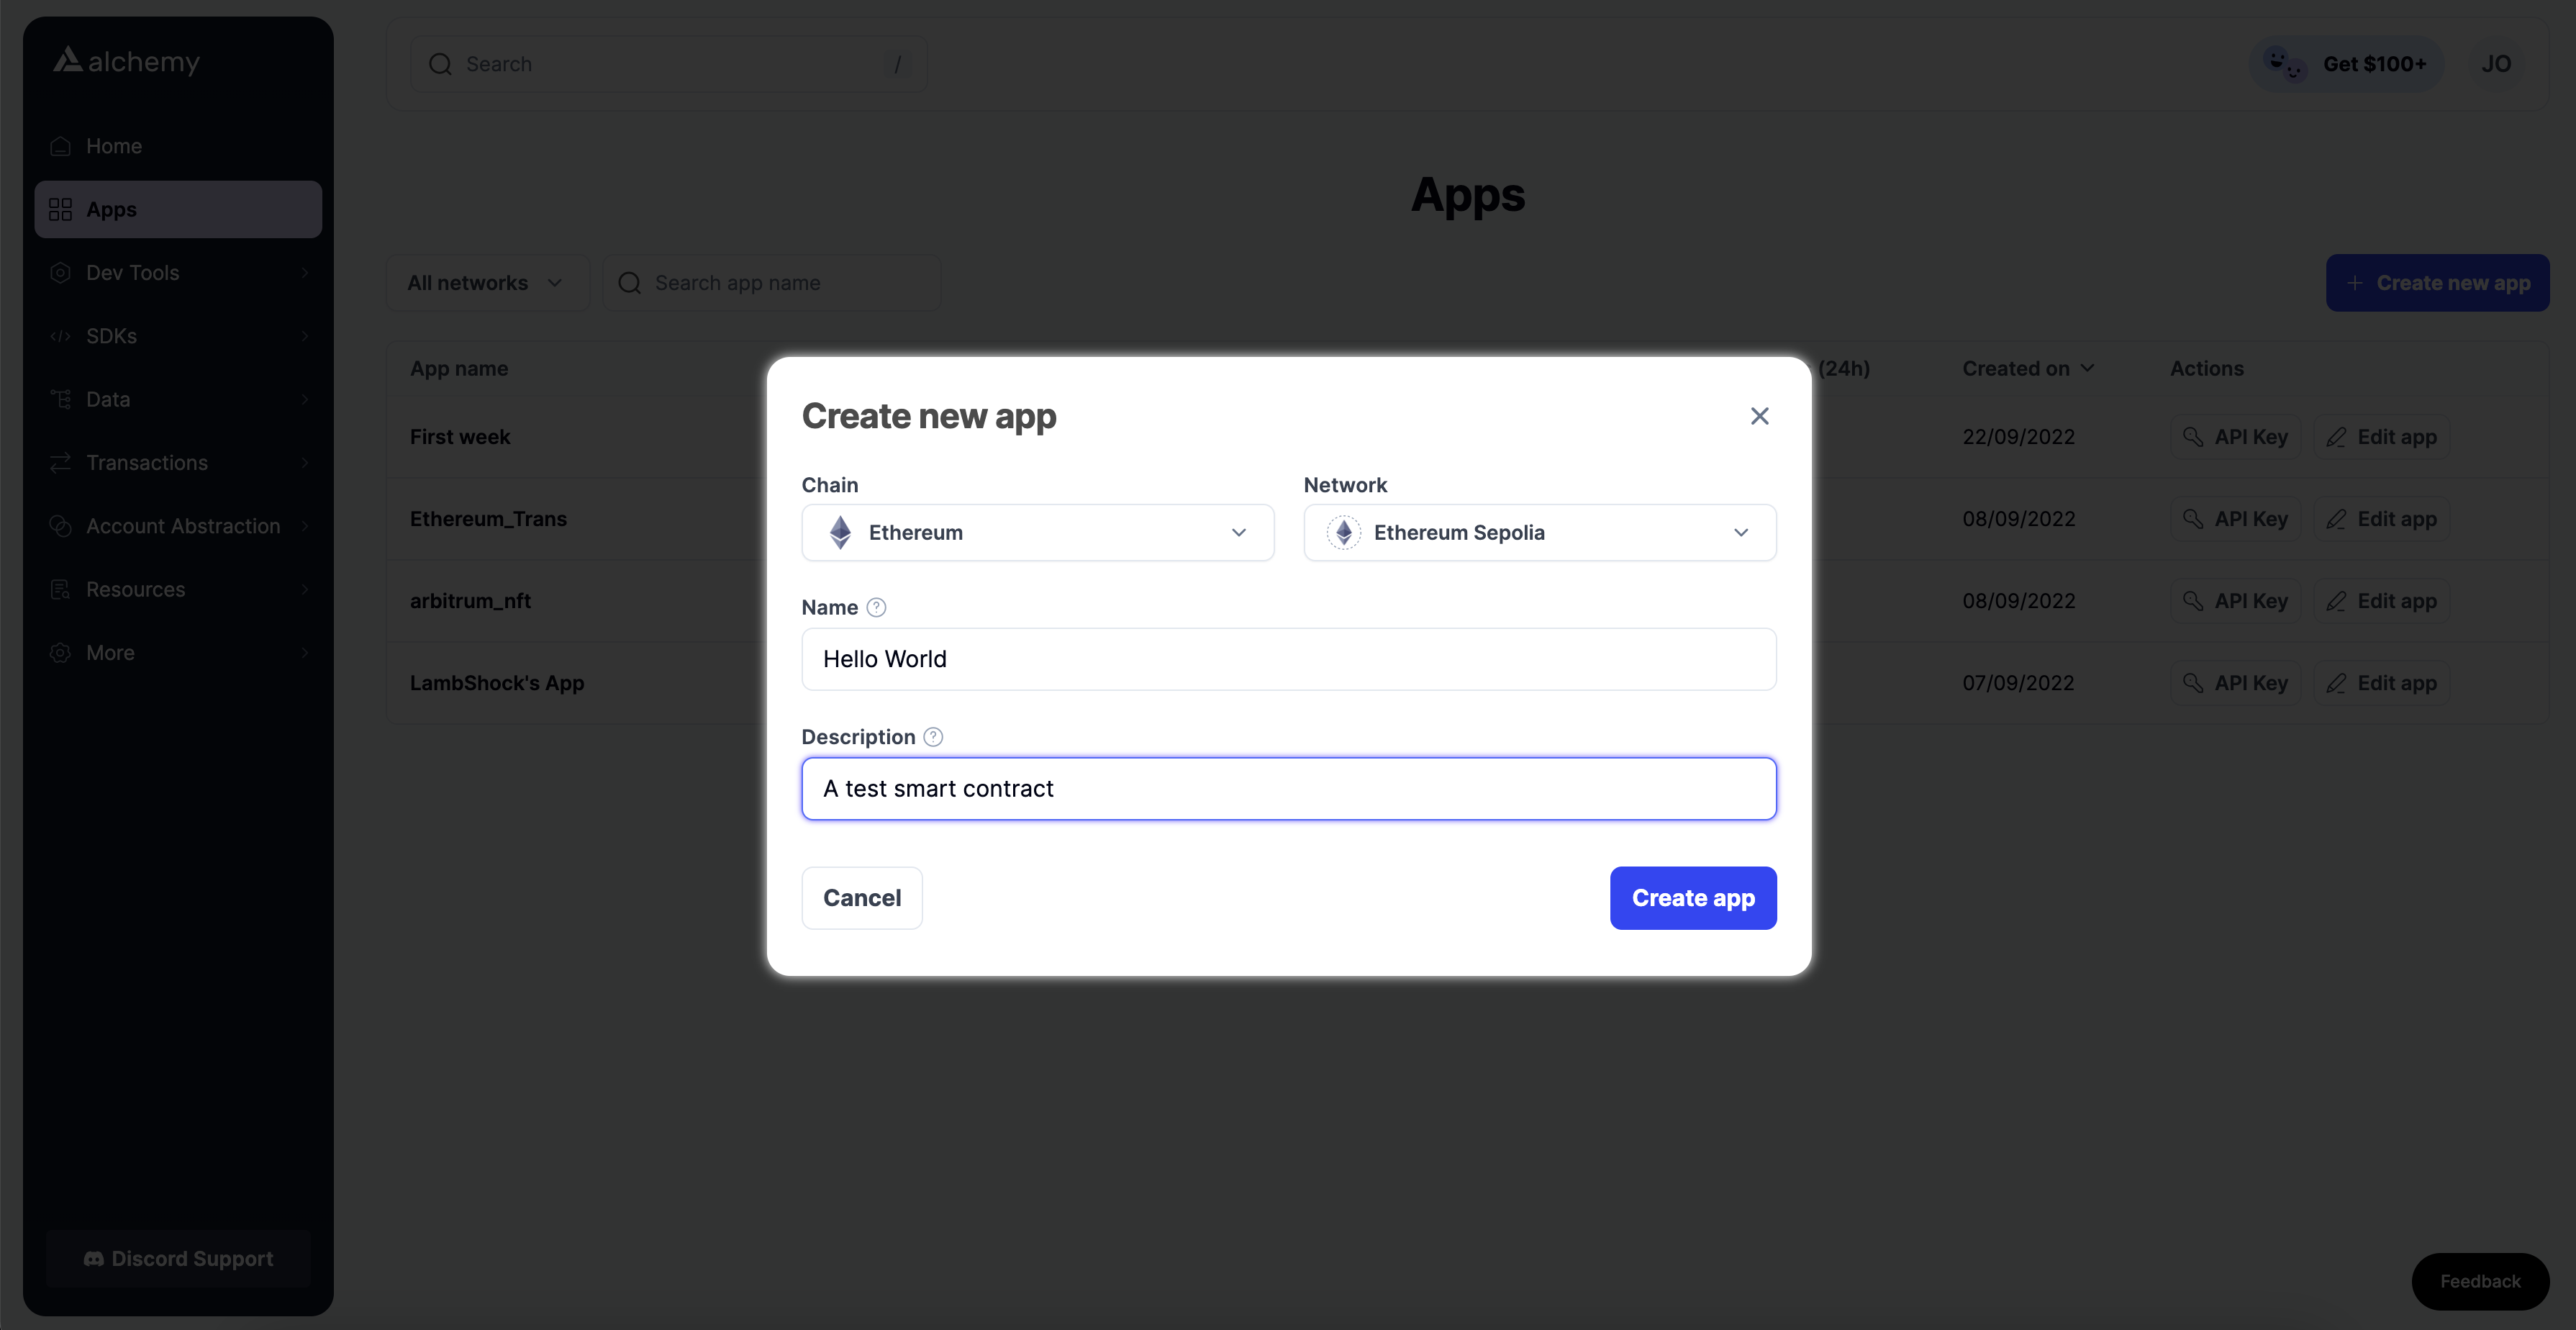
Double-check that you're selecting the Sepolia testnet!
Click “Create app”, and that’s it! Your app should appear as a new page, as shown below:
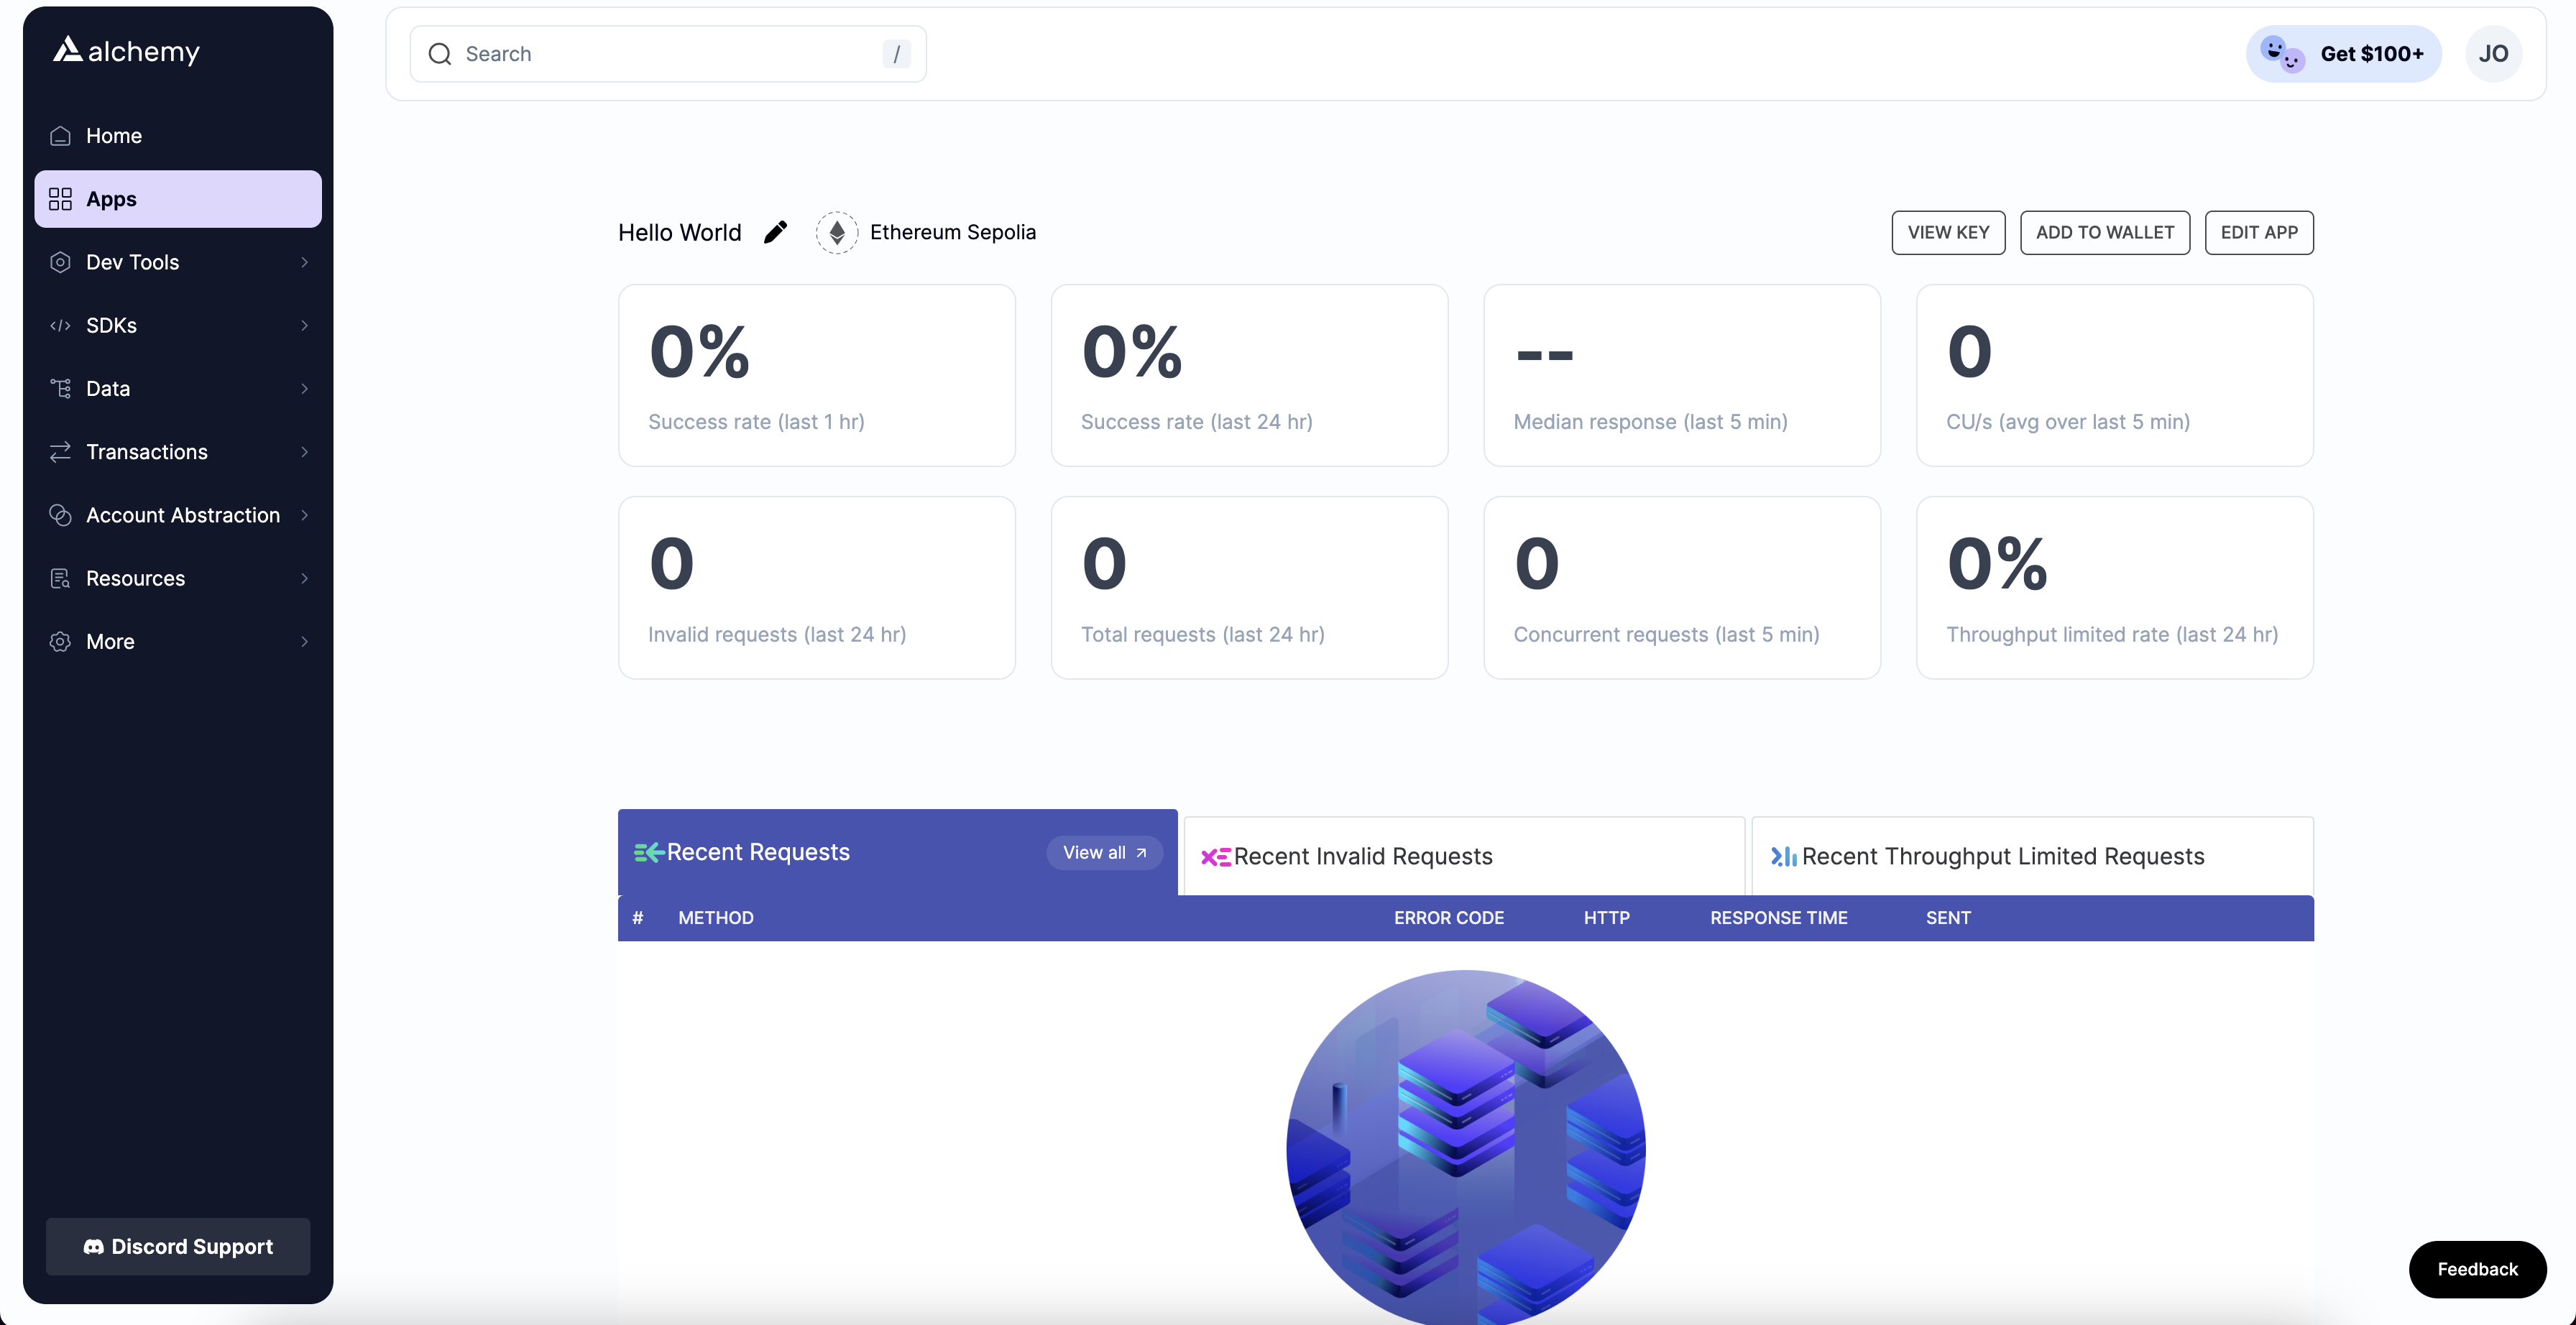
Your new App!!
Step 3: Create an Ethereum account (address)
We need an Ethereum account to send and receive transactions. For this tutorial, we’ll use Metamask, a virtual wallet in the browser used to manage your Ethereum account address. If you want to understand more about how transactions on Ethereum work, check out this page from the Ethereum Foundation.
You can download and create a Metamask account for free here. When creating an account, or if you already have one, switch to the “Sepolia Test Network” in the upper right (so that we’re not dealing with real money). Since Sepolia is a test network, if you don't see Sepolia as an option, ensure you have the "Show Test Networks" toggle on in your Metamask settings.
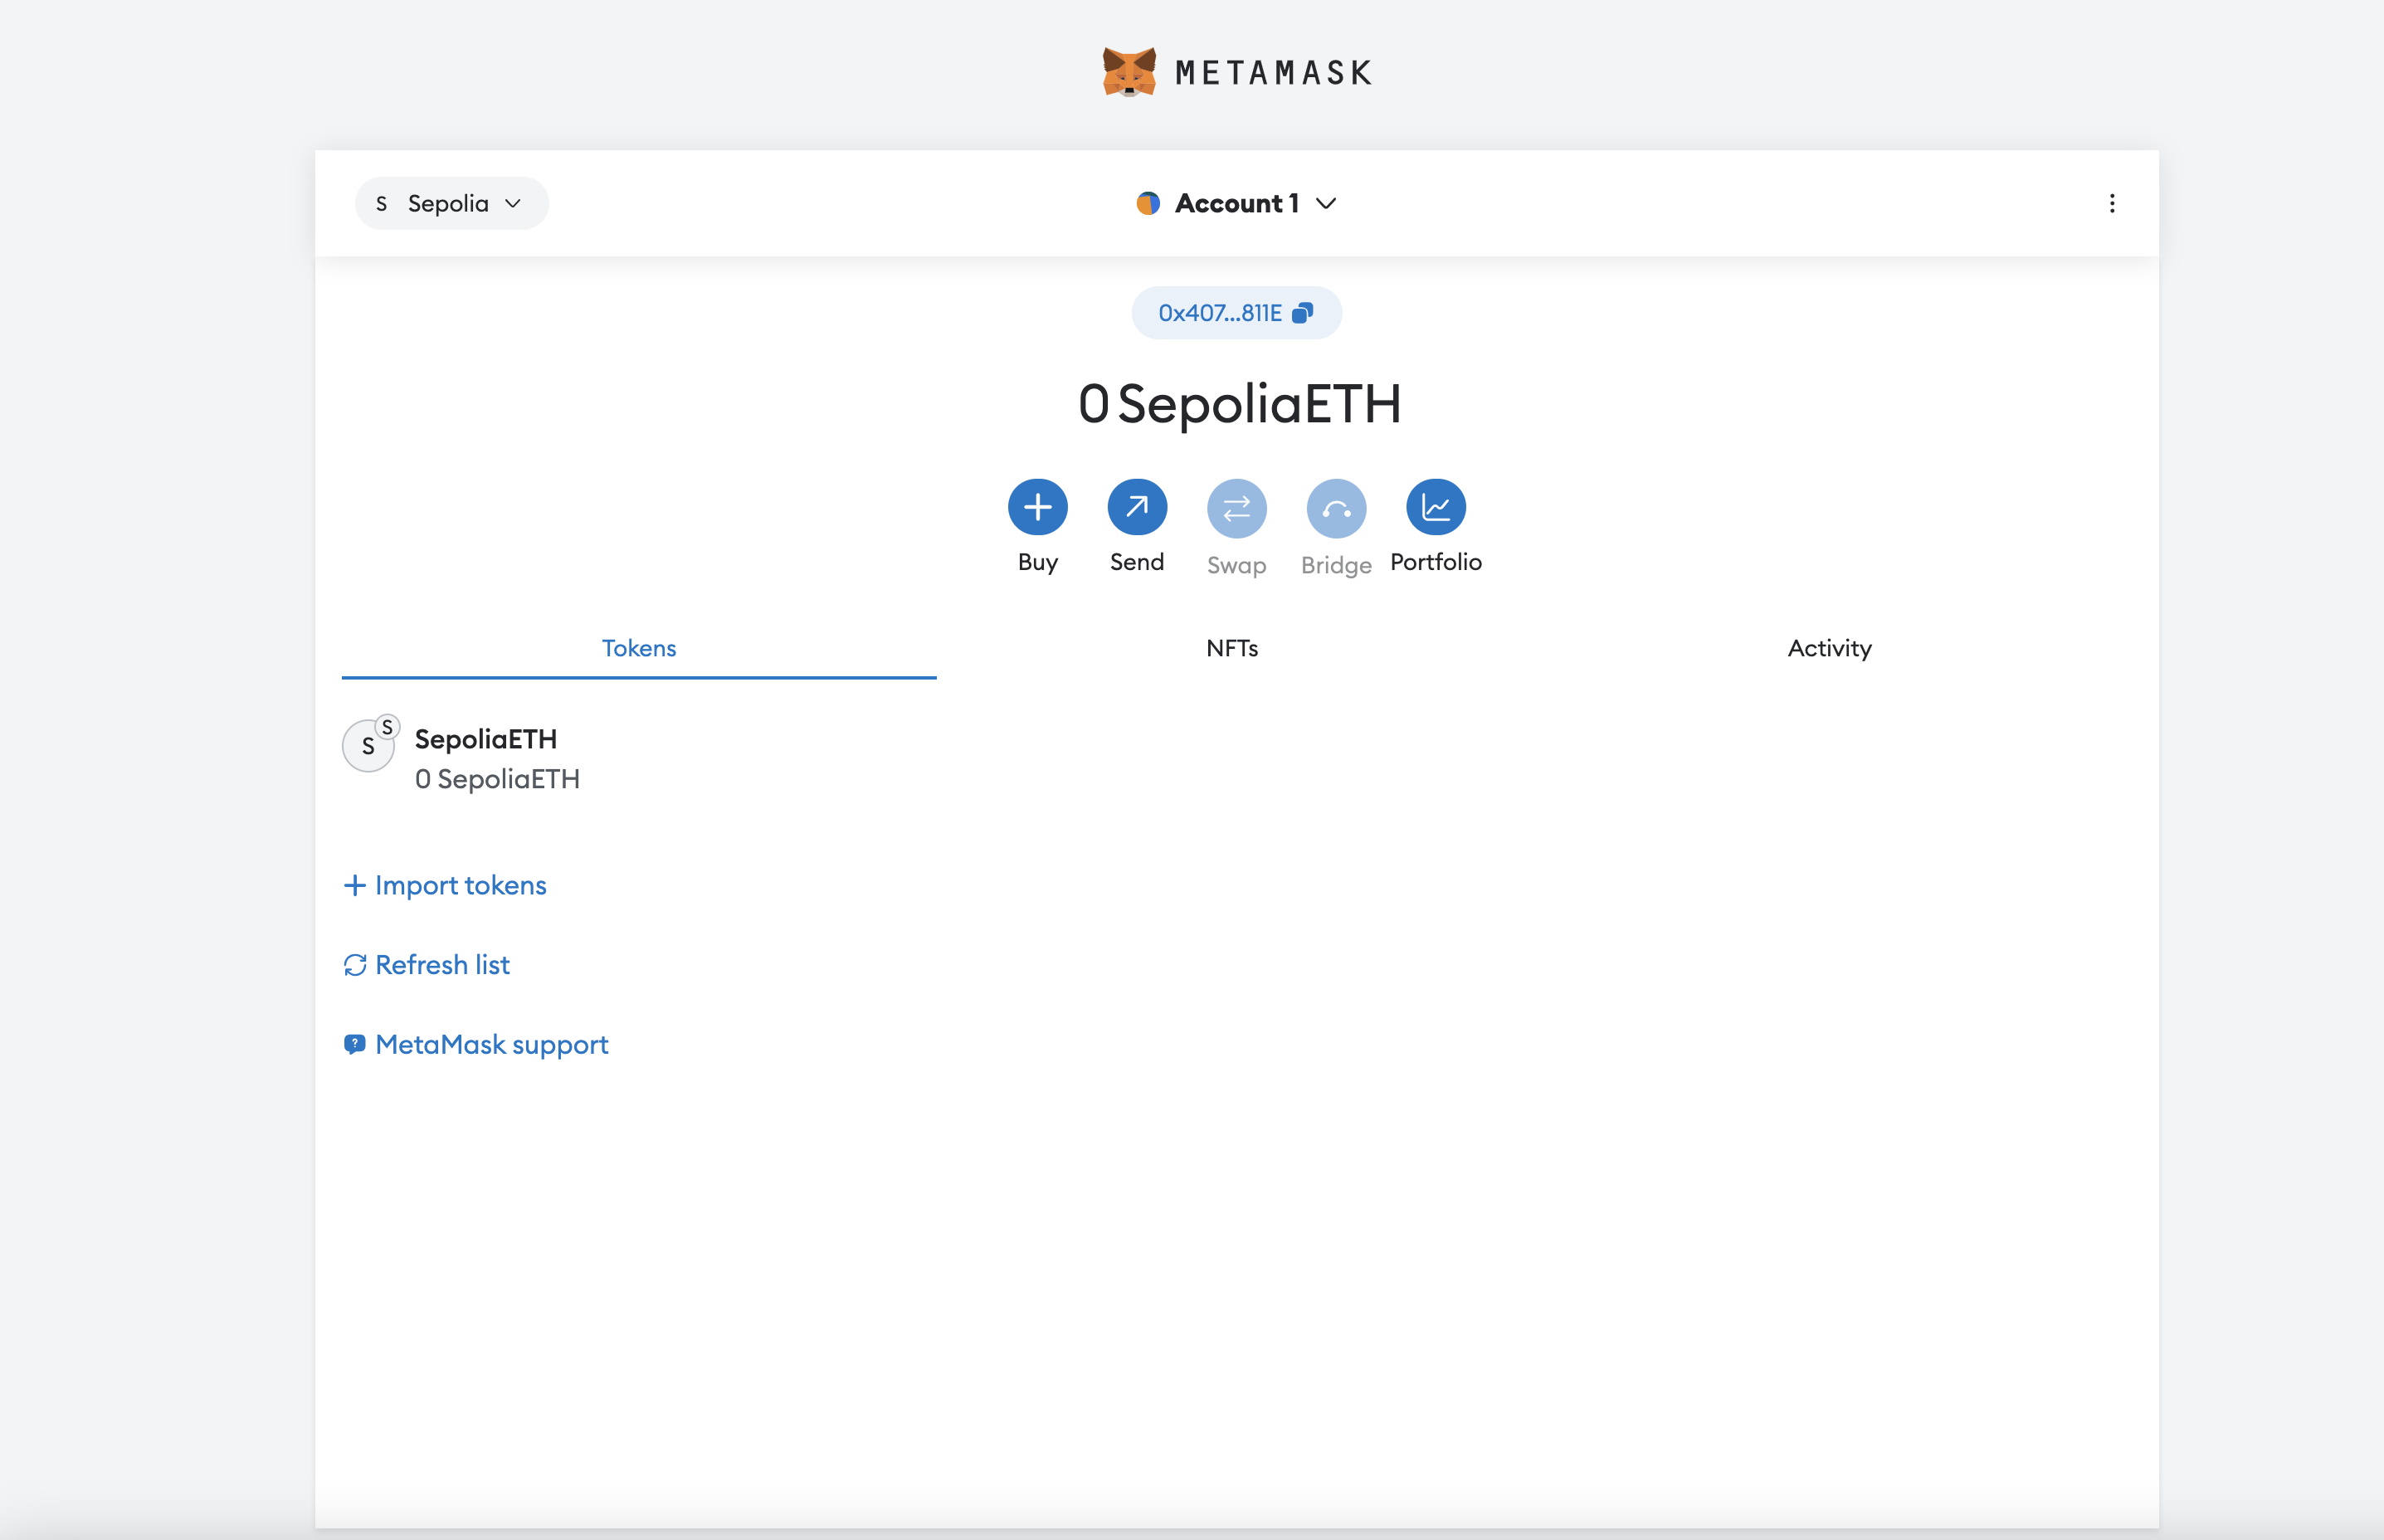
Step 4: Add ether from a Faucet
To deploy oursmart contract to the test network, we’ll need some fake ETH. To get ETH, you can go to the Sepolia faucet and log into your Alchemy account and enter your wallet address, then click “Send Me ETH.” Due to network traffic, receiving your fake ETH may take some time. (At the time of writing this, it took around 30 minutes.) You should see Eth in your Metamask account soon after!
Step 5: Check your Balance
To double-check that our balance is there, let’s make an eth_getBalance request using Alchemy’s composer tool. This will return the amount of ETH in our wallet. Check out this video for instructions on how to use the composer tool!
After you input your Metamask account address and click “Send Request”, you should see a response that looks like this:
{"jsonrpc": "2.0", "id": 0, "result": "0x2B5E3AF16B1880000"}
NOTE
This result is in wei not eth. Wei is used as the smallest denomination of ether. The conversion from wei to eth is: 1 eth = 10^18 wei. So if we convert 0x2B5E3AF16B1880000 to decimal we get 5*10^18 which equals 5 eth.
Phew! Our fake money is all there🤑 .
Step 6: Initialize our project
First, we’ll need to create a folder for our project. Navigate to your command line and type:
mkdir hello-world
cd hello-world
Now that we’re inside our project folder, we’ll use npm init to initialize the project. If you don’t already have npm installed, follow these instructions (we’ll also need Node.js so download that too!).
npm init # (or npm init --yes)
It doesn’t really matter how you answer the installation questions; here is how we did it for reference:
package name: (hello-world)
version: (1.0.0)
description: hello world smart contract
entry point: (index.js)
test command:
git repository:
keywords:
author:
license: (ISC)

About to write to /Users/.../.../.../hello-world/package.json:

{
   "name": "hello-world",
   "version": "1.0.0",
   "description": "hello world smart contract",
   "main": "index.js",
   "scripts": {
      "test": "echo \"Error: no test specified\" && exit 1"
   },
   "author": "",
   "license": "ISC"
}
Approve the package.json and we’re good to go!
Step 7: Download Hardhat
Hardhat is a development environment to compile, deploy, test, and debug your Ethereum software. It helps developers build smart contracts and dApps locally before deploying to the live chain.
Inside our hello-world project run:
npm install --save-dev hardhat
Check out this page for more details on installation instructions.
Step 8: Create a Hardhat project
Inside our hello-world project folder, run:
npx hardhat
You should then see a welcome message and the option to select what you want to do. Select “create an empty hardhat.config.js”:
888 888 888 888 888
888 888 888 888 888
888 888 888 888 888
8888888888 8888b. 888d888 .d88888 88888b. 8888b. 888888
888 888 "88b 888P" d88" 888 888 "88b "88b 888
888 888 .d888888 888 888 888 888 888 .d888888 888
888 888 888 888 888 Y88b 888 888 888 888 888 Y88b.
888 888 "Y888888 888 "Y88888 888 888 "Y888888 "Y888
👷 Welcome to Hardhat v2.12.2 👷
? What do you want to do? …
Create a JavaScript project
Create a TypeScript project
❯ Create an empty hardhat.config.js
Quit
This will generate a hardhat.config.js file for us, which is where we’ll specify all of the set up for our project (in step 13).
Step 9: Add project folders
To keep our project organized we’ll create two new folders. Navigate to the root directory of your hello-world project in your command line and type:
mkdir contracts
mkdir scripts
contracts/is where we’ll keep our Hello World smart contract code filescripts/is where we’ll keep scripts to deploy and interact with our contract
Step 10: Write our contract
You might be asking yourself, when the heck are we going to write code?? Well, here we are, on Step 10 😄.
Open up the hello-world project in your favorite editor (we like VSCode). Smart contracts are written in a language called Solidity, which we will use to write our HelloWorld.sol smart contract.
- Navigate to the “contracts” folder and create a new file called
HelloWorld.sol - Below is a sample Hello World smart contract from the Ethereum Foundation that we will be using for this tutorial. Copy and paste the contents below into your
HelloWorld.solfile, and be sure to read the comments to understand what this contract does:
// SPDX-License-Identifier: UNLICENSED
// Specifies the version of Solidity, using semantic versioning.
// Learn more: https://solidity.readthedocs.io/en/v0.5.10/layout-of-source-files.html#pragma
pragma solidity >=0.7.3;

// Defines a contract named `HelloWorld`.
// A contract is a collection of functions and data (its state). Once deployed, a contract resides at a specific address on the Ethereum blockchain. Learn more: https://solidity.readthedocs.io/en/v0.5.10/structure-of-a-contract.html
contract HelloWorld {

   //Emitted when update function is called
   //Smart contract events are a way for your contract to communicate that something happened on the blockchain to your app front-end, which can be 'listening' for certain events and take action when they happen.
   event UpdatedMessages(string oldStr, string newStr);

   // Declares a state variable `message` of type `string`.
   // State variables are variables whose values are permanently stored in contract storage. The keyword `public` makes variables accessible from outside a contract and creates a function that other contracts or clients can call to access the value.
   string public message;

   // Similar to many class-based object-oriented languages, a constructor is a special function that is only executed upon contract creation.
   // Constructors are used to initialize the contract's data. Learn more:https://solidity.readthedocs.io/en/v0.5.10/contracts.html#constructors
   constructor(string memory initMessage) {

      // Accepts a string argument `initMessage` and sets the value into the contract's `message` storage variable).
      message = initMessage;
   }

   // A public function that accepts a string argument and updates the `message` storage variable.
   function update(string memory newMessage) public {
      string memory oldMsg = message;
      message = newMessage;
      emit UpdatedMessages(oldMsg, newMessage);
   }
}
This is a super simple smart contract that stores a message upon creation and can be updated by calling the update function.
Step 11: Connect Metamask & Alchemy to your project
We’ve created a Metamask wallet, an Alchemy account, and written our smart contract. Now, it’s time to connect the three.
Every transaction sent from your virtual wallet requires a signature using your unique private key. We can safely store our private key (and Alchemy API key) in an environment file to provide our program with this permission.
To learn more about sending transactions, check out this tutorial on sending transactions using web3.
First, install the dotenv package in your project directory:
npm install dotenv --save
Then, create a .env file in the root directory of our project, and add your Metamask private key and HTTP Alchemy API URL to it.
Your environment file must be named
.envor it won't be recognized as an environment file. Do not name itprocess.envor.env-customor anything else.
- Follow these instructions to export your metamask private key.
- Click on the View Key button to view your HTTP Alchemy API URL
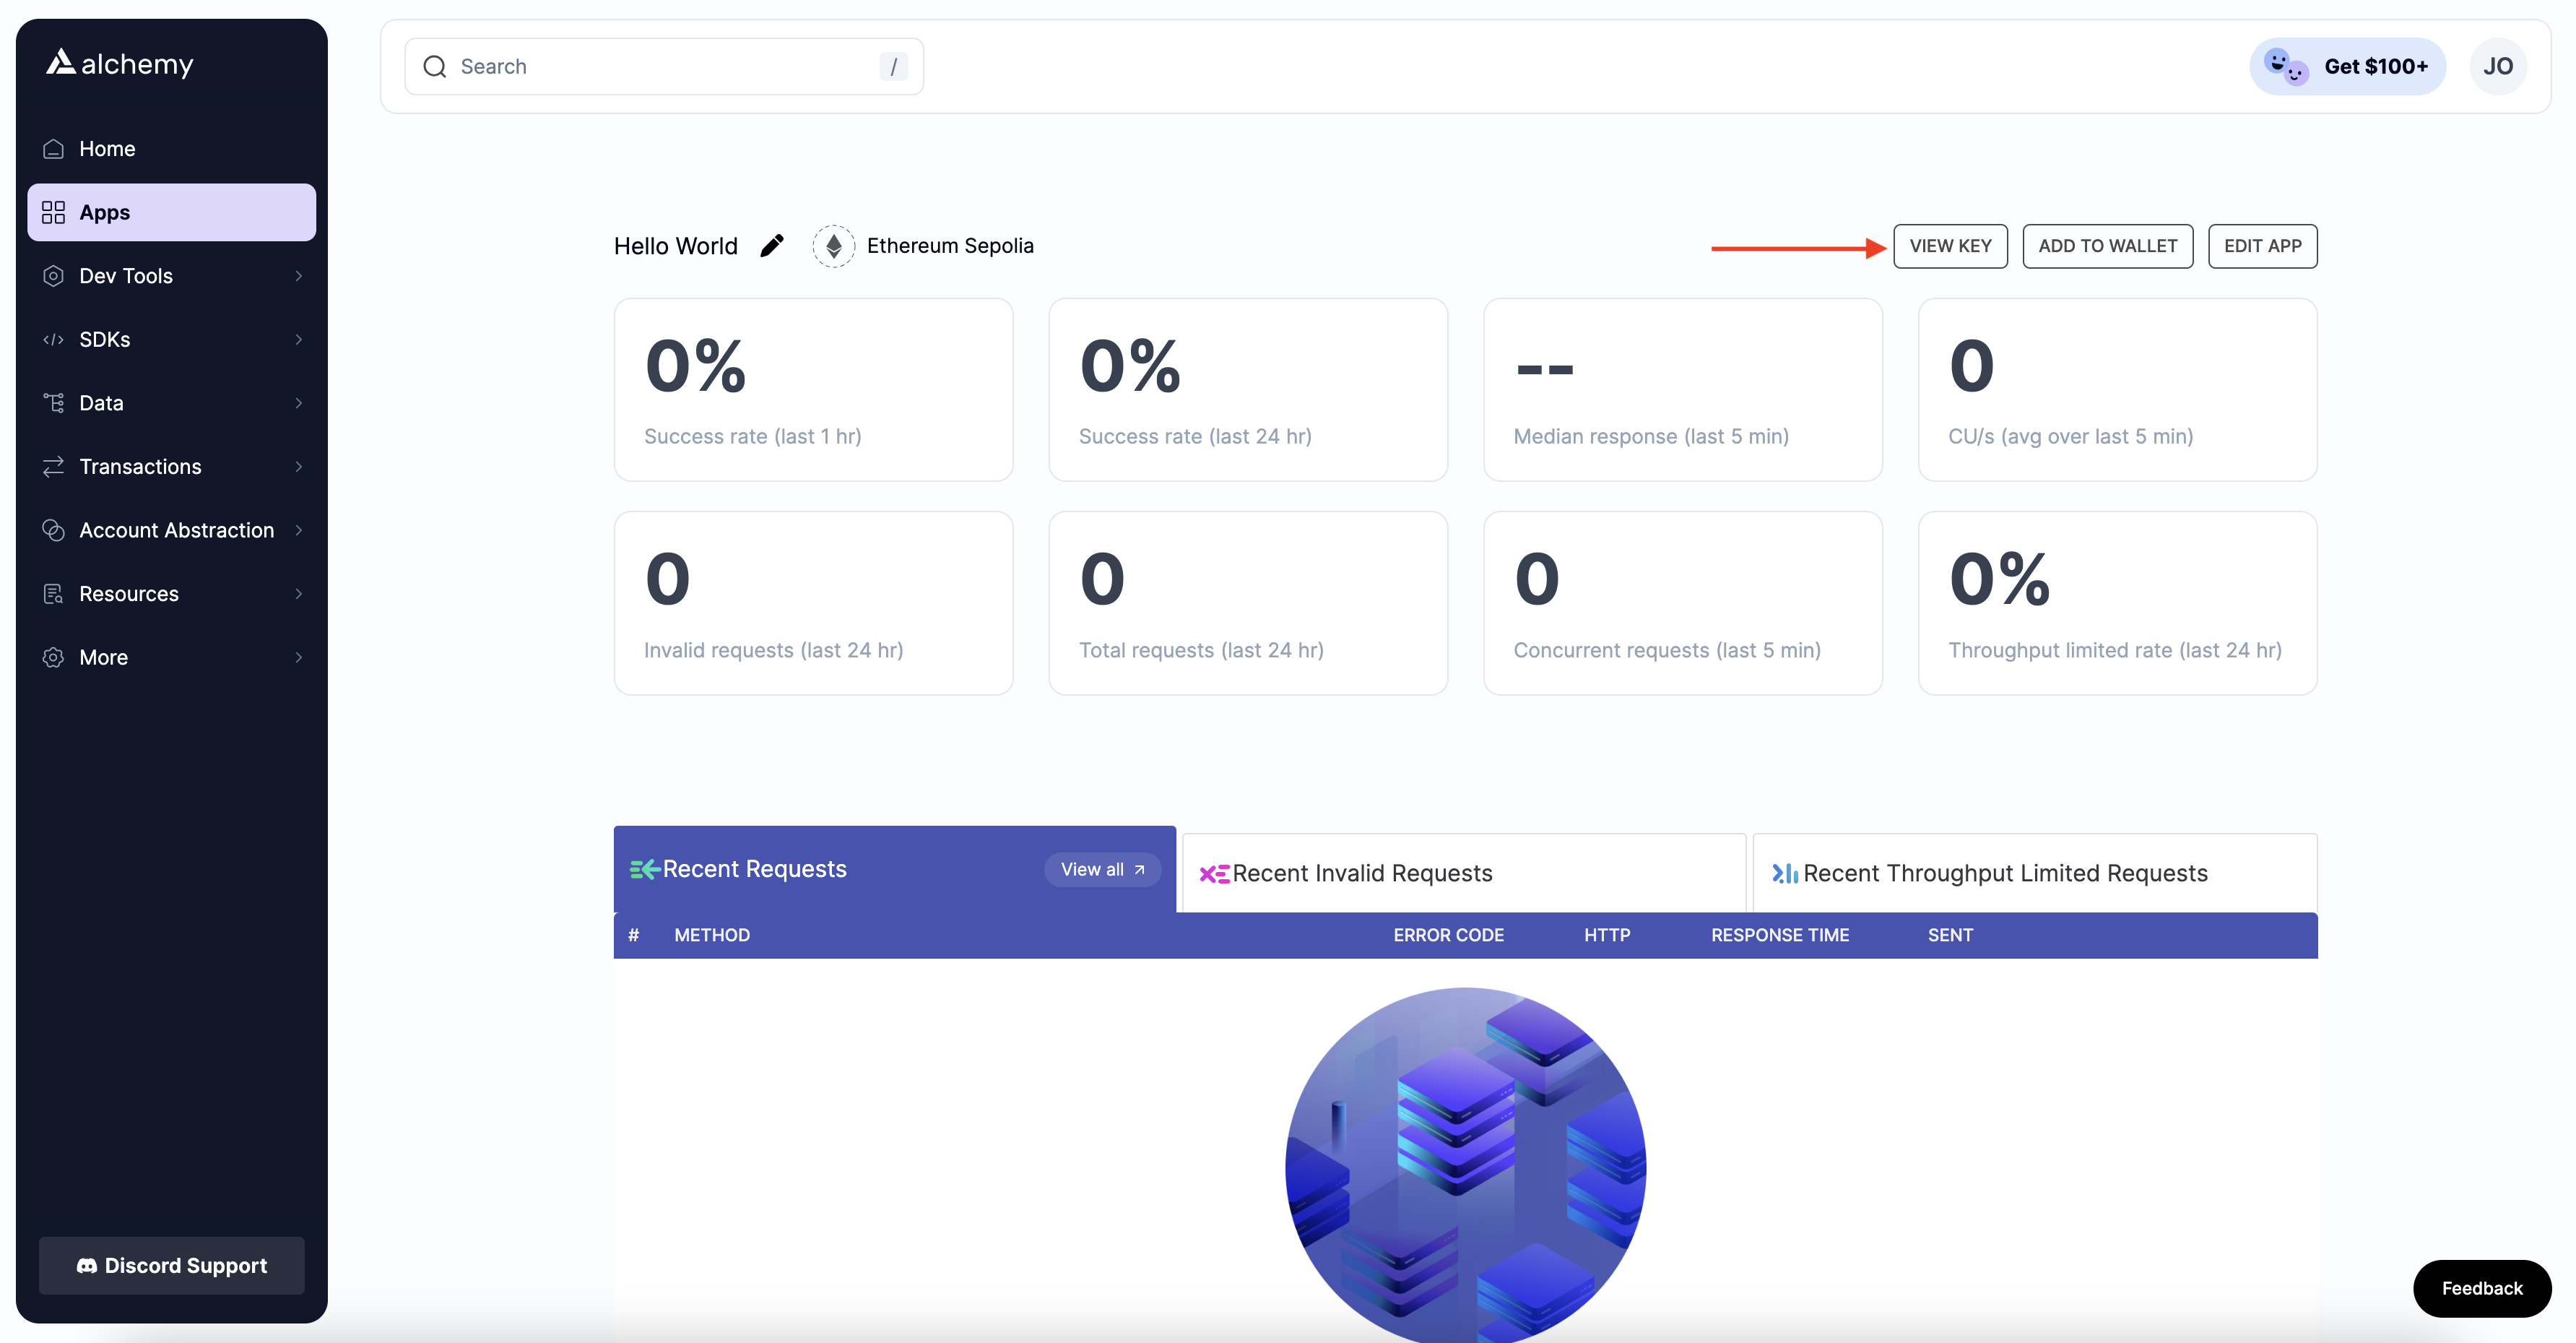
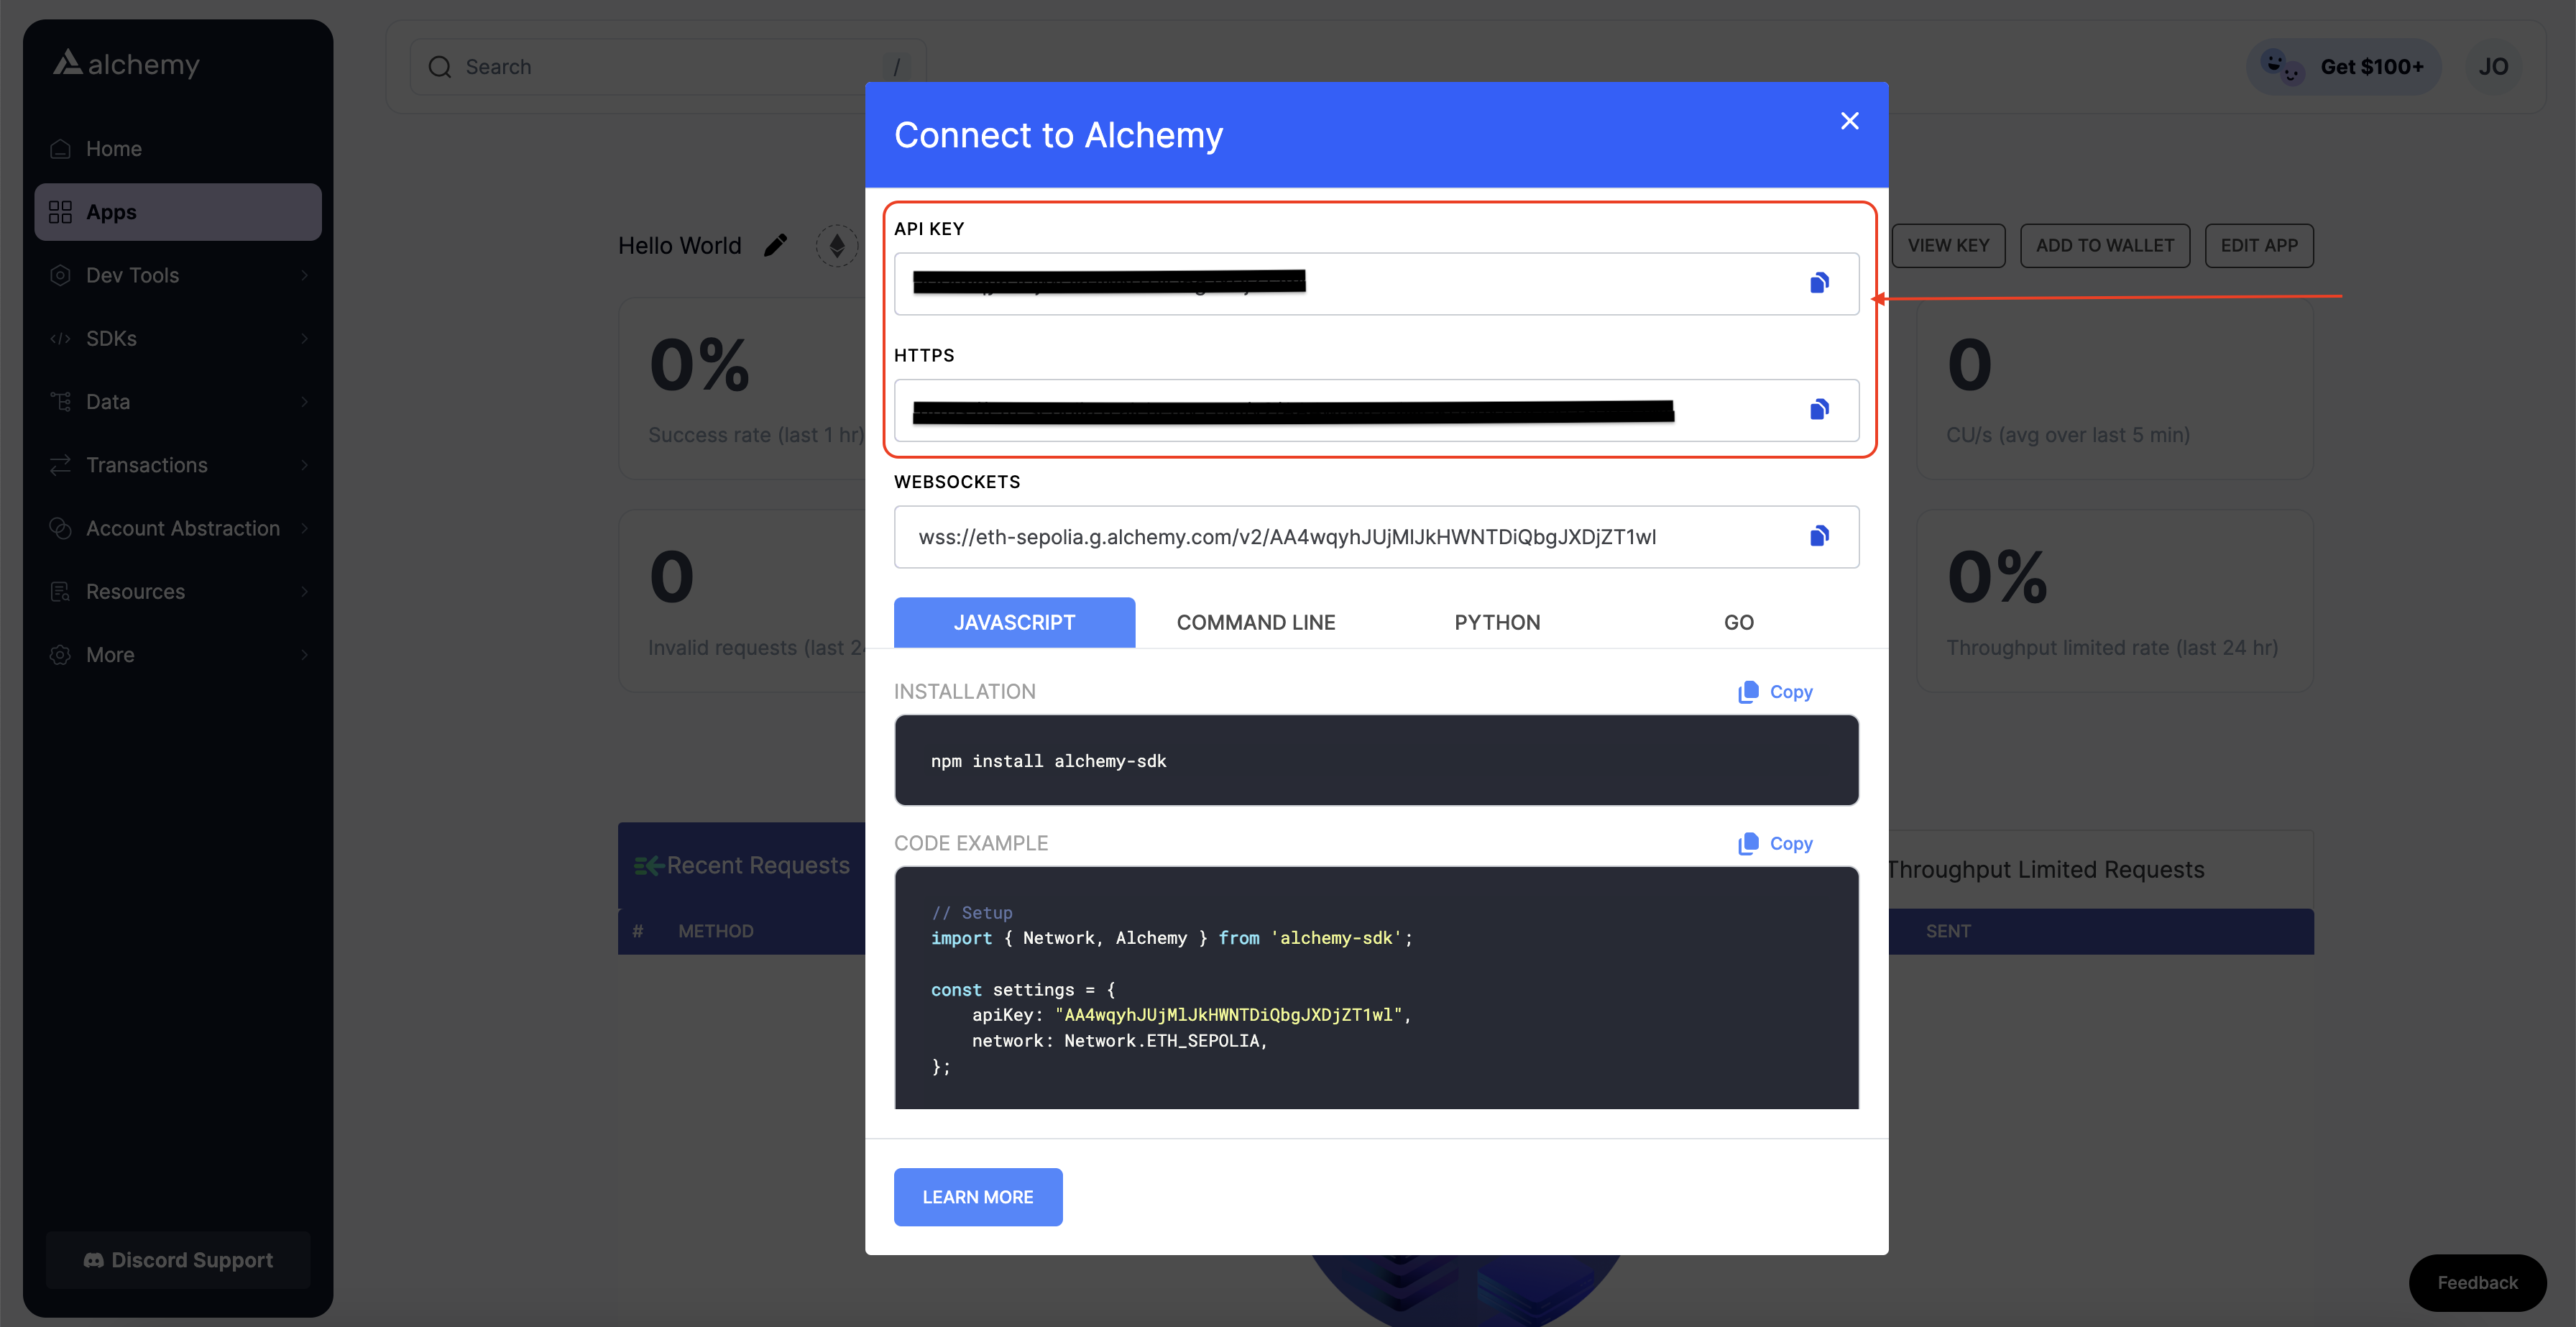
Your API KEY and HTTP API URL
Your .env should look like this:
API_URL = "https://eth-sepolia.g.alchemy.com/v2/your-api-key"
PRIVATE_KEY = "your-metamask-private-key"
To actually connect these to our code, we’ll reference these variables in our hardhat.config.js file in step 13.
Step 12: Install Ethers.js
Ethers.js is a library that makes it easier to interact and make requests to Ethereum by wrapping standard JSON-RPC methods with more user-friendly methods.
Hardhat makes it super easy to integrate Plugins for additional tooling and extended functionality. We’ll be taking advantage of the Ethers plugin for contract deployment (Ethers.js has some super clean contract deployment methods).
In your project directory, type:
npm install [email protected]
We’ll also require ethers in our hardhat.config.js in the next step.
npm install --save-dev @nomiclabs/hardhat-ethers
Note: If you installed an earlier version of ethers, i.e., ethers^6.0.0+, you might encounter problems when installing hardhart-ethers because of the peer depency of hardhat. You can use the --force or --legacy-peer-deps flags to ignore these warning and install hardhat-etherscan, i.e., npm install --save-dev @nomiclabs/hardhat-ethers --legacy-peer-deps
Step 13: Update hardhat.config.js
We’ve added several dependencies and plugins so far, now we need to update hardhat.config.js so that our project knows about all of them.
Update your hardhat.config.js to look like this:
/**
* @type import('hardhat/config').HardhatUserConfig
*/

require('dotenv').config();
require("@nomiclabs/hardhat-ethers");

const { API_URL, PRIVATE_KEY } = process.env;

module.exports = {
   solidity: "0.7.3",
   defaultNetwork: "sepolia",
   networks: {
      hardhat: {},
      sepolia: {
         url: API_URL,
         accounts: [`0x${PRIVATE_KEY}`]
      }
   },
}
Step 14: Compile our contract
Let's compile our contract to ensure everything is working so far. The compile task is one of the built-in hardhat tasks.
From the command line, run:
npx hardhat compile
You might get a warning about SPDX license identifier not provided in source file, but no need to worry about that — hopefully, everything else looks good! If not, you can always message in the Alchemy discord.
Step 15: Write our deploy script
Now that our contract is written and our configuration file is ready, it’s time to write our deploy script.
Navigate to the scripts/ folder and create a new file called deploy.js, adding the following contents to it:
async function main() {
   const HelloWorld = await ethers.getContractFactory("HelloWorld");

   // Start deployment, returning a promise that resolves to a contract object
   const hello_world = await HelloWorld.deploy("Hello World!");
   console.log("Contract deployed to address:", hello_world.address);
}

main()
  .then(() => process.exit(0))
  .catch(error => {
    console.error(error);
    process.exit(1);
  });
Hardhat does an amazing job of explaining what each of these lines of code does in their Contracts tutorial, we’ve adopted their explanations here.
const HelloWorld = await ethers.getContractFactory("HelloWorld");
A ContractFactory in ethers.js is an abstraction used to deploy new smart contracts, so HelloWorld here is a factory for instances of our Hello World contract. When using the hardhat-ethers plugin ContractFactory and Contract, instances are connected to the first signer (owner) by default.
const hello_world = await HelloWorld.deploy();
Calling deploy() on a ContractFactory will start the deployment and return a Promise that resolves to a Contract object. This object has a method for each of our smart contract functions.
Step 16: Deploy our contract
We’re finally ready to deploy our smart contract! Navigate to the command line and run:
npx hardhat run scripts/deploy.js --network sepolia
You should then see something like:
Contract deployed to address: 0xDe511981CC4C5946824867E0f479aC133F84E029
Please copy and paste this address to save it somewhere, as we will use it for later tutorials, so you don't want to lose it.
If we go to the Sepolia etherscan and search for our contract address, we should see that it has been deployed successfully. The transaction will look something like this:
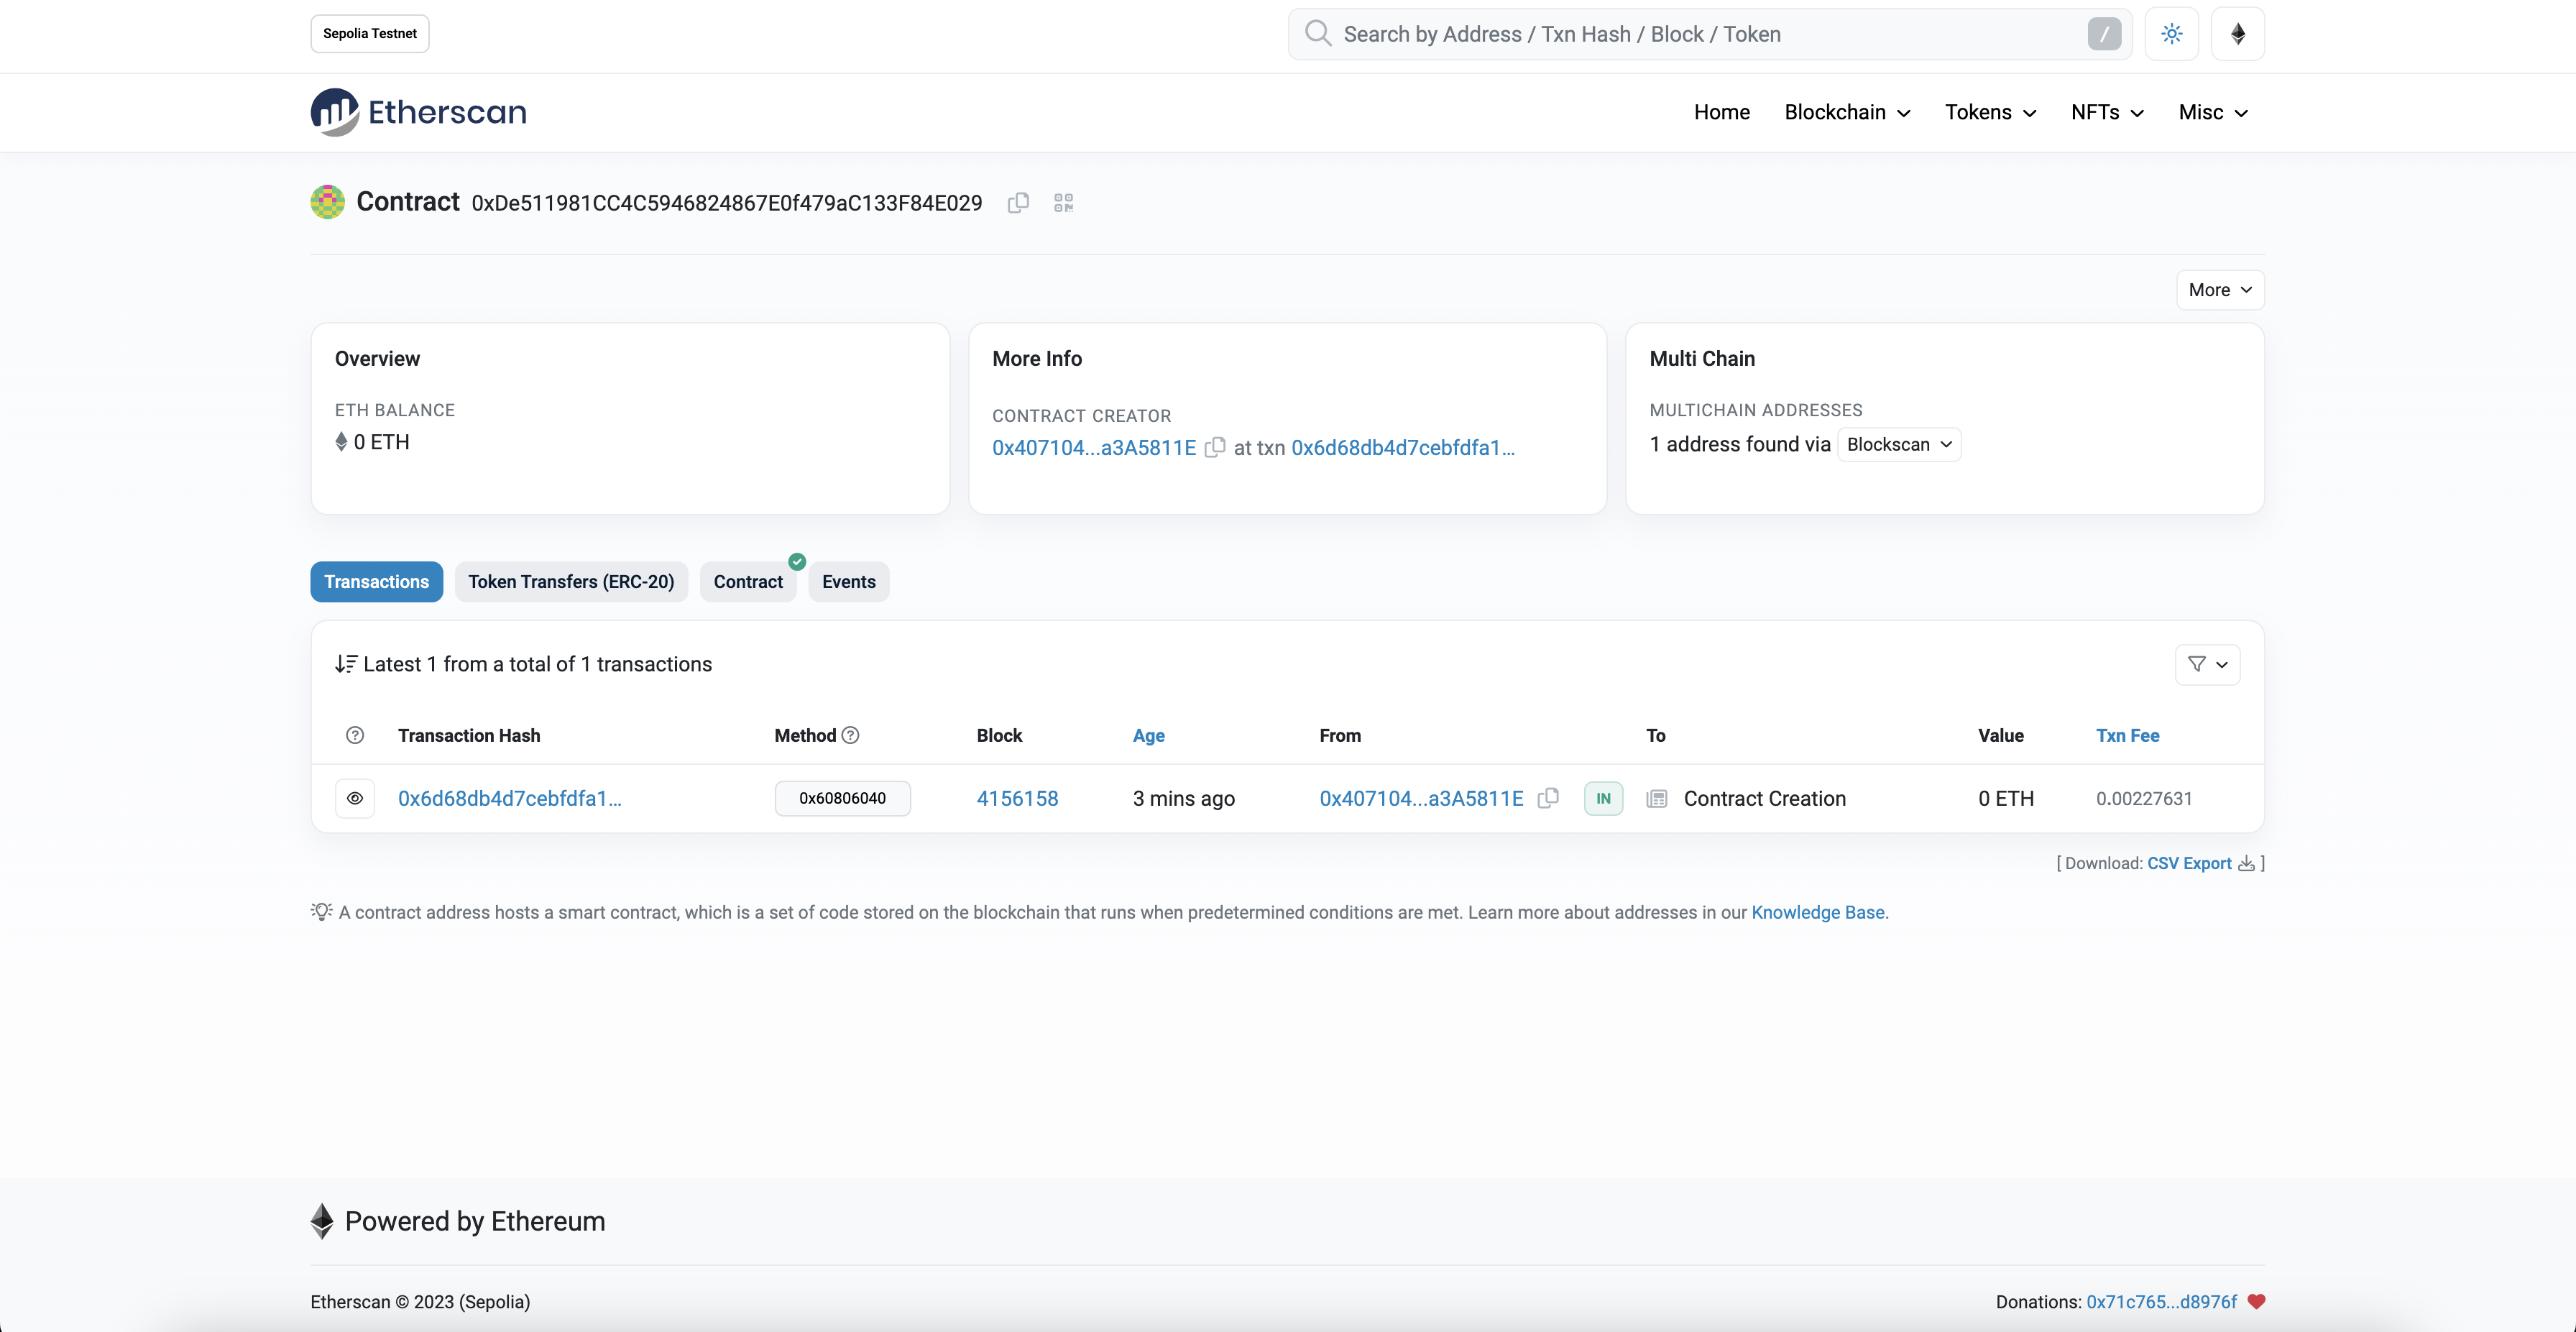
The From address should match your Metamask account address and the To address will say “Contract Creation”, but if we click into the transaction, we’ll see our contract address in the To field:
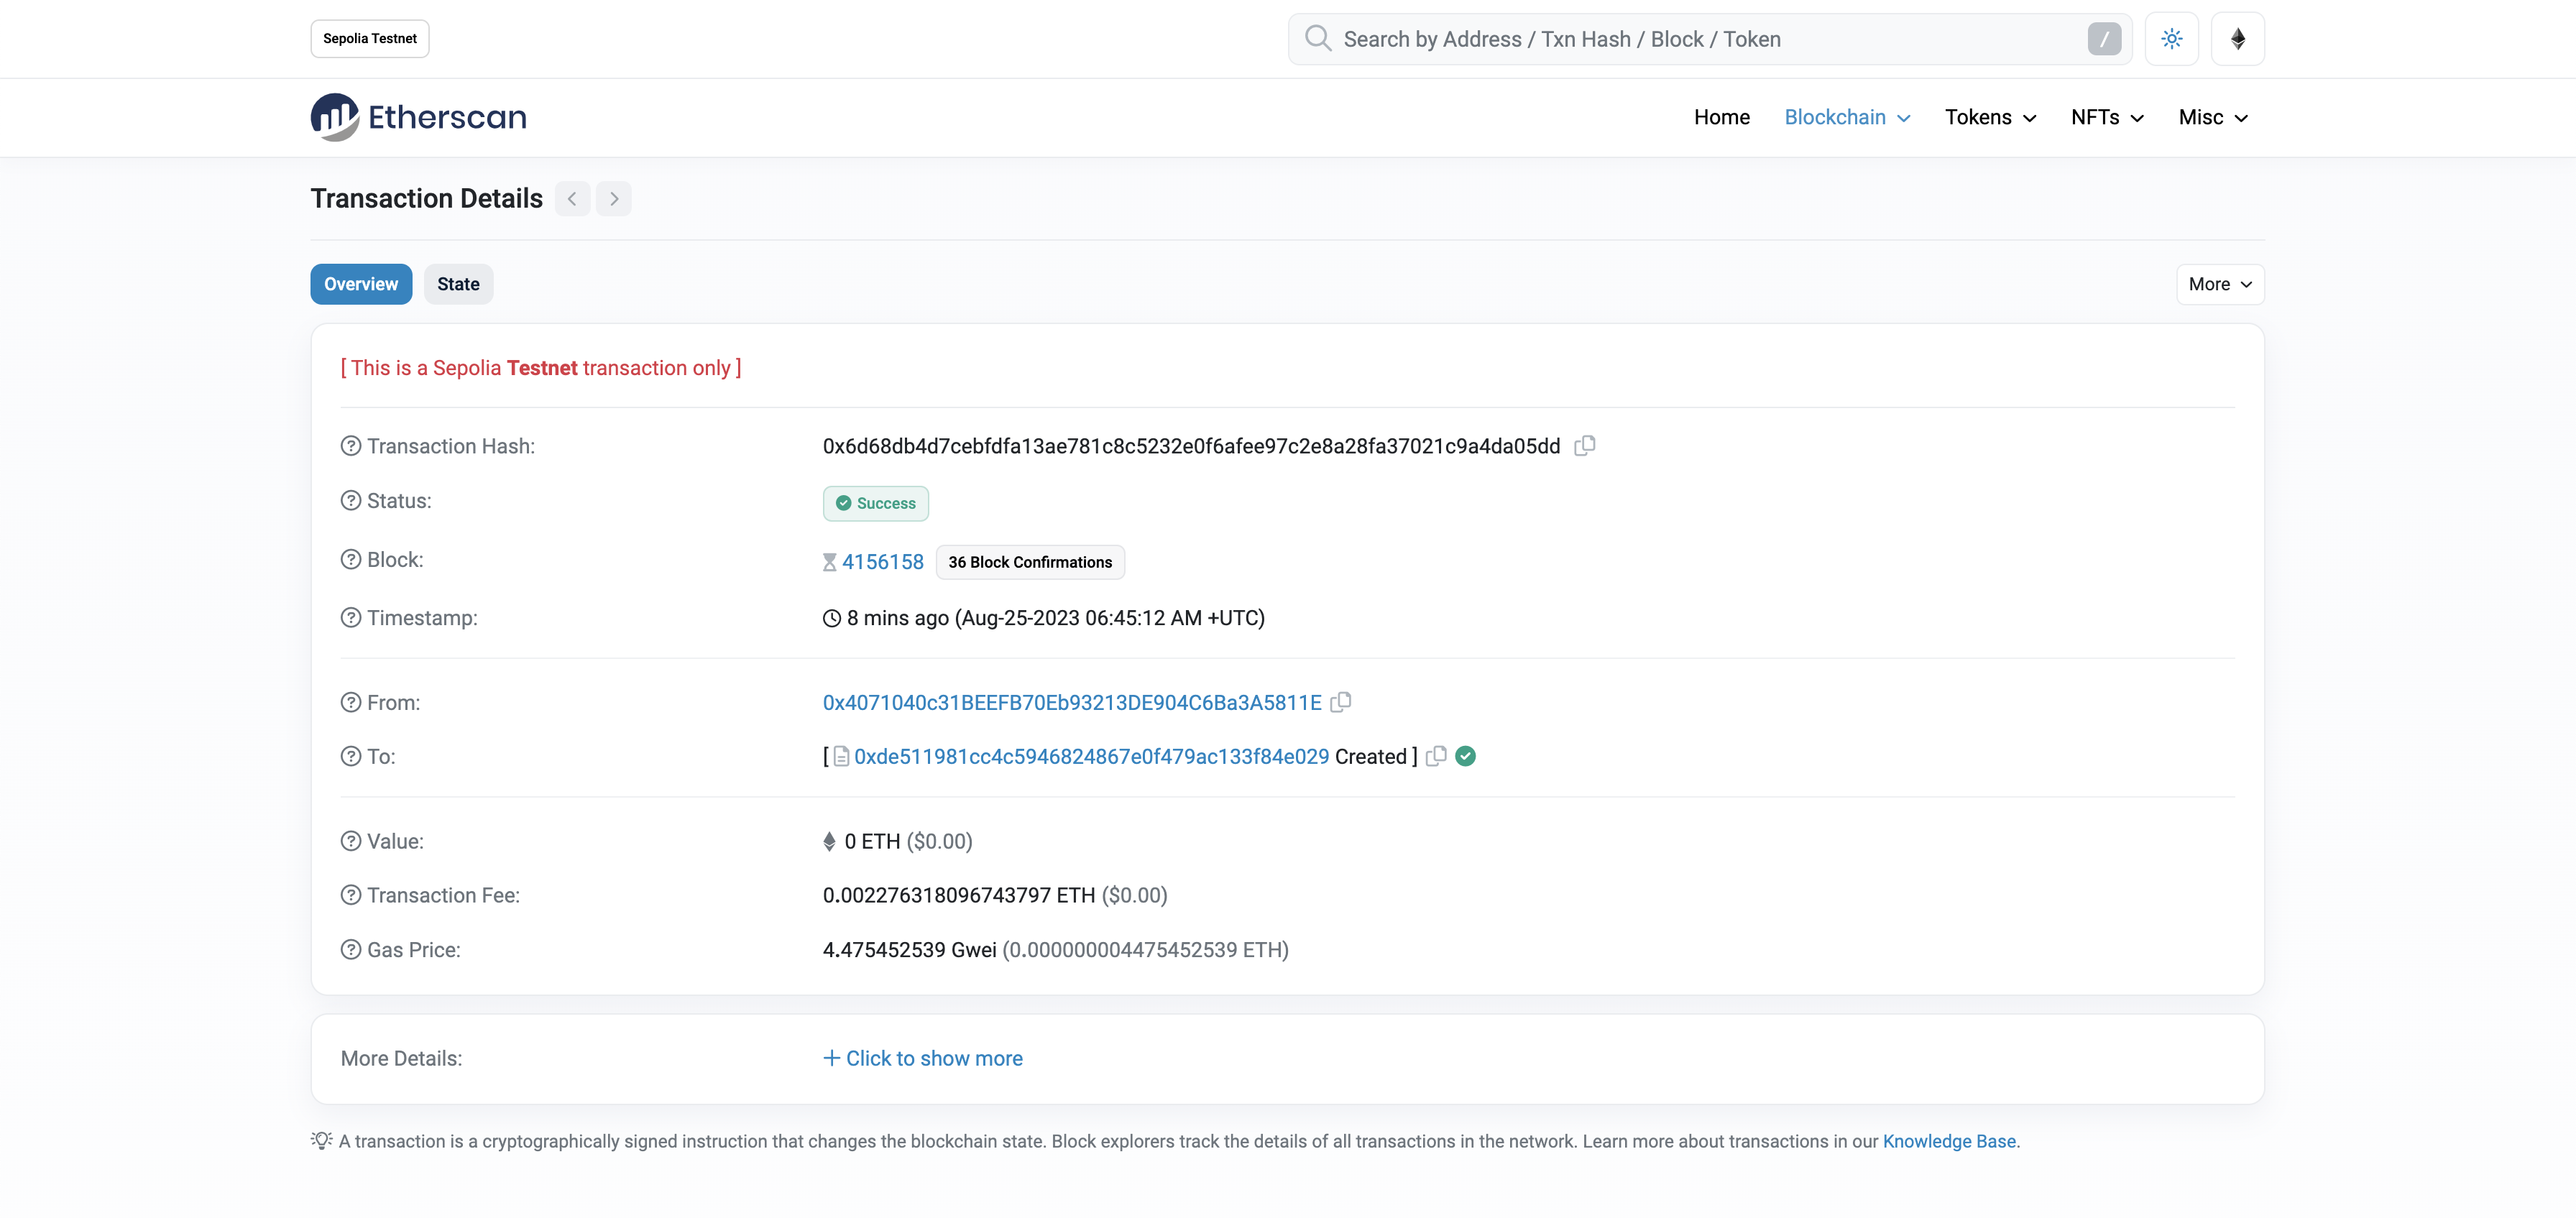
Congrats! You just deployed a smart contract to the Ethereum chain 🎉.
To understand what’s going on under the hood, let’s navigate to Dev Tools > Logs tab in our Alchemy dashboard. If you have multiple Alchemy apps, make sure to filter by app and select “Hello World”.
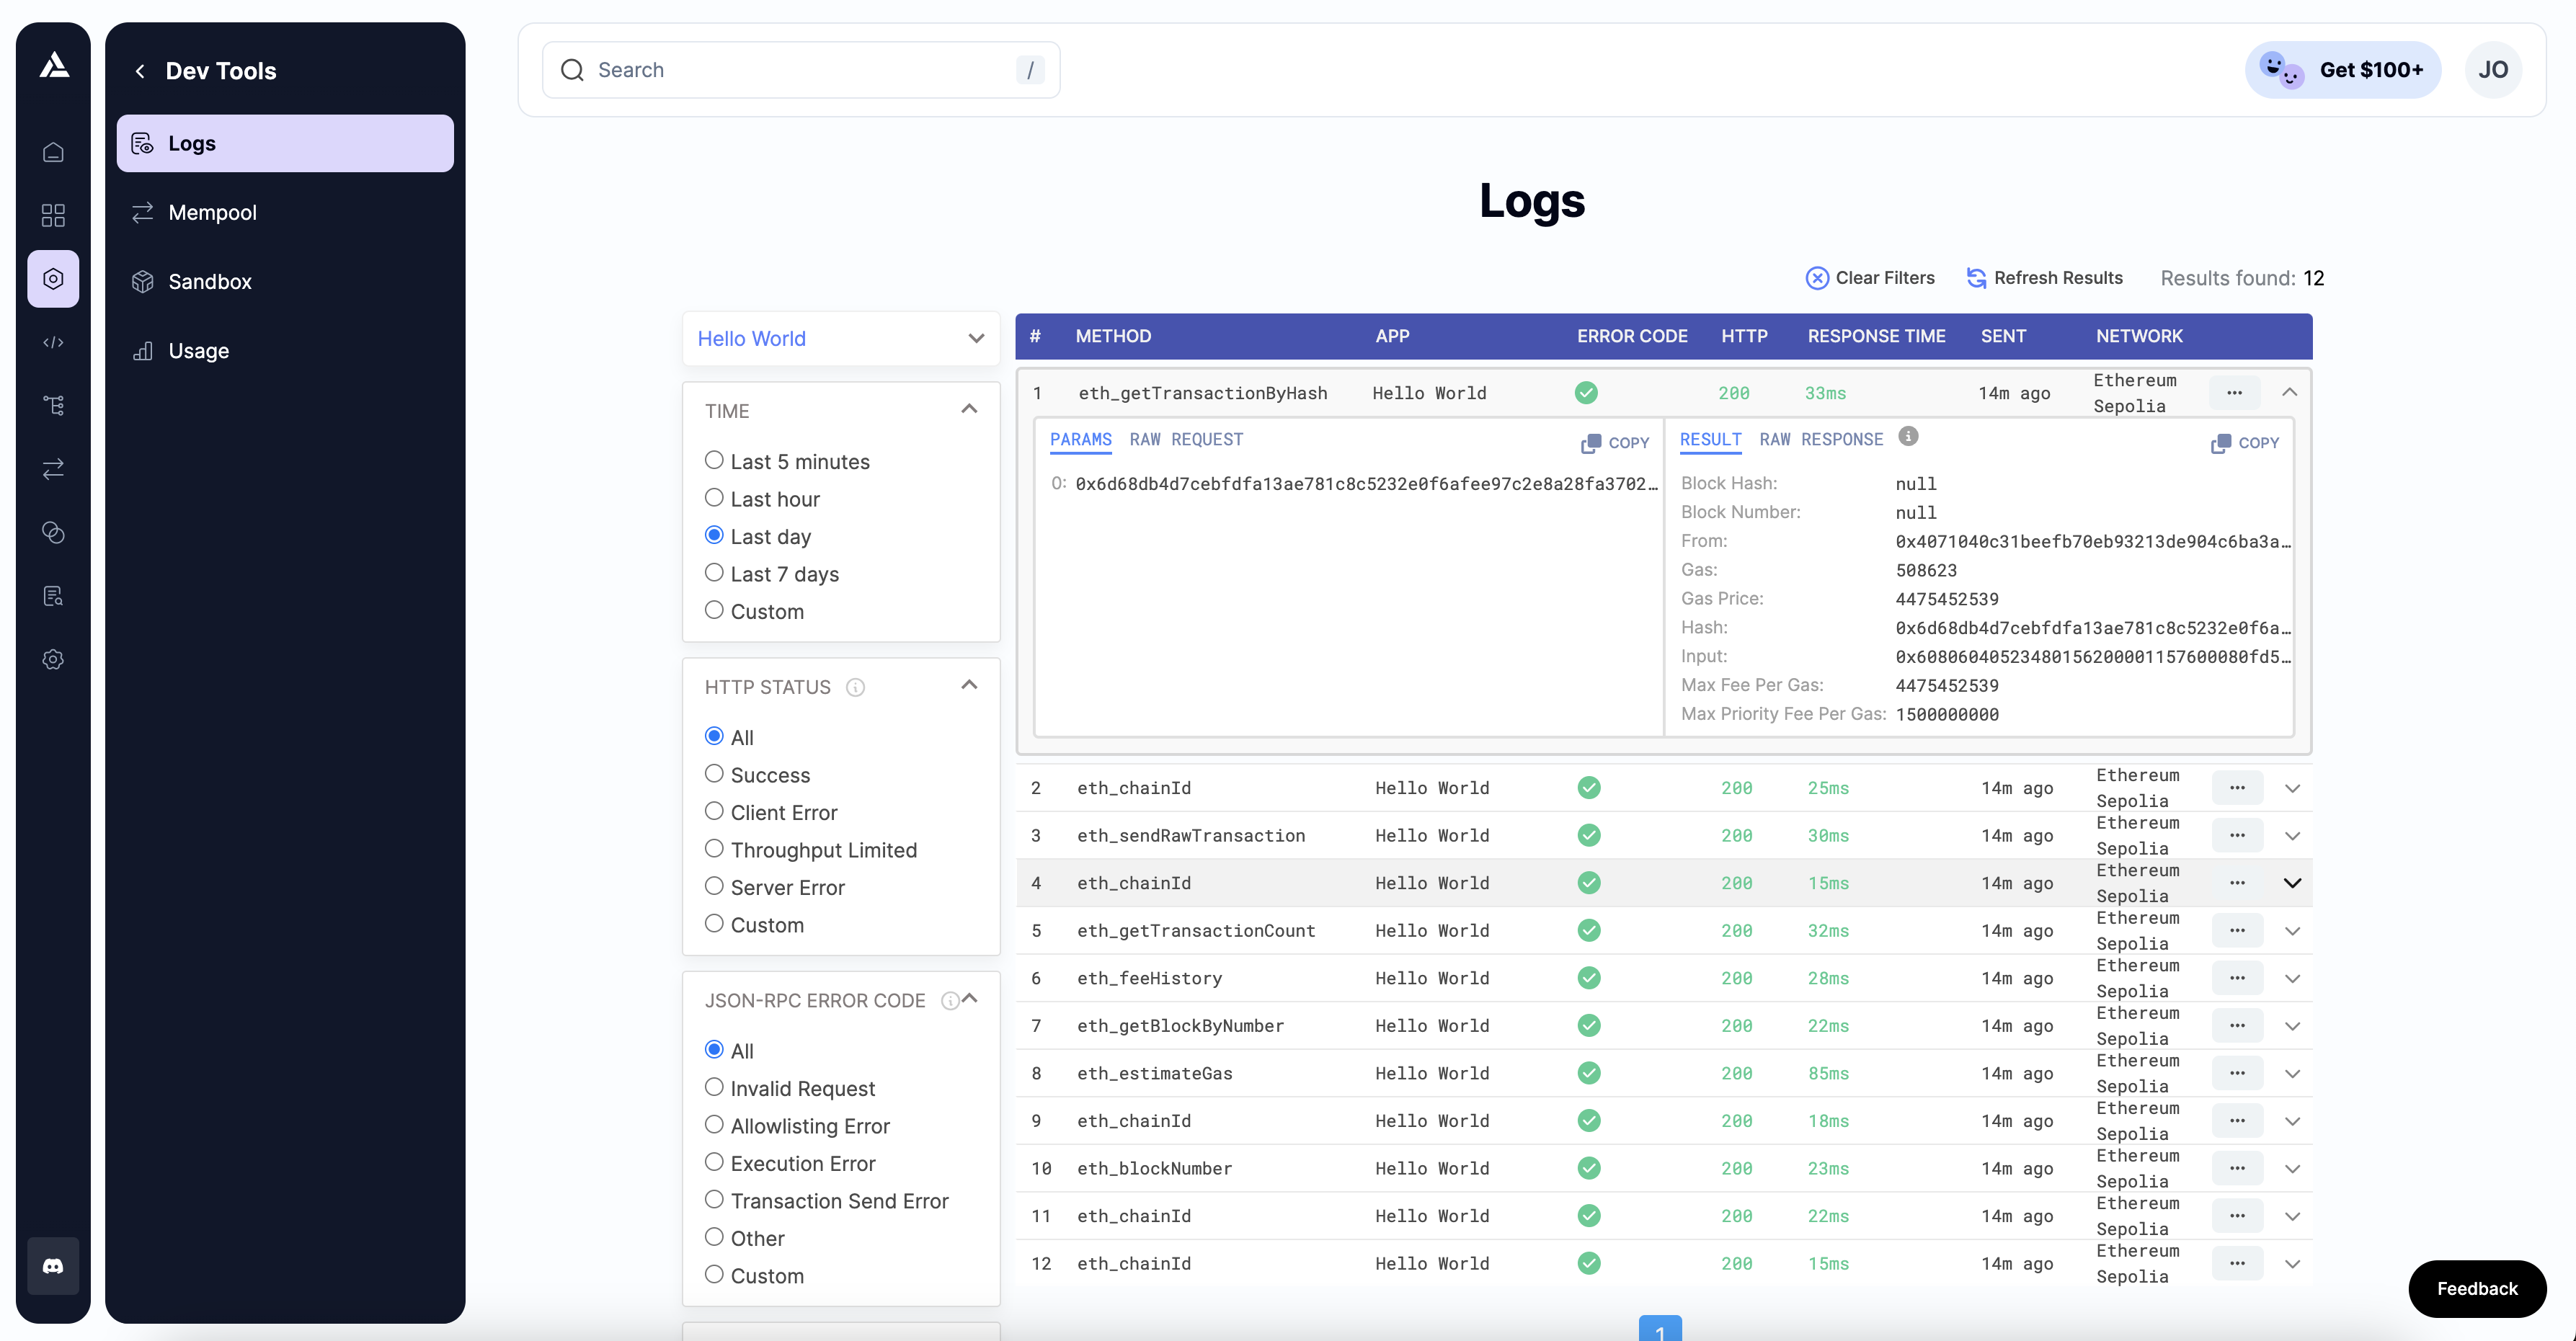
Here, you’ll see a handful of JSON-RPC calls that Hardhat/Ethers made under the hood for us when we called the .deploy() function. Two important ones to call out here are eth_sendRawTransaction, which is the request actually to write our contract onto the Sepolia chain, and eth_getTransactionByHash, which is a request to read information about our transaction given the hash (a typical pattern when sending transactions). To learn more about sending transactions, check out this tutorial on How to Send Transactions on Ethereum.
That’s all for part 1 of this tutorial. In part 2, we’ll actually interact with our smart contract by updating our initial message, and in part 3, we’ll publish our smart contract to Etherscan so everyone will know how to interact with it.
Troubleshooting - FAQs
Error HH8: There are one or more errors in your config file
This is caused by a misconfiguration of your API Keys in your .env file as described in step 11: Connect Metamask & Alchemy to your project.
Updated over 1 year ago
