How to create a Smart Contract Account and send UserOps with Account Kit
Learn how to create your own smart contract account and send user operations using the Alchemy Account Kit.
Introduction
In this guide, we will walk you through the process of creating an ERC-4337 compliant Smart Contract Account (SCA) and executing an ETH transfer from it by sending a user operation with our Account Abstraction SDK.
As web3 development increasingly favors SCAs, developers must become familiar with Account Abstraction and understand how SCAs will be used within the web3 ecosystem. Fortunately, our AA-SDK makes the technical transition seamless - letting you focus on building your dapp while attaining all the benefits of using SCAs.
Prerequisites
Before creating a SCA with this guide, you should possess skills and knowledge about the topics we are going over. We assume that you already have an understanding/experience with the following:
- The development of smart contracts and their role in Ethereum
- Web3 Libraries like viem, ethers, or web3
- Metamask or similar crypto wallet usage
- JavaScript and (preferably) TypeScript
- Account Abstraction (ERC-4337) and how it works, conceptually
We also strongly recommend that you read our 4-part article series, You Could Have Built Account Abstraction, and our Introduction to Account Abstraction for Developers guide.
You will also need to make sure your Node version is v18.16.1 or above. You can check this by running node –version inside of your preferred terminal. If your Node version is not up-to-date, follow these instructions to ensure you can work through this guide. Now that you've made sure you have the required Node version, let's review this guide's accompanying repository!
Developer Environment
We built a public GitHub repository that you can fork and modify. If you prefer, you can create your own repo, adjusting your configuration according to whether you're using JavaScript or TypeScript and AA-core or AA-ethers.
The repository uses npm and tsx to execute the code and displays the results directly in the terminal. More details on how to execute code can be found in the README.
The rest of the tutorial assumes you are following along with our repository.
The ‘src’ folder within our repository is split into four different sections:
- Typescript + AA-core
- TypeScript + AA-ethers
- JavaScript + AA-core
- JavaScript + AA-ethers
The code snippets throughout this guide will use TypeScript with AA-core. However, code snippets for the other methods are also provided for you.
The AA-core SDK is type-safe and built using viem. If you are unfamiliar with viem, it is a type-safe, lightweight alternative to web3.js and ethers.js. We recommend diving into their documentation to learn more. However, if you prefer to use ethers, use AA-ethers!
We are creating the SCA on the Sepolia testnet, so you won’t need to use real ETH for this guide. However, you will need SepoliaETH to transact on the testnet. You can get test ETH from Alchemy's Sepolia faucet.
Before we dive into the details of the guide, let us go over what we will be doing from a high level.
Overview
The starting point typically involves a mnemonic phrase or private key when programmatically building with an Externally Owned Account (EOA). The process is similar here. Your EOA will be considered the owner of the SCA.
Your private key is still used to sign messages and user operations. However, transactions now gain much more flexibility, including:
- Allowing for verifying various signing methods other than signing a tx with your private key alone
- Permitting allowed wallets to send transactions on your behalf
- Having session keys that enable wallet access rules for a set amount of time - the web3 equivalent to JWT
However, creating an interface to programmatically interact with a SCA from scratch is tedious and adds many complicated moving parts.
The AA-SDK takes most of the responsibility off web3 developers so that you can focus on building great dapps and products yet still benefit from all Account Abstraction has to offer.
We will separate our code into two scripts:
- One that creates an instance of our SCA,
createSigner.ts - A second one that sends our user operation,
index.ts.
We will get started within our createSigner.ts file located at src/ts/createSigner.ts.
Creating an Account
1. Importing Modules and Defining Constants
We will import the required modules and get the constants during the setup process.
1a. Import Modules
import {
  type SimpleSmartAccountOwner,
  SimpleSmartContractAccount,
  SmartAccountProvider,
} from "@alchemy/aa-core";
import { privateKeyToAccount } from "viem/accounts";
import { toHex } from "viem/utils";
import { sepolia } from "viem/chains";
import * as dotenv from "dotenv";
dotenv.config();
There are three different libraries we are importing from: dotenv, @alchemy/aa-core, and viem. dotenv allows developers to set environment variables in a .env file and securely load those variables into your code.
The imported material from viem is sufficiently self-explanatory thanks to their naming, except sepolia. sepolia is a Chain defined as an object containing all of the necessary information to work with the blockchain.
SimpleSmartAccountOwner, SimpleSmartContractAccount, and SmartAccountProvider will be vital to creating our SCA - with explanations of each to come below. Now that we have imported the necessary modules, we must initialize our constants and obtain our environment variables.
1b. Get Constants
const PRIV_KEY = process.env.PRIV_KEY!;
const ALCHEMY_API_URL = process.env.ALCHEMY_API_URL!;
const ENTRYPOINT_ADDRESS = "0x5FF137D4b0FDCD49DcA30c7CF57E578a026d2789";
const SIMPLE_ACCOUNT_FACTORY_ADDRESS = "0x9406Cc6185a346906296840746125a0E44976454";
Here we are retrieving our environment variables from our .env file. If you do not have a .env file, you must create one at the root of your directory and add your private key and Alchemy API key for Sepolia network.
At this point, your .env file should look like this:
PRIV_KEY= <your-eoa-private-key>
ALCHEMY_API_URL= <your-alchemy-api-url>
ALCHEMY_API_KEY= <your-alchemy-api-key>
We have also included a .env.example file in the repository as a reference.
We are retrieving the private key from our .env file within the above code snippet. You could use your mnemonic phrase instead of a private key - however, we will only use a private key for our example.
Then, we import our Alchemy API key. You will want to ensure your API key is for the network "Ethereum Sepolia." If you still need to get a key, here is a quick guide to get you started.
Then there is the Entry Point address and our SCA's factory address. The entry point contract is where bundlers send bundled user operations to, which are then validated and executed.
A SCA's factory address is a contract that contains the SCA implementation and two methods which are createAccount and getAddress. These methods create the SCA using CREATE2 and retrieve the counterfactual address for some specific owner address plus optional salt, which we will not use today.
Salt is an optional, arbitrary value passed in from the sender. Your counterfactual address is deterministic and is derived from the sender’s address and the salt. Thus, salt allows one owner to have multiple SCA from the same factory smart contract.
We will pass this factory address directly into the SimpleSmartContractAccount class in our code.
Now that we have the necessary modules and set the constants to create an account, we can begin working on our createSigner function!
2. Create the Owner
**
* @description Creates a smart contract account that can be used to send user operations.
* @returns The smart contract account owner + provider, as a signer, that can be used to send user operations from the SCA
*/

export default async function createSigner() {
  const account = privateKeyToAccount(`0x${PRIV_KEY}`);

  const owner: SimpleSmartAccountOwner = {
    signMessage: async (msg) =>
      account.signMessage({
        message: {
          raw: toHex(msg),
        },
      }),
    getAddress: async () => account.address,
  };
}
Before creating a SCA, we need to convert our imported private key into a standard private-key account.
privateKeyToAccount is a function provided by viem and returns an object containing a few properties. For clarity, viem uses the term ‘Account’ rather than ‘Signer’ - as you may be used to if you work with ethers or web3.
Next, we will create the SimpleSmartAccountOwner. First, let's review the account object.
2a. Breaking Down the Account Object
{
  address: '0xc536f942c381414036675502A69454595f9C2A8',
  signMessage: [Asyncfunction: signMessage],
  signTransaction: [AsyncFunction: signTransaction],
  signTypedData; [AsyncFunction: signTypedData),
  source; 'privatekey'
  type: 'local'
  publicKey:
  “0×04f64759c3bacb4de7 f52a1c125243312e8d537458b390d7eebff1b449afb4f4fad3f15e4267d5e0113cee89a311
  266a3c621a303d6d9f9d1d44acd02725”
}
The account itself is relatively simple!
The properties worth highlighting are the:
- public-key pair of the private key we passed in
- the address
- the three async functions, specifically,
signMessageandsignTransaction.
These functions are executed the same way as we sign messages or transactions with an EOA today.
We still need to link our private-key account to a SCA, with the private-key account being the smart contract’s owner - so let's get into what a SimpleSmartContractOwner is!
2b. Explaining the SimpleSmartAccountOwner
SimpleSmartAccountOwnerThe owner object is of the type SimpleSmartAccountOwner, which contains two methods: signMessage and getAddress. Here is where we started utilizing the power of AA.
In our example, we use the default version of signing a message by using the account object's signMessage method, which uses the address' associated private key.
However, you can make the signing method whatever you would like. Since Smart Contract Accounts can allow for arbitrary verification logic instead, we can also define that signing mechanism at the interface level.
We now have our SimpleSmartAccountOwner. From here, we can create our SmartAccountProvider and, ultimately, a SCA controlled by the owner we just made!
3. Create the interface for the Simple Smart Account
Now it is time to create the interface for our Smart Contract Account! When creating an instance of an EOA, we need to establish both a Provider and a Signer. Currently, the Provider allows you to query all read-only data from the blockchain, while the Signer will enable you to interact with and submit transactions to the blockchain.
Below is the rest of the code inside our createSigner function:
  const chain = sepolia;
  const provider = new SmartAccountProvider(
    ALCHEMY_API_URL,
    ENTRYPOINT_ADDRESS,
    chain,
    undefined,
    {
      txMaxRetries: 10,
      txRetryIntervalMs: 5000,
    }
  );

  const signer = provider.connect(
    (rpcClient) =>
      new SimpleSmartContractAccount({
        entryPointAddress: ENTRYPOINT_ADDRESS,
        chain,
        owner,
        factoryAddress: SIMPLE_ACCOUNT_FACTORY_ADDRESS,
        rpcClient,
      })
  );

  return signer;
}
Now let us dive into what is happening above line-by-line!
3a. Create the Smart Account Provider
The Smart Account Provider class is where much of the magic happens. Before we dive into our ERC-4337 adapted Provider, let us do a brief review of traditional providers.
Providers serve as interfaces for querying blockchains, like Ethereum, via the JSON-RPC API. Although you may not directly call these API methods, they are indispensable as they form the backbone of libraries like ethers, web3, and viem, which offer more convenient methods for interaction.
Underneath these higher-level methods, JSON-RPC API calls are being made. Some frequently used methods from this API include eth_gasPrice, eth_blockNumber, and eth_getBalance.
However, when dealing with Smart Contract Accounts based on the ERC-4337 standard, simply utilizing the current RPC methods is not sufficient. Due to the incorporation of user operations and the Entry Point Contract, additional methods are required for more comprehensive and effective interaction.
These additional methods are:
- eth_sendUserOperation
- eth_estimateUserOperationGas
- eth_getUserOperationByHash
- eth_getUserOperationReceipt
- eth_supportedEntryPoints \
So, instead of implementing these methods yourself, our AA-SDK has done it for you!
Now, let’s break down the SmartAccountProvider class.
  const chain = sepolia;
  const provider = new SmartAccountProvider(
    ALCHEMY_API_URL,
    ENTRYPOINT_ADDRESS,
    chain,
    undefined,
    {
      txMaxRetries: 10,
      txRetryIntervalMs: 5000,
    }
  );
We will pass in five arguments (the first three are required):
- rpcProvider (ALCHEMY_API_URL) - your Alchemy API endpoint as a URL
- entryPointAddress (ENTRYPOINT_ADDRESS) - the address to the entry point
- chain - your respective chain of type Chain.
sepoliawas imported from viem - account (undefined) - this refers to the SCA connected to the provider, which will be done in the next step
- opts (object) - this is an object of type SmartAccountProviderOpts. Its role is to configure the options for
SmartAccountProvider
For this guide, we only want to overwrite txMaxRetries and txRetryIntervals.
txMaxRetires sets the number of attempts to try to fetch the transaction hash, which includes the user operation before giving up. txRetryIntervalsMs determines at what interval, in milliseconds, to wait between UserOperationReceipt retrieval attempts. By default, they are five attempts and two seconds, respectively.
A user operation receipt is akin to a transaction receipt, except it contains a few extra properties. The UserOperationReceipt includes the following:
export interface UserOperationReceipt {
/* The request hash of the UserOperation. */
userOpHash: Hash;
/* The entry point address used for the UserOperation. */
entryPoint: Address;
/* The account initiating the UserOperation. */
sender: Address;
/* The nonce used in the UserOperation. */
nonce: BigNumberish;
/* The paymaster used for this UserOperation (or empty). */
paymaster?: Address;
/* The actual amount paid (by account or paymaster) for this UserOperation. */
actualGasCost: BigNumberish;
/* The total gas used by this UserOperation (including preVerification, creation, validation, and execution). */
actualGasUsed: BigNumberish;
/* Indicates whether the execution completed without reverting. */
success: boolean;
/* In case of revert, this is the revert reason. */
reason?: string;
/* The logs generated by this UserOperation (not including logs of other UserOperations in the same bundle). */
logs: string[];
/* The TransactionReceipt object for the entire bundle, not only for this UserOperation. */
receipt: UserOperationReceiptObject;
}
Once all the arguments are correctly set, we have a provider containing an ERC-4337 custom PublicClient which includes all of the standard RPC methods and the ERC-4337-specific API endpoints.
Next, we must connect our SCA to our newly initiated provider.
3b. Create the Smart Account Signer
  const signer = provider.connect(
    (rpcClient) =>
      new SimpleSmartContractAccount({
        entryPointAddress: ENTRYPOINT_ADDRESS,
        chain,
        owner,
        factoryAddress: SIMPLE_ACCOUNT_FACTORY_ADDRESS,
        rpcClient,
      })
  );
To connect the provider with our account, we must call .connect on our provider. This method combines a Smart Contract Account with provider’s underlying rpcClient requiring specific arguments.
The arguments are:
- entryPointAddress - the address of the entry point we will be interacting with
- chain - same as the chain above
- owner - refers to the
SimpleSmartAccountOwnerwe made earlier - factoryAddress - the factory address for the Smart Contract to which we are connecting to
- rpcClient - the rpcClient is of type PublicErc4337Client, which contains all of the default JSON-RPC API methods, as well as those required for ERC-4337 actions
Put succinctly - we provide a callback function as an argument for connect, which connects our provider to our Smart Contract Account.
In our example, we used the Simple Smart Account, however, you can include a custom Smart Account Contract. Ensure it extends the Base Smart Account class and has the factory address deployed to your desired chain.
console.log(await signer.getAddress();
// 0xBCaA1c9cA41b5F0BcfFb413Ad8DB652998Ddd8D0
The getAddress function exists on the Simple Smart Account’s factory address. Below is its implementation on SimpleAccountFactory.
By using CREATE2, we can derive the address of our SCA even before it is deployed since CREATE2 is deterministic.
  /**
     * calculate the counterfactual address of this account as it would be returned by createAccount()
     */
    function getAddress(address owner,uint256 salt) public view returns (address) {
        return Create2.computeAddress(bytes32(salt), keccak256(abi.encodePacked(
                type(ERC1967Proxy).creationCode,
                abi.encode(
                    address(accountImplementation),
                    abi.encodeCall(SimpleAccount.initialize, (owner))
                )
            )));
    }
Since we now have access to our SCA’s counterfactual address, we must ensure it is pre-funded. Since we are not using a paymaster, we must do this ourselves. Fortunately, two handy scripts are inside our repository to quickly do this!
4. Funding Your SCA
Within the repository you cloned at the beginning, you will see a folder named “scripts.” Within this folder are two files: getCounterfactual.ts and sendEthToSCA.ts.
At this point, we have created a signer linked to our SCA. However, if we try to send a user operation on-chain, an error will be thrown because the SCA has no ETH to make such an action.
When you send your first user operation that transfers ETH from a SCA, you will need gas for two reasons: the on-chain creation of the SCA and the specified amount of ETH to send.
Thus, we need to fund our SCA ahead of time. To do so, we will run both scripts.
The first is getCounterfactual.ts, which can be done from your terminal. In your preferred terminal, while inside your repository, run:
npm run getCFaddress
The getCounterfactual.ts script will import the createSigner function we created above. We have a version of the createSigner file inside a helper folder, but this is not required. Using this function we create a JSON file called accountInfo containing our counterfactual address. You should see this file at the root of your directory.
After the accountInfo file has been created and we have our counterfactual address, run:
npm run sendETH
This command will send, by default, 0.5 ETH from the wallet derived from your private key to your counterfactual address.
Now we are ready to create our SCA!
5. Deploying the Account and Sending ETH ( executing userOp )
userOp )With our SCA properly initialized with ETH in its balance, we are ready to interact with the blockchain. We are moving on from createSigner.ts and will begin working on index.ts in the same folder.
This file is the centerpiece of our guide. We bring in the signer we created in createSigner.ts and submit our first user operation from that account.
These are the two things that we need to do to achieve this:
- Deploy the SCA
- Send ETH to another account
With ERC-4337 and Alchemy’s AA SDK you can do both in one line of code!
However, we would like to also wait for the user operation and tx receipt to see all of the details regarding our user operation and the transaction that included it.
5a. Deploy SCA and Send Test ETH
So, as of now, we have created an instance of our SCA with a signer (owner) connected and pre-funded our SCA.
Thus, we are ready to deploy our contract account on-chain and send some ETH to any Ethereum address we want.
In our src/ts/core/index.js file in the main function, we call createSigner to retrieve our signer. We import this function from createSigner.ts, which we created above, into index.ts. Then we use parseEther, a utility function from viem that is like parseEthers from ethersjs, to set how much ETH we want to send to ADDR. By default, ‘ADDR’ is set to Vitalik’s address.
Then we call sendUserOperation on our signer. This method makes an RPC request and places our user operation in the Bundler mempool. Let’s break down our work!
/**
 * @description Creates a smart contract account, and sends ETH to the specified address (could be an EOA or SCA)
 * @note Seperating the logic to create the account, and the logic to send the transaction
 */
export async function main() {
  const signer = await createSigner();

  const amountToSend: bigint = parseEther("0.0001");

  const result: SendUserOperationResult = await signer.sendUserOperation({
    target: ADDR,
    data: "0x",
    value: amountToSend,
  });

  console.log("User operation result: ", result);
sendUserOperation takes an object with three properties as an argument:
- target - this will be our targeted address (i.e., the address we are sending ETH to)
- data - this is our calldata - since we are sending ETH, calldata is not needed. Thus, we will pass in “0x”
- value - the amount of ETH we are sending to ADDR
At this point, if you were to return and print result, you would see something resembling the following:
User operation result: {
  hash: "0x3021655b563d21ea114216eff4d44a4073958ccb9b9152915b965cb3acc623f
  request:
  initCode: '0×9406Cc6185a346906296840746125a0449764545fbb9cf000000000000000000000000406240764eaf40fcc07325363445268558663000000000000000000008000000000000000
  000000000000000000000000000000'
  sender: '0×D2CABE749d7cC3873a5e1d6bf91293444529f0b4,
  nonce: 'Oxo',
  callData: 'Oxb61d27f6000000000000000000000000d8da6bf26964a9d7eed9e03e53415d37aa9604500000000000000000000000000a107a480000000000000000000000000000000000000000000000000000000000000000600000000000000000000000000000000000000000000000000000000000000000'
  signature: '0x948951e4dc49a0900217937326bb5402009057e16c4fa84af8b4b0759ea501ceb215ac46eec2dff2f274c784c1aa00779340af116af81c'
  paymasterAndData: 'Ox',
  callGasLimit: '0×3400',
  verificationasLimit: '0x568f8',
  preVerificationas: 'Oxab90',
  maxFeePerGas: '0x5f5e118',
  maxPriorityFeePerGas: '0×5f5e100'
}
The value set to “initCode” is the concatenation of the factory address you passed into the SimpleSmartAccount class above and the encoded createAccount method on our factory contract along with its arguments.
However, the User Operation Result is not the User Operation Receipt. The user operation still needs to be bundled and included in a block. The user operation result is more of a proof of submission than a receipt.
Thus, we will include the following code:
  console.log(
    "\nWaiting for the user operation to be included in a mined transaction..."
  );

  const txHash = await signer.waitForUserOperationTransaction(
    result.hash as `0x${string}`
  );

  console.log("\nTransaction hash: ", txHash);

  const userOpReceipt = await signer.getUserOperationReceipt(
    result.hash as `0x${string}`
  );

  console.log("\nUser operation receipt: ", userOpReceipt);

  const txReceipt = await signer.rpcClient.waitForTransactionReceipt({
    hash: txHash,
  });

  return txReceipt;
}

main()
  .then((txReceipt) => {
    console.log("\nTransaction receipt: ", txReceipt);
  })
  .catch((err) => {
    console.error("Error: ", err);
  })
  .finally(() => {
    console.log("\n--- DONE ---");
  });
We will break down each method call:
waitForUserOperationTransaction- Dependent on
txMaxRetriesandtxRetryIntervalMs - we attempt to fetch for the UserOperationReceipt
txMaxRetriesamount of times, at an interval oftxRetryIntervalMs. The UserOperationReceipt is returned once the user operation has been included in a block - Returns the transaction hash that includes the user operation
- Dependent on
getUserOperationReceipt- Passes in the hash provided in the UserOperationResult
- It is worth noting that you must wait for the user operation to be included inside of a block for this method not to throw an error
- Returns the UserOperationReceipt
waitForTransactionReceipt- Pass in an object with only one required argument, which is the transaction hash
- It is called on the signer’s rpcClient and is a method on viem’s PublicClient
- Returns the transaction receipt
Once you have included the code above, you can submit your first user operation and see the transaction hash, UserOperationReceipt, and the transaction receipt logged!
To execute our main function, we will run:
npm run execute:ts-core
Now watch as your terminal returns all of the above!
Once you see ‘--- DONE —’ in your terminal, go to Sepolia’s Etherscan, and input your transaction hash (displayed in your terminal as Transaction hash: 0x7b64…).
You will then see something similar to this:
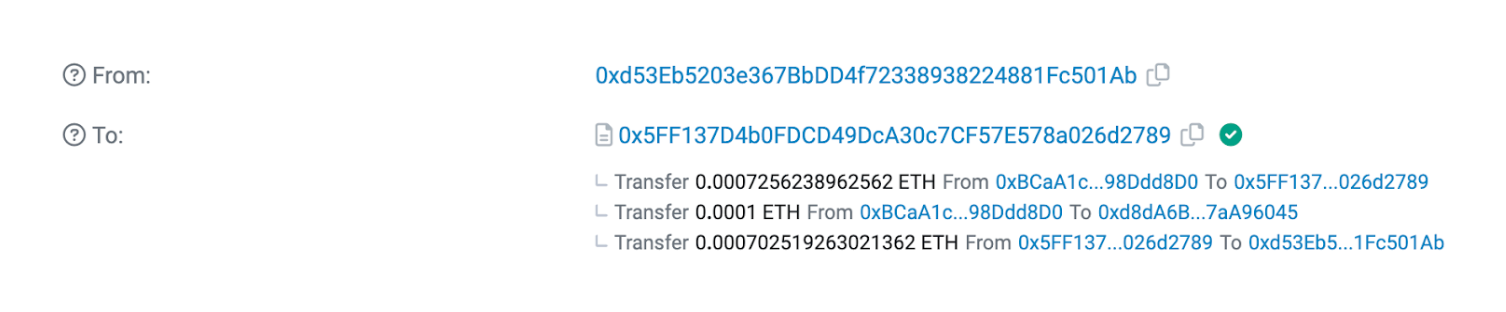
Under the hood, our parent transaction includes three internal transactions that occur automatically:
- Deposit ETH from the SCA (0xBCaA1c…) to the entry point address.
- Transfer ETH from your SCA to the address we passed in (ADDR).
- Transfer ETH from the Entry Point to the beneficiary (likely the bundler).
With that, we have successfully submitted our first user operation!
Note: This is required and must be enough to cover the max possible cost regarding the already-completed validation and max execution gas.
Conclusion
Today, we created an instance of the SimpleSmartAccount with a connected owner, created a Smart Contract Account, and sent ETH from it to another Ethereum account.
We hope this guide was helpful to you. If you have any questions or want to share what you have done, feel free to @ us on Twitter and chat with us and the community on our Discord.
The AA SDK is still in beta, so we encourage your feedback and want to hear about your experience using it!
Happy Buidling!
Updated 2 months ago